
Got killed by an enemy you couldn’t see? Got a lot of blueprints and want to know how to get by all the enemies standing between you and the exit? Then this is the guide for you! This bestiary contains detailed information on all the enemies in the game – where they appear, how they behave, and of course how to defeat them!
Contents
Introduction
All credit goes to Sjasogun!
From the peaks of the Ramparts to the deep Old Sewers, Dead Cells is filled with hordes of powerful enemies. But, like all enemies, they have their weaknesses. This guide will list all of the different types of enemies, where they can be found and how they are best dealt with.
Zombie

The zombie, one of the most basic and common enemies in the game, yet also one of the most dangerous. Its dangerous and fast lunge attack and its relatively high health for an early-game enemy make it a force to be reckoned with.
Attacks: Melee slash + Lunge.
Behavior: Attempts to lunge you if you are outside of its melee range, if you are in melee range it will attempt to slash you. If you are further away than that it will walk towards you.
Strategy: In spite of their power, their greatest ability by far is their lunge attack, which they can only use from a distance. The solution is thus to simply walk up to them and hit them with melee attacks until they’re dead. If they’ve already spotted you just increase your distance and their lunge attack will likely miss, leaving them close enough that you can whack them in the face. This is much safer than trying to roll through it, especially when there are more enemies around.
Additionally, as with most early-game enemies, stunning them with a jump attack or sneaking up on them from behind works wonders too.
Grenadier

Like zombies but red in appearance, but with completely different behavior. While their bombs are not that strong their ability to throw them through walls and floors makes them the bane of many beginning players.
Attacks: Bomb throw
Behavior: The behavior of the Granadier is very simple – if it sees you it will throw a bomb at you, and if you get too close it will do a short hop backwards to get out of melee range. However, unlike most land-based enemies they can actually spot you through walls and floors, which can make it difficult to predict when they will attack.
Strategy: The real challenge of Grenadiers is not fighting them but to avoid their bombs and the attacks of other nearby enemies. The safest way to deal with them is to be wary of your surroundings in the areas they can appear in (see the end of the guide) and to retreat out of their range until the other enemies have been dealt with. If you are on the same platform as them and there is no room to retreat always prioritize avoiding other enemies over their bombs, since they’ll usually do more damage and attack much faster.
In short, always try to retreat out of their range if they have spotted you already. If they haven’t spotted you yet the opposite is true – rush them down first so that they can’t interfere when you are dealing with other enemies.
Shield Bearer

The only regular enemy in the game that can protect itself from attacks, and boy does it do it well! From the front this enemy is completely impervious to almost all attacks with very few exceptions. Worse still, they’ll often defend other enemies by standing in front of them and they will try to close the distance with you with a shield charge, both hurting you and blocking even more of your attacks.
Attacks: Shield charge
Behavior: Attempt to charge you when you are in their range, even when you are right next to them. Otherwise they’ll walk towards you.
Strategy: Since their shield blocks almost all attacks and protects other enemies as well your first priority when encountering one is to get behind it. The best way to do this is to voluntarily get in their melee range and wait for them to prepare their charge and then roll through it. This is because they take much longer to turn around to face you again after a charge than they do when they are just walking or standing around. Once hit from behind once they are an easy target and can almost always be finished off before they get the chance to turn around again.
A common way to beat them easily is by throwing a bomb behind them, or any other skill that can attack it from behind like a Turret. Another way to deal with them is by using the few weapons that can bypass its shield – the flames from the Flamethrower Turret (though Fire Torrent or the Fire Grenade don’t work), the Meat Grinder (as it hits its feet), the Whip (the regular one, not the Electric Whip) and the Bear Trap. The Ice Bow will also freeze it, even when its guard is up. Any shield is also useful, allowing you to block its shield charge instead of dodging it, often preventing you from placing yourself between them and other enemies that are behind it. Obviously the Phaser ability is also fantastic as it teleports you right behind them.
Finally, and perhaps surprisingly, both the Horizontal Turret and the Biter Swarm are useful in keeping him in place too, since even though they can block their attacks they won’t be able to turn around to block your attacks while they’re being attacked by them.
Undead Archer
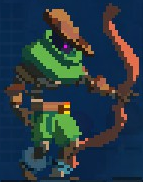
Like the Grenadier this enemy can attack you from a distance, but its projectiles are faster, can be fired in more rapid succession and have a much longer range. Fortunately they are also very fragile and thus like the Grenadiers mostly difficult to deal with in the presence of other enemies.
Attacks: Fire arrow
Behavior: Fire an arrow at you if you are in their range. They’ll walk towards you otherwise. If you get too close to them they’ll do a hop backwards to get out of your melee range. If they have no room to hop back they will teleport to the other side of you instead. In spite of what the hop may look like it does not count as a dodge – they are vulnerable for its entire duration.
Strategy: The strategy for these guys is mostly the same as with the Grenadiers if you are on the same platform as them, namely to get out of their range if you can and deal with the melee enemies first or to kill them first priority if the group of enemies hasn’t spotted you yet. However, be wary that the arrows it fires can fly much further than its aggro range is long. Rolling backwards to avoid one is generally a bad idea – you’ll place yourself right in its path again. Ducking or rolling towards it are the way to go.
Because of their low health taking them down with a bow is also very possible before they have a chance to retaliate.
Phazer

Got a pattern going where you deal with all enemies from a distance, safely pelting them down with ranged attacks and skills? Well, this enemy is here to ruin your day! As soon as it spots you it will relentlessly teleport to follow you, forcing you into a face-to-face confrontation.
Attacks: Teleport + Melee slash
Behavior: As soon as they spot you they will attempt to teleport to you as soon as you are too far out of their melee range. If you are close enough they may also just walk up to you, but that only happens when you are just barely out of their melee range. If you are in melee range it will attempt to slash you. If you manage to lose track of them they will be walking faster than when they were wandering, as will they when you are too close for them to teleport.
Strategy: A common mistake to make with the Phazers is to treat them like a zombie in melee range, which is to whack them in the face until they die. The problem with that tactic is that Phazers are much harder to stun, so they will just hit you with their melee slash instead. So, the most important thing to do when dealing with one of these is to not panic. As long as you keep a cool head they can be swiftly dealt with. Retreat to a safe location outside of the reach of other enemies and wait until it prepares a melee attack, then roll behind it and quickly attack it. Your weapon may be too weak to take it out before it can attack again, so be ready to dodge again, either rolling away so you have more time to set him up for the melee attack again or by rolling directly behind it again to continue attacking it right away, though that strategy requires a bit tighter timing.
Weapons or skills that can immobilize them can also help tremendously, but can be hard to land because they are usually ranged attacks – the Phazer will just teleport towards you and avoid the attack. Again, don’t panic – just wait for it to teleport to you and use the ability when he’s right next to you.
Shield Dummy

Although this enemy doesn’t attack at all and doesn’t even move it is still perhaps the most dangerous creature in the Promenade of the Condemned, which is thankfully the only area it appears in. Any enemy around its location will receive a forcefield, protecting them from all damage from all directions, basically turning all enemies nearby into worse versions of the Shield Bearer as long as it’s alive.
Attacks: Buff allies: Shield
Behavior: This enemy cannot move or attack. Its only action is to buff all enemies nearby with an invincible forcefield for five seconds at a time, after which it will have to cool down for one second, dropping the shields for that time. It cannot buff itself or Cyclops Bugs.
Strategy: By its nature it is almost mandatory to avoid other enemies and take it out first. However, this can be very dangerous, particularly when there are Phazers nearby that can close the distance and attack you before you can take it down. The safest way to deal with it is to first lure all nearby Phazers with you to deal with them first. Next, lure away any other enemy that can be lured out of its range, which will make their shields disappear. When there are as few enemies nearby as possible you can take it out.
Cyclops Bug

A flying pest this one is, making an encounter with any other enemy more difficult just by their proximity. Their charge attack makes it hard to catch them, but when you do this fragily insect can be crushed with any attack.
Attacks:
Charge
Behavior: Once it spots you it will start following you around, flying after you, through any obstacles, attempting to stay to the side of you. Every once in a while it will attempt to charge at you in a straight line from the side, damaging you. The charge often places it behind you.
Strategy: Flying enemies are always a pain to deal with, and this guy is no exception. The best way to take it on is to get to an area that is as open as possible so it will most likely not be in a wall when it prepares to charge you. The moment it does so is the best opening to attack it, since it will not move for a second or so. The kind of attack does not matter – it will die in one hit no matter the attack. Alternatively you can also dodge its attack, preferably backwards to make sure you’re close to its position at the end of the charge, where it will also not move for a moment. If you’re daring you can also attempt to hit it mid-charge, but this is risky due to how fast the charge is.
Alternatively, if you have any weapon with AoE abilities like bombs or a homing weapon like throwing knives or the Electric Whip it is also very quicly dealt with.
Inquisitor

A threatening looking wizard that will pelt you with magic projectiles that pass through walls. In terms of ranged characters this one is possibly the most dangerous one as avoiding all of its attacks while fighting other enemies is very difficult.
Attacks:
Magic Missile
Behavior: This enemy does not move. When it sees you, which may be through walls, it will fire a fairly slow magic projectile at you that passes through obstacles.
Strategy: Your first intuition in dealing with this enemy is probably correct – seeing as it is a wizard it is very weak in close-range confrontations. In fact, pretty much any melee attack will stun it, so as soon as you get one hit in its death is pretty much guaranteed. To actually get there is the tricky part. The best way to do it is to take it in steps – bait it to fire away from the route between you, advance a little and repeat until you can close the rest of the distance with a roll so you can whack it to death.
If you have the chance to it is highly recommended to either rush it down before other enemies can become a problem or to neutralize it for a bit with a stunning or freezing attack or skill. Once you’ve done that you can either deal with the other enemies or close the distance without risking taking its magic attacks.
Red Bug

Recall the Cyclops Bug? Well, this bugger is more aggressive, moves in packs and uses melee attacks that don’t leave it open nearly as much. Combine a swarm of these with some melee enemies and you have a recipe for disaster.
Attacks:
Melee slash
Behavior: As soon as it spots you it will start attempting to fly towards you through obstacles to attack you with its slash. They back off for a moment when a member of their swarm is killed.
Strategy: As soon as you get their attention, retreat immediately. Dealing with a swarm of these (and it’s pretty much always going to be a swarm of them) in addition to other enemies is suicide. Luckily they are not very fast, so you usually have time to climb up as far as you need to reach an area that’s as open as possible. Once there apply hit-and-run tactics – wait for them to get close, hit them once or twice if you have a fast weapon, retreat a little bit and repeat, occasionally rolling through them to avoid backing into a wall or drop.
If you have homing attacks or AoE attacks they are both very helpful, the first to hit them more easily and the second to quickly burst down the whole swarm. Immobilizing skills should be used with care though – if they are immobilized in mid-air you might not be able to hit them anymore until the effect wears off.
Scorpion

Surprise – there was a huge, aggressive insect hidden inside of this thin platform all along! These insects are hidden in the ground and will dig their way to the surface to ruin your day if you get too close.
Attacks: Melee sting + Poison shot
Behavior: If you are close enough they will attempt to sting you with their tail, which is a fast but dodgeable attack. If you are further away they will shoot a projectile at you that will both hurt and poison you. If you are further away than that they will walk towards you slowly.
Strategy: The best way to take them out is to never give them a chance to attack, simply bursting them down as they just emerge from the ground. Failing this, just keep your distance – their melee attack is pretty fast and their ranged attack has a very short range, both in terms of when they will use it and in terms of how far the projectile can fly. Ranged attacks are the most effective at this point, but rolling forwards when they fire their projectile also works as they can be stunned fairly easily given a long enough opening. Ducking also works to evade the shot, but getting out of range or rolling is generally better. Additionally, while their melee attack is fast they won’t use it quickly when you are next to them, so climbing up or down to their level and quickly rolling behind them is a safe strategy too.
Ugly Worm

Apparently this thing is a worm, according to the game. It’s certainly easy to see that it is ugly though, with is green body embedded with cracked eggs and its gaping mouth with sharp teeth.
Attacks: Melee bite + Drop exploding eggs on death
Behavior: When they spot you they will quickly move towards you and attempt to bite you. When they’ve spotted you they are faster than when they are just wandering around.
Strategy: The most dangerous thing about this enemy are the exploding eggs from its back, which it drops on death. I prefer either taking them out from a distance, which will keep you outside of the range of the eggs, or leaving them for last so that the eggs can be reliably dodged. This second tactic is easier than it sounds with their surprising speed. Just keep moving and they’ll never have a chance to bite you. Leaving immobilizing skills for them so you can deal with other enemies first is also very helpful.
As for the eggs, they are easy enough to avoid as long as you are prepared for them. Make sure you know which direction you want to escape to before you actually land the killing blow and it’ll be fine – both rolling and running away will work, as does jumping up to a higher platform, obviously. Never jump down though (climbing is fine) since some of the eggs may also fall down.
Bomb Bat

You like getting killed in one hit? No? Too bad, it’s bomb bat time! These pests hang from ceilings, often blending into the dark environment. You’ll only notice them when you’re tangled up with a bunch of enemies, warned only by its trademark shriek before it explodes and makes you want to ram your keyboard through your monitor.
Attacks: Explode
Behavior: As soon as it spots you it will fly right at you and attempt to explode. The explosion has a large radius.
Strategy: Ideally you want to spot these enemies before they spot you, so you can engage it on your terms. Lure it back a bit so you won’t be bothered by other enemies and then either quickly hit it when it comes into melee range, shoot it with a ranged attack (which is easier than with the other flying enemies because it really flies right at you) or roll backwards, making it explode uselessly.
Often you won’t have this luxury though, and you’ll be warned only by its shriek as it spots you, often when you’re already fighting other enemies. When this happens, first attempt to separate yourself from the group with a quick roll – the next step is a lot safer when you aren’t surrounded. Ignore all other enemies and focus only on the bat. If it approaches you mostly from the front, hit it as soon as it gets close to kill it. If it approaches you mostly from above, do a light jump just before it reaches you so you end up next to it, allowing you to attack and kill it.
And as always, but especially with this enemy, if you have an AoE ability or a homing attack, use it. It’s by far the safest strategy. And if all else fails, always prefer taking any other attack over the explosion, and you’ll be almost guaranteed to take less damage than if the explosion were to hit you.
Brown Bug

Meet the Red Bug’s smaller cousin, the Brown Bug! It behaves the same but appears in smaller and tighter swarms, and is harder to hit due to its size. Unfortunately, they don’t do any less damage.
Attacks: Melee slash
Behavior: As soon as they see you they’ll fly at you through obstacles and attempt to slash you. They back off for a moment if a member of their swarm is killed.
Strategy: Refer to the Red Bug strategy. Take extra care with attacking them, since they are much tougher than they look and are difficult to stun – attacking them head-on expecting them to die quickly can be lethal.
Mushroom
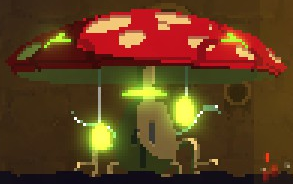
This enemy is solely responsible for many players avoiding the Old Sewers. Even before you can see it on your screen it can summon a wide field of wooden stakes that burst from the ground below you, through walls and no matter what platform you are on. They also drop two cells though, so the risk is well worth it.
Attacks:
Summon stakes
Behavior: This enemy cannot move. Whenever you are in its range, which is larger than the screen is tall, and are on a platform it will summon a wide field of stakes below you that burst from the ground after the floor rumbles for a second or so.
Strategy: The most dangerous thing this enemy does is its first strike, which will often surprise you since it can use its attack from off-screen. Always be prepared for the ground to start rumbling when you are in the Old Sewers, and quickly roll away or jump/drop onto a different platform when it happens. If you manage to avoid this first attack you’re pretty much good as long as you expect it to happen until you find the mushroom itself and kill it. The difficulty then is in taking on other enemies while the spikes get summoned. Either use ranged attacks from outside of its range if possible or bait the stakes and avoid them before attacking other enemies, as there is a cooldown window between its attacks. When you find it you can beat it fairly easily, though it may sometimes summon stakes right below it, but if you keep attacking it usually won’t.
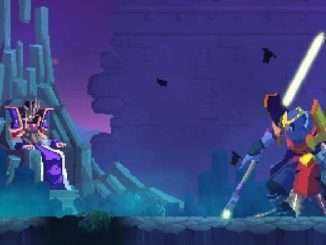
Slasher

Giant and intimidating, this enemy is first encountered as an elite in the Old Sewers, guarding the Teleportation Rune. Its ability to teleport towards you even as a normal enemy and its large range make it a very intimidating enemy, and a very dangerous one too if you don’t know how to take it on.
Attacks:
Triple slash
Behavior: If it spots you it will attempt to blink towards you and attack you with its melee slashes. It can only blink horizontally, but it can reach platforms slightly higher or lower than the one it is currently on, as long as they are also to the side. It attacks three times in a row if it has the chance to, and the third hit sends a shockwave forwards across the ground for a short distance. It can stop the combo if you get too far away from it. When it has spotted you but can’t blink to you it will wander around at greater speed.
Strategy: In spite of how threatening they look they are fairly simple to deal with as long as you don’t recklessly charge in. The simplest way to deal with them is to use ranged attacks and skills, which are fairly easy to land due to its large size – firing arrows while ducking from a higher-up platform often works, for example.
In melee range they are also simple to deal with as long as you know how, and as long as you have isolated them. Since they will always attack three times as long as you stay close, bait out their first attack and pay close attention to the exclamation mark above their head indicating the timing for their attacks. Roll behind them after every slash, but only attack after the third one – they cannot easily be interrupted while they’re slashing and the window after the third slash is much longer and will often allow you to stun them so you can finish them off before they can attack again. Never roll away from them – the third attack sends out a shockwave that may catch you when you attempt to do so.
Obelisk

This cyclopean sculpture’s creepy appearance should immediately warn you to stay away from it. Indeed, if you attack it at all or get too close it will activate an electrified field in a huge circle around it, constantly damaging you as long as you stay inside.
Attacks:
Electric field
Behavior: This enemy does not move. If you get too close and are in its line of sight or if it takes damage it will summon a large circular electric field that deals damage as long as you stay inside. The field disappears after a second or two, but the cooldown before it can summon it again is not very long. The activation range for the field is slightly larger than the range of the field itself, so you can safely stand on its level without standing in the field while it will still summon the field.
Strategy: Contrary to most ranged enemies this one is actually the safest to deal with at range. This is because its ranged attack is a field, which cannot be dodged. Take care when using skills like turrets or status effects though – even if you are outside of its line of sight it will summon the field if it takes damage from any source. And unlike its sight, the field does pass through walls.
If you can’t take care of it from range it will usually be in a spot where you can either drop down right next to it or climb up close to it. In this case your best bet is to quickly attack it and kill it before it can summon the field. Of course, if you have any stunning skills (immobilization alone is not enough, as it can still summon its field then) that’ll be helpful in either scenario.
Slime Vial

An alchemical experiment either gone horribly wrong or horribly right, this man-sized glass vial filled with orange goo should not be approached carelessly. The slime it spews turns into slimelings that’ll viciously protect the flask, and until the slime runs out it’ll just keep on summoning more until the threat has been dealt with.
Attacks:
Summon Slimeling
Behavior: This enemy does not move. If it has enough slime left to do so it’ll summon up to three Slimelings, which it can shoot from some distance away. It’ll always try to summon the Slimelings close to the player if they are close enough. Its health and its remaining slime are one and the same – summoning Slimelings takes some of its health and hurting it will reduce the amount of Slimelings it can summon.
Strategy: This enemy is easily underestimated, mostly due to its huge health pool and the surprisingly fast attacks of its minions. Try to take out any other nearby enemies first if you can, eliminating any Slimelings that happen to be there as they get in your way. When only it and its Slimelings are left try to lure the Slimelings as far away from it as possible and then bolt for it, placing it between yourself and its minions. Then just start whacking away at it. The reason for this is that summoning a Slimeling does not take much of its health, so killing them takes too long and is more dangerous besides. However, since it can summon at most three of them and since the Slimelings are not terribly fast this tactic will allow you to take down all or most of its health without any threat of retaliation. Even if the Slimelings get close your positioning makes it so you are attacking in their direction, and your constant attacks will usually take them out before they can hit you, and pretty much always in one hit too due to their low health.
Don’t bother immobilizing the Slimelings, since the little damage those abilities deal will likely just kill them. Also don’t bother using ranged attacks with ammo on the vial, since you’ll just run out before it dies. However, if you have a ranged attack that doesn’t require ammo (if you are close enough with a bomb, for example, or if you have an infinite bow) ranged attacks are also a reliable, if slow, way to kill it.
Slimeling

These little abominations don’t appear naturally, only being summoned by the Slime Vial. Their only duty is to protect the vial that spawned them, but their low health and dim wits make them easy to take care of. However, be wary of their fast melee attacks!
Attacks:
Melee slash
Behavior: If they see you they will crawl towards you and attempt to slash you. This attack is fast and difficult to dodge on reaction, though it is possible.
Strategy: When you encounter these your first priority should be to take out the Vial, but in doing so you may have to kill some first and even if you don’t there’ll be some of them left after the Vial is dead. Luckily, they have very low health and will almost always die in one attack, but not always. Dealing with them using ranged attacks is preferable due to their fast melee attack, but just spamming your melee attack as they approach usually works because their melee range is pretty low. Any ability, even an immobilizing one will often kill them in one hit too, so use those if you don’t want to deal with them in melee. They are not very threatening either way, as long as you only have to deal with a group of them.
Mechanical Spider

You know what’s worse than spiders? Giant spiders! You know what’s worse than giant spiders? Giant mechanical spiders! These huge constructs roam the Prison Depths, making dealing with other enemies difficult with their bombs, shockwave and large health pool.
Attacks: Bomb spread + Shockwave stomp
Behavior: If it spots you it will attempt to get closer to you and either use its stomp that sends shockwaves across the ground in both directions, but only for a short distance. Alternatively, if you are too far away, it will shoot out four Grenadier bombs that randomly spread out to the sides.
Strategy: The biggest pitfall when fighting these things is to attempt to take them down in one combo. Even if you immobilize, stun or freeze them beforehand and use a strong combo with critical hits they will often not go down before they get another chance to attack. Therefore you should exercise patience and only get a few hits in before retreating a bit to rinse and repeat – they don’t have the means to deal with you at a distance so this is a very safe method.
It’s another story if there are other enemies nearby. Do not try to engage this enemy or any enemies on the same platform as it when there are any. Instead, wait for it to distance itself from other enemies and pick those off one by one until only the spider is left. Alternatively, it is very weak to ranged attack due to its lack of long-range options, so using those can take it down safely, albeit slowly due to its large health pool. Always be wary of its bomb attack though – those bombs can fly over gaps that you might not expect them to reach over, but since they are Grenadier bombs they are slow enough to detonate that you can easily dodge them.
Fog Channeler

If you start seeing a thick fog, progress slowly, for there is a Channeler nearby casting concealing fog. Enemies in this fog become more difficult to see, up to becoming completely invisible until you bump into them in the thickest parts of the fog, and even then only showing up as vague outlines.
Attacks: Cast fog
Behavior: This enemy does not move or attack. A constant and large cloud of fog surrounds it that passes through obstacles. Any enemy besides itself standing in the fog is heavily obcured, completely invisible near the center and transparent towards the edges. It is always slightly transparent itself, even though it is in the middle of the fog cloud.
Strategy: As a buffing enemy, like the Shield Dummy, the challenge in taking them out is mostly in safely navigating the enemies around it. As soon as you see the fog, fire ranged attacks blindly in front of you and never go down or up unprepared. If you hit an enemy with an attack it will appear in its transparent form for a moment, even if it is completely invisible. If you are lucky you can approach the Channeler from the side, allowing you to easily pick off enemies like this and lure them out of the range of the fog, but more often than not they will be above or below you.
The best way to go down is to attack downwards with skills and ranged attacks if applicable, to take down any enemies before you descend yourself. Going up is the hardest part, pretty much requiring you to throw out an AoE skill, preferably an immobilization skill if possible, to spot any threats that might be right next to you. Retreating for some distance to make the enemies start wandering again and waiting for your skill to recharge is the only reliable way to take the enemies out consistently, and even then you may be met with an unpleasant surprise. If that happens, immediately bolt forwards – you’ll either run into the Channeler and probably be able to kill it before the enemies catch up to you or you’ll escape the fog on the other side, allowing you to deal with the enemies more easily.
Running Zombie

These tiny blue versions of the Zombie may appear almost cute, but they are more dangerous than their bigger cousins. Surprisingly high health, very fast movement and horribly quick melee strikes make them a menace to deal with, especially since they always appear in groups.
Attacks:
Melee slash
Behavior: Will run at you when they see you and attempt to slash you. Their slash is very quick and has a short cooldown, but unlike their larger cousins they cannot use the lunge.
Strategy: First, these things almost never appear alone, and with that I don’t mean that they always appear in packs, I mean that there is almost a different kind of enemy with them. Take down the other enemies first if possible, since you’ll have your hands full with a pack of these and you’ll need the maneuvering space.
Once you’ve got a pack of them isolated you can draw their attention. Hit and run is the way to go here – hit them before they reach you and roll away to avoid their slash, and repeat this until they’re all dead. If you reach the edge of the platform or a wall just roll through them and immediately attack – they’re so small that they probably won’t be next to you ready to attack. Do not under any circumstance attempt to rush them down – their fast attacks and numbers may interrupt your attacks indefinitely, burning through your health bar before you realize that your strategy is backfiring.
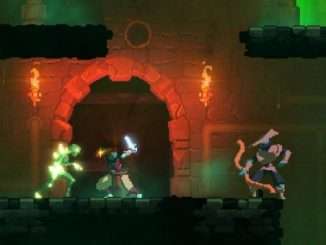
Meat Grinder

These intimidating knights use their broadaxes as boomerangs, dealing huge amounts of damage. If you get trapped against a wall as their axe flies at you, well, you’d better kiss your cells goodbye.
Attacks:
Boomerang axe
Behavior: If you are in range it will throw its axe at you, which will slow down and return to its owner at the edge of its range. The axe can deal damage multiple times as long as you stand inside of it. It cannot attack in any way until its axe returns. If it is killed while the axe is flying it will fly past it as it returns and continue flying until it encounters an obstacle.
Strategy: Surprisingly, these guys are not that hard to deal with. That is, when they are alone. If they are, lure them away if you can and just let them throw their axe, roll behind them and whack away until they are either dead or ready to throw their axe again, upon which you can rinse and repeat. If they are not alone it is best to bait out the axe throw and roll behind them to deal with the other enemies – it’ll take a couple of seconds before it can throw its axe again. Be ready for that though, since you don’t accidentally want to roll into the axe as it is at the end of its range, as you’ll get hit multiple times for heavy damage. Using skills from above also work very well since its axe can only reach right in front of it.
The most dangerous thing is encountering two of these at once. When this happens you can either sneak up on both from behind, hit the one in the back a couple of times and quickly escape down or up, wait until they start wandering randomly again and repeat. Alternatively you can use skills like you would for just one or use an immobilizing skill on one or both to create a larger window for attacks.
Pirate Captain

A captain of the seven seas, this cannon wielding giant is a force to be reckoned with! Whether it’s firing cannonballs or caving your non-existant skull in with their cannon, underestimating this naval fiend will surely be your downfall!
Attacks: Cannonball + Triple smash
Behavior: If it sees you it will fire a cannonball at you. The cannonball rolls for some distance before exploding with a pretty large range. The cannonballs can also be destroyed with any attack, causing them to blow up prematurely. If you are right next to it will do three quick smashes with its cannon, dealing a lot of damage. Although it may not look like it at first it can turn around in the middle of the smashes.
Strategy: As long as you keep your distance these guys are not a huge threat. Just make sure to keep pelting them with ranged attacks to blow up their cannonballs, or make sure to stay away for a moment to measure where their cannonball will blow up, and then just stay anywhere that’s not in the explosion’s range and not next to the captain as you deal with the other enemies, timing your jumps to avoid the cannonball. Ranged attacks also work very well due to their large stature.
However, do not get close to them unless you’ve stunned them first – their triple cannon smash is very fast and does a lot of damage – take them down with skills and ranged attacks whenever possible. Only get into melee range when you can assure your safety from their melee attack.
Infested Zombie

The threat level of this enemy varies wildly. At first glance, it appears like a larger version of the nimble and powerful Zombies, but when you get close it appears that they are slow and can only use the melee slash. However, when killed they spawn a swarm of Brown Bugs, which can quickly go out of control when there are other enemies around.
Attacks: Melee Slash +
On death spawn swarm of Brown Bugs
Behavior: Slowly walk towards you if you are not in melee range. If you are they will attempt to slash you. When they die a swarm of Brown Bugs will spawn (3-4). Additionally, sometimes they don’t appear in the level from the start but will climb from the ground as you get close like Scorpions do, though this is somewhat uncommon.
Strategy: Since they are so slow it is best to just ignore these enemies and save them for last. Even if they do get close you’ll easily have enough time to roll away from them. The danger is mostly in dealing with the swarm, especially if you accidentally kill one while there are still other enemies around, or when you kill two at the same time. Refer mostly to the Brown Bug entry to see how to deal with those, but be wary that these are quite a bit tougher. There are also a lot of spikes all over the map, which makes backing away from them more dangerous. Just avoid getting hit – they don’t deal much damage but you’ll have to fight a ton of them, and you cannot afford letting that damage build up.
Grappling Brute

This enemy is possibly the toughest one in the game at time of writing. A ton of health, strong attacks, ranged and melee options and even a move to counter people trying to roll around it to dodge all of its attacks. Take extreme care whenever you’re fighting one of these.
Attacks:
Grappling hook +
Stomp +
Melee slash
Behavior: If you are out of its range, it will attempt to walk towards you. If you are in range it will attempt to catch you with its grappling hook and pull you towards it. The grappling hook may hit you and deal damage but fail to pull you in if it just grazes you. After pulling you in it will attempt to use its slash. If you get right next to it it’ll use its stomp, which is very quick and next to impossible to avoid on reaction.
Strategy: Hoo boy, this thing is a nightmare. Its grappling hook can reach you almost as soon as the brute can be seen on the screen, its stomp prevents you from easily using hit and run tactics and if you get hit you’ll take a lot of damage. Skills are again the safest option, since as tough as it might be it cannot attack above or below it. Ranged attacks are the next best thing, but be very careful of his fast and long grappling hook. Melee attacks are least recommended, but are possible as long as you make sure that only the very end of your slash reaches him, otherwise you’ll be in range of the stomp. Freezing or stunning helps a lot, but still be aware that it can use the bash almost immediately after the stun/freeze is cancelled.
Enemies by Area
Prisoner’s Cells
- Zombie
- Grenadier
- Shield Bearer
- Undead Archer
Promenade of the Damned
- Zombie
- Grenadier
- Phazer
- Shield Dummy
- Cyclops Bug
Ramparts
- Zombie
- Shield Bearer
- Undead Archer
- Inquisitor
- Red Bug
The Toxic Sewers
- Zombie
- Undead Archer
- Scorpion
- Ugly Worm
- Bomb Bat
Old Sewers
- Zombie
- Shield Bearer
- Scorpion
- Ugly Worm
- Bomb Bat
- Brown Bug
- Mushroom
Ossuary
- Zombie
- Shield Bearer
- Scorpion
- Slasher
- Obelisk
- Slime Vial
- Slimeling
Prison Depths
- Zombie
- Shield Bearer
- Undead Archer
- Bomb Bat
- Slasher
- Mechanical Spider
- Fog Channeler
The Fog Fjord
- Phazer
- Bomb Bat
- Running Zombie
- Meat Grinder
- Pirate Captain
The Graveyard
- Inquisitor
- Bomb Bat
- Slasher
- Fog Channeler
- Infested Zombie
- Grappling Brute

Be the first to comment