
The Pyromancer Build Everyone is neglecting! Blast your way to CT 15 with this Acari based Pyromancer build.
Guide to Acari Bomber
All credit goes to gOT mILK?!
Overview
The Acari Bomber is a high adrenaline end game build which makes heavy use of Thermal Bomb for damage and crowd control. The build leverages the set bonus of the Acari legendary armor, which supercharges your Anomaly Power by 50% for each enemy hit by heatwave.
Class Tree

The class tree is straight forward. Since we’re going with an anomaly build we spec out the bottom tree. I won’t go into detail about every node, however the following will highlight some key choices.
- Both World Ablaze nodes are selected, as well as Wildfire, ensuring your skills are off cooldown as soon as possible.
- Extinction is really nice as it helps you finish off elites quickly once their health threshold reaches 30%
- I’ve taken all 3 Mark’s Cumulation which totals an impressive 24% damage increase against marked enemies. Overheat will insure every enemy on the map will be marked, so this is a guaranteed permanent 24% damage increase
- With Fire and Anomaly gives a 12% damage increase for 10 seconds after using an explosive skill. Between Overheat and Thermal Bomb this should be up permanently.
- Chasing The Chill Away in my opinion is a useless node. Most of your heals come from skill life leach rather than the pyromancer’s class heal.
- Master of the Resistance is huge. The Alpha Perforo jumping attack will be your biggest threat, and it is an anomaly skill that they posess, meaning armor does nothing against it. The 20% increase in resistance will allow you to survive a hit or 2 and give you time to fire off a skill for some interrupts and healing.
- If you find survivability challenging you could optionally remove the first and last Mark’s Cumulation, then choose Magma Golem above Extinction and another Master of the Resistance to the right of it. This will boost your HP pool by 10% and total up your resistance to 40%. Note that you will deal less damage. Also note that 40% Resistance is 2/3 of what Emergency Stance provides so this is a great option.
Skills
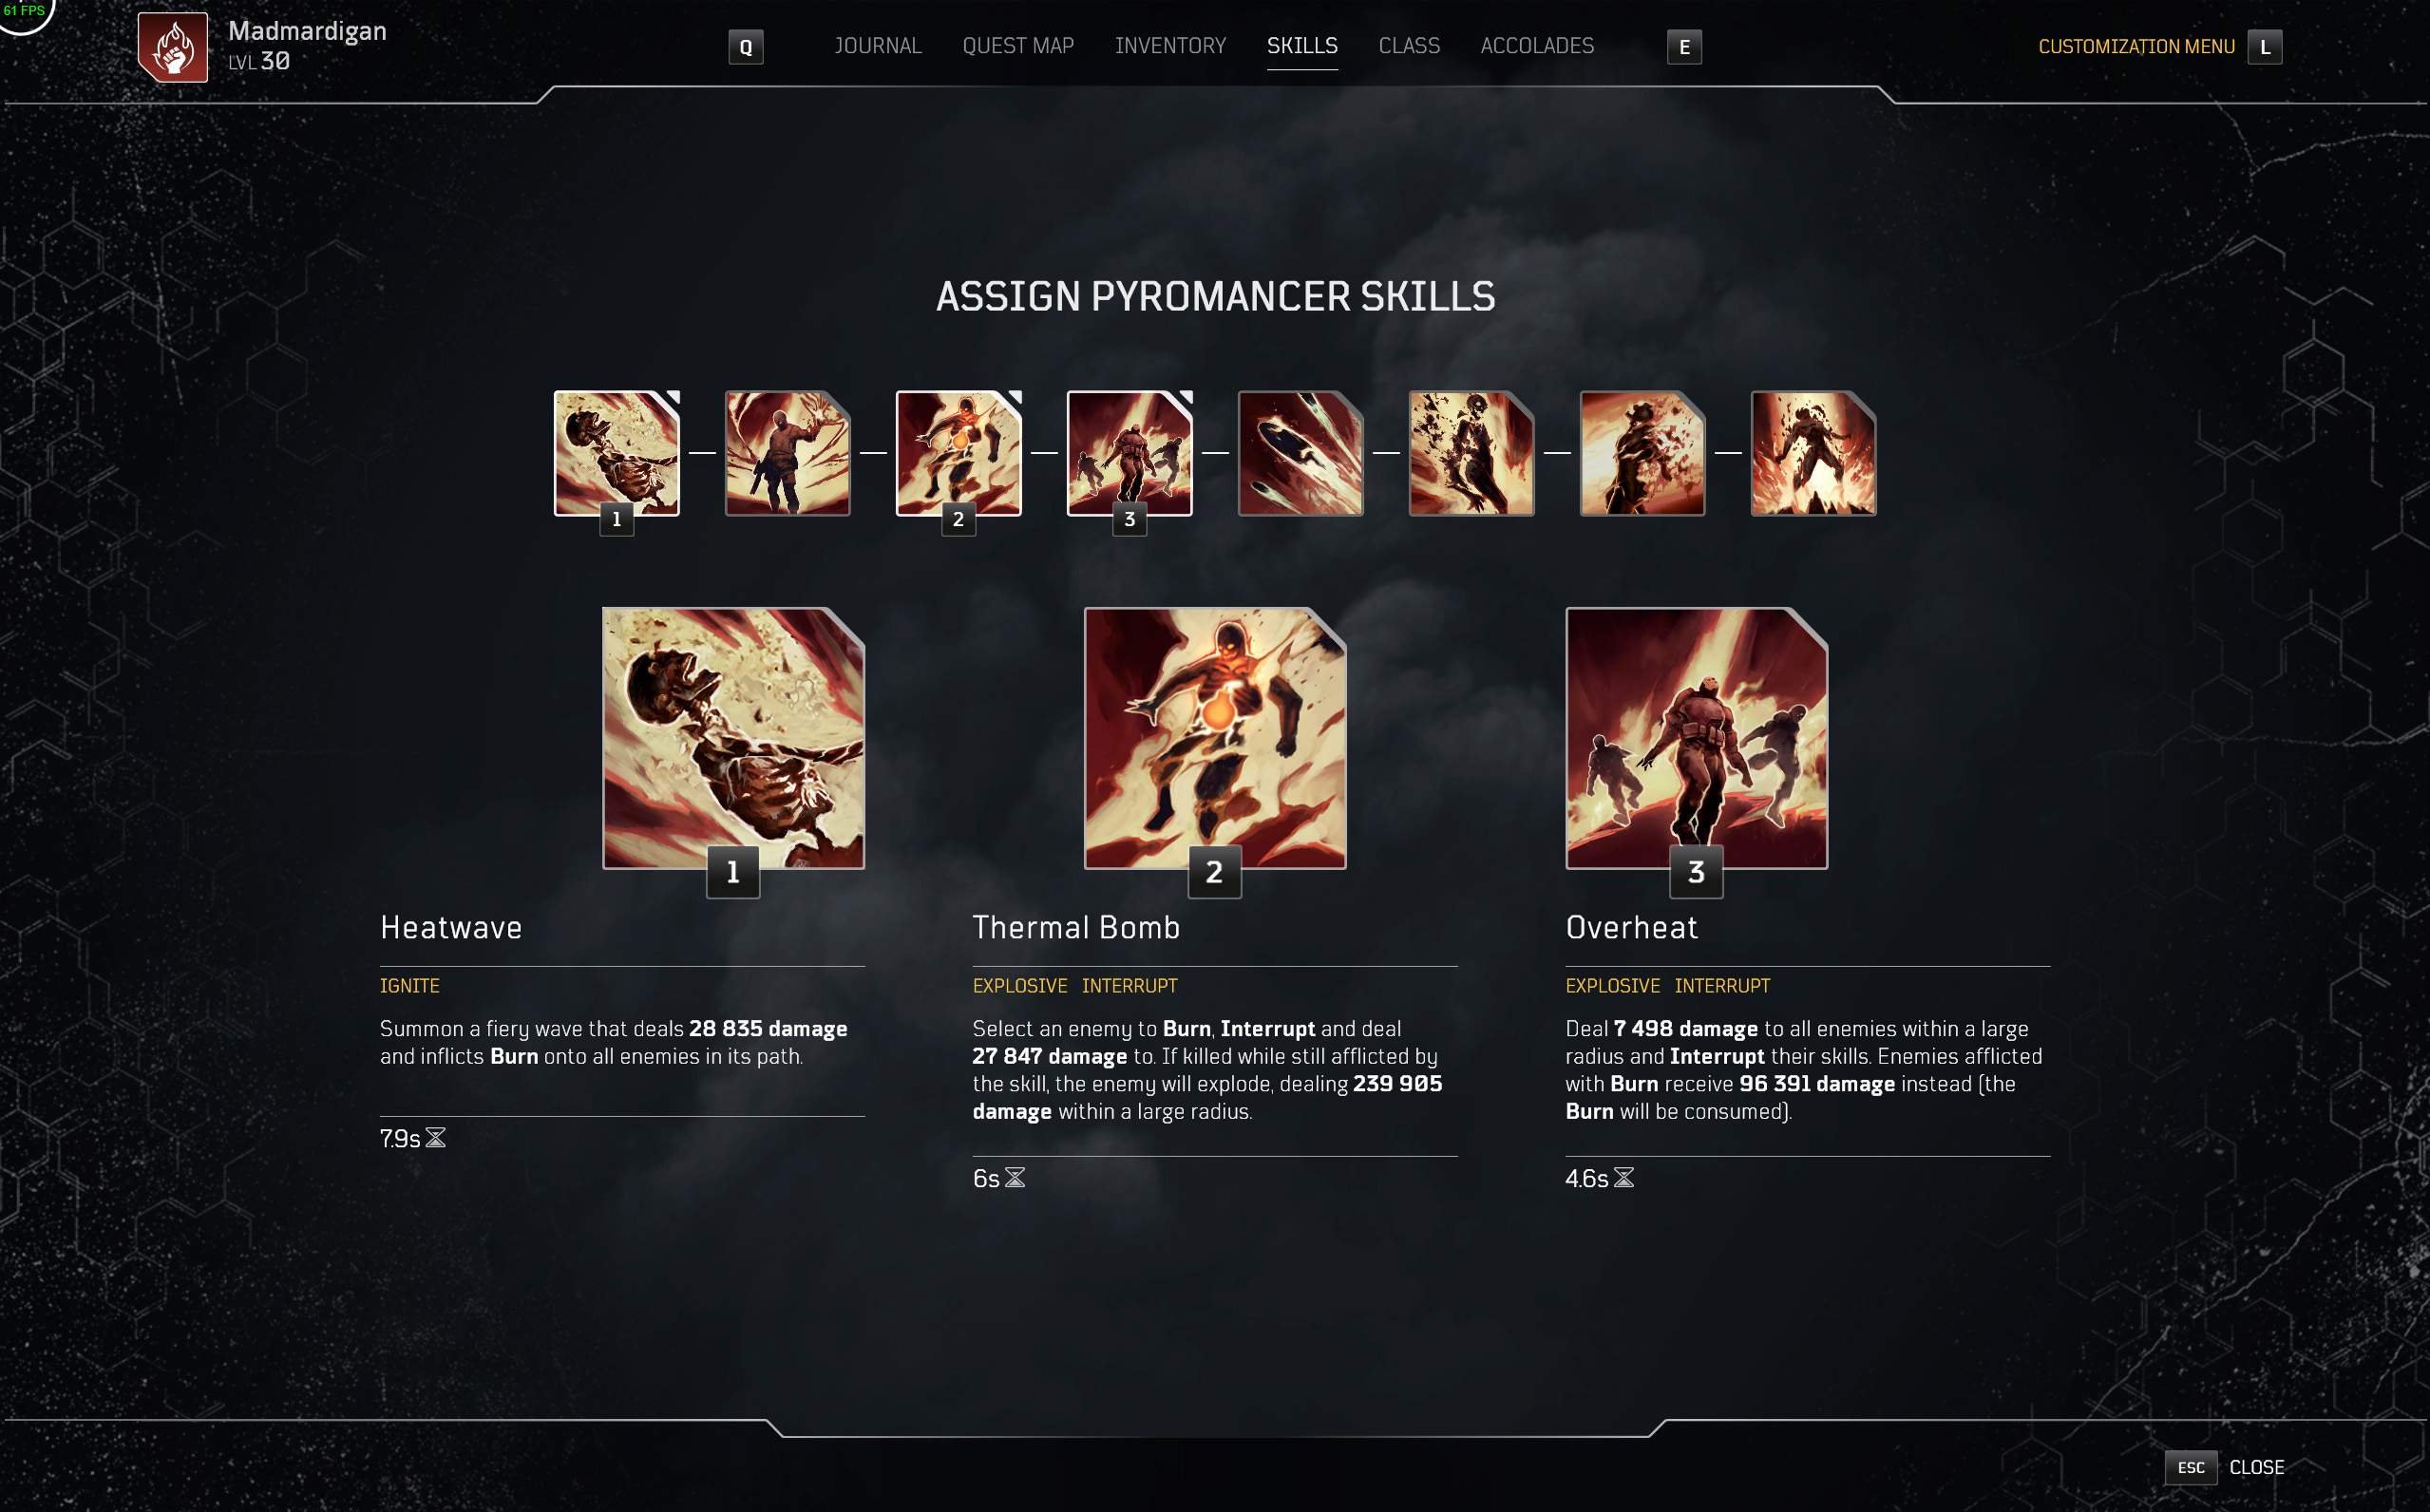
The skills that the Acari Bomber uses are Heatwave, Thermal Bomb and Overheat.
Heatwave
Heatwave will proc your Acari set Bonus, amplifying your Anomaly Power. It will also apply burn which will sustain your HP pool. Heatwave is also a great interrupt. Casting it towards flying Alpha perforos will stun them momentarily and if the timing is right it’ll prevent them from hitting you with their jump attack. Heatwave will also cause enemies to take a stacking 25% damage increase thanks to Tier 1 Mod Burnt Out, which your entire team will benefit from.
Thermal Bomb
Thermal Bomb is your bread and butter. Enemies explode when they die. You’ll have 4 bombs per cooldown cycle, and they’ll be ready to go again in just a few seconds. They also interrupt. Enemies hit take a stacking 25% damage increase thanks to Tier 3 Mod Branded, which your entire team benefits from.
Overheat
Overheat will be your main damage dealer. It will interrupt the entire map and do chip damage. It will do huge damage to anyone on fire, killing adds instantly and triggering your bombs. Thanks to Tier 1 Mod Pants On Fire you shouldn’t have to worry about outlier enemies. Once the main fight is over you will have cast Overheat enough times that they will have suffered death from a thousand cuts.
Weapons
Your choice of weapons here is subjective. I’ve chosen the following:
Imploder

I find Imploder to be under appreciated. The Tier 3 Mod Deadly Disturbance interrupts and causes massive AOE damage, perfect for keeping the mobs at bay during the second or so that your skills are on cooldown after a cycle. The post battle report often shows Deadly Disturbance to be a significant source of overall damage. Shooting an elite in the head while an enemy is about to explode next to them is often enough to ensure they die outright from the bomb, or close to it. More often than not this also means the elite themselves will begin to detonate, so any close by adds can be ignored since they’ll get nuked, giving you time to focus on other threats.
I’ve also added Tier 3 Mod Fortress, which can be found on Death Shield. Because Fortress: 43% increase on all your damage output.
Death Shield

If you’re looking at this guide you should know what Death Shield is by now. Tier 3 Mod Fortress is amazing. I’ve added Tier 3 Mod Moaning Winds in the 2nd slot. Dump your mag at the start of an expedition, then switch back to Imploder. Simply quickswitch when you’re getting swarmed and quickswitch back to Imploder before the reload animation finishes. It does massive AOE damage centered around yourself on reload.
Lucky

Nobody uses pistols, but they can be used to your advantage. I’ve added another Tier 3 Mod Moaning Winds to this one. I’ve chosen Lucky because it has a small clip, which can be dumped quickly then ignored. It’s a safety net. Usually, it’s not worth using. By the time you’ve used the Tier 3 Mod Moaning Winds from Death Shield your skills are back up and ready for use. Since skills are the source of your heals it’s most often better to start a new skill cycle than to pull out your pistol. Still, don’t sleep on it. Every now and again it’s the difference between killing off a Brood Mother and getting slashed to bits by her.
Armor
Here I’m running Helmet, Chest piece and Pants from the Acari Set for the set Bonus, which gives 50% increased Anomaly Power for each enemy hit by Heatwave. The Acari Bomber will have 2 Heatwaves per cooldown cycle which has the potential for a MASSIVE damage buff. By adding Tier 1 Mod Burnt Out to the build your Heatwaves also provide a stacking 25% Increased Damage to enemies hit by the wave. I would have liked to have used the Acari Boots for Cooldown Reduction, then used a purple or other Legendary Helmet with Cooldown Reduction as well, but sadly both Mods that come with Acari Boots aren’t used in this build, so swapping out one of them for a Mod we do use sill leaves one unused Mod Slot.
Armor Stats
Anomaly Power: More Damage. Self explanatory.
Cooldown Reduction: The Acari Bomber makes heavy use of CC, along with buffs and debuffs which come from it’s skills. Since these are on a timer we need to keep them up as much as possible. Being able to cast skills frequently will help you control the battlefield and direct your damage where it’s needed most. It will also help your HP sustain.
Skills Life Leech: Much more important than status power on this build. Overheat consumes burn and you should be casting that every 5 seconds or so. As such, the bonuses you gain from Status Power are wiped away frequently, making it a less than ideal choice. Even though you’re dealing less damage over time from Burn, stacking Skills Life Leech helps keep your HP pool topped up during the short window when your burns are active.
Helmet

- Tier 3 Mod Fire Tsunami: Comes natively on Helmet of the Acari. Doubles the width of Heatwave. Lets you hit more enemies per cast, supercharging your Anomaly Power, and priming enemies for Overheat.
- Tier 3 Mod Double Fun: Found on Cowl of the Reforged. Lets you hit 2 targets with one cast of Thermal Bomb.
Chest Piece

- Tier 3 Mod Detonator: Comes natively on Armor of the Acari. Great cooldown on Overheat and essential to this build. This lets you cast Overheat every 4-6 seconds depending on how optimized your gear is.
- Tier 1 Mod Tidal Wave OR Ride the Wave: Gives one extra cast of Heatwave.
- *note: The keen observer will notice that Overheat was previously modded out on my chest piece. The reason behind this is that there will never be a good reason to get rid of an extra Heatwave when wearing the Acari set. That means if you choose to try a different build, such as an Eruption build, you won’t need Overheat, making Detonator pointless, but you will always run at least 2 Heatwaves. Make sure you have another Chestpiece to breakdown so that if you do remove Detonator, you’ll be able to put it back on.
Pants

- Tier 3 Mod Anomaly Echo: Comes natively on Waistcloth of the Acari. 15 seconds of increased Anomaly Power and Firepower on skill activation. This Mod isn’t amazing but it isn’t terrible either. Since the Gloves and Boots of the Acari are useless for this build we have no choice but to take the pants so we can get our set bonus. Furthermore the 2nd Mod slot on the pants are useless to the build, so that’s the one we need to swap out. That means we get Anomally Echo.
- Tier 3 Mod Branded: Stacking 40% increased Damage to any enemy affected by Thermal Bomb. That is just insane.
Gloves

Tier 1 Mod Fire Frenzy: An extra use of Thermal Bomb. Paired with Double Fun this gives you a total of 4 bombs per cooldown cycle. Cast for explosive lols.
Tier 1 Mod Pants on Fire: Does extra chip damage from Overheat to enemies unaffected by burn. This is a great Mod. It lets you forget about those pesky outliers who like to cower in fear from you on the edges of the map. By the time the main battle is over you will have cast Overheat enough times to have killed them. Some of the later spawns do survive from time to time, but usually not.
Boots

Tier 1 Mod Burnt Out: Essential debuff. Gives all enemies hit a stacking 25% damage taken increase. Paired with Tier 3 Mod Branded you and your team will do a ton of damage.
Tier 1 Mod Ash Grasp: I used this mod extensively during my campaign playthrough and really missed it in endgame since it was the first to go in order to slot in a Circle of Power. I really missed it and did everything I could to fit it in. Eventually I dropped out Circle of Power for it. This mod is slept on and I don’t understand why. It’s so good. Anyone caught within a 7.5m radius of an exploding target will receive ash status. that’s a 15 m Diameter, or about 50 ft. I can’t stress enough how good this is. Any enemy exploding will freeze in place all surounding enemies, which means they won’t be able to avoid the bomb. The CC this provides is nothing to laugh at either. Freezing half the battlefield is an effective way to give you respite from incoming damage while you focus your attention on elites. By the time Ash wears off most of the adds will be dead from the explosions and Overheat.
Gameplay
The Acari Bomber will use medium damage skills frequently in order to freeze and clear the battlefield. They will debuff the enemy, increasing damage done against them. They will make everything explode and it will be glorious.
Initiating combat
First thing to do is to dump the ammo out of your Death Shield and Lucky, getting them ready for Moaning Winds to do it’s work when you need it.
When the expedition starts pop Overheat. Run towards the enemy. You should be able to get another Overheat off before you get too close. This will interrupt and stun.
Next, get up close to the largest group of enemies and cast both your Heatwaves, then launch your 4 Thermal Bombs. In a lot of situations you can do a quick 90 degree turn between Thermal Bomb casts, spreading them out over a wider area.
Pop Overheat again. At this point Overheat will kill the adds that were burning from your Thermal Bomb, triggering the detonation. The surrounding enemies will be frozen and will get decimated by the bombs. Elites will take a solid chunk of damage. Try to land some crits with Imploder on them.
Whenever there’s a lull in the battle that brings back all your cooldowns, the cycle should be:
- Overheat –>Heatwave–>Heatwave–>Thermal Bomb–>Thermal Bomb–>Overheat–>Imploder Crits.
On stunned elites you can get up close, quickswitch to Death Shield in order to proc Moaning Winds, then quick switch back.
With no defensive mods you’ll be pretty squishy, which means you always need to have a skill active on an enemy to benefit from skill leech. If no enemies are close use Thermal Bomb to get some HP Regen or Overheat for a burst heal.
The penultimate of this build is when your Thermal Bombs hit 3 adds and an elite all grouped up together after they’ve been hit by a Heatwave. I’ve taken out Brood Mothers in a single volley. Something to consider is to Heatwave–>Thermal Bomb–>Heatwave–>Thermal Bomb–>Overheat. Often times with weak adds like Perforos 2 Heatwaves is enough to kill them outright, meaning you lose your targets for Thermal Bomb. By Alternating you are ensuring more explosions.
This works really well on single target elites as well. 2 Heatwaves and 4 Thermal bombs will give an insane Debuff on targets with large HP pools, high armor and high resistance. Overheat will do a significant chunk of damage after that. You can easily drop a Brood Mother’s health by half with one cycle, and once it’s completed and you’ve fired Imploder for some crit burst damage, or used Moaning Winds, your cycle will be back up and ready to go again.
If you find yourself getting flanked and swarmed, do a 180 between Thermal Bombs, cast Overheat, then relocate while the enemies are frozen in place, fire off Imploder Crit burst damage, or run into the swarm and hit them them with Moaning Winds.


Be the first to comment