
Guide to Custom Shapes
All credit goes to spookster!
Introduction to Shapes in Hexels
Hexels allows you to work with two different kind of layers:
- A shape layer comes with a grid that you can move, rotate and resize without pixel bending/stretching because it is based on vector shapes.
- A pixel layer does not have a grid and is the typical classical approach to drawing.
When you look at your layer list you can identify the layertype by the small icon in the preview image.
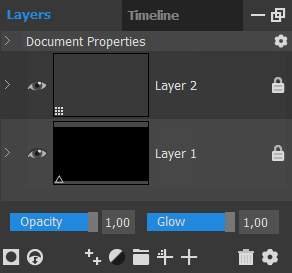
A small triangle indicates this is a shape layer.
The three by three dot symbol lets you know you are working with a pixel layer.
There are 4 different kind of shape settings in Hexels which define the the grid for ALL shape layers in (and if you are in vector mode the size of) your document:

1. Classic shape
A grid made up of hexagons.
2. Trixel shape
This is probably the most powerful kind of grid you can have. It got its own subset of grid shapes which you can switch forth and back without losing any vector information. You can set the x-y ratio in the settings, in conjunction with transform/scaling you can mix any kind of settings together.
3. Voronoi shape
This lets you morph your own kind of grid with it’s settings. You can get thing between squares and hexagons with some jiggle.
4. Custom shape
This shape setting is what this guide is about! You have a lot of control about the kind of grid you want to work with.
If you change shapes you will not lose any painting on your grid, so you change shapes back and forth however you like!
The Custom Shape Menu
A word of advice:
- This menu is bugged when your document is in pixel mode.
- You can choose presets or load in user shapes (.hfk files) but the shape design area can look broken and creating your own shapes would be difficult.
- Switch to vector mode in your document settings to avoid this.
- When the shape design area does not refresh when loading in shapes/presets use the +/- zoom buttons below it to force hexels to update.
You will also want to check you have the Hexel Grid activated to see what you are doing live on the canvas.

Now that’s out of the way let’s look at the options.

On top of the panel you have the shape design area. The small grey squares are the points that define your shape. The one grey square with white in it is the point that is currently selected.
You can select points by left clicking them with your mouse. You can drag points around by click and holding left mouse button. You can create additional points by doubleclicking on any line between to points. If you press delete on your keyboard you can also delete points. Points like to snap to other points, this can make things difficult or easy depending on what you are trying to do…
Below the shape design area are the X and Y coordinates of the currently selected point. You can type in values here for precise positioning (or if you do not want a point to snapping to another point). You should try and keep all points between -0,5 and 0,5 to avoid trouble with the spacing later. You should also be aware that if you plan to have rotation in your grid: hexels will always rotate around the zero point.
The Zoom – + buttons are self-explanatory.
Increasing the number of sides value adds a point in the middle of an adjacent line of the currently selected point (in most cases this goes clockwise, but it can be different if your lines crossing each other). If you are working with a lot of points this can be handy because hexels sometimes does weird point adds when the points are really close together. Decreasing the value deletes the selected point.
‘Save’ and ‘Load’ lets you save/load a .hfk file with your current shape and settings (the shape is also saved in the .hxl file, you do not need to save the shape, if you save the currently open project, and do not plan to use the shape in another project again).
Presets can be expanded by placing you saved .hfk files to “%UserProfile%AppDataRoamingMarmosetHexels3Add-OnsCustom Shape Presets” folder.
Resetting a shape will need a zoom + or – to update the shape design area.
All other options below are about how the grid is going to work (spacing, row offset, shape flip, per column rotation). There is no rotation per row in this window but you can edit a saved .hfk with a texteditor of your choice and there are two values there for coloumns and row rotation (the row rotation ones are always 0 by default).
Be the first to comment