This is just basic tips I’ve picked up so far from the ALPHA version of the game.
Contents
The Tavern APs
All credit goes to DeeplyDippy!
First and foremost – spend those APs
On my first playthrough, on release day for backers, I thought I needed to save 30AP for the quests, as I didn’t notice the gold symbol on the map til later, so that playthrough went slower. I also started to run somewhat low on quests. I usually had 1-2 available but not much more.
However, once I started to spend the APs, two very important things happened:
- My Inn leveled up quicker
- More quests became available – many more…
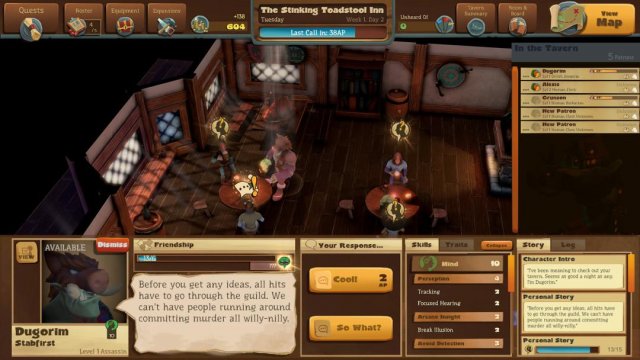
I initially look at the In The Tavern – Patrons list and noted who was closest to the next level (ie. 8/10), then ply them with drink (until they got the drink symbol on the Patrons list – I don’t know if it makes a difference – anyone?) then with food until they leveled, then moved on to the next one, and so on.
Often this would trigger Patrons to want to Rent A Room, new Patrons to enter the bar, and once I got my Inn past level 8, would also trigger extra quests. Yes, suddenly not just the person I had leveled, but also often 2-3 other Patrons would also suddenly have quests. At one point I had over 25 quests and just could not keep up!
So for those who are complaining about lack of quests, spend the APs! It’s somewhat tedious, granted, but if you actually read what some of them say it can be quite entertaining. Murgul and Grunson (the first two you get in the game) have quite a backstory prepared.
Accepting Quests
When you come back to the Tavern, there is usually at least 1 quest available. Occasionally there will be an option (and at the moment the Accept window on the choice quests almost covers the Quest window so these can be hard to see) to pick one of two Skills for the same quest.
For example, I had a quest to save a baby unicorn (I know, so sweet awwww) and the quest gave me a COMBAT quest option and a MIND quest option, the rewards were slightly different, COMBAT 200 XP, 200 GP, 25 RP – MIND 300XP, 25RP (it’s also funny to read the quest descriptors for each).
Ignoring the fact money isn’t of any consequence at the moment, I looked at this two ways, the XP reward (more is always better), but also how my Roster was set up – was I geared more towards MIND or COMBAT, what sort of quests did I already have available (if I had lots of MIND quests already and my roster was evenly built, COMBAT would make more sense as I could ensure two teams could quest at the same time), etc.
So take the time to look at the quests when you accept them, and choose the right quest both for your roster build and the quest types you already have available.
Leveling The Team After A Mission
At the moment (26 Sept) it is somewhat buggy when you Return to Tavern and notice the green arrow on the Roster tab. If you try and click on Level immediately after returning, nothing happens, and for me not even switching to a different team member then back works.
I found you need to Action at least one Patron (grub, quest, welcome) to get it to work, so for me I got into the rhythm of Return to Tavern, Stock Up, Spend APs, Level Up Team, View Map/Go on quests.
Also try and pay attention to the skills your team have, as the sub skills are often required on quests, and having duplicated skills is no use, so having 3 with Swords & Axes is useless (but 3 under Melee is ok – explained later under Quests), so perhaps 1 Swords & Axes, 1 Spears & Pikes, 1 Hammers & Maces.
It’s also important to be stringent in your skill choices. Some team members you choose may have their skills spread out all over (I usually only choose these types of team members when they have a rare sub skill available), I then just choose a certain few skills (3-4) and build them up, concentrating on the rare sub skills if there are any.
Stock Up
As mentioned above, don’t forget to stock up on food/drink (found under the Room & Board tab), I usually make sure there is a minimum of 20 of each item available. Money, so far, doesn’t seem to be an issue, so you can make this higher if you wish for those times you forget to stock up, to give yourself a safety net.
Questing – Choosing Your Team
Choosing Your Team
Skill Requirements
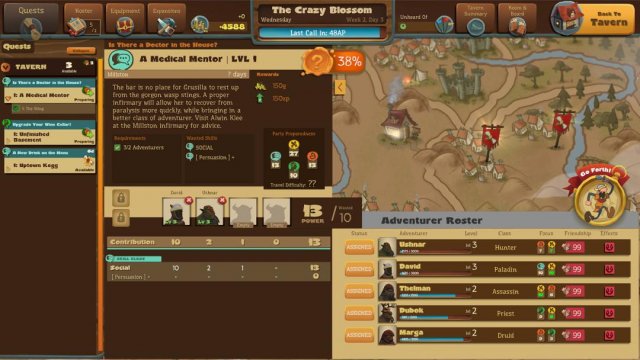
When choosing your team for the selected quest, first make note of any specific sub skills required. As you can see from the image above [Persuasion] is required.
The way it’s typed gives information on the skill set:
- Capitals – SURVIVAL – is one of your main 4 skill sets.
- [ ] – [Fitness] – is one of the skills available under the SURVIVAL set.
- Normal – Toughness – this is a sub skill of [Fitness]
One of the things to be wary of, and one of the reasons I commented above about ensuring skills are not duplicated is because:
As you can see from the image, the quest requires 2 skills, SOCIAL and Balance. If you look towards the bottom of the quest you’ll see two rows, one with SOCIAL, and one with Balance, but saying SOLO at the end of it. It will usually have a bonus next to it, for example in the image above x3
THIS IS IMPORTANT: This stat is taken from the FIRST PERSON in the group. Doesn’t matter if you have 3 people in the group with Balance skill, it will only take it from the first person assigned to the group, and if you assign incorrectly you may miss the bonus and it won’t take anything into effect even if others in the group have it – it has to be the FIRST PERSON IN THE GROUP (can’t stress this enough – guess who didn’t figure that one out til much later…)
Questing – Overall Stats
Once you’ve covered the required skills, it is also essential that you have rounded skills scores before you set off, especially quests level 4+ (and some 3s). Just because the above quests wants SOCIAL (blue) and Balance (orange) doesn’t mean you can forget yellow and green. Don’t head off with SOCIAL at 40+, SURVIVAL 30+, MIND at 10+, COMBAT 10+.
As you head off on your quests, you’ll get lots of sub quests for all the other stats, failure often results in debuffs (to be honest, the occasional win does too but ahh well), but wins can sometimes result in items (weapons, armor, items – tho I have yet to see any of those).
So it’s important to make sure your team is well balanced, even if it means leaving several other team members in the Inn whining, it’s better to ensure 1 great team than 2 mediocre teams.
I tend to note who I left out and ensure they get grouped the next round. So far I have found not grouping them 3-4 days has no effect yet – it’s still -0 friendship, but I’m sure this will change as time progresses.
Rest The Team
What can I say, debuffs are a pain in the ♥♥♥ They give minus effect on rolls when questing and can make a huge difference. So I tend to sit them out until healed. At the moment the longest debuff I’ve found is 3 days, so it tends to be no biggy resting, as that doesn’t usually start hitting you until you start doing level 3 quests and by then you are usually at 6+ team members, so should always be able to send one team out.
Saying that, I had 7 out of 8 members all debuffed for 2 days, and decided just to rest them until healed, rather than chance failing quests – I want my loot!


Be the first to comment