
Purpose of this tutorial is to break down and explain all off the game menus (like game speed, buildings, overview) and some useful controls and few more things.
Contents
Guide to Game Menus, Options and Features
All credit goes to vecnavatra!
Introduction
Today we are going to focus on all game menus, options and features that are available in the game.
To name a few, what is covered below: Game Speed, Building and Overview menu.
Beside that some focus is allocated to Docks (Trade) and addtional hotkeys that are useful to know.
Also if you prefer video instead of long text, see the video link below in the Video section.
Video
If you prefer, you can check out my YouTube video with this content.
Game Speed Menu
We gonna start this guide with the simplest tool and that is this controls here on the bottom middle part which are designed to control the speed of the game.
- With this options you can have game speed at 1, 2, 5 and 10 multiplier and arrows left and right with you increase and decrease it.
- You can also change the speed by pressing keys 1,2,3 and 4 to directly specify speed modifier.
- Of course there is a pause button, by clicking middle button or pressing the Space bar key and probably this will be used mostly across the game.

Building Menu
After simplest control, we gonna cover now the biggest part and most options that you can click on the screen, which is the building menu.
We gonna break down each category here and explain a bit more what each one has to offer.
Keep in mind fact that some buildings have efficiency bonuses when placing it, but for this subject I will dedicate new tutorial to cover it.

Housing
Housing menu is reserved only for buildings related to residential purposes.
Shelter is the only building that can have multiple families and it should be used only as a temporary solution for housing or preventing the families to have more offspring.
All other houses which have families will have kids and continue your settlement to grow, except for the shelter.
Difference between wood house and brick mansion and everything in between is the size of household.
It is stated that brick mansion are preferred residential choice for Gentry and Merchants but at this point I can’t confirm that since it is very new addition to the game.
Town Buildings
Town Buildings is next on the menu and here we can see now the different purposes of the buildings.
By type and effect, we can brake it down into: Trading, Happiness, Religion, Safety, Health, Education, Income and Vanity.
To name a few, we have Docks which is your first go to when you want to import and export goods and very vital thing to have as early as possible.
For happiness you have Wells and Inns, which will increase the happiness in the radius of that building and by clicking on it, you can see it’s radius.
Religion, Safety, Health and Education works in same manner as happiness building and each one also have radius of effect.
There are also guildhouses which are one the few buildings that don’t require any upkeep or upgrade and also will gain you some coins for each member of it’s class associated with that building.
Lastly, we have Vanity building, which are Patron’s mansion and villa, which are there just to show off with no obvious effect.
Farms
Here on the Farms menu, we have three types of building, crops, orchards and ranches.
All basic types first needs to be placed and after building it, then you decide which sub-type will be chosen for that particular building.
Once you unlock farms menu, you have at least 1 default option, everything else for sub-types is unlocked through research and some from events (like potatoes).
Maximum size for crops is 12×12, for orchards and ranch is 20×20 and of course, the bigger you have it, bigger will be upkeep and production out of it.
Production
- Production menu is the largest one and these buildings are responsible for producing all products (duh…).
- This includes the basic products, like lumber, coal, iron, to the last in the chain like jewelry, bread or drinks.
- Most of the building here have some effect and a lot of them are boosted by some bonuses, so make sure to read research tree red items and decrees thoroughly so you know what to expect.
- Beside that there are storage buildings, like Depot, Warehouse and Large Warehouse.
- More information about production will be covered in a different tutorial.
Beautification
- Beautification menu is reserved for building that is going to increase happiness around and there are some that are only for decoration.
- Keep in mind this fact and always leave some space for these buildings since in the grand scheme it can help a lot with overall happiness of all your residents if placed properly.
Roads and Bridges
- Roads and bridges menu are reserved for items related to exactly that.
- Dirt road should be used only until you get stone road unlocked and for the bridge, wooden one is fine but when you have stone one, just use that one.
- For the bridges, when you are building it, always go to the Build Grid view so that you know exactly from which point you can start and where to finish it, it is not that obvious as you might think.
- Road signs are extremely important, spam this item all across the map, check radius and make sure that each road have enough signs so that your settlers can move faster.
Clear buildings and resources
- Lastly we have menu related to gathering resources and demolishing things.
- For the resource, you have options to gather them all with single selection or gather specific one that you need from the ground.
- You have X on the end, which is used to cancel any gathering task that you select.
- Demolishing structures can only be done through one item (which also includes started but not finished buildings).
Overview Menu
For the overview menu, we gonna shift focus now to the upper right corner and see what we have here.
All options in this section can be also accessed through the hotkeys and since some you will need to open often, it is good to remember few of those.
Even if you forget, you can hover over any item here and it will show you the hotkey in a tooltip.

Status windows
- Status window is probably one of the most useful condensed information on one place, my suggestion is that this window remains open at all times.
- On this overlay you can see almost every product and information breakdown and when you hover over each item, you have additional information in it, like production and needs stats.
- However I strongly suggest to not rely on this numbers, have always a rough idea what number should be there and monitor always this overlay, since you can get in trouble if you lack some particular products.
- So monitor this overlay all the time, get familiar with it and use these information to your needs.
Jobs board
- Jobs board is one of the menus that you will probably access very often, especially on the beginning and until mid game.
- This overlay is designed to control and globally allocate number of workers that are associated with each of available professions.
- Always tend to have maximum worker for each profession and only expand that profession when you need to increase that particular branch.
- Also make sure that you always have enough “free” (General) workers which is located on the of the list, since you rely on this workers heavily and if get below optimum number, you get notification instantly.
Research
- On this overlay, you have access to all items that are researchable in form of tree.
- So if you want to unlock something down the line, make sure that you research everything before that.
- There are three types of research, building which is blue, decrees which are green and bonuses which are red.
- Make sure to read carefully red ones and green ones, since it can have a huge impact on your production and overall status.
Town hall
- Town hall is next item on the menu and here you can enact different decrees that can shape up your settlement a lot.
- Choose these items carefully and use the one that you actually need to boost that particular area of interest.
- Beside that you have two options, overview and details, which will show you overall effect that all current things have on all settlers and on details what is actually the output of each enacted decree.
- More upgrades you have to your Town Hall, more influence points you will gain for each level of upgrade.
Additional panels
- Additional panels can provide you with a lot of global statistics, information related to settlers and various data that you extract from it.
- Some are more useful than other but it is up to every player how much you will use this section here.
Annual
- Annual overlay is opened beneath the Status overlay and it show you all the events related to residents of your settlement.
- It will show you when people are married, when someone is born or someone dies, research is completed, etc…
- In the beginning of game it could be useful to track this information but as soon as your settlement reach some level, this is just going to be wall of text.
Stock
- Here is one of the menu items that you will most definitely access a lot during this game.
- You can also access this overlay by clicking on any storage building that you have.
- This overlay will show you quantity of each resource that you currently have and for each resource you have a history data of total amount that you have.
- Also it can show you how much you produce and what was spent, also through entire history and there is also option to show you how much you sold or bought.
- Beside that you can set a cap for each individual product, but I advise not to do that since it will essentially just pause the production of that item.
- Better solution is just to export if it is as a final product or increase production which uses that product for upkeep.
- Important feature here is a lock mechanism, which can prevent your settlers to use it a day to day life and only used it for production.
- This option is extremely important and you will probably use it for products like wheat, plums, cherries, etc…
- On top of the overlay you also have Capacity of all storages, so make sure not to overflow it and lose resource due to that fact.
Residents
- Residents menu is purely for statistical purposes, I will not get into detail and leave you to find out what is all available there.
- It is good for tracking, it can show you current state, historical states and various things related to your residents.
- Whoever likes this kind of menus and data, will check it out thoroughly even without my any explanation of each item.
Buildings
- Buildings menu is one of the additions to the game that was introduced after the release and it can be very useful.
- On this menu, you will have overview of all of your buildings, divided into three tabs, which are Production, Town and Houses.
- For each tab you have overview all of that sort and you can click on each individual sub-type to see information related to that.
- This menu is extremely important in the mid and late game since it can show you very easily which building are not fully upgraded or used enough (or builded/completed).
- So check this menu from time to time and make sure that all your building are up to the state that you want them to be.
View
- In the View menu, we have Minimap which is also accessible by pressing key M and it will show or hide your minimap in the bottom left corner of the screen.
- We have a grids, which are also available by clicking key G, to toggle between different grids like Build grid, Fertility soil and Ore richness grids, which should be used often in the game.
- There is also toggle for showing or hiding tress and this is also available through the hotkey T.
Options
Here you have two options, to quick save the game which also has a hotkey F1 and Open the main menu which is also available when pressing the hotkey ESC.
Docks (Trade)
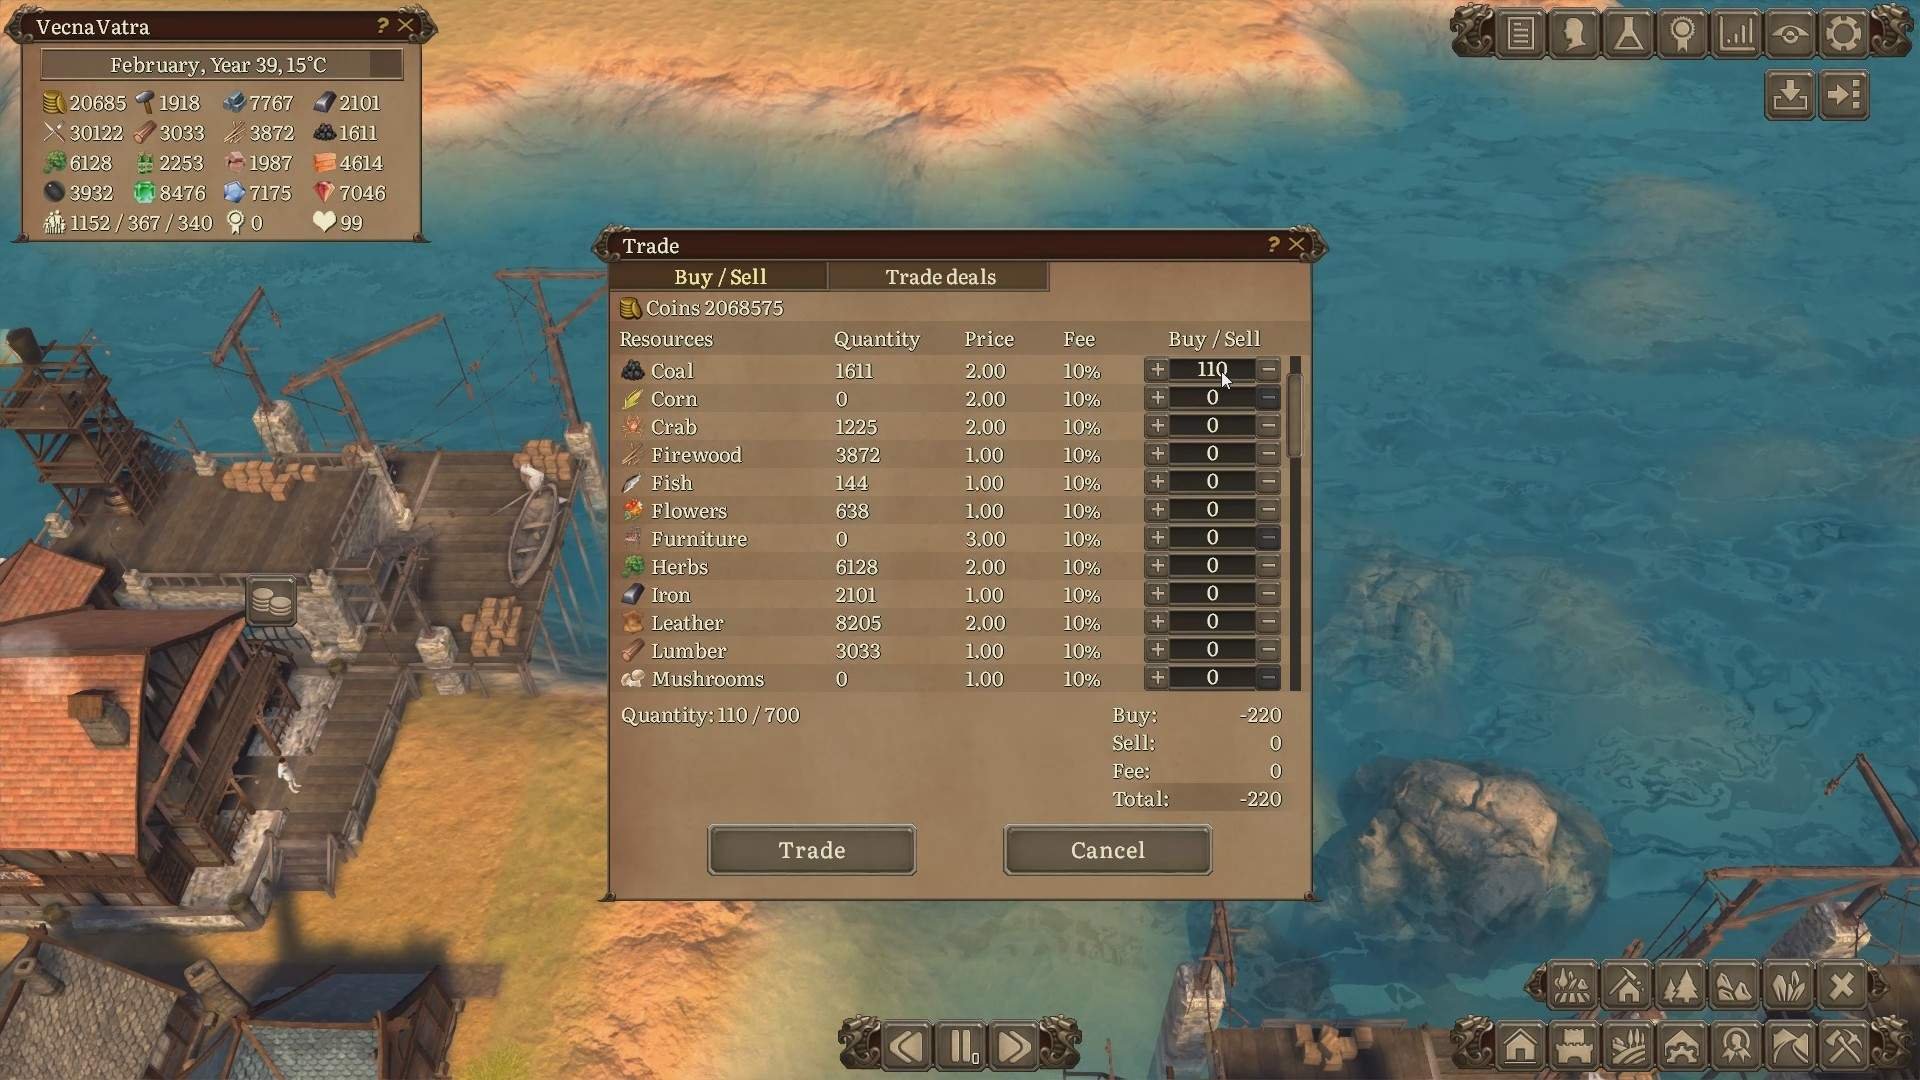
- Beside all options that we cover so far, we gonna talk about Docks a bit more since it also provides a unique menu and some additional options.
- To brake down functionality, you have manual and automatic trade, which was introduced in last version of the game.
- On the buy/sell tab, you can will see list of all products that could be available at this point in game, quantity and fee that you gonna pay for that trade.
- You can type manually amount that you want, holding CTRL and click on arrow will increase it by 20 and holding shift will set the maximum.
- To buy something, number must be a positive, when selling number needs to start with minus.
- Quantity of trade is based on the upgraded level for each building.
- Trade deals are automatic way to obtain and sell specific amount that you select for products that you choose over time,
- Keep in mind that each Dock has it’s own unique overlay and each either manual or automatic trade is only executed from that particular building that you selected.
Additional Controls/Hotkeys
- To mention a few which could be also useful to know from the start, beside zooming in and out with mouse scroller, lets mention few more.
- Hotkeys Q and E are used to shift camera rotation to left and right and hotkey R to rotate building in one direction )clockwise), while hotkey B is used to change the model of that building if available of course (houses for instance).
- Hotkey F8 can be used to enter the Photo mode and inside that you will use W S A D command and use mouse to define direction, well check it out, how it looks.


Be the first to comment