
This is a step-by-step guide to getting a president’s medal in the metropolis scenario.
This guide will start with a lot of detail. The initial setup and the first few expansions are critical. After that it gets a bit messy with a lot of “when you have time”. (I didn’t record the game in detail, so I actually don’t have the precise sequence.)
This guide assumes that you know how to build track, make passing sidings, manage platform use, make signals, set up routes, and set signals. Look to other guides if you want help with these.
Contents
Difficulty Settings
All credit goes to steel_ratt!
TLDR: Normal tracks, very hard opponent, your choice of pause mode
Personally, I like manual pause mode. I like being able to set up trains for specific loads and set up warehouses without losing 3 weeks of time while doing it. It makes a difference of about a month or two just to get your initial setup (spending all starting money). That lead time helps get the snowball rolling. You can afford to miss one optional objectives with this setup and still get the required 30 points. (I got 10/10 all gold check marks by continuing the play-through. More on that later.)
Going with normal pause mode will give you more leeway on objective deadlines, but you’ll need it because of the time spent setting up trains and warehouses with the clock ticking. If you’re feeling confident of hitting your marks on normal pause mode (and I’m guessing you’re not, since you are reading this!) you could drop opponent difficulty to Hard. This will make the final optional objective easier, but I actually didn’t have to do anything in the last year except let cash build and buy shares.
Choosing a Character
TLDR: Choose the Engineer
Cheap locomotives and free repair sheds are easily the best money savers for this scenario. you will be buying at least 16 trains right at the start which will give you an extra $336k for building. Remember, money saved in the early game will help your snowball get rolling. That said, you are going to be upgrading A LOT of businesses, and the extra cost is going to hurt. By the time you are doing that, though, you will be earning a lot. (I was earning twice as much as Adekyn was at the same point in his game, and was doing it sooner.) Using the Engineer also makes the tactic of putting down 2 small stations viable. It’s cheaper than a medium station, denies your opponent access to your cities, and the extra maintenance sheds cost nothing.
The Industrialist would save you $150k at the start. The savings later on could be HUGE , with cheaper factories and not paying a premium for upgrades. This could be a viable alternate to the Engineer if you want to try it, but I suspect that the cheap locomotives getting the snowball going earlier will be better.
The Lady and the Gangster may be tempting for the bonus incomes for freight or passengers, but you pay for this with a loss in the other type. And for the Lady, you don’t want to be spending money making sure we have the latest trains for the express bonus.
The General might save you up front on track costs, but a lot of that will get eaten up by extra bridge costs.
The Trickster might save on auctions, but you will be launching very few of those. The slow tech advances and the fact that you wouldn’t save any money at the start of the game makes this a non-starter.
Research and Personnel
TLDR: Profit and reliability, not trains. Staff as you see fit.
Engine reliability, reduced maintenance, and freight prices are important. Drive toward those.
One or two engine upgrades are helpful. The first new engines almost doubles the capabilities of the Grasshopper. It’s more expensive… but not so much for the Engineer. One upgrade will see you through to the end of the game.
Reduced building costs are also important. Drive for those after you get the ‘detonator’, ‘spark arrester’, and ‘interlocking tower’. Once you have ‘call for tender’ and ‘foundations’ go back to upgrading reliability and reducing maintenance time.
Personnel is not a tremendously large part of the strategy. I was playing against both the Lady and the Gangster who stripped away my office staff in no time flat.
Office staff can still be helpful while you have them. Train staff are good — boost freight prices on freight lines, passenger prices on general purpose lines, and reliability on longer lines. Speed upgrades are not useful; speed will be regulated by passing sidings and the other locomotives on the line.
Promoters are mandatory. Always get them and boost New York. Get inventors if you can. The others… use your own judgement. (I rarely use offensive staff — I need my money more than I need to hurt my opponent.)
Start the Bidding Wars!
TLDR: Hamstring opponents by having them spend all their money
There aren’t any auctions you need to bid on at the start, so it isn’t necessary to lay foundations for an unopposed auction. Also, there aren’t any completely useless businesses you can make your opponents buy. BUT… you can drain their initial cash reserves to get them off to a slower start.
Pause the game immediately at the start. (You can un-pause during the auctions, but pause again before leaving the bid window so no time passes.) There is no reason to progress past Jan 1st until all of your starting money is gone.
Then…
Start an auction for the Brewery in Montgomery. Raise once, then watch as your opponents bid against each other. They should drive the price up to $360k. Let them win.
Start an auction for the Brewery in Atlanta. Raise once. The opponent who didn’t win the last bid should raise to $511k. Let them win.
Start an auction for the Brewery in Charlotte. Don’t raise. One of your opponents should raise to $230k. Let them win.
Your opponents should now have spent as much as they are willing to spend on auctions. They will each have spent upwards of $500k on businesses that won’t get connected to anything for a long time. That should slow them down a bit!
The Initial Set-Up
TLDR: Build 4 lines: Meat to Baltimore. Baltimore to New York. New York to Albany. Logs to New York. Use passing sidings. Set up trains.
1. Build a small station at the cattle ranch near Baltimore (hereafter BLT). Try to get it as far up the slope to the west as you can. Build a small station on the east side of BLT, far enough back from the river so that you can get a switch in on flat ground. Build tracks between the two. You should get a line ~84 miles long with a maximum slope of 1%. Lay parallel tracks here; this connection is short enough and important enough to warrant it. Build a supply tower, put in switches, build maintenance sheds at both stations. Set 2 trains to run from cattle to BLT, minimum 8 cars.
Note: Play with the heights of your way-points to get lines as flat as you can. Steep grades are going to be particularly tough for these early locomotives. Don’t make it harder on them than it has to be.
Note 2: You will be building maintenance sheds at ALL stations. Why not? They’re free!
2. Delete the station in New York (hereafter NYC). Build a small station there. Build a 2nd small station in BLT. Run a line between the two. Follow the contours of the hill on the south end — it should run fairly close to the cattle line. Cross the river near NYC next to the steep hill. Leave space for a line from NYC to the wheat farm. You can get a ~175 mile line with a maximum grade of 1% for just over $290k. This is a long run, so use passing sidings. Make 5 passing sidings, with the center one being a longer one with a supply tower. Set signals and build maintenance sheds. Queue 4 automatic trains — 2 at either end of the line.
Note 3: Passing sidings should be ~18 miles long with one-way switches at either end. A passing siding with a supply tower should be ~30 miles long with the tower in the center. You want to avoid trains stopping for supplies on a single track section. On a line with passing sidings there should be one immediately adjacent to each station to give trains somewhere to wait for a free platform. Others should be spaced along the line as evenly as possible.
3. Now that your stations in BLT are set, build a Meat Industry there. Make sure it doesn’t block your station entrances.
Note 4: This is as far as Adekyn gets before he runs out of money, and it is already January 18th. With the game still paused, it’s still January 1st for you and you’re not finished your initial set-up yet!
Get your 2 bonds when you need them. ($240k + $260k)
4. Build a medium station in Albany (hereafter called ALB). Set it diagonally, as far back from the river as possible (to minimise grade to the bridge). Leave room for a second station that points up the hill toward the V in the contour lines. Build a medium station in NYC. Connect the 2 stations with a line. It should be ~95 miles, maximum grade 2%, costing $90k. Use passing sidings here as well. Only 3 will be needed; one with a supply tower. Queue 4 trains (2 from each direction). Set signals, etc.
5. Finally, build a small station at the logging camp near NYC. Connect it to the second platform of the medium station in NYC. Connect with a single line with a supply tower. Queue 1 train logging to NYC with 8 cars. One train will be sufficient here for most of the game.
Now you are finished your set-up and are ready to start. You should have ~$9k left. If you find yourself short of funds for the last line, don’t get the extra queued trains and get them first thing.
Establish and Expand
TLDR: Connect wheat, fruit, milk to a warehouse connected to NYC. Connect the warehouse to ALB. Connect vegetables to NYC.
The priority now is feed NYC. Never let NYC stop growing. Ever.
(This is an exaggeration. You will get 250k population just as you are starting to ship clothing. More population means more demand, though, and you can ship faster if there is demand.)
First off, get a few more trains running. BLT – NYC should have at least 6 trains. Cattle – BLT should have at least 3.
Note 5: As soon as NYC gets 60k population, build a museum there. This is critical for growth.
Build a small station at the Vegetables near NYC. Tie a line into your NYC – BLT line. Make sure the section from there to NYC is fully double tracked.
Next, work on getting wheat to NYC and to ALB to supply the Beer Industry. Set up your first warehouse. Build a regular warehouse connected to NYC next to the river just north of NYC. Set it to accept wheat, fruit, and milk. (Might as well just go into the window once, right?)
Build a small station near the wheat farm west of NYC. Run a line around the steep hill from the wheat to the warehouse. Remember, make it as flat as possible. Leave room for double tracks as you squeeze past NYC. Run passing sidings if you must to set things up, but switch as soon as possible to double track. This line is Very Important. 4 trains on this line should do it.
Build a small station in ALB and connect the 2nd platform of the warehouse to ALB. You have a bit of time while a surplus of wheat gets moved to the warehouse, but NYC gets unhappy when the beer supply dries up. Get it going ASAP. 3 trains here should be enough. We already have a line from ALB to NYC.
Look! We have more than 20 trains already 3+ years to spare for the golden check mark. And the Engineer has already saved us $480k. If you rush your research to the John Bull and upgrade your city-to-city locomotives, you should get your 5 express trains 4+ years ahead of schedule.
To keep NYC happy and growing, tie the fruit production across the river into a spare platform on your warehouse. (Expand it to large size.) One train is more than enough.
Next, tie the milk production into your wheat line. Run 2 trains.
Some of your production will get diverted from the warehouse to ALB. As long as NYC is happy, this is good. You want to keep ALB growing as well as you will want an industry slot there soon.
Once this has been done and sufficient supplies are getting to NYC, you are set to have that keep growing for a while. You can shift focus to the next priority.
Note 6: If there isn’t enough meat getting to NYC it may stop growing. Keep checking to make sure production is keeping up. As soon as it isn’t, upgrade your Meat Industry in BLT and make sure sufficient cattle are being delivered. More trains!
Cotton and Clothing (Part 1)
TLDR: Connect SYR to ALB, corn and cotton. Build a tailor in ALB. Build a weaving factory in SYR. Upgrade production.
Now NYC has enough to keep it happy… for now. It’s going to need clothing very soon, and you need to deliver it for your next task.
Start laying the ground work for a fabric / clothing chain from Syracuse (hereafter SYR) to ALB to NYC.
Expand a station in ALB and connect it to a medium station in SYR. Double track this. It is a critical connection. Connect the second platform of the station in SYR to the cotton industry nearby. This is a really short run. Double track it. It’s that important. Make sure the line is long enough to hold a train between the stations. Build another small station in SYR and connect to the corn nearby. We need an industry slot here, and it needs the extra resource to grow. Run some trains on the city-to-city line and corn line. Queue one (or more) on the cotton line. It won’t do anything until SYR needs cotton.
When you see ALB nearing 40k population, save up $500k to immediately build a tailor there. You do not want to leave this to chance and you want control of the upgrades.. Just do it. (You can renew a bond if you need quick cash.)
While you are waiting for SYR to grow to 40k, it is a good time to check your delivery network. Make sure you are producing enough beer and meat. Increase supplies and upgrade factories as needed. You can look at upgrading your city-to-city lines from passing sidings to full double track.
You should reach this point by December 1830. Quarterly profit will be around $650k. Around 19 active train lines will meet the $10k criteria. NYC will be just under 90k population.
As soon as SYR reaches 40k population, build a weaving factory. Make sure you have enough trains to keep moving the cotton / fabric / clothing. Except you won’t be delivering any clothing… yet. Production at your factory is so small it is just keeping up with demand in ALB. You need to upgrade the clothing supply chain. Put all of your money here until it is done.
Keep tabs on the amount of cotton and cloth stockpiled at SYR and ALB. If there is spare fabric at ALB, upgrade the factory there. If cloth is running low and there is surplus cotton, upgrade the factory in SYR.
Upgrade until you have 5+ clothing production and enough cloth to keep up. Don’t forget to renew your bonds for extra cash.
Cotton and Clothing (Part 2)
TLDR: Get a second clothing production chain going in Washington and BLT. Stockpile some fruit near Wilmington.
There will be times when the limiting factor in your clothing chain is the available cotton. Assuming you have 3 trains running that short loop there,and you have upgraded the station there to a large one for quicker loading times, that means you can turn your attention elsewhere for a few moments.
When you have one of these moments, build a small station in Washington (WAS). WAS needs to grow so that you can build another weaving factory there. But you’re going to be clever about it. You will eventually want a huge stockpile of sugar handy for making liquor, so build a warehouse south of WAS, set it to accept cotton, corn, sugar, and fruit. (Shades of what is ahead!) Connect it to the sugar plantation and get the sugar filling the warehouse.
That should be enough to keep WAS growing to 40k. If it isn’t, connect the warehouse to the corn to the south.
As soon as WAS hits 40k population, build a weaving factory there. Connect the warehouse to the cotton WAY to the south. This is a long run, but double track it anyway and run lots of trains.
Now lean HARD into this clothing chain, doing the same as you did with SYR / BLT. You will keep upgrading all of your weaving and tailors until you have 6.4 production across the board. (You can leave one of the tailors at 5.5… choose which-ever one has less of a steady supply.)
All of this upgrading is going to make you think twice about taking the Engineer. The snowball will be big enough by now to sustain the extra cost.
While this is going on, don’t forget to keep checking back on NYC to make sure it is still growing. Check meat and beer production. Check shipping to make sure all of it is getting to NYC. Upgrade any passing sidings to double track and make sure you have enough trains. (I failed the president’s medal once because over 40 loads of clothing got bottle-necked in ALB.)
In reality you will end up upgrading all of the weaving factories and tailors together in a mix. Keep tabs on supply and prioritize: 1. tailors with stockpiled fabric (cheapest first), 2. Weavers with stockpiled cotton (cheapest first).
One more thing you can do while we are waiting for the cotton supplies to catch up to our factories is to pave the way for fruit gathering. Find the fruit farm just south of Wilmington. One of your opponents will have a line running across just north of it. That may look like it blocks access, but a large station built between the line and the river will reach it. Build one and connect it to a warehouse a short ways away (like near — but not connected to — the wheat farm north of Wilmington). Set this up to start stockpiling fruit.
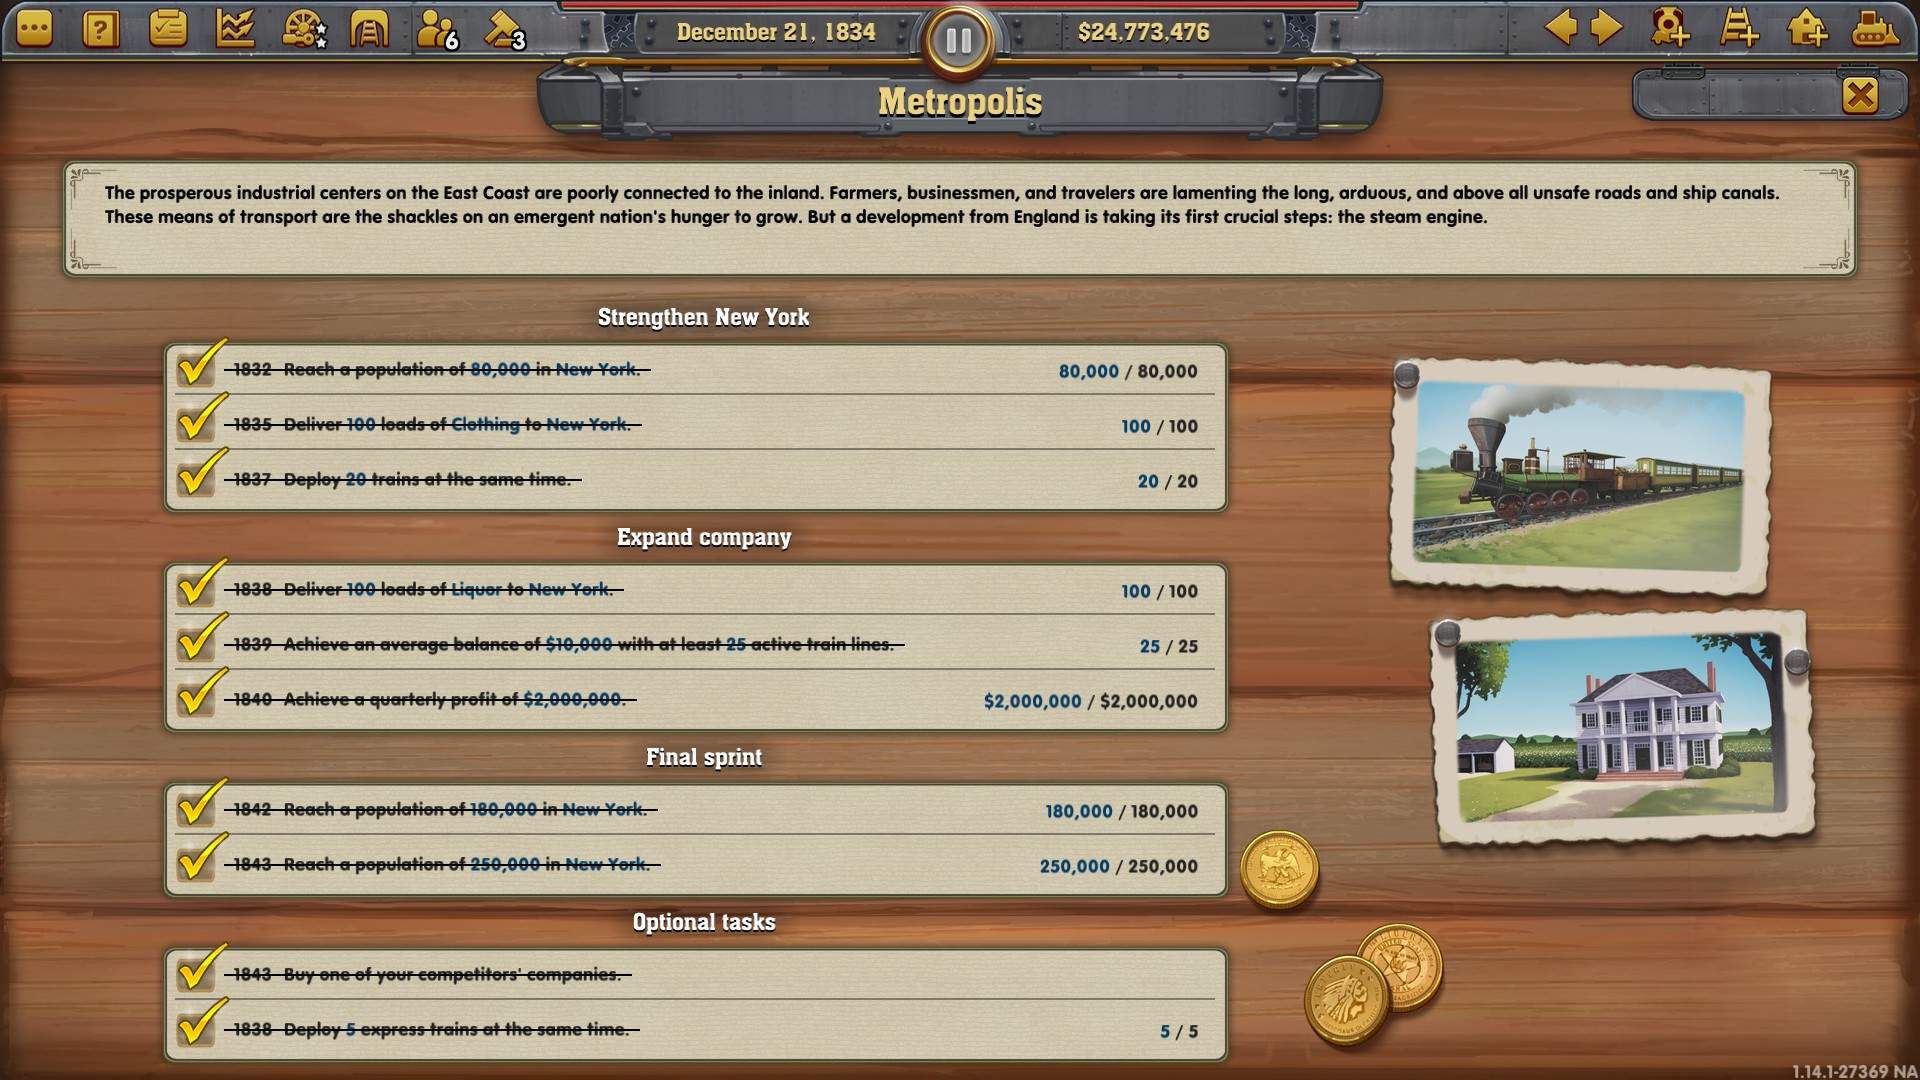
You can stop worrying about keeping NYC happy when you reach 250k population there. I did that in March 1832 when I had just delivered 13 loads of clothing to NYC… only 4 years ahead of schedule for the golden check mark.

Note 7: Contrary to what people might tell you, DON’T put museums anywhere except NYC with the possible exception of WAS. Increased population means increased demands, and we don’t want those demands to reduce shipments to NYC. We do want 90k population and a 3rd factory in both WAS and ALB, but we don’t want to hit this threshold until we are ready for it. They will grow naturally just with what we are supplying them.
When you reach the 6.4 (and 5.5) production mark, it is time to move on.
Distilleries for Everyone!
TLDR: set up a distillery in WAS. Supply it with sugar and fruit from the south. Upgrade. Set up a second distillery in ALB. Supply it with fruit (nearby) and sugar from the west. Upgrade.
You now have in place what you need to get the golden check mark for cotton deliveries. Let that run in the background and move on to liquor.
Connect the fruit warehouse to your warehouse near WAS. Set trains to run 8 cars minimum from fruit to WAS, and 0 cars maximum from WAS to fruit. You want this to be a one-way transfer.
WAS should hit — or will soon hit — 90k population and have an industry slot ready for a distillery. Since you want this now, if WAS isn’t near 90k population, save up some money and replace the dairy there. This would be expensive, so you really don’t want to do that unless it is absolutely necessary. One way or another, build a distillery in WAS.
Once that is set up, build another warehouse near, but not connected to the cattle north of BLT and connect it to a station in WAS. Start stockpiling liquor there. It is slightly cheaper to do this than to run a full line to NYC. There is more factory upgrading to do, so prioritize expenses. The important thing is to get the liquor out of WAS before the population has a chance to drink it. Remember to go back to connect it to NYC before it overflows!
Lean HARD into upgrading the distillery. We want an eventual production of 5.5 per week.
When supplies run low (and they will) switch to setting up a second distillery until the AI upgrades the resource production.
The second distillery will be in ALB. It already ships to NYC and should have, or be close to having, 90k population. Build a distillery there. Connect it to sugar. The nearest source is WAY far to the west, near Buffalo. It’s a long way, so run double track and lots of trains. ALB will have a small stockpile of fruit just from being near the orchard. Connect the station at the fruit along the side of the cliff into ALB. Keep upgrading the distillery to keep ahead of incoming supplies. 5.5 units per week is the target here, too.
Coast to Victory
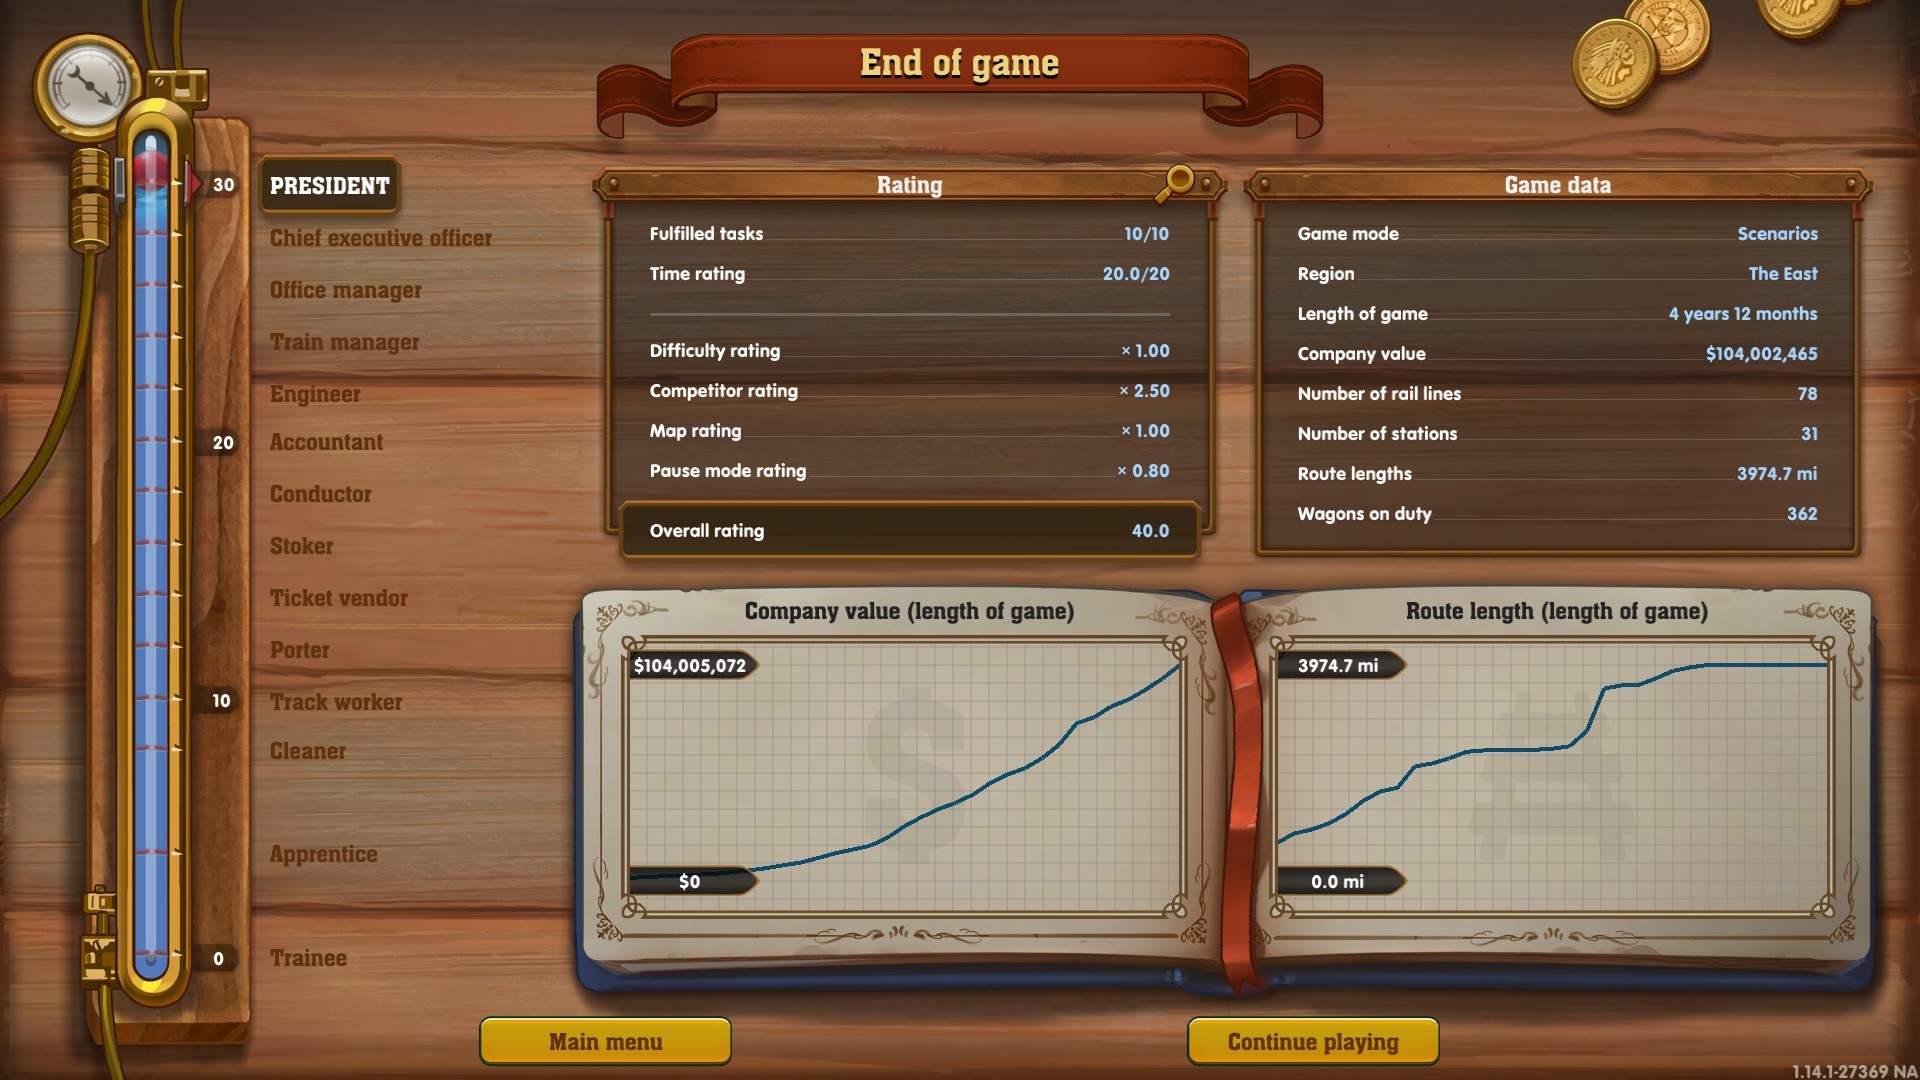
At some point, about when you reach the end stage of your distillery upgrades, you will get the Game Over message. You should have everything with a golden check mark except the optional task of taking over one of your competitors. The resulting task score of 18 will, with multipliers, give you 36 points and a president’s medal. But is that enough? No! We want all the golden check marks.
If you want all the golden check marks, click “Continue playing” and then do… nothing. Let the money roll in. Renew bonds when possible. Buy shares. After another year of game time you will have bought out the cheapest of the 2 opponents. Press escape and select “Rating” to recount the score.
Be the first to comment