Contents
Background
All credit goes to Lking 2002!
Success as the Union can range from extremely difficult, to moderate. This is all dependent upon the leadership by both the Confederates, and the Union forces.
When skirmishes were first released, it was nearly impossible of a map for the Union to win on. Typically the Confederates would simply form a battle line on the other side of the bridge, unscathed by fire from across the bridge. Any charges from the Union were typically met with a beautiful volley of rifle fire from the Confederates, leading devastating losses, and barely a scratch on the Confederates.
As time progressed, and the Union just about never won, the developers increased the odds of the Union succeeded. The out of bounds for the Confederates was moved back to the small ridge on their side, allowing more room for the Union troops to get across.
Advantages and Disadvantages
This section will be going over the different advantages and disadvantages of the map’s terrain for the Union forces.
Disadvantages:
- Confederates fores hold the high ground, allowing for them to lay heavy sniper fire down on the Union forces.
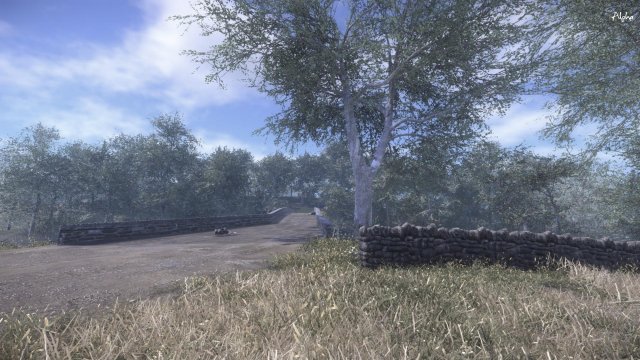
- The only way across the river to get to the capture point is a single bridge, essentially bottleknecking Union forces.
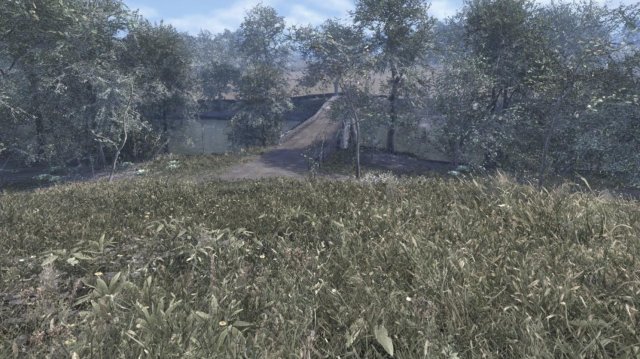
- There is little to no cover directly infront of the Bridge on the Confederate side except for a small ridge.
Advantages:
- There is a stone fence on the Union side, protecting the forces from sniper fire if they stay crouched behind it.
- On the Confederate side of the bridge, there are embankments on either side. These embankments are covered in brush and trees, along with are low enough to protect from incoming Confederate fire.
Know Your Oponent
Before we can get into the Union tactics, we must understand the different tactics employed by the opponent.
Line Approach:
In this approach, the Confederate forces typically form a line on their ridge, ready to massacre any crossing Union forces. Some soldiers in the line will snipe at the opposing forces, whereas the rest in the line will hold fire until the main Union body crosses. This is particularly devastating to the mass charge, and I will give you a warning now to never charge a massive force across that bridge with a Confederate line.
Skirmish Approach:
This is the most basic, and typically the most common approach used in the game in general. This formation is best shown by spread out Confederate forces, using trees and and brush as cover. They will typically pop out of the trees to shoot, then return to reload. This is used in usually small servers with little amount of people, or no dedicated leadership on the Confederate’s side. Sometimes in this tactic, the Confederates are not even behind cover, and some will just sit in the wide open firing, this dependent upon posistion of course.
Skirmish Line Approach:
Similar to the regular line, this is essentially a line, just the soldiers spread out instead of shoulder to shoulder. Despite the similarities, this formation can lead to quite the different impact on both sides of the conflict. In the skirmish line approach, typically the volleys are more lousy and less synchronized, along with orders are less easily passed down the line. This can lead to some confusion among the forces, in which an experienced Union officer can exploit with some difficulties.
Combating Your Opponent’s Tactics
This will specifically state how to directly combat the Confederate tactics described in the last section. The next section will actually discuss tactics on how to conduct the battle, and pave the way for a victory.
Line Approach:
The first thing to do, is to try to get your more experienced sharpshooters to a flank, or at least an area in which there is a direct line of sight upon the line. The objective is to use these sharpshooters to inflict enough casualties to the opponent’s line, so-as they will either pull back or retreat. Typical areas for the sharpshooters to be are the flanks on your side of the embankment, where there is enough line of sight to lay down the fire upon the opponent.
Skirmish Approach:
Once again, this countering of the opponent will utilize experienced sharpshooters, though also basic line infantry. The first step is to place sharpshooters on the flanks, in positions where they both have a line of sight, though can drop back into concealment so-as they can not be sighted. Next is to place your line infantry behind the stone wall on the Union side of the embankment. Essentially, the men will be ordered to fire a shot every so often at a tree, or a hill in which an opponent is believed to be spotted at. The objective is to draw some fire from the skirmishers on the Confederate’s side, so that the Union sharpshooters can spot patterns of opponent’s fire, and return it.
Skirmish Line Approach:
Since the Confederates are spread out, not all of the soldiers will be concealed, leaving some in the open. This will allow your designated sharpshooters to wreak havoc on their line and soldiers who are typically exposed. The regular line infantry can also be used in this instance if they have clear lines of sight from their heavy cover.
Tactics to Victory
All that has been discussed so far is the terrain, Confederate tactics, and some ways to combat them. Now we will get into tactics that can be used in certain situations, though not all. These tactics are also based upon the belief that the opponent has been countered as described in the previous section, or is simply in skirmish posistion on their hill.
*These tactics I will describe are merely suggestions, and will always need to be altered depending upon the situation.
First thing is first, to get the forces to the bridge itself. When first spawning in, and forming up, Union forces are to be brought to the stone fence on your side of the bridge. This is a great regrouping point after your forces spawn in, and is where officers can quickly assess their situation. There are a few different charges across the bridge that are suggested to utilize.
1. The Mass Charge:
Despite belief, this is to not be a disorganized effort, but an organized and highly effective tactic when used. This is typically used when your forces outnumber those of the opponent, or in servers with smaller amounts of people.
The charge is quite simple, but effective in the heat of combat. Firstly, before the actual charge is undertaken, the infantry are to have their bayonets on, and their rifles loaded. The bayonets will give them an advantage in melee combat against the Confederate defenders, who typically dislike having bayonets. The shot in the rifle will give the soldiers the advantage in close engagements, so-as they have a shot to take out Confederates at moderate range.
Once the soldiers are readied at either the stone fence, or the bridge fence, the charge will be executed all at once. The soldiers will rise up, and charge across the bridge, sprinting so that they are harder to hit. Along with sprinting, it is suggested that the men move in a type of zig-zag, or serpentine pattern, weaving back and forth, though still moving forwards. Once across the bridge, the forces will form up below the small ridge on the Confederate side, or the fence to the right of the ridge.
What to do next is dictated by the situation. If the Confederates fired most of their shots as your forces were crossing, then charge straight up the center with the men in melee mode. The objective is to catch the Confederates either reloading, or at the least without their bayonets fixed.
Before the charge, I suggest two ideas that can improve your odds of success. The first of which is to use the experienced sharpshooters to your advantage. Essentially, they will be kept on the Union side of the bridge to lay down fire on Confederates popping out of cover. This can reduce the Confederate forces that are holding the ridge, and let the regular infantry have an easier time. If the regular infantry have taken the hill, then the skirmishers are advised to advance and meet the entire Union force.
2. A Couple At A Time
Somewhat self explanatory, this tactic used correcty can deal a significant blow to the opposing faction of the Confederates. This is to be used when there a decent amount of people in the server, or the Confederates are using line tactics. In this tactic, the Union soldiers will cross the bridge either in pairs or by themselves. The soldiers are to zig-zag across the bridge until they get to the other side. Once they are across, they are to get onto the sides of the bridges on the embankment. What happens then can differ dependment upon the various situations that occur involving the Confederates.
A prefered tactic is to go all the way to the flanks of the embankments, and then move up them. A coordinated assault on both flanks at the same time can lead to a pinning down of the Confederate forces, and their ultimate destruction.
After Capturing the Hill:
The next step in success on this map is to capture the actual point itself, and hold it against the enslaught of the Confederates respawning and reinforcing the point. First this is first, track down and kill any surviving Confederates from after your first assault.
Once those are dealt with, defenses are to be set up on the point, along with near it. Multiple soldiers should be placed on the rocks around the capture point, facing both the front, and the flanks. Along with that, men should be placed on some of the trees around the rocks, facing the Confederate’s spawn.
Finally, men should be placed directly infront of the capture point on the fence line, once again, facing the Confederate spawn. Once the capture point is being held, it is almost certain that your forces have taken casualities, ranging from a few men, to more then half the men. Meaning, that if you are killed and respawn, make sure you quickly load your rifle, fix your bayonet, and head straight to the point to reinforce your comrades.
What Not to Do
This is a brief section based upon some of my experiences on the map, and different combat situations that occured.
Do Not Be A Cinematic Officer
This is my own term that I made up while playing this game. The Cinematic Officer, is an officer who is typically more focused on beautiful looking formations or perfect volleys then combat efficiency. My issue with these officers are that they are more focused on their formations then sucess in battle, or the lives of their men.
In this map, there are a few formations and other things that I have observed which I believe are outright idiotic or stupid. These are typically undertaken by the cinematic officer, or other offiicers similar.
1. Firing Volleys From the Stone Fence
Some officers enjoy having their men lay down volleys on the oponent from the stone fence on the Union side. The issue with this is that when officers do this, they believe it will pin opponent forces down, or make the duck for cover. This is completely false, and a waste of good bullets.
The only situation that I could see this as feasible, would be if there is a chance of hitting large amounts of enemies at once. I am essentially saying that this tactic is useless, unless the Confederates have formed a visible line in which casualities could be inflicted.
2. Forming A Line On the Bridge Before a Charge
I have seen this a few times throughout battles on the bridge. The problem with forming up like this, is that it leads to two consequences. The first of which, is that the men are highly exposed by incoming sniper fire from the Confederates. This can lead to massive casualites before the Union forces even cross the bridge.
The second consequence, is that it reveals the intentions of the Union forces to the opponent. This can allow the Confederates to prepare for the impending assault, and maybe obliterate crossing forces.
3. Marching Across The Bridge
Luckily, I have not been witness to any assaults as such, and I have put this in just to make anyone thinking of doing such to think again. This would be defined by typically collumns marching across the bridge at the quick time or double quick.
I will state once again, I have not witnessed this personally, but nobody should ever attempt this, or all your forces will be massacred within a few seconds.


Be the first to comment