
This guide describes how to earn all of Natucket’s achievements.
Story Achievements
All credit goes to Tysserr!
First Trails
Complete the “Finding the Rachel” quest
The above-mentioned quest is the second main mission of the game and it can be very tough if you haven’t the right crew or if you level up too much before completing it. I recommend completing this mission at level 4-6 by following the next steps:
First, hire a level ≥ 5 Field Doctor and then make sure that you also have a Sailor and a Hunter on your crew. Once your crew is assembled, explore the map until you find the spot where the Rachel is, but be careful not to activate the mission by accidentally sailing too close to the mission icon.
Now that you have the appropriate crew and know where the mission will take place, you’ll need to acquire a surplus of 5 food barrels, which can be done either by hunting some whales or by buying them at the nearest city.
Once you have the required bait, navigate to a point near the mission’s location and save. Next, start the mission and pick the special option regarding using food barrels as distraction; if you’re successful, just read the paragraphs below, but if you aren’t just reload your savefile and try again until you manage to divert the sharks attention. If you’re playing on seadog mode, you’ll have to retreat and try again if you don’t manage to distract the sharks, but if you do so you’ll need to acquire 5 barrels of food again.
Lastly, you’ll only need to survive 6 rounds against an endless wave of sharks. Having a Field Doctor on your whaleboat will increase your chances of survival by a lot, as all Bleeding damage will be denied, thus preventing adullt sharks from using their fearsome Blood Frenzy skill.
During the combat encounter just kill as many adult sharks as possible, only pausing for healing or protecting your crew members if they’re in mortal danger, and the mission wil be over before you know it.
Haida Knowledge
Complete the “Blind Secrets” quest
The above-mentioned quest is the sixth main mission of the game and can be completed by either being friendly or belligerent. Behaving peacefully will require you to have a level ≥ 3 Scientist on your crew whereas acting aggressively won’t require anything of you, but if you choose to behave that way you’ll be forced to beat a canoe encounter.
First of all, you’ll need to find the mission’s location, which is situated on the northwestern end of the Gulf of California. Once you arrive there, pick the set of choices regrading the scarlet fever if you want to be friendly or just be a prick to the natives. Regardless of your choice, you’ll be directed to a new location.
Once you arrive at the next native encampment, you’ll be able to pick a special option regarding helping the sick natives if you acted friendly or you’ll have to fight against a group of natives if you acted belligerently. Regardless of how the next events play out, you’ll complete the mission.
Redemption
Kill Moby D-i-c-k
This boss is fought in the last main mission of the game.
Exploration Achievements
Navigate 21.600 nautical miles
This will undoubtedly be one of the first achievements you’ll earn. After navigating for a few in-game months it will pop up naturally.
Busy Bee
Visit all the cities
Pretty self-explanatory and easy to earn. You’ll get this achievement once you have docked in the Nantucket, Horta, Peterhead, Imbituba, Cape Town, Korokareka and Honolulu cities at least once.
Builder
Create 5 safe docks
This achievement is really easy to get because it’s cumulative, meaning that you don’t need to create 5 safedocks in a single savefile: you can just create one safe dock, reload your save, create another one and so on until you earn this achievement.
Creating safe docks requires two things: having a level ≥ 5 Helmsman and 30 wood barrels per safe dock. As soon as your captain has enough prestige to hire said crew member, do so and then buy as many wood barrels as possible. Next, save near a mainland location and build as many safe docks as possible, then reload your save and repeat the process as many times as necessary to earn the achievement.
Tracker
Track back 10 lost ships
Another self-explanatory achievement: you’ll just need to complete ten tracking jobs, which are listed as Unveil the X’s destiny on the newspaper.
Once you accept a tracking job, a dotted line between the city where the ship departed and the city where it was headed will appear and you’ll find it somewhere in that route. As soon as you find it, one of two things will happen:
- The ship will be under attack. In this case you can either defend it, which will trigger a war canoe, pirate, shark or whale encounter, or use your special hunting skill in order to try to fend off the enemies attacking the ship, but do note that if you fail at that the lost ship’s crew will be massacred.
- The ship will already be deserted and you’ll be able to either board the ship in order to look for money or barrels, but in that case you’ll always run a 10% risk to lose a crew member, or look for survivors around the missing ship’s area.
Also, there will always be a third option, fleeing the area, but I don’t recommend picking it because your captain’s prestige will be reduced in 1.
New jobs appear every month on the newspapers of Nantucket, Horta, Peterhead and Honolulu, so visit said cities on a monthly basis until you’ve accepted and completed enough tracking jobs to earn the achievement.
Delivery Boy
Complete 10 delivery quests
Yet another self-explanatory achievement; you’ll just need to complete ten delivery jobs, which are listed as Deliver goods in X on the newspaper.
Once you accept a delivery job, a dotted line between the city where you shipped the goods and the city where you’ll need to deliver them will appear. As soon as you get close to the destination’s town, sail near it until an event regarding delivering the goods pops up.
New jobs appear every month on the newspapers of Nantucket, Horta, Peterhead and Honolulu, so visit said cities on a monthly basis until you’ve accepted and completed enough delivery jobs to earn the achievement.
Explorers’ Legacy
Complete all the side quests
There are four side quests and all of them are divided in 4 parts:
Kahekili II:
- Quest 1: this quest is located in the Kauai island, right next to Honolulu. Once you activate the event, it will activate quest 2.
- Quest 2: this quest can be completed just by talking to Kahekili’s descendant, but if you have a level ≥ 7 Craftsman you’ll be able to break into his office and either loot it (it will net your captain the Greedy trait) or just look for information regarding the spear (it will net your captain the Diligent trait). Regardless of your choice, the next quest will be unlocked.
- Quest 3: this quest can be completed by either bribing an official with $300 or 5 grog barrels or by having ≥ 70 prestige, which will grant you an audience with Brazil’s emperor. No matter how you get to chat with the emperor, the next quest will be unlocked.
- Quest 4: this last quest will consist of a fight against a legendary southern right whale called O Inquieto Du.
The Northwest Passage:
- Quest 1: this quest is located in London, south of Peterhead, so head there to activate the next quest.
- Quest 2: this next quest can be completed by either offering some natives 20 food barrels, which can be obtained by hunting bowhead whales nearby, or by beating a canoe encounter. Regardless of your choice, the next quest will be unlocked.
- Quest 3: the last quest will be unlocked as soon as you get to this quest’s location.
- Quest 4: this last quest will be completed as soon as you get to its location, which is in Hudson’s Bay.
Bass:
- Quest 1: this quest is located in Chile, by the Tropic of Capricorn, meaning that is almost in a paralel line with Imbituba. Once you get there, the next quest will be unlocked.
- Quest 2: in order to learn where the next quest is situated, you’ll have to either bribe or intimidate a man (requires the Strong trait).
- Quest 3: completing this quest will require you to beat at least one guard encounter, which is similar to a pirate encounter, except for the enemies having a different unique ability than pirates.
Once you defeat the first wave of enemies, you can either just run away to unlock the last quest or you can stay and fight another wave of enemies, but doing this won’t award you anything special, just the usual loot you would obtain from beating a regular pirate encounter. - Quest 4: this last quest will be completed as soon as you get to the its location, which is in one of Bass Islands.
Cook:
- Quest 1: this quest is located in the frontier between Mozambique and Tanzania, northeast of Cape Town. As soon as you get to its location, an event will pop up, but regardless of your choice the next quest will be unlocked, so pick the option that suits you best.
- Quest 2: this quest is located in the Island of Hawai, south of Honolulu. As soon as you get there, the next quest will be unlocked.
- Quest 3: unlocking the last quest will require you to either bribe or intimidate a man (requires the Strong trait).
- Quest 4: in order to complete this last quest you’ll need to beat a pirate encounter that will feature a pirate captain called Gil el Tahúr.
Master Of Migrations
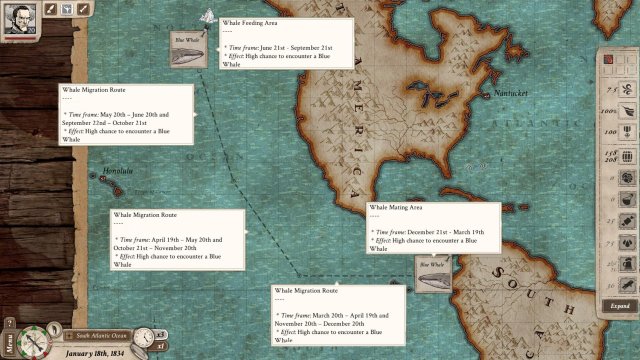
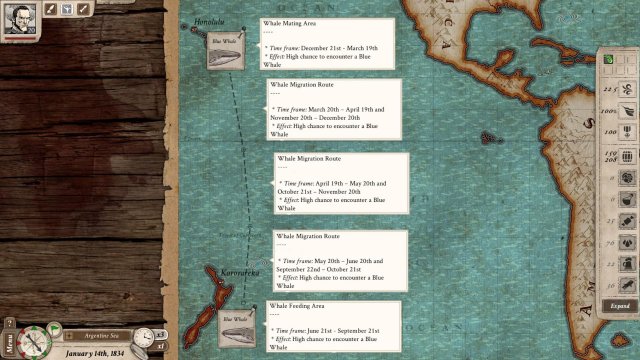
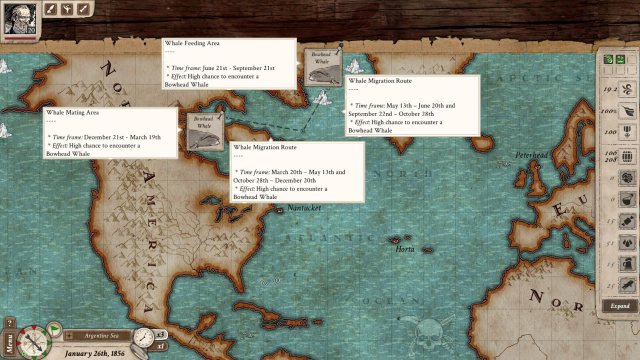
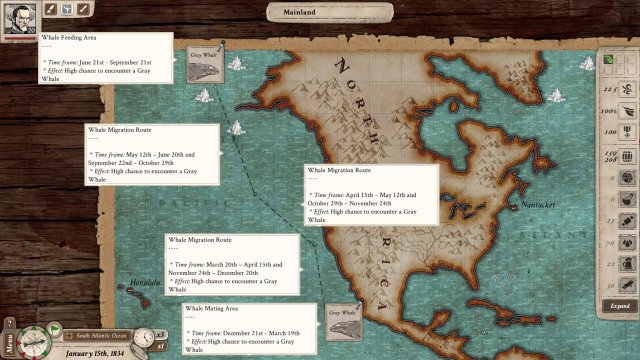
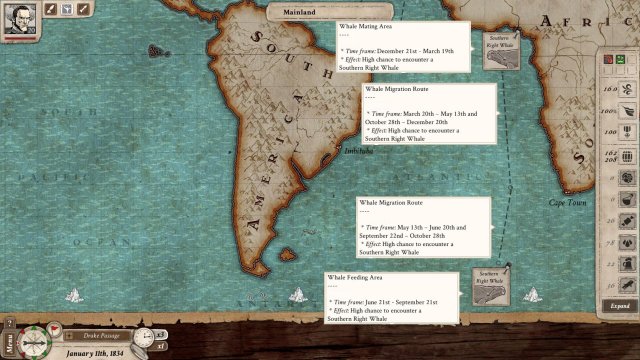
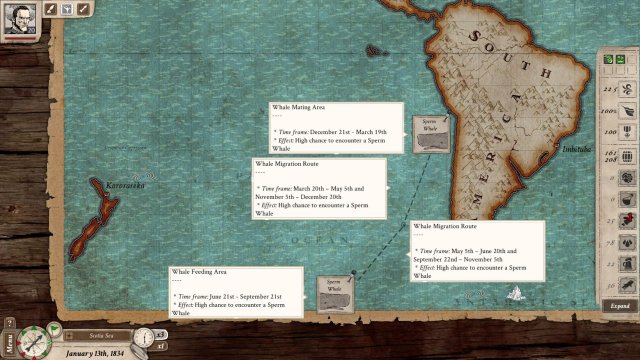
Discover all the whaling areas and routes
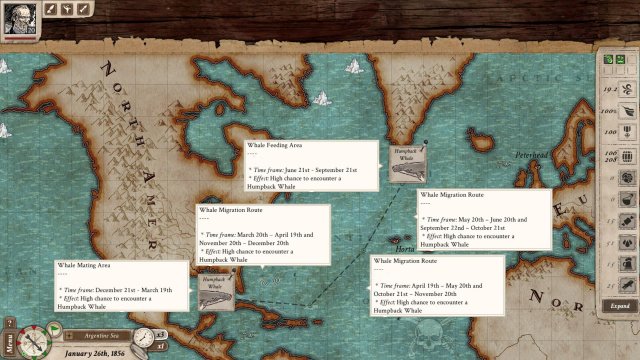
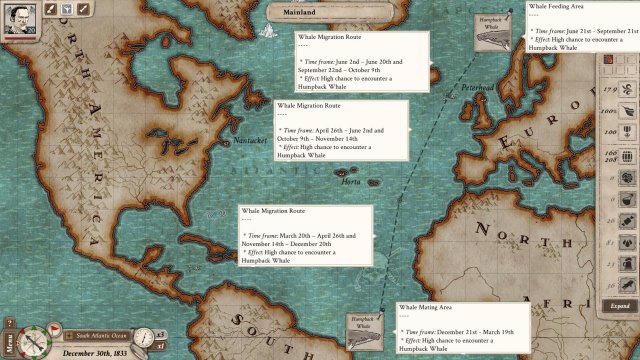
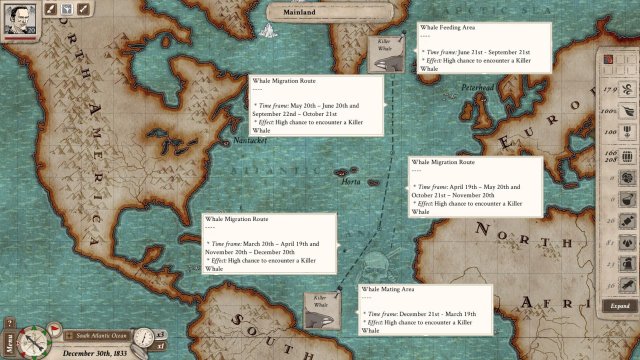
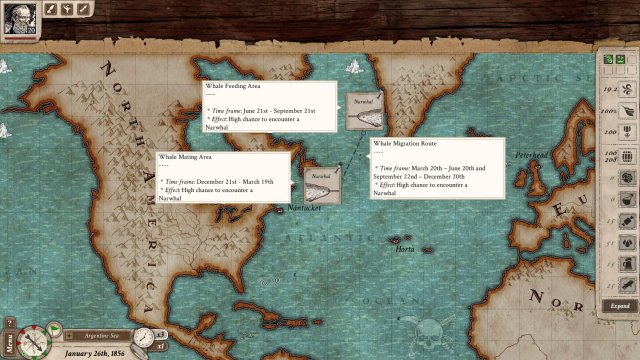
Migration routes are specific map spots where you’ll be able to hunt whales during certain times of the year.
First of all, I recommend completing The Northwest Passage side quest in order to equip your lookout with the Knight’s Hunting Guide special object. Once you do so, your barrelman will be able to spot any whaling areas and migration routes if the ship is near them when they’re active.
There is a total of 12 migration routes and you can see all of them, including the times of the year when they’re active:
Blue Whale
Bowhead Whale
Gray Whale
Humpback Whale
Killer Whale
Narwhal
Southern Right Whale
Sperm Whale
Crew Achievements
Commander
Reach level 5
Impossible to miss. During the early game I recommend farming levels by hunting narwhals, humpback whales and bowhead whales because they’re the weakest species of the game, plus their migration routes are close to the starting area.
Captain
Reach level 10
See the Admiral achievement description for more details.
Commodore
Reach level 15
See the Admiral achievement description for more details.
Admiral
Reach level 20
This achievement will surely require you to farm levels and the best way to do so is by hunting blue whales. I recommend waiting until you have unlocked the last mission of the game to start farming levels, as this will prevent you from wasting the exp gains that the main missions award.
Learning Path
Take a cabin boy up to level 10
Pretty self- explanatory. I recommend either hiring a cabin boy at the beginning of the game in order to turn him into an Oil Master or hiring a cabin boy with the Healthy trait during the late game and turn him into an Harpooner while you do the necessary farming to get the Admiral achievement. If you pick this last option, you’ll need to prioritize protecting your cabin boy until he gains enough levels to withstand enemy attacks without dying.
Quarantine
Enter a city with 3 or more sick men in your crew
I recommend earning this achievement during the early game. First, create a separate save file and then stock your ship with as many food, water and grog barrels as possible. Next, exit the city where you bought the supplies, drop the anchor and let the days pass.
Eventually, an event regarding the possibility of one of your crew members contracting a disease will pop up, so once that happens pick the option that has a chance of afflicting your crew members with a malady. As soon as one of your crew members gets sick, just wait some more days and several events regarding the spread of the disease will pop up, so, once 3 crew members (not including your captain) get sick, enter the city you’ll be next to and you’ll get the achievement.
Love Boat
Have at least 5 crew members with the “Sodomite” trait on your ship
This achievement is quite easy to earn, but it doing so takes a long time. The only way to grant crew members the Sodomite trait is by turning your captain into a Sodomite as well. In order to achieve this, you’ll first need to complete a personal quest for a crew member to grant him the Grateful trait. Do note that completing personal quests that involve finding a treasure will not grant the Grateful trait to your crew members.
Once you have one or more crew members with the Grateful trait on your ship, an event involving a Grateful crew member wanting to express his gratitude to your captain in a physical way will pop up, so accept said offer and both the Grateful crew member and your Captain will be granted the Sodomite trait. Repeat this process with an additional 4 crew members and you’ll get the achievement.
Full Optional
Level all the ship compartments up to their maximum
This is another easy, time-consuming achievement. You can only order ship upgrades at Nantucket, Peterhead and Honolulu, so I recommend ordering important ship upgrades at Nantucket and Peterhead and trivial ones at Honolulu in order to manage your time more efficiently.
There are 5 ship compartments that will require you to hire specialized crew members in order to upgrade them:
- Captain’s Cabin: requires having a level ≥ 5 Harbormaster on your crew.
- Try-Works: requires having a level ≥ 5 Oil Master on your crew.
- Caboose: requires having a level ≥ 5 Cook on your crew.
- Sick Bay: requires having a level ≥ 5 Medic on your crew.
- Cannon: requires having a level ≥ 5 Man-at Arms on your crew.
Once you have ordered any of the above-mentioned level 5 upgrades, you’ll be able to fire the specialized crew member needed to order it, but I recommend always keeping an Oil Master and a Cook on your crew, as their passive abilities grant great bonuses to your income and crew health and morale respectively.
Hunting Achievements
First Blood
Hunt your first whale
Self-explanatory and impossible to miss.
Sea Of Blood
Hunt 100 whales
I think that this achievement is nearly impossible to miss, as you’ll need to hunt quite a hefty amount of whales in order to level up your crew and earn money, but in case you miss it somehow just sail to a whale migration route and start hunting whales until you get this achievement.
Check List
Hunt every type of sea creature
Nantucket features 8 whale species and 1 shark species, so once you’ve killed at least one member of said species you’ll get this achievement.
Big Hunt
Kill a legendary creature
Legendary creatures are powerful whales that have been nicknamed by sailors, just like Moby D. Every now and then, jobs regarding the hunt of a legendary creature will appear on newspapers, so, in order to get this achievement, you’ll need to complete one of said quests.
Legendary creature hunt jobs are divided in 3 types depending on their level requirement: level 5 jobs, level 7 jobs and level 9 jobs. Said level requirements must be met by your captain, not by one of your crew members.
New jobs appear every month on the newspapers of Nantucket, Horta, Peterhead and Honolulu, so, once your captain is at level ≥ 5, visit said cities on a monthly basis until a job regarding the hunt of a legendary creature pops up.
No Quarter
Repel a pirate board
Your crew can engage in pirate encounters every time they run into a pirate ship, which are found patroling pirate areas on the nautical chart. Pirate areas are zones that appear near the Equator which are marked by a skull and crossbones icon.
Every time your ship runs into a pirate ship you’ll be presented with 3 choices: repel it using your ship’s cannons, pay $200 to the pirate ship’s captain or engage in a fight with the pirates. In order to earn this achievement, you’ll need to choose the third option (or fail when picking the first one) and win the ensuing fight.
Instant Justice
Kill an enemy just after he killed one of your man
The easiest way to get this achievement is during a sea creature encounter, but I recommend saving on a separate file before trying to earn it for obvious reasons.
Once you’re ready to try to get this achievement, engage in a sea creature encounter and kill all sea creatures except for one, which you’ll need to wear down until it’s a strike away from dying. As soon as the combat reaches this point, just let rounds pass without doing anything until the remaining sea creature kills one or more of your men. This will be your cue to retaliate and earn the achievement.
Money Maker
Amass $10.000
This achievement is not cumulative, meaning that you will need to have $10.000 on you in order to earn it. This is quite easy to achieve if you have fully upgraded the Captain’s Cabin and Try-Works ship compartments, as this will increase your earnings by a lot.
Once you’ve upgraded your ship that way, don’t forget to place a level 9 Oil Master on the Try-Works compartment. as this will maximize the amount of oil yielded from blubber, and then farm some blue whales until you reach the required $ quantity to earn the achievement.




Be the first to comment