
Guide for the current Avalaible Scenarios.
Other World of Warships Guides:
- Tips for New Players.
- How to Enable Training Rooms.
- Specializing, Advanced Basic Techniques.
- Useful Settings.
- How to Hide Interface (UI).
Contents
- The Basics – Who, What, Where?
- Your Task Force Part 1: Tier VI and VII Ships Ranked
- Your Task Force Part 2: Tier VI
- Your Task Force Part 3: Tier VII
- Your Adversaries: The Behaviours of the AI
- Defense of Naval Station Newport (Tier VI)
- Operation Aegis (Tier VI)
- Operation: Killer Whale (Tier VI)
- Operation: Raptor Rescue (Tier VI)
- Ultimate Frontier (Tier VII)
The Basics – Who, What, Where?
All credit goes to Supergramps!
Scenarios is a PvE Co-op gamemode that puts 7 tier VI or VII ships in a map where the task force must complete a series of objectives, which include primary and secondary objectives to achieve victory. Scenarios have pretty nice rewards, which include signal flags, economic camouflages, 10 point commanders for certain nations, 24 hours of premium account, supercontainters, and doubloons. On top of that, if you run economic camouflage, signal flags, and first victory XP bonuses, you can potentially reap quite a fair bit of XP and free XP if all primary and secondary objectives are completed.
Your team and sometimes AI allies will be spawned with freindly fire off to prevent teamkilling and griefing and will generally be filled in on what to do by a commander. Your primary objectives and secondary objectives must be completed as you go along the mission. Enemy forces will be controlled by advanced AI combatants, who use ships from tier III-IX, more about the AI later. Failing your primary objective(s) or if your task force is destroyed, will result in a mission failure, and you will get no rewards and the only XP you will get is from the damage you dealt.
Your Task Force Part 1: Tier VI and VII Ships Ranked
Your task force consists of 7 ships of tier VI or tier VII ships, which each have their own strengths for this gamemode, but ultimatly, some excell while others fall short of their capability in this gamemode, most of which can be blamed on the AI’s behaviour. Still, that dosen’t mean that some ships should not be played in scenarios, but rather playing certain ships can cause you to have a harder time staying alive or doing damage. I will go over the reccommended ship compostion for each scenario. With out further ado, here’s the list of ships that can be used currently at tier VI and VII sceneraios ranked from most recommended to least, with consumables and flexability being the biggest reasons for my choices.
DDs (Tier VI):
- Ernst Gaede (KM)
- Farragut (USN)
- Aigle (MN)Reward
- Anshan (PA)$
- Fushun (PA)
- Gnevny (VMF)
- Gallant (RN)$
- Shinonome (IJN)Reward
- Hatsuharu (IJN)
- Fubuki (IJN)
CL/CAs (Tier VI):
- Cleveland* (USN)
- Budyonny (VMF)
- Graf Spee (KM)$
- Molotov (VMF)$
- Aoba (IJN)
- Nurnberg (KM)/Admiral Markov (VMF)$
- Gallisionare (MN)
- Duca d’ Aosta (RM)$
- De Grasse (MN)$
- Perth (CW)$
- Huanghae (PA)$
- Leander (RN)
*- Soon to be replaced by the Dallas and downtiered Pensacola
BBs (Tier VI):
- Queen Elizabeth (RN)
- Bayern (IGN/KM)
- New Mexico (USN)
- Arizona (USN)$
- Warpsrite (RN)$
- Fusō (IJN)
- Mutsu (IJN)$
- Normandie (MN)
- Dunkerque (MN)$
CVs (Tier VI):
- Ryūjō (IJN)
- Independence (USN)
DDs (Tier VII):
- Leberecht Maass (KM)
- Sims (USN)$
- Mahan (USN)
- Gadjah Mada (PA)
- Leningrad (VMF)$
- Minsk (VMF)
- Błyskawica (PMW)$
- Akatsuki (IJN)
- Shiratsuyu (IJN)
CL/CAs (Tier VII):
- Myōkō (IJN)
- Yorck (KM)
- Indianapolis (USN)$
- Algérie (MN)
- Duca degli Abruzzi (RM)$
- Belfast (RN)N/A
- Atlanta (USN)$
- Shchors (VMF)
- Pensacola* (USN)
- Fiji (RN)
*- Soon to be downtiered and replaced by the New Orleans and Helena
BBs (Tier VII):
- King George V/Duke of York (RN)
- Gneisenau (KM)
- Scharnhorst (KM)
- Lyon (MN)
- Colorado (USN)
- Nagato (IJN)
- Ashitaka (IJN)$
- Nelson (RN)
CVs (Tier VII):
- Kaga (IJN)$
- Hiryu (IJN)
- Ranger (USN)
Your Task Force Part 2: Tier VI
Now as for explaining my choices:
Tier VI DDs:
The AI is has exceptional torpedo dodging reaction times, as my theory is that the moment the torpedo can be detected, they will instantly react to said torpedo. So, exploting this and minimizing the time that a ship can react to a torpedo is to use the torpedo with the lowest detection range. That said, Pan-Asain destroyers with their deep water torpedoes are great for doing damage, but do not have any consumables that allow them to be very versitale and in most instances, AI attack from bow on, so there wil be few instances in where you can get a nice broadside unless you time it just right. Besides the PA destroyers, Gaede is a great destroyer that can hold her own with her 150mm guns, and her torpedoes are moderatly stealthy, this all tied together with german hydro makes her the best all-rounder for her tier. Farragut, Aigle, and Gnevny are gunboats, plain and simple: realiance on guns and drawing fire is more important for destroyers in scenarios. That said, the Gallant, Shinonome, Fubuki, and Hatsuharu are torpedo boats of their tier, and are the least reccommended since IJN torps have a whopping 1.6km detection range giving the AI plenty of time to dodge your torpedoes, while Gallant relies a lot on her torpedoes as her 120mm guns are the smallest guns for her tier, which combined with her abysmall AA suite leaves her a lot to be desired. Hatsuharu is the only saving grace of the torpedo boats in that she has a usable AA suite, which can be useful for assisting in shooting down planes.
Tier VI CA/CLs:
Cleveland is the undisputed queen of scenarios as she can do it all: DPM? check. AA? Check. Yep, if you have no idea what you’re doing and it’s the first time doing scenarios, use the Cleveland, she’ll put in a lot of work since she is the ideal cruiser for this gamemode. Budyonny comes close to this, boasting more armor, higher speed, and longer range for the lack of AA and manouverability. Molotov, Graf Spee, and Aoba fill in as for the heavy cruisers of the tier, with powerful guns that can flatten enemy crusiers with their AP rounds and do significant damage to DDs and BBs. Graf Spee escpecially has repair party, which can be very useful to keep going after taking heavy damage. Nurnberg/Makarov are decent ships with their distinguishing features being AA or torpedoes and their hydro and high damage AP rounds, but are squishy due to low HP. Gallssionnare and De Grasse use speed and kiting to their advantage with their HE and range, but in scenarios you really do not want to kite that much, and rather you want to push in to complete your objectives. Duca d Costa is a unique ship, with blazing fast shells, great manouverability, and is quite fast, but she suffers from low alpha damage, lackluster AA, and weak armor. Leander/Perth/Huanghae are all really the same type of ship in that you perfer static gameplay using your smoke to your advantage. The problem with using smoke in scenario gameplay is that you always want to be moving, as you have objectives to complete as time is of the essence, and being mostly static is more of a hinderance than a benefit, which can be explained in the AI behaviour section. Leander especially, will have the hardest time in this gamemode, as the AI usually attacks bow on, and is quite adept at changing speeds and directions to avoid fire, which with Leander firing AP only leads to mostly richochets and shatters on most ships.
Tier VI BBs:
As mentioned above, enemy ships usually attack bow on and change their course and speed frequently, which for the average battleship player, can be quite frustrating. However, since the AI likes to attack bow on and towards you, there will eventually come an opprotunity to blast that ship out of the water when they show enough broadside: it’s all about patience. Other than that, AI are VERY good with using torpedoes, and some scenarios where the IJN are the main enemy, torpedoes will be everywhere pretty much, so ships that are manouverable with short turning circles are very desirable. Lastly, AA is important, so having good AA will help when attacked by hostile aircraft. For that reason, Queen Elizabeth come out on top, with great AA, turning circle, decent speed for her tier, and powerful guns, while lacking volume of fire. Bayern has fantastic long range AA, small turning circle, and is quite durable, but she suffers from very poor accuracy that can be really furstrating against how nimble the AI behave. New Mexico has workable AA, short turning circle, and a large volume of fire, but is very slow. Arizona and Warsprite are like the NM and QE, but have significantly less AA for the trade of very accurate and lethal guns and more HP in the Arizona’s case and a unique damage control for Warpsrite. Fuso has very comfortable gunnery, able to put out a wall of long range, accurate 356mm shells, but she has very poor manouverabiliy and AA. Mutsu is like Warpsrite, with some of the highest damaging guns for her tier but at the cost of the rest of her stats being pretty poor. Normandie and Dunkerque are fast and have comfortable gunnery, but they have poor AA and thin armor, and AI generally fire upon ships with the weakest armor, and in Dunkerque’s case, bow-tanking while reversing is an ill advised option in scenario play since the AI also like to fire on slow moving targets. More on how the AI behave later.
Tier VI CVs:
Is there really any questions here? Ryujo is considerably better simply because she has more strike aircraft at her disposal with her 1-2-2. This can allow you to hit multiple targets at once, such as a BB with your torpedo bombers and an aircraft carrier with your dive bombers. The Independece on the other hand, has only 1-1-1, which while the squadrons are large at 6-7 aircraft that are also more durable than their japansese counterparts, you just have less aircraft to work with. Probably the biggest upside with the Ryujo is that she can cross-drop with her torpedo bombers, which can help with hitting nimble targets. Still, carriers are very useful, as they can prove invalube to spotting hostile aircraft carriers, which a usually secondary objectives, and they can spot torpedoes in the water.
Your Task Force Part 3: Tier VII
Tier VII DDs:
Maass comes out on top due to her high base HP, high damage and quick firing guns, moderatly stealthy torpedoes, and hydro, allowing you to get a lot done in one small package. Sims is a great USN DD with high speed, rapid firing guns, and a unique choice of torpedoes, with the longer ranged ones being quite stealthy at the cost of being slow and low damaging. Mahan is very similar, but suffers from high detection range, and is slower, but with the tradeoff of having Defensive fire on Hull C, having 9km torpedoes in 3×4 configuration allowing her to fire quite a good number of torpedoes off. Gadjah Mada has great deep-water torpedoes for catching the AI of guard, but dosen’t have much else going for her. Minsk and Leningrad are basically the same ship with the Minsk having short range torpedoes, less HP, slower turning guns, better AA and Leningrad having moderate range torpedoes, more HP, faster turning guns, and lower detection range. Błyskawica is like a higher tiered Gallant, with low caliber guns with high fire chance, stealthy, and workable torpedoes. Lastly, the IJN destroyers and their high detection range torpedoes combined with how fragile they are, make them more of a liabality than an aid. Still, the Akatsuki is a better choice simply for having more firepower as well as having a DP armament. Shiratsuyu’s torpedo reload is not reccomeded due to the threat of being spotted by aircraft as well as how accurate AI ships are, meaning it’s better to use smoke instead of having your torpedoes reloaded when the AI will just dodge your spread of torpedoes anyways.
Tier VII CL/CAs:
Myoko is a very flexible heavy crusier, with a heavy 10 gun 203mm broadside, 10km torpedoes, workable AA with DF, hydro, fighter planes for spotting, and decent armor when angled. Yorck comes for a very close second, with decent AA, turtleback armor, and most importantly, German Hydro, while falling short with her odd gun caliber. Algerie is a pretty standard heavy cruiser, with strong armor and big guns, but is really lacking in anything else other than her speed gimmick. Indianapolis is a more flexible Pensacola with better guns, better armor, and radar. Atlanta is a DPM monster for her tier, as well as having radar, fantastic AA, torpedoes, and being quite nimble makes her great for scenario play, but you must beaware of battleships and opposing cruisers, as they will enjoy shooting at you. Belfast is the hellspawn of tier VII, and she can do it all really: radar, sonar, smoke, concelament, DPM; the only thing she cannot do is take a hit, as she does not have repair party. Duca degli Abruzzi is a decent ship with the same ups and downs as the Duca d’Aosta, but with repair party and more guns. Shchors is a decent DPM ship, with a strange armor scheme and citadel placement that can actually save you from citadel hits, and along with the standard VMF cruiser flavor of range, and speed, she has a terrible AA suite, which is why she’s ranked so low despite her DPM potential. Pensacola is a great AA ship but suffers from weak armor combined with bieng a large target, makes her melt under concentrated fire. Fiji is a great improvment over Leander, but still suffers from how the AI generally attack bow on, leaving you to really penetrate superstrucutre of ships until they show a broadside and a heavy reliance on smoke to stay alive without taking too much damage to be able to fire her guns with her paper thin armor.
Tier VII BBs:
King Geroge V and Duke of York are probably the easiest ships to play in the game, since their raw HE alpha is so high combined with their fire chance means you can pretty much melt any ship that you point your guns at, on top of having heavy armor, an underwater citadel, and decent AA with the only drawbacks of turret rotation and manouverability. Gneisenau has fantastic AA, torpedoes, secondaries, HP, armor, and speed, with the drawbacks of low accuracy and only a 6 gun broadside with a large turning circle; Gneisenau can really hold her own if played correctly. Her sister Scharnhorst is very similar, but has 3×3 283mm guns on a 20 second realod, meaning she can wreck enemy cruisers with her larger volume of fire, while retaining many of the strengths of Gneisenau’s design. Lyon is the glass cannon for the tier with a whopping 4×4 340mm broadside that can put out a massive wall of shells that can obletirate enemy cruisers that dare give broadside. She also has a great AA suite, decent turning circle, decent speed, but is hampered by painfully slow turret traverse and weak armor. Colorado is decent, with powerful accurate guns, decent AA, and a small tunring circle, but suffers from her armor scheme and her painfully slow speed. Ashitaka is a battlecrusier, as in she is quick and has powerful 5×2 410mm broadside but lacks the armor to take any punishment nor does she have any AA to defend her self from air attack. Nagato is similar to Colorado, in all regards, with more accurate guns and HP, but suffers from a poor AA suite and is very sluggish. Nelson has great guns in a configuration that supports bow-tanking, but is sluggish and has a poor AA suite, along with an easy to hit citadel when her broadside is exposed.
Tier VII CVs:
Kaga is excellent due to her torpedo bombers having a unique hard to dodge drop pattern, which in scenario play with the AI trained in the ways of the torpedobeat, is a big plus. Not to mention she has a nice 2-2-1 loadout with the dive bombers having a tiny drop circle, making them easy to use. The only downsides to her is her detection range and that her fighters are locked to A6M2s, which can be outmatched by other aircraft. Hiryu and her balanced 2-2-2 is vastly superior to the Ranger’s 1-1-2, simply because she has more aircraft to work with. Still, Ranger’s aircraft are in large squadrons and are much more durable than IJN aircraft.
Your Adversaries: The Behaviours of the AI
The advanced AI in scenario’s are no push-over like co-op. They do a variety of things that make them much more of a challange that can put an overconfident player’s ship down to a watery grave early in the mission.
For starters, the AI will generally attack bow on in most circumstances, keeping their vitals protected to prevent them from going down quickly. On top of that, they will constantly change course and speed to throw off your aim, which for battleships players and to a certain extent CV players as well, can be very frustrating, especially if you fire and then while you’re reloading they show their broadside just long enough to rudder back wehn you’re ready to fire again. However, the AI is not completely unpredictable, in that they will evenetually show their broadside to do one of several things: fire torpedoes, fire a full broadside, or to begin turning away if you start getting too close. Because of this, it’s best to simply wait and let your cruisers pummel away while you wait for the opposing ship to give broadside to nail them in the vitals.
The AI is also quite adept at aiming and firing both their guns and torpedoes, meaning that they are generally pretty accurate as long as you are spotted. This is the reason I do not recomend ships with low hp, ships that rely on smoke or kiting, as the AI will regularly hit you unless you do everything in your power to change course, speed, regularly, which can severly cut down on your damage dealt. This however, like most things can be exploited for the better, as you can draw fire away from your allies if you incite an AI to fire at you as you kite away or if your a battleship and tank it and heal it up later. Keep in mind however, the AI perfers to shoot at the closest, least armored target, giving the most broadside in most cases (from what i’ve observed) so if you kite too far away, the AI will generally lose interest in you unless your HP is critical.
As for the expertise in torpedoes, the AI is very good at firing torpedoes at you the moment they get in range. For that reason it is generally best to either sail directly towards the ship and change your course a litle after you think they’ve fired torpedoes, or to turn away from the attacking ship that is attempting to torp you. Change course often, and adjust your speed often for best results when fighting against ships carrying torpedoes closing the distance attempting to use them. Lastly, AI will ignore smoke line of sight when using their torpedoes against you, so be careful when using smoke, as you might catch a nasty suprise if you let your guard down.
As I’ve already made abundently clear, AI are very good at dodging torpeodes, so it’s usually not in your best interest to rely on torpedoes that you have unless you are in a very close range engagment with another ship. It’s almost pointless to fire torpedoes at an AI ship that is angled in towards you or is bow on, as they will more often than not dodge the torpedo spread. Still, there are some exceptions to this, such as forcing the AI ship to give broadside towards your team, but those occurances will be few and far between. Still, it dosen’t hurt to fire torpedoes anyways, as you might get lucky and catch the ship’s broadside and may land one or two torpedo hits.
AI are also make liberal use of consumables, and will generally put out fires immedately when they occur (usually applies to CVs the most), DDs will use smoke if they’ve taken critical damage and will generally be pretty static when doing so, Crusiers with defensive fire will use the consumable the instant your planes get in their range, and AI will make use of radar or hydro if your are in smoke.
Lastly for CV captains, AI aircraft will behave like they do in normal co-op battles, in the they will attempt to auto drop their ordanace, and fighters will attack the closest squadron, while prioritzing fighters first in dogfights, and will attack catapult launched aircraft even if the aircraft is in the middle of several cruisers. Yeah, the AI CV captains have not really improved, and are fairly easy to deal with, as you simply turn in towards any bombers and you will usually dodge most of the torpedoes and bombs. Smoke will also prevent the AI’s strike aircraft from attacking you, but said aircraft will linger around and wait out your smokescreen, which may be a bad thing if you’re in a tight spot, but it generally leaves them wide open to freindly AA and freindly fighters to strafing them.
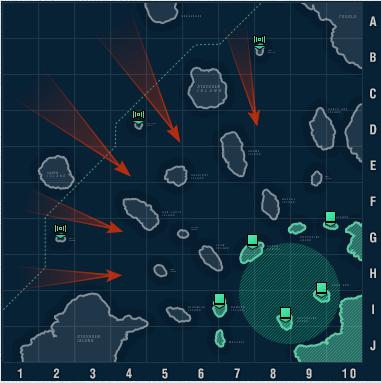
Description: Superior enemy forces were spotted approaching naval station Newport. Your mission is to defend the base until the arrival of the allied attack squadron. Save the base’s infrastructure and moored support ships. Remember, if we lose the Newport base, we will lose control over the entire region!
Goal: Defend the base. Prevent the destruction of essential onshore installations and support ships. Hold out until the arrival of the allied attack squadron.
Difficulty: Easy – As long as you do not let the enemy reach the port, the main attack force will be more manageble. However, if an enemy ships reaches the port before the main attack starts, this will become the most difficult operation in the game.
Opposing Forces: German and Japanese ships ranging from tier II-IX: you will generally be up against mostly destroyers and crusiers, with battleships or carriers thrown in as lead ships of each wave.
Recommended Compostiton:
- 1 Carrier: For spotting enemy carriers, shooting down planes, and attacking large targets
- 1-2 Battleships: You generally are going to be stuck guarding the port, so ships that have high accuracy, range, and shell volume are great in this scenario, as you won’t be on the frontlines too much since it will take too much time to reposition, and the danger of destroyers and aircraft is very high in this scenario.
- 3-5 Cruisers: As a defense mission, ships like the Perth and Huanghae are actually quite viable in this mission, and ships that have high speed, like the french cruisers are also good choices here due to the rapid defense that you must respond to
- 1-2 Destroyers: Gun focused DDs like the Farragut, Gnevny, and Aigle as the idea is of rapid defense, and getting in position to use torpedoes wastes a lot of time, so using fast gunboats that can draw fire and put out fire at a long range are the best choice here. Gaede is also a good choice if you want to hunt down the various DDs that you will encouter in this operation
Example Composition:
- Independence/Ryujo – CV for spotting and destroying BBs and CVs and providing fighter cover
- Fuso/Arizona/New Mexico – Long range Anchor that sits in the spawn and provides fire support
- Aoba/Graf Spee/Molotov – Heavy cruiser that is able to deal heavy damage while mobile
- Perth/Huanghe/Leander – Smoke cruiser that can sit in place and provide focus fire from smoke
- Cleaveland/La Gallissionare – AA cruiser that can shoot down aircraft rapidly
- Budyonny/De Grasse/Duca d’Aosta – Fast crusier that can respond quickly to a problem
- Farragut/Gaede/Aigle – DD to draw fire, hunt other DDs, and to rush down BBs
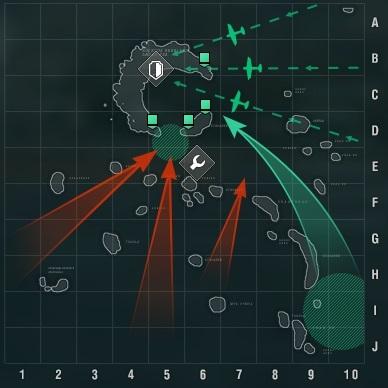
The first wave will spawn from either 3 of the locations near intel stations randomly each time. It will consist of a Chikuma, Tenryu, Kuma, and Yubari. The Yubari is the prime target if a CV is present on your team, otherwise, focus the Kuma and Tenyru first.
The next wave will consist of a 1-1-2 Zuiho, Isizuchi, Kaiser, T-22, and Isokaze. Focus on the destroyers first, as they are the fastest ships that will rush to the port. Next, focus the Zuiho down if it’s spotted, and then deal with the battleships last.
Wave 3 will consist of an Aoba, Furutaka C, Nurnberg, Gaede, and a Hatsuharu. This will be the most important wave, as all of these ships are quick, and will get to the port if left unattended. Focus the destroyers first, as they will be using their engine boost. After the destroyers are down, destroy whichever cruiser is the closest to the port and work your way back. CV captains should avoid the Aoba, as it will use defensive fire.
Based on your peformance, the attack wave will have an Izumo, Kaiser, Bayern, Myoko, Aoba, Yorck, Nurnberg, Maass, and a Shiratsuyu. If the earlier enemy waves have have reached the port, the enemy ships will spawn closer to the port, and a 2-2-2 Hiryu will spawn in place of the Izumo. This wave is nothing short of chaos, but you should not panic. Focus down the DDs first, then the cruisers, then lastly the battleships and or carrier. The goal is to destroy whatever ships that are attempting to get behind and destroy the port structures and support ships in the water.
If your team prevented the first 3 waves from entering the port, a freindly Lexington will spawn and will be chased by an Aoba. It will provide air support and will have AP dive bombers that can decimate enemy battleships.
If your team loses 75% of it’s task force, a Nicholas and Farragut will spawn to assist.
Operation Aegis (Tier VI)
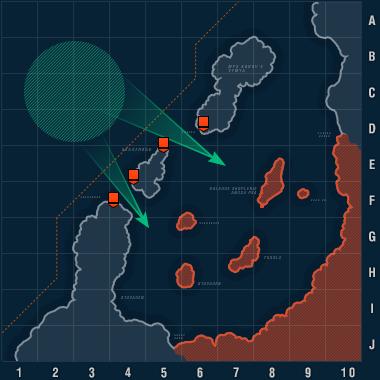
Description: An allied naval division has been attacked. Some ships have been destroyed, and the transport ships that were captured are being convoyed to the enemy base now. Intercept the enemy convoy and take back the allied ships.
Goal: Take back allied ships and protect them en route to their destination.
Difficulty: Moderate – Beware of torpedoes and protecting the supply ships from torpedoes is key
Opposing Forces: Japanese ships comprised of mostly cruisers with ships from tier III-VII
Recommended Compostiton:
- 0-1 Carrier: This is an iffy pick fore me, as there the type of ships that spawn are based on RNG, and the two cruisers you want to look out for are the Aoba and Myoko, both of which use defensive fire, making airstrikes useless; you will be useful later on when you need to defend the fleet from air attack and hunt down and destroy enemy carriers. 3-1-1 Ryujo is a good pick here, as you will increase the chance that the supply ships won’t be attacked by torpdoes
- 2-3 Battleships: There are a lot of crusiers to deal with, but since they’re all japanese, it’s highly recommended that you use battleships with a short turning radius, as the amount of torpdoes you’ll encounter in this mission will be staggering
- 3-4 Cruisers: As above, heavy cruisers and nimble cruisers are a good pick here, and there is a heavy reliance on cruisers to defend the supply ship fleet from incoming air attacks
- 0-1 Destroyers: With the huge amount of cruisers in this mission, I do not recommend DDs with so many cruisers that will enjoy shooting you, but on ther other hand, destroyers can be useful to torp enemy ships as the first two groups of ships you encounter will sail straight and you can spot torpedoes from stealth, which will help tremendously in this mission if a CV is not present on your team.
Example Composition:
- Independence/Ryujo – CV for spotting and destroying CVs, spotting torpedoes, and fighter cover
- New Mexico – BB for destroying enemy cruisers
- Queen Elizabeth – BB for destroying enemy cruisers and providing AA cover
- Cleaveland/La Gallissionare – AA cruiser for protecting the fleet
- La Gallissionare/Cleaveland – AA Cruiser for protecting the fleet
- Nurnberg/Makarov/Graf Spee – Cruiser with Hydro for spotting torpedoes and DDs in smoke
- Aoba/Molotov/Duca d’Aosta – Flexible cruiser that can choose between DF or Hydro
Your team will spawn in G3, with a Shchors and a Mahan as AI allies. The Shchors is a secondary objective and must be protected from concentrated fire. If the Shchors is lost, you must then ‘rescue’ the captain from the wreckage.
You will proceed to the NE to intercept the lead task force, which will consist of 2 Shiratsuyu, 4 random heavy cruisers of either Furutaka Hull C, Aoba Hull B, or Myoko Hull C, and 2 Ishizuchi. Once the force is sighted the Mahan will drop a smokescreen to cover the task force’s advance. Once the Mahan starts moving again, that means the enemy has fired a torpedo spread and it’s time to move. There will be a flurry of wide spread torpedoes that will be shot towards the fleet so be careful and try not to bunch up.
Afterwards, proceed to escort the Shchors N as another enemy force will be coming from D3 from the NW, which consists of 2 Kuma, 4 heavy cruisers of varying type, and 2 Ishizuchi. By then you will surely meet the captured supply convoy, which is escorted by by 4 heavy cruisers of varying type and 2 Kuma. Once all forces have been destroyed, the Supply ships will start heading E towards the escape route at D10. From there, Battleships should move in-line with the Supply ships, while cruisers should set up a line formation in front of the Supply convoy, thereby protecting the fleet from aircraft and spotting incoming torpdoes from enemy ships.
A Hosho and a Zuiho will spawn at A5 and A6, and will send attack aircraft towards your supply fleet. At this point in time, a freindly 2-2-0 Saipan will spawn at J10 and will provide addiontal air support. After the CVs spawn, the next enemy wave will spawn at A8, with 2 Shiratsuyu, 2 Kuma, 1 Myoko, 1 Furutaka, and 1 Ishizuchi. These ships will attempt to close in on the convoy and attempt to torp them. Make sure to be out in front of the convoy to spot torpedoes early or to destroy the Shiratsuyu as 1-2 torpedoes hits to the supply ships will destroy them, which is the number one cause of failing the secondary objective of ensuring all supply ships escape.
By the time the supply ships almost reach then escape route, another wave will spawn, but will not be of importance as the supply ships will reach the escape before they become an issue.
Like Newport and Frontier, failing certain secondary objectives will cause stronger forces to spawn. In this case, 2 Kongo and 1 Fuso will spawn at A7 if certain secondary objectives are failed.
Operation: Killer Whale (Tier VI)
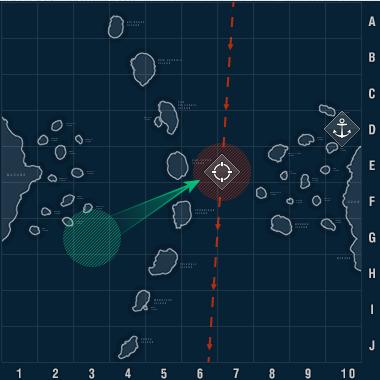
Description: Reconnaissance reports that the enemy’s major forces have left the naval base. Now is a good time for a swift raid and massive destruction. There are only a few ships left to defend the base, with some of them under repair.
Goal: Destroy the enemy base and retreat in the direction designated by reconnaissance.
Difficulty: Hard – Completeing all secondary objectives requires all ships to survive the initial attack to be able to swiftly spread out and prevent the enemy from entering the Haven, destroying the 2 carriers, and first two waves of support. On top of that, veteran AI captains are piloting all ships, so they will not give you an easy shot while being deadly accurate themselves. This mission requires teamwork and coordination to comeplete all objectives before you are surrounded as you make your escape to either F1 or A8 (which is random each time!).
Opposing Forces: Mainly Tier II-VI German ships, with a few Japanese carriers, destroyers, and cruisers as escorts for the carriers. As far as I know, there are no higher tiered ships that spawn if secondary objectives are failed.
Recommended Compostiton:
- 1 Carrier: This is absolutely required for this scenario with a 1-2-2 Ryujo highly recomended as you will need to work fast to destroy the battleships in port, and then focus on spotting and destroying the carriers that spawn after the raid. Without a CV this scenario becomes much harder since you have to risk sailing all the way out to spot and destroy the CVs while under attack from cruisers, aircraft, and destroyers.
- 1-2 Battleships: A minimum of one Battleship is recomended to help destroy costal battaries quickly, as well as destroying the various cruisers that will prove difficult to kill quickly. You have two options: go for a fast BB or go for a Tanky BB, as you will need to tank damage and be fast enough to reposition and fast enough to escape.
- 3-4 Cruisers: Cruisers will be tasked with warding off destroyers, suppressing cruisers and battleships with HE, and defending other ships from air attack.
- 1-2 Destroyers: Destroyers are useful in this operation as enemy destroyers are a big threat simply because how hard of a target they will be for larger ships, so screening for your team and destroying enemy destroyers with rapid fire guns will be a big aid. In the abscence of a CV on your team, you will most likey be the one tasked with the suicide mission of spotting the enemy CVs during the escape phase.
Example Composition:
- Ryujo – CV for spotting and destroying CVs and BBs, spotting torpedoes, and fighter cover
- Normandie/Dunkerque – Fast Battleship that can repostion quickly
- Queen Elizabeth/Warsprite – Mildy fast BB that can help deal damage to enemy BBs and Tank
- Nurnberg/Makarov/Duca d’Aosta – Destroyer hunter with Hydro
- Budyonny/Cleaveland – AA Cruiser that can take a few hits
- Aoba/Molotov/Graf Spee – Heavy cruiser with Hydro that can assist attacking cruisers and forts
- Gaede/Farragut/Aigle – High HP destroyer that can hunt down destroyers and draw fire
Your team will spawn in C2/C3 with a 25% chance for an allied AI Farragut to spawn. You will need to destroy the forts along the way at F4, E5, D6, F6, F8, G7, which are resistant to 152mm AP and
less: Use HE if using < 152mm, and use AP if > 180mm. For CV captains, Avoid forts at all costs, as they have both 4×1 88mm/105mm and 4×4 20mm AA guns that can pick off your planes if you’re not careful. It’s recommended that the force splits up, with 1 DD and 2 CL/CA heading through F4, while the rest of the fleet moves through D6.
A Nassau and a V-170 are found in port at I4 and will move in to engage enemy ships the moment they spot your force or allied aircraft. It’s reccomended if you’re playing a CV to destroy the Nassau by moving your strike aircraft to H2 and head down to I8 to quickly do damage to the Nassau before it gets moving fast enough to evade attacks.
A Karlsrhue will be located around F7 and will move in to engage any ships that moved through D6. Battleships should wait for the Karlsrhue to give broadside before firing, while cruisers suppress the ship as it advances on your fleet. A Kolberg will be located around I6 and will move to engage your task force as well: same rule applies and wait for a broadside if your using AP.
By the time your task force has destroyed these cruisers and the remaining forts, you will most likely be attacked by aircraft from a Hosho at I8, and will most likey come under accurate fire from a stationary Kaiser at J7. If your a CV, use manual torpedo and dive bomber drops on the Kaiser and Hosho to kill them quickly before they become a problem for your task force. Otherwise, burn these two ships with HE, as the Kaiser is angled and will prove difficult to use AP on. After both ships are down, destroy the supply ships that are trying to make a break for it and the supply structures on the shore with HE.
From there, you will be informed to make your withdraw to either F1 or A8, which is random each time. A8 is the easier escape route, as this is where you will need to send your battleships to prevent a Kolberg and Kaiser that spawn at A8 from entering the Haven, which is a secondary objective. F1 is the harder route, since your cruisers will need to survive their task of destroying the 1st and 2nd wave of ships as well as the CVs AND escape, as the battleships will be heading to A8 to stop the aftermentioned cruiser and battleships from entering the Haven.
The first wave will consist of a Karlsrhue, V-25 that spawn at E1, and a Hosho and Wakatake that spawn at A1. If you’re a CV captain, once the Kasier and Hosho in port are destroyed, It’s best to send your aircraft to A1 and wait for the Hosho for a quick kill. The 2nd wave will consist of a Zuiho and Tenyru that spawns at A1 and the Kaiser that spawns at A8. Destroy all of these ships and you are free to escape.
When escaping, you will need 20% of your task force in the escape zone to complete the operation, so 1-3 ships will need to be in the escape zone depending on how many ships in your task force are still alive. IF YOU DO NOT ESCAPE BEFORE THE BATTLE ENDS YOU WILL FAIL THE OPERATION COMPLETELY EVEN IF YOU COMPLETE ALL OBJECTIVES AND DESTROY EVERY SHIP. Once the secondary objectives are complete, LEAVE, do not stay and damage farm as you can still completely fail the operation.
The next waves will consist of a Königsberg and a Konig at A7 as Wave 3, a Nurnberg at E1 and A7, and a T-22 at A7 during wave 4-5. These waves will not be much of an issue if you’re escaping to F1, but will be a problem for any ships escaping to A8, as they will pretty much spawn right next to the escape route.
Operation: Raptor Rescue (Tier VI)
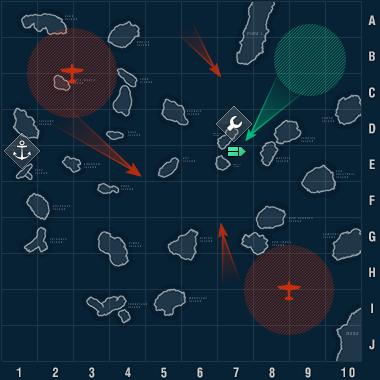
Description: A sudden night attack on an allied aircraft-carrying squadron turned out to be catastrophic: all escort ships were lost, and the aircraft carrier Raptor was badly damaged. Extensive damage incapacitated the ship. Your task force is ordered to find the carrier, repair the ship, and escort her from the danger zone.
Goal: Escort the support ships to the carrier Raptor. Escort the carriers safely out of the combat zone.
Difficulty: Moderate – Similar to Operation Aegis, you will encouter an abundence of IJN cruisers and destroyers that will make liberal use of their torpedoes. Cruisers and Battleships will hurt, so watch out.
Opposing Forces: Like Operation Aegis, you will encouter primarly Japanese cruisers and destroyers, with a few battleships and carriers thrown in there. However, unlike Aegis, you will encounter Tier IV-VI ships.
Recommended Compostiton:
- 1 Carrier: Like Killer Whale and Frontier, there will carriers that spawn very far away from the task force as secondary objectives, which combined with how you must escort your task force and how they have pretty small detection ranges, can prove difficult to hunt down without a CV as well as waste a lot of time from protecting Raptor and the support ships.
- 2-3 Battleships: There are a lot of cruisers that need to be blown out of the water before they launch torpedoes and deal damage to you, your crusiers, or any destroyers on your team.
- 2-3 Cruisers: There are aircraft and destroyers that need to be prioritized as your support ships cannot take more than one torpedo without being destroyed outright. Be careful around the heavy cruisers, as they will hurt and they are quite accurate. AA is not as important in this scenario, as Raptor is a Ranger, but it’s good to have a fallback if either the Bouge gets destroyed early, or if you do not have a CV in your task force.
- 1-2 Destroyers: With the abundence of IJN cruisers with 140mm and 203mm guns, they will enjoy shooting you and make your life pretty hard without you being glued to the repair ship. However, destroyers are invaluable for spotting torpedoes, hunting Minekaze and Mutsuki, and best of all, all ships sail in a predictable pattern, so Deep Water torps are very useful in this mission.
Example Composition:
- Ryujo/Independece – CV for hunting down CVs and spotting DDs and torpedoes in the water
- Queen Elizabeth/Bayern – BB with HP, turning circle, and AA for escort duty
- New Mexico/Arizona/Warpsrite – BB with turning circle, and accurate guns
- Aoba/Molotov/Graf Spee – CA that can go toe-to-toe with other CA and have hydro to hunt DDs
- Budyonny/Cleaveland – AA CL that can take a hit and deal with destroyers with rapid fire guns
- Fushun/Anshan – DD with deepwater torpedoes that can help kill cruisers and battleships
- Gaede/Farragut/Aigle – High HP destroyer that can hunt down DDs and draw fire
Your task force will spawn at B9, with a Repair ship which is a primary objective for the first stage, a munitions ship that will allow Raptor to use it’s secondary and AA guns, and an aviator, represented as a Bouge that is ferrying aircraft for Raptor. If the repair ship is destroyed before it reaches Raptor, the operation will fail. The Bouge is the second most important ship, as it will give Raptor it’s airgroup that wil come into play after the 2nd waypoint is reached, which will help provide fighter cover. The munitions ships is the least important, as it will simply allow the Ranger to use it’s AA and secondary guns, but it’s still a secondary objective. Like all support ships in scenarios, these ships have very low health, and cannot take more than one torpedo. The Bouge is an excpetion to this, but it is still an important ship for the first waypoint.
As your task force sets out to Raptor, which is dead in the water at E7, a Myogi C and Furutaka C will spawn at A7 on the other side of the island next to where the task force spawns and will attempt to intercept the task force. On top of that, a Minekaze will spawn at C5, and will attempt to close in and use torpedoes on the munitions and aviator ships, but as long as it’s destroyed before it closes 7km, you’ll be fine. The Furutaka is of more concern, as she has 10km torpedoes and is the prime target.
After the first wave of ships, a wave of cruisers, which consist of a Myoko, Aoba, and Kuma, will randomly spawn at either A5 and B4, or at H6 and H8. Depending on where they spawn, Battleships and DD should intercept them, while CL and CA stick with the support ships and give supporting fire. The Aoba and Kuma will move in close to use torpedoes, while the Myoko will sit back and turn away to give supporting fire. Moving through E6 is usually the best way to spot them and prevent them from closing in on Raptor.
After the support ships reach Raptor, a Zuiho, Minekaze, and Kuma will spawn at J5 moving to G8, and the Minekaze and Kuma will move towards the task force, with the Minekaze dropping smoke for the Zuiho as it moves between the islands, and the Kuma will head around the Islands, while the Zuiho will make it’s way back to J1. CVs should have their aircraft wait over by H10 after the Moygi is destroyed, and wait for the Zuiho to emerge from the smoke and destroy it quickly. If no CV is present, then any cruisers or DDs should go out to spot and destroy the Zuiho, while Battleships sit back with the support fleet.
Once Raptor gets moving, the task force will began moving to the second waypoint at F5, with the repair ship able to repair nearby ships, except it cannot repair itself. At this point, a Mutsuki and a Minekaze will spawn at C5 and C3 respectively, and will make their way down to F5 to ambush the Raptor and the support ships. To prevent this, your task force should move out in front of the support ships and Raptor to not only spot the enemy DDs, but to coax them into firing their torpedoes on you before Raptor and the support fleet gets there to prevent them from being destroyed by torpedoes at a close range. CVs can also assist by spotting these DDs early. It’s also worth noting that a Aoba and Kuma will spawn with these DDs and will not be too far behind to support them.
After Raptor reaches the waypoint at F5, he will announce that the ship is having engine trouble and will need to stop at a nearby island at F3/F4, where he will lay a smokescreen for himself and the support fleet. From there, a Ryujo will most likely be spotted at E1 and make it’s way up the 1-line, while a large surface force consisting of a Kongo, Myogi C, Aoba, and a Kuma will spawn at C2 and will make their way down to the task force, with the Kongo and Aoba breaking off and heading to D4 to give covering fire, while the Kuma and Myogi will attempt to directly attack through F3.
At this point, the task force should head to the escape at E1 and engage the enemy force head on, as at the same time, Raptor’s air group will be active and will support the fleet with it’s aircraft. It’s also a secondary objective to reach the escape before Raptor does.
Ultimate Frontier (Tier VII)
Description: With the battlefront getting closer and closer, amid persistent air strikes on Rouen Atoll, the project pursued by Japanese scientists and engineers is threatened. To avoid a catastrophe, a group of transport aircraft is sent to Rouen with a mission to evacuate all personnel and documentation. All warships must provide protection for the aircraft and the aerodrome until the evacuation is complete.
Goal: Protect the group of transport aircraft arriving at the base. Defend the aerodrome until embarkation is finished and the aircraft leave the base.
Difficulty: Moderate – You will be fighting American ships, which are generally tougher ships that have good guns, so they’ll hurt when they hit you. Secondary objectives are very important in this mission, as failing them will spawn tougher forces in place of regular forces, that can make the scenario much harder.
Opposing Forces: Unlike all tier VI scenarios where you fight axis forces, you will be fighting the USN, which come packing in Tier V-VIII. They hit hard, but unlike their axis advesaries, their muzzle velocity on most of their ships is very low, so taking evasive manouvers will greatly increase your chances of dodging incoming fire. Note for CVs, there is an enemy CV that needs to be destroyed, and her fighters will show no mercy to your aircraft, so be careful.
Recommended Compostiton:
- 1 Carrier: This is highly recomended as there is a Ranger that spawns at the other side of the map that is a secondary target. Be careful though, not only are his fighters pretty deadly, but the Ranger also has an escort of a Cleaveland and a Destroyer, so your attack on the Ranger will definatly cost you aircraft. Also, most USN ships have intense AA the higher the tier they are, and most have defensive fire, so it might be in your intrest to bait defensive fire and then wait it out by counting down from 40s.
- 1-2 Battleships: There are several cruisers and battleships in this scenario that will prove to be difficult targets to take down, but someone has to soak up damage for your team, and dish it back out.
- 3-4 Cruisers: Aircraft and destroyers are key targets in this scenario, but you also have to be either evasive enough or tanky enough to avoid getting blasted out of the water by the various battleships and heavy cruisers in this scenario.
- 0-1 Destroyers: Destroyers are not reccomended due to how the enemy ships will be going straight to the objective, which will lead to multiple instances of ships coming bow on to your torpedoes. Still, due to USN muzzle velocity, drawing fire is a not a bad idea due to how easy it is to evade shots.
Example Composition:
- Kaga/Hiryu/Ranger: CV for attacking battleships and dealing with the Enemy CV
- King Geroge V/Gneisenau: BB that can tank, heal, has powerful guns, and has AA
- Nagato/Colorado: Tough BB with powerful guns that can deal good chunks of damage to BBs
- Myoko/Algerie: CA that can deal heavy damage to other cruisers and set fire to BBs
- Shchors/Belfast: Light cruiser for DPM and anti-destroyer duties
- Yorck/Atlanta/Indianpolis: AA Cruiser with radar or hydro
- Maass/Sims/Mahan: DD for hunting other DDs and drawing fire


Be the first to comment