
Spooky times are around the corner for Hat Kid, and now she’s in the Snatcher’s home turf no less. Run, jump, dive, and clutch your soul tight, because tonight’s haunt is a real scream.
Other A Hat in Time Guides:
- 100% Achievement Guide (How to Unlock All).
- How to Get All Roulette Items (Cheat).
- Guide to Farming Pons.
- The Secret R. King Notes Guide.
- No-Death Wish: A 100% Guide, Mafia Town.
- No-Death Wish: A 100% Guide, Battle of the Birds.
Contents
Speedrun Well: Gotta Go Faster
All credit goes to CraftMaster707!
Both Bonuses are complimentary to one another, so thankfully this one is easier to explain. Given how this is mostly mechanical mastery on display, there’s not much I can say. However…
- Enable auto-skip of cutscenes in settings. It’s a lot less of a hassle than manually skipping cutscenes and losing time.
- You can ignore pressing switches altogether. Look for pipes or other terrain to jump onto instead to skip large portions of platforming (this is what the Snatcher was referring to).
- Abuse the hookshot points to fling yourself to heights normally inaccessible, and use said height to skip platforms.
Rift Collapse: Sleepy Subcon
This Rift Collapse can be summarized with the word concise. This one will be incredibly quick from map to map until completion, as the maps are very simplistic. The path forward, however, is less than obvious.
The All-Pon Run
Map 2:
- Leap forward and grab the Pon straight ahead.
- Turn around and skip as many platforms as possible to go directly to the second Pon.
- Grab the third Pon by swinging on the Hookshot point, then use the height to get across to the other side with the two Pons.
- If you feel risky, aim straight for the Pon; otherwise, dive to the leaf platforms closer to you.
- Leap onto the treehouse and grab the next Pon.
- Use the spiky branch to get the height you need to get back onto the leaf platforms. You can sprint across these without jumping if you go from one to the next.
- Avoid the wrecking ball swinging about and leap to the Pon inside the treehouse.
- Sprint out and get down the hatch.
Map 3:
- Go right and trick the sleepy raccoon into plummeting. Smack’em and grab their Pon.
- Leap near the spider and use the homing attack to take them out and grab the Pon all at once.
- Double back and leap across to the next castle tower and run directly next to the chair (you should be brushing it) to swipe the Pon without jumping.
- Leap onto the edge and hop onto the spinning platform. Just wait until you’re decently close before you leap across.
- You can ignore this sleepy raccoon and go straight for the Pon in the back, then use a homing attack to take their Pon.
- Leap down the hatch.
Map 4:
- Immediately go left and grab the Pon.
- Turn around and leap across the gap towards the Pon near the sleepy raccoon. Use one of the frozen towers to get there.
- Hop, skip, and jump your way up the frozen towers.
- Use a double jump to grab the Pon behind the hatch and leap into said hatch.
Map 5:
- Before the Pon atop the cages, there is a Pon hiding on the side over some wooden platforms. Falling off and respawning is faster than platforming back up.
- Leap atop the cages and grab the last Pon.
- Dive into the hatch.
The Perfect Run
Map 2:
- Leap across the gap in front of you and grab the Pon.
- Reverse direction and cross the fire to grab the two Pons next to one another.
- Use the swing to get enough height to leap across the gap and grab the Pon atop the tree platforms.
- Use the leaf platforms to get to the Pon inside the treehouse near the hatch. Make sure you’re not hit by the wrecking ball!
- Run over and leap into the hatch.
Map 3:
- Trick the racoon into dropping and beat him up for his Pon.
- Leap near the spider and use homing attack to kill it and swipe the Pon.
- Double back and leap across to the other castle tower. Run near the chair to magnetize the Pon to you.
- Leap onto the spinning platform and wait. Remember, your momentum carries into your jump, so abuse that to get across faster.
- Leap to the back to grab the hovering Pon, then use homing attack to slay the raccoon for his loot.
- Jump into the hatch.
Map 4:
- Run to the left and be near enough to the Pon to magnetize it.
- Dash across the well to the lonely Pon with a nearby raccoon. Leap across and swipe it.
- Platform you way up the frozen castle towers.
- Use double jump to grab the Pon and leap into the hatch afterwards.
Map 5:
- Leap atop the crates and grab the Pon.
- Jump off and straight into the hatch.
Boss Rush: Get Good, Kid
Reward: Camera Filter- Nani?!
Thank the developers above, this one is just the normal boss fights and not the EX ones. So if you’re worried this is an impossible Death Wish, know before you begin it’s the bosses as their normal selves. Not that a contest of attrition against these heavyweights is going to be easy! Especially not with the One Hit Hero Badge equipped.
What are the boss difficulties? Want to size your personal boss challenges with mine? Here’s my opinions on this Death Wish:
- Mafia Boss- easy, completable with 0 damage without much effort
- Battle for Award 42- easy++, with a little practice it’s completable without damage 9 times out of 10.
- Toilet of Doom- journeyman, it takes practice to find the right timings for certain attacks, and techniques to ignore some attacks altogether.
- Snatcher- hard but not quite master, definitely the hardest of all the bosses. No Heart Pon at any point in the fight, no hat abilities to use as a crutch, and his attacks are quite wide for AoEs. It takes a lot of practice to know what to do for each attack, how they scale as the fight goes on, and executing on all of that consecutively without fail. Good luck beating this ghoul with only 1 HP.
- Mustache Girl- easy++ until final phase, then journeyman if with the One Hit Hero Badge; it doesn’t take much effort to dodge her attacks, as they are not nearly as wide or complicated as Snatcher’s. Keeping a cool head makes this fight fairly easy until the very end.
Possible Health Pon appearances (they tend to be randomized per attempt):
- Mafia Boss- any enrage past the first two
- Battle for Award 42- after any enrage
- Toilet of Doom- after any enrage; rarely appears in clear bubbles circling the Hookshot point
- Snatcher- none; you better psyche yourself not to get hit!
- Mustache Girl- every so often during the final phase
Given once again that this is mechanic mastery over challenge knowledge, there’s not much else I can say about this other than the following: good luck, and persist!
Snatcher Coins in Subcon Forest
Reward: The Queen’s Dress
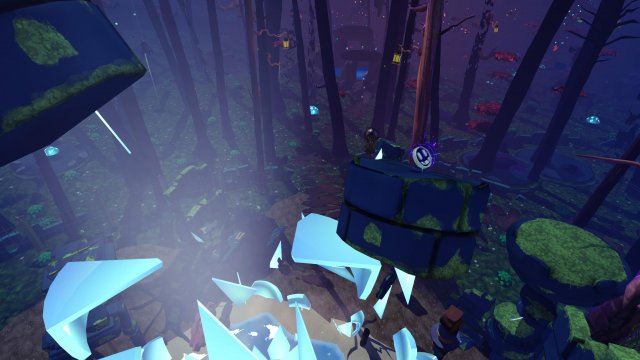
Coin 1 – found north at the frozen fountain, atop a broken brick platform near the top.
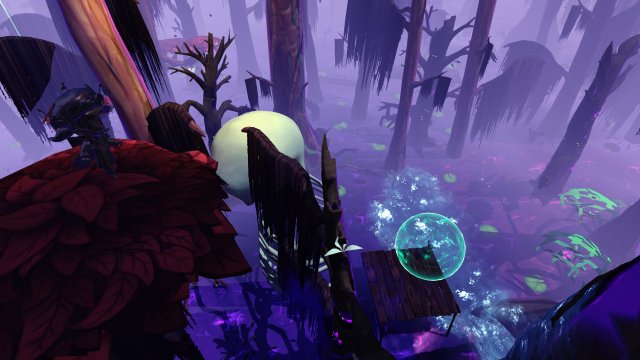
Coin 2 – In the swamp area, located atop a tree near the giant skeleton.
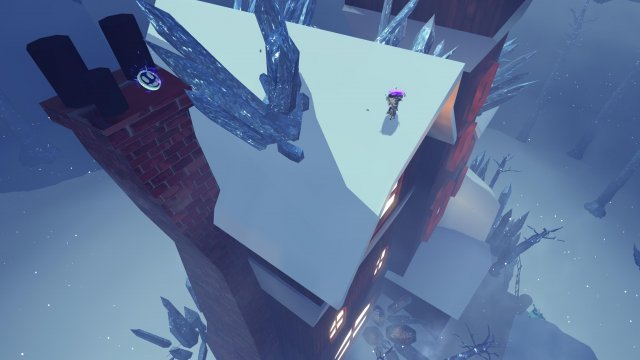
Coin 3 – Atop Queen Vanessa’s Manor’s chimney, which can be reached by using the ice spikes and some wall climbing.
Quality Time with Snatcher
Unlike the other EX boss encounters, Snatcher’s is just running down the clock rather than super-boosting his techniques. However, his attacks do get faster as the clock counts up! Don’t let yourself get hit any more than once per 90 seconds and you’re golden. This Death Wish is great practice for the One Hit Hero Badge Bonus on Boss Rush, heads up!
At 6 minutes, the Death Wish ends and the Time Piece appears. You don’t have to obtain it to get the 6-minute Bonus, so feel free to die for fun.
Here are some tips for dodging his attacks:
- You cannot afford to be indecisive past the 3 minute mark. Snappy decisions are your best friend. Train yourself to instictively know which direction to go and what button to press with every attack.
- The spinning wave of lost kids is best done by staying in the same spot, don’t run left or right.
- There’s always an area the Snatcher does not target with any pulse during his child-spin attack.
- His red multi-blast wave that spins across the stage is far more punishing if you move the wrong way in the beginning. If he fires left, go left. If he fires right, go right. Train yourself to move towards the initial red pulse and not away.
- That said, you can also avoid the attack by diving forwards/backwards at the last second instead of left or right. It requires positioning far forward/backward and great timing, but it’s a good clutch if you move the wrong direction.
- His random pulse blasts don’t care about jumps, so don’t bother jumping. Focus on diving in the right directions instead. Train yourself to dive instead of jump and you’re already set for this Death Wish!
- His quake-pulse maneuver isn’t that punishing until the waves begin to cover the map. Try to stay in the air as long as you can in the beginning, then time your landings such that you’re not going to get hit by the quake.
- Remember that the Snatcher’s final quake-pulse will always be on his closest node to you. Make sure you’re in the air when he does his final pulse.
- Pay close attention to the Snatcher’s movement! If he dives down into the ground, JUMP. Train yourself to react to this instinctively, else past the 3 minute mark you may meet an embarrassing demise.
- His spinning 4-pulse blast is best dodged by standing still. Wait until they slow down, then dive out of the way if necessary. When it grows faster about 3 minutes in, just watch carefully!
Community Rift: Twilight Travels
Once again, since this one is easier than most Death Wishes and is completed just by playing through, no gimmicks, I’ll just list Storybook Page location.
- Map 1 – Found at the back end of the map, on a low rocky platform. You may need to get creative with the camera.
- Map 2 – Directly behind you when you enter, atop the tall pillar. Use the bell’s Hookshot point to ascend.
- Map 2 – Opposite of the Pon hidden behind both blue and green Dweller walls accessible only by wall climbing. It is located on the left path.
- Map 2 – In the same room on the left path, you can find the page atop one of the high pillars after you obtain the highest Pon.
- Map 3 – follow the river to its source when you enter, and you’ll find the page below.
- Map 3 – climb to the Pon atop the higher peak of the two peaks, then find the wooden platform attached to said peak with the page sitting atop it.
- Map 4 – Right before the two red spiders, you can find a floating pillar below with the page.
- Map 5 – Behind the goat statue and the Time Piece.
Breaching the Contract
Reward: Witch Costume (equipable in color schemes)
After lots of practice from Quality Time with Snatcher, this one is a snap in comparison to the other EX bosses. Regardless, he’s still not going down without a fight, and neither are we!
His attacks now have the following variances:
- All pulse blast attacks create a shockwave, except for the red swipe move he has. Be prepared to jump! This has consistently caught me off guard.
- Snatcher will start flinging blue potions during his 4-pulse spin attack and his original shockwave-generating move. Either of them will generate a tossable blue potion to skip an attack of his you don’t like (and hey, to deal damage too).
- Snatcher’s 1000 potions attack will start aiming for you and cover for dive movement in your movement direction, so make your movements curved and snappy. Don’t be afraid to turn around either.
- Shadow clones will now start walking towards you; if you’re not already aware, you can swing your umbrella to scare them back.
- The red circular pulse attack can no longer be avoided just by running towards the initial blast. Rather, pick being near or far from Snatcher, and dive in the opposite Z direction when the blasts get close.
Some other notes:
- You can regain Health Pons in this fight; specifically, when you hit him with your umbrella during his quake attack.
- Being hit with a tossed blue potion will interupt and end any attack the Snatcher is doing, so you can cut him off before he tries anything if you get cheeky.
- If you swap to any kind of costume, such as the Detective Outfit, you’ll regain your hat! But only cosmetically, no Time Stop Hat for you.





Be the first to comment