
Learn the specials of each character. Goes over each character’s special in detail. Teaches how to use them, less so how to beat them. Includes pictures of angles.
Other Lethal League Blaze Guides:
- All Unlocks.
- Beginner’s Guide.
- Economics Guide.
- Speed Scaling.
- Candyman Guide.
- Secret Techniques.
- Secret Taunt Costumes.
- How to Unlock the Grand Slam Achievement.
How to Special and Special Meter
All credit goes to PKPenguin!
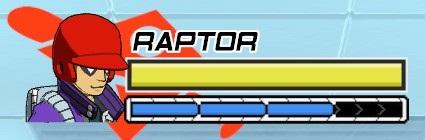
Above is an image of the health bar and special meter. The health bar is the big yellow bar. The special meter is just below it, and it has three charges.
To use your special, you first have to fill up your special meter. By default, you need 4 charges to fill the meter. There are a couple ways to do this:
- Hit or grab the ball. This fills 1 charge.
- Hit a bunted ball. This fills 2 charges. (Down airs will only fill 1.)
- Taunt when you have 3 charges. This will give you the last charge to fill your meter.
- Parry someone successfully. This completely fills your meter.
When the meter is full, hit the ball and press the Swing button again before you release it (you can also press the Grab button). This will activate your special. Depending on your character, your special will do different things. Let’s get into what each character can do now.
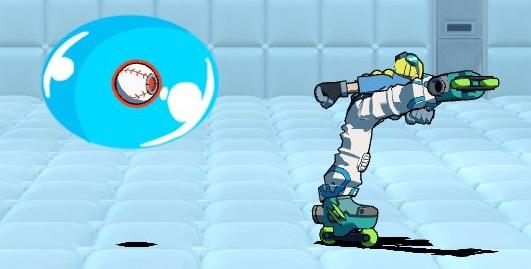
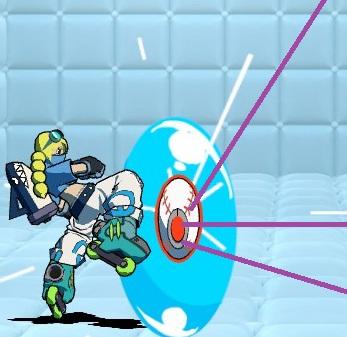
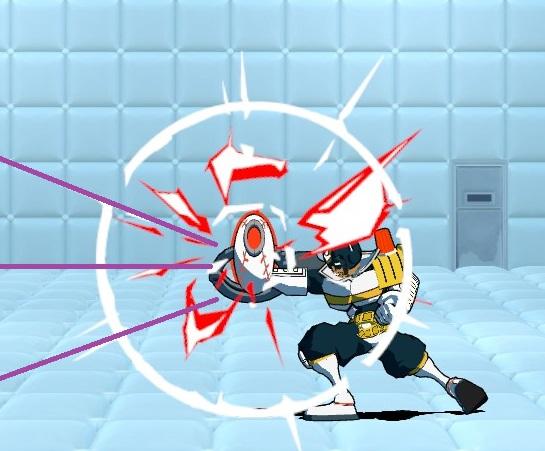
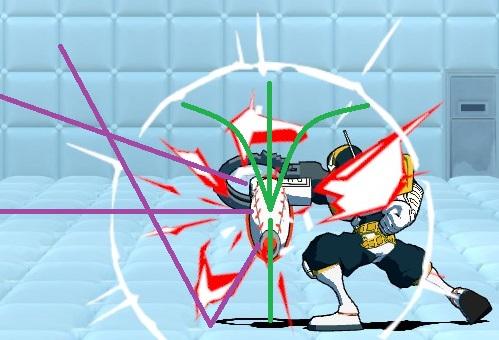
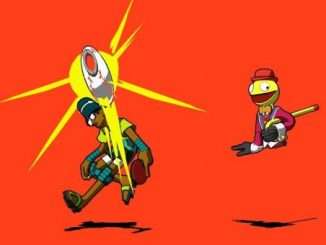
Raptor
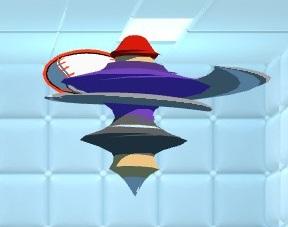
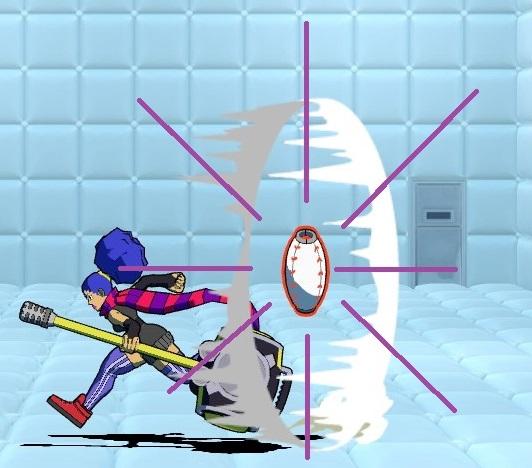
Raptor can use his special out of a regular hit or a smash hit. He cannot use it out of a down air.
When he uses it, he flies into a tornado-looking spin (see the picture above). While you’re in this spin, you can hold a direction to send the ball to. You can send it horizontally in front or behind you, or diagonally up/down in front or behind you. This gives you six different trajectories to send the ball that you can choose, and launches very quickly.
You can also delay the ball release by holding the Swing button when you activate the special. This will make you stay in the tornado animation for a second longer before releasing the ball, and add a bit more speed to it. You can use this to fake out people who try to predict the timing of the release.
If you hold the Bunt button while in the tornado animation, the ball will be bunted when it is released instead of hit. The angles you can release at are a bit different when you bunt. You can go straight vertically up or down, or diagonally up-left/up-right. Combine this with a double jump or a fast fall, and you can bunt out of your special and smash the ball very quickly.

This image shows a rough sketch of what his angles are. Purple lines are regular hit angles, while green ones are bunt angles.
Candyman
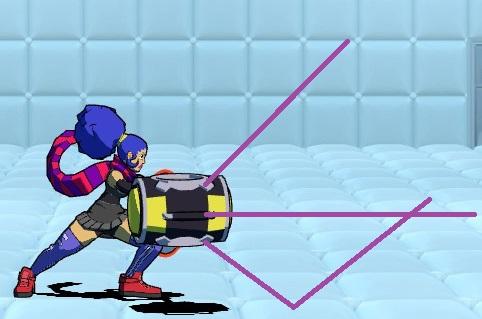
Candyman can use his special out of a regular hit, a smash hit, AND a down air hit.
Candyman will turn the ball into a special ball that passes through walls (some people call it a Candyball, others a Jawbreaker). When he uses his special, the ball will transform in his hands, but will still release it at the same time that it usually does. Because of this, you will want to use his special just as he is about to release the ball to give your enemies less time to react. Also note that Candyman cannot bunt out of his special.
The Candyball will warp to the opposite wall that it passes through. If you start it very close to a wall, it can travel just barely far enough to warp twice before disappearing, but usually the ball will only last long enough for one warp. However, if you predict where the ball will go, you can hit it again while it’s still a Candyball, and it will reset its lifespan. What this means is that as long as you can keep hitting it, it will always stay as a Candyball.
The speed of the Candyball is pretty much set. This means that if you activate a Candyball at low speeds, it will go about the same speed as if you activated it at high speeds. This speed change combined with the warp allows you to trick opponents by getting the ball behind them.
The angles you can release the Candyball at are as follows.
For regular swings and smash hits:
- Straight in front of you.
- Upwards, similar to your regular swing up-angle.
- Downwards. On regular swings, it’s much steeper than the regular swing down angle. On smashes, it is about as steep as a regular swing down angle.
For down airs, the angles are the same as regular down air angles. You can send the ball straight down by holding down, above and behind you by holding back, and at a steep downwards angle in front of you by holding forward.

Here is a picture of just his smash angles.
Switch
Switch has a pretty unique special. On its own, it’s pretty straightforward, sending the ball at a unique, steeply horizontal angle. What sets it apart is that it can be used without actually having to hit the ball first. To do this, just jump and hold the Taunt button while in the air. (You can also hold taunt while crouching or while riding on the ceiling to do a grounded version and an upside down version, but both are way less common and debatably less useful.) The picture above shows Switch throwing out his special in the air without having the ball. If the special doesn’t connect, your special meter won’t get used up, so you can keep throwing out switchflips in the air until you get one.
The hitbox for the switchflip is around your waist/the skateboard, so if you try an aerial switchflip and the ball comes at you from above, you’ll still get hit (unless you do a ceiling ride switchflip to do an upside down version, in which case you’ll still get hit from below).
You can still activate switchflip out of a smash and a regular hit, of course (not down airs, though). Switch will release at the same speed as he would otherwise, so use his special just as the ball is about to release regularly to catch your enemies off guard. Using a standard switchflip like this will only allow the ball to travel in one angle in front of you, and you cannot bunt cancel out of it. The only exception is if you get an overhead smash, where the ball is above you and you hit it with the very start of your smash; if you land an overhead smash, you can reverse the angle of switchflip by holding back.
Landing an aerial switchflip (the one where you hold Taunt) is always an instant release, meaning that the ball will launch about as soon as you touch it, leaving your opponent with very little time to react. You can also send the ball at an alternate angle: Behind you. Just hold back as soon as the switchflip connects to do this. You can still send at the standard in-front angle by just holding forwards/not holding anything, too. This is just like the overhead smash angle mentioned in the previous paragraph, only it doesn’t require the ball to be above you.
While the angles are simple, the fact that you can spam this special in the air until it connects, as well as the fact that it can be held out for a long time by holding Taunt, make it a very easy-to-connect move and a powerful tool for turning the tables on your enemies.

Here’s an image of the angles switchflip can send at. Note that the one that goes behind him can only be used with an aerial switchflip, not a standard one.
Sonata
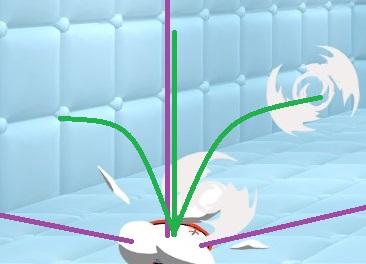
Sonata’s special is a bit unique. When you release the ball, it will first launch in front of you in a direction you hold, then will travel in any direction you hold a second later, and will travel in your held direction AGAIN a second later. Basically, you can redirect the ball twice in the air.
This special can be used out of a regular hit, a smash hit, and a down air. The initial angle of release can be straight, down angled, or up angled, but it MUST be in front of you (unlike the two air redirection angles). For down airs, the initial angle must be either straight in front of you or down angled in front of you (it can’t be sent up). The special cannot be bunted out of. The special has a set speed, meaning it will get put at a certain speed once specialed regardless of the ball speed before it was specialed. This special does not have an instant release (it releases when the ball normally would), so activate it just as you’re about to release the ball regularly.
When you activate this special, you can hold directions to redirect it in the air (as I’ve already said), but you can also move Sonata at the same time. This will allow you to pull the ball back to Sonata and hit it again while it’s still being specialed. The special will also end early if the ball bounces off of a wall (but not the floor or ceiling), so avoid using it if you’re facing a wall and are right up against it.
Use this special to manuever the ball around your opponent, get the ball very close to the ground where it’s hard to avoid, move the ball straight into your opponent, or to bring the ball back to you and keep comboing it.
These two images show the angles you can use with the initial release of the special, as well as when you redirect the ball in the air.
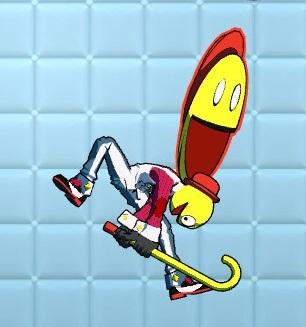
Latch

Latch’s special allows you to pick up and carry the ball around for a brief time before spitting it out again. When you use the special, he will play the eating animation (see the picture above), and then will be able to walk/jump around until the release meter at the bottom of the screen fiils up. This special can be activated out of a regular or a smash hit, but not a down air.
When Latch releases the ball, he MUST angle it up, down, or straight in front of him. However, because he can turn around while holding the ball, “in front of him” can be in either direction (as long as you’re facing that direction before the release meter fills).
Latch can also bunt cancel the ball by pressing the Bunt key at any time while the release meter is charging. This will cause him to instantly spit out the ball into a bunt. Bunted balls have different angles, and can be send diagonally-up in front of him, diagonally-up behind him, or straight up/straight down.
Potential uses of this special are: Walking right up to your foe with the ball and launching it straight at them, launching it in specific spots where you know you can follow up with another hit, bunting the ball in any direction in any spot you can get to and following up with any hit of your choice. Just remember to keep away from your opponent, who will be trying to hit the ball away from you as soon as you release it.

Pictured are the release angles Latch can use as he’s about to spit out the ball. Purple lines are regular swing angles, green ones are bunt angles.
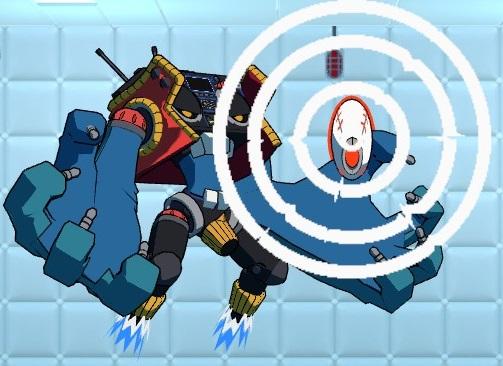
Dice

Dice’s special sends the ball in a nasty arc, which can be very hard to react to. Not only that, but after the ball finishes arcing, Dice can choose a direction for it to ricochet off of the floor. He can also bunt the ball instead of ricocheting it after the arc, and can use his special out of his normal swing, smash, AND down air. Overall, his special is very robust if you know how to use it.
On the ground and with a normal swing, your special arc will pretty much look like the image above. Holding directions doesn’t seem to affect the size or shape of the arc much, if at all. Rather, holding directions will change the direction of the ricochet after the arc. If you are in the air, or you are getting a smash hit, the arc will be much wider, so change your POSITION to change your arc, not your angle. You can FLIP your arc, however, by holding behind you, which will give the same exact arc as before, only travelling in the opposite direction.
If the ball hits a wall before finishing its arc, the ball will slide down the wall and ricochet only once it hits the floor.
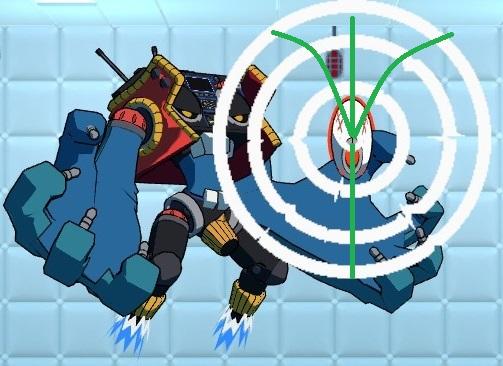
Once the ball ricochets, you can hold down to make the ball go at a VERY steep horizontal angle. If you hold up, the ball will go perfectly vertically up and down. Holding left or right gives a similar angle to the down angle, but will travel in the direction you held. Holding up-left or up-right counts as just an up angle, and will send the ball vertically, so avoid doing that. The same goes for down-left/right, but with a down angle.
If you bunt out of the ricochet, you can hold up, left, or right to make the ball travel straight up, diagonally-up left, or diagonally up-right, respectively.
Pictured are the angles you can send the ball once it has ricocheted. Purple lines are regular angles, green lines are bunt angles.
Jet
Jet’s special puts the ball in a bubble. This bubble counts as a parry. If you don’t what that is, parries cannot be hit or bunted (trying to do so will cause you to clank and get knocked back/stunned briefly). They can, however, be grabbed, so watch out for people who will try to grab your bubble. Also, the parry only affects enemies, so you can still hit your own bubble ball.
This special can be used out of a regular swing, a smash, or a down air. It follows the regular release time, so use it when the ball is about to release reguarly to give your enemies less of a chance to react.
The bubble has a set, slow speed, meaning it will always put the ball at that slow speed no matter how fast the ball was going before. It also has a set timer, and once the timer on the bubble runs out, it pops, causing the ball to go much faster.
After the bubble pops, the ball will have a blue trail on it for a while. Hitting the ball again while it’s in the bubble or while it has this blue trail and pressing swing again (not holding, but pressing) will put the ball in a second bubble, doubling the length/usefulness of your special (note that you must SWING, not grab or bunt, to re-bubble). You can only re-bubble once per special.
Pictured are the angles Jet can use out of a regular swing special. If you use her special out of a smash hit or a down air, the bubble will travel in her regular smash angle and straight down, respectively.
Doombox
Doombox’s special is a lot less interactive than other specials. You cannot angle it normally. When the ball releases, it will actually do a homing attack, going in a straight line at the nearest enemy. Doombox can use his special out of a normal swing, a smash, or a down air.
Because the ball is homing, there is no room for mixups with Doombox’s special’s regular usage. Your enemy simply has to swing as soon as your release meter fills up, and they will hit the ball every time without fail. Because of this, knowing when to use your special is important. Use it when the oppoent is jumping around frantically, not sure of what to do, or when they’re too close to react in time. Do NOT use it when they are standing still far away waiting for you to make your next move.
Doombox’s special DOES have another usage, however: You can bunt-cancel it. At any time while the release meter is filling up during your special, hold a direction to bunt in and press the Bunt key to instantly end your special animation and bunt the ball. From here, you can near-instantly fly up to the bunted ball and hit it with any move of your choice. This is a very fast technique, making it difficult for your enemies to react to, and gives you a lot of moves to choose from.
Pictured are the bunt angles Doombox can use when bunt-cancelling his special. Notice that there are no regular-hit angles, since you can’t actually choose those: They’re simply done automatically with the homing attack. Bunts can be straight down, straight up, or diagonally-up left/right.
Nitro

Nitro’s special has two parts: The chain, where he will throw out the ball in a handcuff, and the followup, where he will either reel the ball back or grapple to the ball before hitting it a second and final time.
He can use his special out of a regular swing, a smash, or a down air. The first part of his special, the chain, uses the regular release time, so you should activate your special just before the ball releases regularly. The second hit is always a near-instant release.
To grapple to the ball instead of reeling it in for the second hit, you must HOLD the Swing button after activating the special. If you hold the button, Nitro will snap to the ball after throwing the chain, allowing you to change his position mid-special.
While the ball is in the chain, is can be hit by enemies, but they won’t gain control of the ball; you will still reel it in for the second hit. They will, however, get stuck in the swing animation, preventing them from moving around. This makes them easy to hit if they try to swing at the chained ball: Just grapple to the ball and angle it straight at them.
The chain has no max length, and will keep travelling until it hits a wall/floor or is hit by an enemy. If you use the special while facing a wall and while right up next to it, the chain part of the special will end near-instantly, allowing you to do the instant-release second hit of the special very quickly.
Nitro can also bunt-cancel the second hit after reeling the chain.
Pictured are Nitro’s angles for the first and second hit of his special, respectively. The second image has green lines for bunt angles. Note that the only real difference in the purple line angles is that the second hit has a much steeper down angle.
Nitro has different first-hit angles if he activates the special with a down air. They’re identical to his down air angles.
Grid

Grid’s special essentially allows him to teleport with the ball before releasing it. He can use it out of a regular swing, a smash, or a down air. He cannot bunt cancel it (bunt cancelling his special was removed in a recent patch). He can teleport up to two times in any cardinal direction (no diagonals). Depending on the direction he teleports, he will launch the ball at one of three different angles. Aside from the very brief teleport, his special is a always a near-instant release.
The three angles Grid can use are a straight, which goes perfectly horizontally in front of him, a smash, which shares his smash angle, and a downair, which goes perfectly vertically below him. The angle he uses depends on which direction he last teleports (so if you teleport twice, it will depend on the second teleport, not the first).
Teleporting left or right will make him do a straight. Teleporting down will make him do a down air, but only if you’re still in the air after the teleport: Landing after teleporting down will result in a straight. Teleporting up makes him do the smash angle.
Teleporting a second time requires you to hold a different direction after your first teleport animation begins. Press Swing/Grab again after the first teleport ends to teleport a second time in the direction you were holding.
There is a way to always do a down angle, regardless of your teleport direction. During the animation for your last teleport (after it starts but before it finishes), hold DOWN, and Grid will always do a down angle (even on the ground). The timing is a bit strict (albeit easier than getting a second teleport), but gives you an extra option when it comes to angles.
While the angles themselves are simple (so simple that I don’t think they need an image), Grid’s special is strong thanks to its speed and positioning power. It’s a very fast hit thanks to the instant release, and it can be from almost anywhere on the arena if the Grid player is fast enough at inputting teleports. The special is tricky to use due to how fast you must change directional inputs, but if you can master it, it can become very robust.
Be the first to comment