
Welcome! I aim to make this a complete campaign guide using a mix of written commentary and video posts of the game. Campaign Playthrough (Hard Difficulty).
Contents
- What is Mutant Year Zero: Road to Eden?
- Hammon’s Cabin and The Fallen Angel
- The High Road and Cave of Fear
- The Sea of Titans and The House of Bones
- How to Level Up (Stuck at House of Bones?)
- House of Bones and Izza and Falla
- How to Beat Iron Serpent
- How to Beat Metal Fields
- Loot and Zones (Loot Chests and Where to Find Them)
- Artifact Locations
What is Mutant Year Zero: Road to Eden?
All credit goes to Shadowcoast!
Mutant Year Zero Road to Eden is a mix between a free roaming / zone exploration game with deep XCOM like tactical combat driven by a seemingly deep story line. The game uses free roaming mechanics that allows you to explore various zones. When you encounter an enemy, the game style switches into tactical combat mode.
The game has a nice mix of stealth and combat options and allows character customization in the form of weapons, gear (head and chest) and mutations (which provide unique abilities or bonuses).
You manage a group of stalkers who are characters that have various mutations and abilities. You start out with Bormin and Dux (a humanoid Bore and Duck respectively). You start out heading back to the Ark which is the last bastion of humanity. Without the Stalkers, the Ark would fall, or so we’re told.
Check out episode 1 where we play through the introduction and make our way back to the Ark. Read on below for more details of the mission and outcome.
Episode 1 – Welcome to Mutant Year Zero
Details
In Episode 1 we try to answer the question, what is Mutant Year Zero? While we don’t arrive at a definitive answer, I can tell you this is a very compelling game with unique game mechanics I have not experienced before.
We start the episode making our (Bormin and Dux) way back to the Ark. Along the way we ecounter several Zone Ghouls, the primary enemies we’ll ecounter throughout the game. During this introductory mission, we only encounter Butcher (melee) and Hunter (ranged) type enemies.
After taking down several enemies and passing through a few short zones, we finally arrive at the Ark where we explore the various shops.
Resources
There are four types of resources which can be found in the top right of the screen.
- Scrap which is used to buy items and medkits.
- Artifacts which can be used at Pripp’s shop for various bonuses.
- Medkits which are used to heal your stalkers. Note: using a medkit when outside of combat will fully heal your stalker.
- Weapon Parts can be used to upgrade weapons. Upgrading weapons increases stats such as damage and chance to critical strike.
The Ark provides access to four shops.
Iridia’s Shop
Iridia’s Shop provides much needed items such as medkits, weapons and mods for a price (scrap – left most resource).
Delta’s Fix Pit
Delta’s Fix Pit allows us to attach weapon mods we find in chests or from loot dropped from enemies. We can also upgrade our weapons for a price (weapon scrap – top right resource).
Pripps Place
Pripps Place allows you to redeem or use your artifacts to purchase various bonuses.
First recommended bonus to purchase – Deal Maker.

The Elder
Heading to the Elder normally results in cut scenes where he provides insight and knowledge. Helpful, maybe? Though take everything with a grain of salt. After all, the Elder is the closest thing to an Ancient who are to blame for the wasteland we live in now!
Hammon’s Cabin and The Fallen Angel
Once we return to the Ark, the Elder sends us on a new mission to track down Hammon. Hammon is a key technician the Ark needs to survive. Word has come in that Hammon headed out with his team of Stalkers to explore up North. To find more clues, the Elder recommends we head to Hammon’s Cabin to find clues as to where he and his Stalkers went.
In this episode we explore Hammon’s Cabin and the Fallen Angel zones.
Episode 2 – Hammon’s Cabin and The Fallen Angel
Details
I recommend exploring in the opposite direction of Hammon’s Cabin. In this area you’ll encounter 2 Zone Dogs which can easily be taken out by Dux (or Bormin). You’ll also find much needed Scrap and Weapon Parts.
After taking out the two Zone Dogs and picking up all the Scrap and Weapon Parts, head towards Hammon’s Cabin. Approach with caution as there is a Shaman Ghoul who will summon additional Ghouls if you do not take him down first. I recommend pathing around back to pick up scrap and weapon parts before positioning yourself to focus fire down the Shaman.
Setting up, I’d position yourself so you can have both Bormin and Dux ambush and hit the Shaman taking him out in the first turn. I then recommend foucsing down the Hunter before taking out the Marauder who does less damage.
Be sure to pick up the Far-Looker artifact in the front of the yard!
We pick up valuable clues confirming Hammon took his team to explore up North another mysterious machine that fell from the sky.
Continuing on, you enter The High Road where you meet Selma, one of the Stalkers on Hammon’s team. After meeting her, you then have the decision to branch left and head North towards Hammon or branch off to the right to explore the Fallen Angel zone. I recommend exploring the Fallen Angel zone where you can pick up additional Scrap and Weapon Parts as well as additional loot.
I’d recommend waiting to take on the Nurse Ghoul and Med Bot at the Fallen Angel until you’ve gain more levels and output more damage.
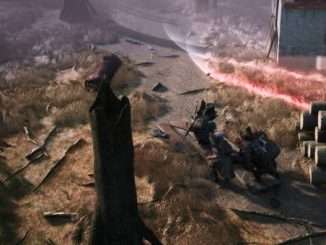
The High Road and Cave of Fear
Episode 3 – The High Road and Cave of Fear
Details
The High Road can be tricky to take on during your first pass through. I recommend sneaking around the back after climbing up the cliff. Take out the lone zone ghoul but be wary of the Med Bot. You can sneak up to and grab the loot crate without engaging the main body of enemies.
After grabbing the loot, sneak back around and wait for the Shaman to path away from you.
I recommend watching the video above if you have trouble timing it. Patience is a virtue and it’s important you sneak by on the far left side while the Shaman is walking away from you.
Note: The Shaman will call backup if allowed a turn so it’s important to wait until you can output enough damage to take him out in one ambush turn.
Once you enter the Cave of Fear, head over to the right section to pick up scrap and weapon parts. From there, head back up the left side of the tunnel avoiding the three enemies guarding a loot chest (Pyro, Med Bot and Hunter). Heading up the left tunnel, you will encounter a few lone zone ghouls. Take your time to silently take them down using Selma’s Ancient Pistol and Dux’s Crossbow (I recommend upgrading both when you have enough weapon parts at Delta’s Fix Pit).
Once you eliminate the lone zone ghouls behind, you can choose to engage the three enemies guarding the loot chest. I personally decided to wait until I leveled up and was able to upgrade my weapons.
Note: There is a fair amount of scrap and weapon parts laying around, be sure to walk around and collect it all!
The Sea of Titans and The House of Bones
Episode 4 – The Sea of Titans and The House of Bones
In this episode we sneak past the Sea of Titans picking off enemies one at a time. We leave a major group for later sneaking past them to steal the ferry to cross the water.
Note: we become STUCK at the House of Bones because we’re too low of a level. See my “How to level up” section on recommendations on how to progress.
How to Level Up (Stuck at House of Bones?)
Progressing through the game, I hit a road block at House of Bones. We’re forced to take out multiple higher level enemies (I was level 11 at the time and enemies were level 20) which forced me to back-track and clear out The Fallen Angel, The High Road and the Cave of Fear and The Sea of Titan zones.
After clearing out all those zones, you should be level 18-19 enabling you to take out enemies in The House of Bones zone.
House of Bones and Izza and Falla
Episode 6 – Taking Down Brother Skoog
Episode 7 – Izza and Falla
How to Beat Iron Serpent
Episode 8
How to Beat Metal Fields
Episode 9
Episode 10
Loot and Zones (Loot Chests and Where to Find Them)
Broiler 50
- Bonuses: +1 Additional Critical Damage / +50% Chance to Burn Enemies.
- Dropped by first Zone Ghoul encountered in the first Zone, The Metal Bird.
- Recommend equipping on Dux’s Crossbow once you reach the Ark in Delta’s Fix Pit.


Gaper
- New Weapon (Scatter Gun/Shot Gun).
- Bonuses: Can Destroy Cover, Knocks Enemies Back
- Found in the second Zone, Eastern Outpost behind the cabin guarded by 2 zone Ghouls.
- Note: there is a third zone Ghoul behind the cabin. Recommend ambushing with Dux’s crossbow.
Recommend Equipping on Bormin.


Snazzy Visor
- New Equipment.
- Bonuses: 25% Added to Weapon Range.
- Found in Ark Outskirts zone in dilapidated gas station on the way to the Ark elevator.
- Recommend Equipping on Dux.


Noatun – EMP 30
- Weapon Mod.
- Bonuses: +1 Additional Critical Damage, 30% Chance to Disable Robotic Enemies.


Aristo Hat
- New Equipment.
- Bonuses: +20% Critical Damage from High Ground.
- Found on Eastern edge of The High Grounds zone guarded by zone dogs.


Artifact Locations
Artifacts can be used to redeem key bonuses that strengthen your squad and allow you additional bonuses in the Ark such as discounts at Iridia’s Shop.
Boom Box
Found in the Eastern Outpost zone guarded by 2 zone ghouls (with an additional 3rd zone ghoul behind the cabin). Recommend purchasing Iridia’s Discount first (can be redeemed at Pripps Place).


Far-Looker
Found in Hammon’s Cabin zone right outside of Hammon’s Cabin. Guarded by level 5 Shaman, Hunter and Marauder.


All Artifacts and Where to Find Them

Be the first to comment