
Artificial Scarcity is a contact mission given by Martin Madrazo and according to many players it’s one of the most difficult contact missions in the game; you’ll need to enter an area surrounded by enemies, it even has snipers on the rooftops! This guide will show you how to get the most out of this mission; many players rush through using a Buzzard, armored Karuma or a missile launcher but by doing so they’re severely missing out on some good cash.
All you need are 3 sticky bombs, one proximity mine and plenty of ammo. Even if you’re just level 19 then this mission is very well doable!
Other GTA Guides:
- 100% Completion Guide!
- Beginner’s Guide (GTA Online).
- Advanced Nightclub Guide.
- Advanced Guide for MC Business.
- Advanced Smuggler’s Run Guide.
- How to Use Mods?
- How to Make Easy Money Everyday (Solo Guide).
Contents
Introduction
All credit goes to ShelLuser!
Contact missions are a very important way to make some decent money in GTA 5 Online (‘GTA:O’) and also one of my favorites. If you don’t have a CEO office yet then this could very well be your only option into some serious money.
But if you want to make some serious money then there are some rules regarding these missions which you really need to keep in mind:
#1: Don’t rush the mission(s)!
If you complete a contact mission successfully then you’ll get paid. But the amount of payment heavily depends on the time you took to do that mission. This is also why I wrote this guide: many players rush through missions such as Artificial Scarcity using a Buzzard or a tank, but in doing so they’re actually denying themselves some good payment!
#2: Waiting for the timer is a bad way to make money!
Knowing about rule #1 might tempt you to simply start a contact mission and then spend plenty of time waiting for the timer to pass. But that is actually a very bad strategy! Why? Because you’re wasting opportunities and can do much better!
See: making money in GTA:O is all about having things working together. Slightly offtopic for this guide but the main reason that CEO properties & Motorclub businesses (bunker, counterfeit cash, heroin, night club, etc.) are so popular is because they can generate while you do other things to make even more money. Things like this contact mission for example.
But that same strategy applies to contact missions as well! Why wait around doing nothing while you could also be killing (hostile) NPC’s which will earn you both some extra (dropped) money as well as reputation points (‘RP’)?
Which is why Artificial Scarcity is such a great mission. By taking the time to clear out the enemies you’ll take longer (which earns you more money) and you also earn RP and some dropped cash.
PS: And in case you’re wondering: yes, I’m a guy who plays with a female character. I have no intention to pretend that I’m a girl, my reasoning is very simple: I spend a lot of time on this game (it’s one of my favorites) so then I’d rather look at an avatar I can actually enjoy looking at 😉
Mission Starts: Preparations & The First Two Trucks
Artificial Scarcity is a difficult mission to complete, but if you apply a little bit of strategy (and don’t rush things!) then you’ll soon discover that it’s actually quite doable. Please note: I’m not saying that this is going to be easy, but it will be very well doable, even on your own and even if you’re only level 19.
However, you’re going to need some specific weapons and a ditto strategy.
Required weapons
The minimal requirements to successfully complete this mission are:
- 3 (‘three’) sticky bombs; you’re going to use these to blow up the first three trucks.
- 1 (‘one’) proximity mine; you’ll need this to deal with one car of the reinforcements.
- A lot of ammo (depending on your aim). You’re going to shoot the rest of the enemies in a cool and fierce firefight, so you’ll need some ammo.
- Something to blow up the last four trucks. Worst case scenario: run over to the nearby Ammunation (south) and buy some extra gasoline.
And here are some weapons which can definitely help you to make this easier on yourself (but without rushing anything):
- A silent weapon; I always have a silencer on one of my automatic weapons and one pistol. Although not required it will help in the first stages of the mission (enemies won’t notice you just yet).
- Sniper rifle (or the marksman rifle): You’re going to deal with 2 snipers on a rooftop, and one gunner at the top of a staircase. They can all be shot using an (semi) automatic rifle, but obviously a sniper rifle will be easier.
- If you have some grenades then that’s going to help with blowing up the trucks as well as getting rid of some enemies in hiding.
Step one: Be sure to approach the west side from the south!
")
If you started this mission after having completed another you’ll already be positioned south, but if not then I strongly suggest that you make sure to approach from the south, see the map above for details.
The reason for this strategy is because it’ll be easier on you; when you approach the factory then two trucks will leave: one on the western exit and one on the east. The truck on the west side will already be halfway on the road, whereas the truck on the east is still in a corridor. Therefor its best to start on the west side.
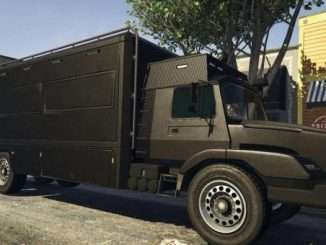
Step two: Place a sticky bomb on both trucks, but don’t detonate them yet!
")
The first truck (seen above) either drives away from you or approaches you. Plant a sticky bomb onto the truck and then continue to drive north until you reach the traffic lights; here you need to go right to reach the second truck:
")
The crossroad, go right to reach the second truck.
")
Once you come close to the second truck then do the same thing as before: plant a sticky bomb onto the truck but whatever you do: do not detonate them yet.
This is all part of the strategy; if you detonate any of the trucks at this point then two things are going to happen: first some reinforcements are going to spawn in. At the least you’ll have to deal with 2 vans which each contain 4 enemy NPC’s.
Second, and the bigger problem, is that all the enemies in the game will be alerted to your presence are have now turned hostile. Some will even start to seek you out, and that is going to make this mission a lot more difficult.
Fun fact: if you plant a sticky bomb somewhere then you can easily drive off, literally to the other side of the map if you want to, and the bomb will still work. That’s what we’re going to do here: we’re going to detonate the trucks, but only after we’re fully prepared. So let them drive off, we’ll get them anyway.
Note: it is very important that you don’t die before detonating the trucks. So be sure that you don’t take unnecessary risks.
Killing the First Enemies & Planting the Proximity Mine
")
After you planted the sticky bombs on both trucks, drive to the north-east corner of the yard. Park your car and you’ll now overlook the whole area and can directly see three parked trucks below. Our first target is an enemy which is standing on the roof. Look closely at the screenshot above and you’ll see him right in the middle (I should have added some markers, I only thought about that later).
If you can’t spot the enemy: You can see a pole to the right of my car. And to the right of that pole, somewhat in the middle, you’ll see a white/gray air vent (?), it has a black area. Right above that air vent is the enemy, standing before a fence.
This is our first target. If you have any then I suggest that you use a silenced weapon.
Once you killed the enemy run up to the alley on your left. Careful because there will be 2 hostile enemies which start to shoot you right away (even without any red dots).
")
As soon as you killed these then some more enemies in the yard below will get alerted (notice the red dot?), try to quickly shoot them from your position above. This will also draw some extra attention. Do not walk too far into the alley because there’s a chance that multiple enemies will engage you, if that happens you need to take cover.
")
Remember: It is vital to our strategy that you don’t get killed in this stage of the mission (if that happens then the sticky bombs will disappear). Do not take too much risks; be sure to dodge, use cover and be patient!
At this point 2 (actually 3) things can happen: the enemies below are alerted to your presence and they’ll try to shoot you from below. Points of interest are the crate next to the container (in the middle), the right corner at the end of the alley below (also notice the crate there) and of course the area in the middle (notice the dead enemy near my crosshair?).
But: some enemies can also try to get behind you. In the screenshot above you’ll notice several red dots on my right, some are even right next to my car! This is the other thing that can happen: the enemies won’t engage you directly, but try to flank you.
And of course, to make this even more difficult, it’s also possible that all of the above happens at once. So: some enemies will shoot you from below while others try to circle and flank you. If this happens then concentrate on the enemies to your right, those will actually charge at you. Once they’re dead you can focus your attention again to the ones below.
When in doubt: go back to your car, take cover there and wait for the enemies to come towards you, while also keeping an eye out for enemies which might come up the alley (this seldomly happens).
Important: Sometimes an enemy will climb up to your car, but instead of attacking you right away it’ll climb up further onto the roof. And with that I mean the roof behind (and ‘above’) the first enemy we killed. If you look at my first screenshot then it’s the building right behind (‘above’) my car.
If this happens then you’ll notice this on your mini map (a red blip). Stay calm! First focus on any enemies which are charging you. Once they’re killed then cross the street (do not stay on the road because you risk startling a driving NPC which might then run into you!), stay on the pavement and kill the enemy on the roof. Don’t climb up, just stay on the pavement across the street, keep your aim on the roof and the enemy will eventually show itself. Worst case: fire a few shots to draw him out.
Once all these enemies are dead (there are still plenty left in the yard below) go back to the alley and place a proximity mine somewhere in the middle (make sure it’s somewhat away from the road to avoid NPC detections).
Now go back to your car.
Going Down onto the Yard
")
I hope you know how to sneak, because you’re going to need it! Slowly (and I mean that: take your time and do not rush things) go towards the area on the right. Our first goal is the pillar on the right, get behind it in cover. There will be at least 2 enemies that will start to shoot the very moment they’ll notice you.
")
Be very careful here. There are two enemies on the left. You need to kill these first. It is possible that a third will start to shoot at you (from above the white container, on the stairs) but ignore him for now because he’ll be more busy shooting the container than you.
More important are the enemies on your right. These will even start to walk from right to left (basically they will try to get into the same position as the enemy I’m shooting at above). If you’re fast enough you can shoot them while they’re running but… as you should know by now: don’t rush and don’t take chances. Worst case scenario is that they’ll take up position and then you have to kill an extra enemy. No problem.
Once they’re dead walk towards the back of the truck that is closest to you and plant the last sticky bomb. Once again: do not detonate it just yet.
")
Now make your way to our first strategic point: behind the paper stack:
")
Notice the stack with the red lines? That’s where we want to go.
Careful: there are several dangerous enemies here:
- There are 3 enemies in front of the truck on the right (the one behind the white trailer). Two of them will start walking towards you once you’re close enough. You should have no problems just shooting them.
- Notice how the trucks on the right side of the yard (see the mini map) have the shape of an arrow (‘triangle’)? Behind the truck at the tip of the arrow (the one close to the alley) will be another enemy. He’ll be crouching (in cover), but you should be able to shoot him in the legs from your position further above (use zoom if you can). Shoot him in the legs, he’ll fall, and then continue to shoot until you kill him.
After those enemies met their demise you can slowly make your way to the ‘strategic point’:
")
I’m in position, notice the dead enemy on my right?
Once you reached this place then start by waiting, one (or two) enemies on your right will probably start walking towards you, shoot them. Unfortunately the third remains in place. So sneak up to him: go past the front of the trailer, dodge if you need to and then shoot the enemy (he’ll be covered behind a crate, but also come out to try and kill you).
Fortunately there’s also a crate close to you which you can use to take cover.
However: don’t stay there for too long because there are still several enemies behind you, including some snipers! What I usually do once I killed the enemy in front of the truck is to run up to the crate and take cover behind it (he usually shoots at you, so then it’s best to wait until your health restores itself).
When you’re done sneak back to the strategic position. It’s time to start stirring up some action!
Destroying the First (3) Trucks: Ambush!
This is it, the moment when all hell is about to break loose (and also my favorite part of the mission)!
If you haven’t already sneak back to the strategic position. Why this is strategic? Simple: the two trucks on our left are ‘dynamic’ (the one close to us (where we planted the sticky bomb) and the other on the other side of the yard). And with ‘dynamic’ I mean that once we blow up the trucks then they’ll start driving out of the yard.
One of them obviously won’t make it because it gets blown up, but the truck on the other end will start driving away, and it is essential that you kill the driver!
")
If you fail to kill the driver then you’ll have a bit of a problem on your hands; the truck won’t make it very far thanks to our proximity mine, but unfortunately that also opens up the way for the reinforcements. However… if you’re lucky then the wreckage of the truck can slow them down enough so that you can kill both waves.
Of course in this guide I’m assuming that you killed the driver.
Take a good luck at the screenshot above! There are three areas (I marked them for you) which are very important because there are some dangerous enemies there. On the right side (on roof) you can see a sniper. In the middle, on the right side of the spotlight, there’s another sniper hiding behind the wall.
And finally there’s also a gunner on top of the stairs on the left.
No one said this was going to be easy 😉
So now it’s time to RUN & DUCK! Make it quick because reinforcements are on the way. You will notice a stone barricade on your left; quickly run towards that and take cover behind it! Don’t worry too much about those three dangerous locations I marked for now, just keep them in mind. It is the main reason why we need to run (well, that and the upcoming enemies).
")
There will be 2 waves of enemies: one coming into the alley on the left and one on the right. Unfortunately for those on the left we left a proximity mine in the alley so they get blown up, which leaves us with only one wave to take care off.
Be careful these enemies will charge right at you. When in doubt just shoot one to make it fall to the ground so that you can focus your attention on another enemy. At this point the most important thing is to drop them on the ground; preferably dead but don’t rush (if you shoot at an enemy for too long then another could take a shot at you and kill you).
If you have grenades then those could be useful: try to blow up both the car and the truck; that’s where some enemies will try to take cover.
Also: don’t worry too much if you get killed. At this point in the game that won’t matter too much. Of course you’d need to be extra careful during the next stage, but you’ll spawn outside the yard which gives you a bit of an advantage because there are more items to seek cover behind. This is very important if you didn’t kill all the reinforcements yet.
Killing the Final Enemies
Once you killed all the reinforcements it’s time to take care of the final enemies.
Take shelter behind the truck in the middle (or what’s left of it if you used grenades during the previous assault). At this point both the sniper on the right as well as the gunner on the left will start to notice you. Fortunately you’ll be close enough to shoot them.
")
There’s also a small ‘nest’ next to the truck on the right, but fortunately (?) these enemies are behind a container so they often shoot up the container instead of you:
")
This is the advantage you need to take care of the sniper on the rooftop to your right. Of course there’s also a down side: because those enemies are pretty dug in it makes them harder to hit and kill, especially if you’re using free-aim like I do. Worst case scenario could be to try and throw some grenades at them, or try sneaking around to come on them from the left (they normally don’t move).
However… don’t forget (or ignore) the most dangerous enemy at this stage: the sniper on the roof:
")
He will often show himself but if he doesn’t then simply fire some shots his way. I often shoot the spotlight which will make him come out. So then you only need to aim a little to the right and he’ll be dead, easy 😉
")
(I got killed plenty of times during this fight, usually because I became too impatient)
Once he’s killed you’ll have the whole yard to yourself. So first you should do now is run around and pick up any left over dropped money.
If you have grenades (or sticky bombs to spare) then you can easily destroy the rest of the trucks. But if you don’t have much ammo (yet?) or don’t want to waste any then don’t worry: there’s an Ammunation in the street just south from you. So worst case scenario would be to destroy one or two truck(s) with gasoline and then buying some more to repeat the process.
Remember: You’re not wasting time either way because the “reward clock” will still be ticking.
Aftermath
")
Congratulations! At this point you beat the mission, and using a way which was both intended an more profitable than using a Buzzard or other kind of aid. Don’t forget: even if you don’t got to pick up all the dropped money (because a fight took too long) you’d still get RP in return which will help you level up. And higher levels will unlock better weapons. Win-win either way.


.. or just climb on the roof and take care of all the enemys from there? Theres a ladder next to the gas station that makes things so much easier. Good work on the guide though.
Cool guide! I love good old contact missions. No pvp bull or cheaters, and most can be done alone or with another player or two.
This mission is time locked at 21:00, so you can also spawn and store some npc modded Sentinel XS. I put a link to your guide in my guide on the Sentinels.