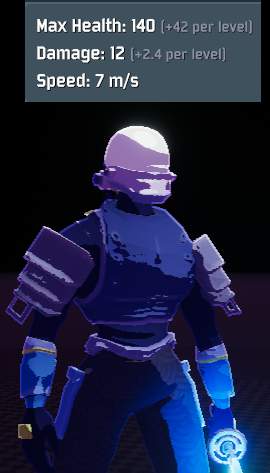
An in depth guide on how to play Mercenary, one of the hardest characters in the game.
Other Risk of Rain 2 Guides:
- Beginner’s Guide (Tips and Tricks).
- How to Unlock All Characters.
- Altar of Gold, Gilded Coast and the Aurelionite.
- How to Restore Your Unlocks.
- Shrine / Environment Guide.
- How to Find Teleporters.
- Newt Alter locations.
- All Items Tier List.
- Engineer Guide.
- Artificer Guide.
Contents
Summary
All credit goes to RobinValentine!
Have you ever wanted to be an anime character as awesome as Kirito? Slicing through the air, spinning around, comboing attack into attack into attack, charging through hordes of enemies unscathed, somehow never setting foot on the ground? Well now you can! Mercenary is a melee survivor who can effectively fly. He is a decently difficult character that uses invulnerability on his attacks to stay alive. If a fast paced, high skill ceiling, high risk high reward character is what you are looking for, Mercenary is your man.

How to Unlock
At any point after you finish the last map you will have a chance to find on that says a “Celestial portal appears”. It’ll be next to a teleporter; once you go in the portal and make it to the end you will get the Mercenary.
Laser Sword

Base attack speed 1 a second.
At first this move feels awkward to fit in when all your abilities are up all the time and it leaves you really vulnerable to attacks when used alone. However this is a really strong move because it can be animation canceled by any of your abilities. What this means is that if you use it then immediately use another skill you will cancel the attack animation getting the damage off from laser sword while still using the skill. So before you use a skill always use laser sword before it. This however means that by maximizing your damage through animation cancels you will never get off the third attack. The time it takes to get those 3 attacks off, even with high attack speed, isn’t worth it.
Whirlwind

3 second cooldown.
This is your main damage tool but it also has mobility applications.
Damage
Your bread and butter. If this is on not on cooldown you are either wrong or have 2 Backup Magazines 😛 While on the ground this skill sends you forward. This can cause it to miss it’s second hit on a single target if you are close enough to it so you really only want to use it when you want to close the gap in a little more controlled manner than Blinding Assault or damage a horde of enemies. However when in midair it gives you a short jump and makes it so both hits hit a single target getting that big burst of damage. So if you cancel laser sword with an aerial whirlwind you can do a burst of 530% damage. The only downside to this skill is that it has decent end lag meaning that you can’t act out of it for a while after you use it. This is a time you are vulnerable, can’t move, and time you can’t go into another cancel marking the end of your combo. Something really cool though is that if you get the item Backup Magazine you can cancel a Whirlwind into another Whirlwind.
Mobility
When on the ground this gives you a brief dash. If you have no mobility items this can be very worth while to do to travel the map quickly. When in air you can use it to keep you there, burn all charges of whirlwind before you jump so that they go on cooldown while you jump. You can get pretty far with whirlwind alone.
Blinding Assault

7 second cooldown.
This skill can be used for damage, running away, and reaching high areas. It also makes you invulnerable during the dash.
Damage
It is important to know that this attack has NO end lag. What this means is that you can use any attack/skill instantly after you reach your destination. This allows you to do you laser sword whirlwind cancel right after Blinding Assault doing a 730% burst. This is actually crazy.
Running Away
Sometimes you just have to run. A single dash alone can get you pretty far but try to hit an enemy on your way out and 2 is even better. Keep in mind that even while running getting a whirlwind cancel is worth it because it can potentially kill reducing the damage you take while running.
Travel
If there is an area you just can’t reach blinding assault has got you covered. Just double jump and dash up to it. If you can hit something along the way you can get even farther. Look at enemies and footstools to leap off of!
Eviscerate

6 second cooldown.
In actuality what this does is make you dash then do 7 attacks in 3 seconds. This also has no end lag giving it the same applications as Blinding Assault. It also has the same dash range as blinding assault making it easy to learn. Something important to remember is that in this time you cannot be attacked so when fighting bosses you may want to save it to dodge their big attacks.
You CAN use another charge of Blinding Assault after eviscerate but you have a split second window to do it. If that is what you want to do you need to spam blinding assault and even then sometimes it doesn’t work.
Perhaps the best thing about Eviscerate is that it buys time for cooldowns. Unless you have to use it to stay alive, you should only use it while Whirlwind and Blinding Assault are on cooldown.
Cybernetic Enhancements

Starting with a double jump allows you to attack air units early when blinding assault is down, prevent fall damage if whirlwind is down, and keep up with tankier targets so you can pull your combos on them twice before landing.
Dealing With Air
People seem to be really scared of fighting air with a melee character. And when you say it out loud it makes sense. However it’s actually really easy! Blinding Assault alone one shots wisps. So if you hit as many as you can with each individual dash you actually clear them better than any other character. Also it’s important to remember that Whirlwind keeps you in the air. If you manage your cooldowns well you can stay in the air for a very long time (forever once you get a Backup Magazine) The same combos that work on ground enemies work on ground. Just let yourself fall a little bit before you use your next Blinding Assault. You also have a double jump allowing you to manage more air time. Once you get good at managing your cooldowns fighting flying enemies actually becomes really fun!
Bosses
All Bosses
You want to save Eviscerate for their big burst attacks. You can dodge it with a single button press. You can also use a charge of Blinding Assault to get out of the way if Eviscerate is down. If you are in multiplayer you actually have the best trash clear out of all the other survivors so you can be a bigger benefit by killing the little guys and ignoring the boss. Sort of, if you can hit a ton of trash mobs AND the boss there is no reason not to.
Wandering Vagrant
This fight sounds intimidating but it is personally my favorite. It becomes super easy once you realize… you can stand on its head. That’s right if you get on top of the Vagrant it is solid land. You use your Blinding Assault to reach it then make sure that after your third dash you land on it’s head and fight like normal.
Clay Dunestrider
You know how I said you are invulnerable during your dash? It comes in handy here. When he’s using his black hole and sucking up all the trash you just jump in and combo inside of him. You have so much AoE that him putting all the adds in once clumped ball makes the fight SUPER easy.
Magma Worm
Another scary looking fight that you should handle with ease! Every segment of the magma worm is a hitbox. This means that if you whirlwind inside of it or blinding assault straight up through it, you are going to deal CRAZY damage. Any AoE ability demolishes the guy and lucky for you, everything you have except for eviscerate is AoE.
Combos
I briefly went over some of the combos in each section but here I am going to go into every single one. Keep in mind that every one of these can be started with Laser Sword and you can always (and should always if it’s up exception being in air when you need it to stay afloat) follow any skill up with Whirlwind.
Key:
- LS=Laser Sword
- W=Whirlwind
- BA=Blinding Assault
- E=Eviscerate
Laser Whirlwind (530% damage)
LS+W
Blinding Assault into Laser Whirlwind
Blinding Whirlwind (730% damage)
BA+LS+W
Blinding Assault into Laser Sword
Blinding Sword (~330% damage)
BA+LS
If you don’t mix in anything else and do this 3 times the string looks like this
BA+LS+BA+LS+BA+LS
Remember that after any laser sword you can whirlwind. While there is some end lag, it’s more important to get the damage from whirlwind out then have an endless chain. Whirlwind should always be on cooldown.
Blinding Sword into Eviscerate
Only do this on your last BA or you can loose damage.
(2160% damage)
BA+LS+W+LS+E+LS+W
With one or more Backup Magazines
LS+W+LS+W(+LS+W+LS+W+LS+W+LS+W….)
With 5 Backup Magazines you can literally just hold on to M1+M2.
With 1 Backup Magazine
BA towards+LS+W+BA up+BA down+LS+W
Item Guide
I am separating this into tiers going from top to bottom and talking about how every item works with Mercenary. The higher tiers are what in multiplayer you absolutely need to get early and in single player what you should pick if you have a 3D printer or option of 3. As they get lower they are better to pass up and give your teammates and a lower priority for your personal selection. I also want to make a disclaimer on legendary items: EVERYONE WANTS THEM. Communicate if one drops and spread the wealth. Unless you are playing with douchey randoms who aren’t showing you the same respect, be a good person.
OmG MiNe (Core items)
- Backup Magazine: You really only NEED one but two is ideal. Anything after that is overkill (but fun af) and should go to teammates. When you get one you may as well be playing a new character. The simple idea of hitting Laser Sword for more than a cancel goes out the window, you can never again touch the ground in combat, and the combos flow soooo nicely.
- Armor Piercing Rounds: In multiplayer your teammate should be worrying about the bosses, not you dropping this to the bottom tier. In singleplayer this gets moved up to core tier because you suck versus bosses and need this to move forward in life.
- Wax Quail: Mobility is pretty important and Wax Quail provides all the mobility you need. On top of which it can act as a replacement dash if both Blinding Assault and Eviscerate are on cooldown. You only need one of these.
- Foreign Fruit: It does not matter how good you are you are going to die fast in the early game. Overcoming the early game is the biggest hurdle with Merc and Foreign Fruit makes this a breeze. Once you get better survivability you can dump it for something else but this active is god sent and will carry you their with ease.
- Fuel Cell: This is only core if you got that early Foreign Fruit and even then you only need 1 Fuel Cell. If you can get those two by the second level you know you are in for a good run.
- Alien Head, Brainstalks, and Hardlight Afterburner Let’s be real here. Every character has these three in this tier. It’s because they hard enable everything your character does and are DRAMATIC dps boosts.
- H3AD-ST v2: You know how I said you are going to fly? Well that means you have a ton of opportunities to fall. It also comes with some wicked combos. Be a jerk. Steal this item. Get aaaaallll the kills.
- Unstable Tesla Coil: You are melee, who else is in a better position to use this thing. Insane dps boost.
Lovin’ It
These items are the most ideal for you. They aren’t core, but they are the most preferable picks.
- Tougher Times, Monster Tooth, Personal Shield Generator, Medkit, Leeching Seed, Harvester’s Scythe, Infusion, Dio’s Best Friend, Rejuvination Pack and Gnarled Woodsprite (if you don’t get Foreign Fruit): Survivability is a must. You are in melee range and will take tons of damage with a meh health pool. Keep in mind that in multiplayer everyone is going to want these so don’t hoard all of them.
- Len’s Maker Glasses, Tri-Tip Dagger, and Brilliant Behemoth. : You you are a terrible candidate for on-hit items that don’t scale in percentage. I will explain why in the tier these items are in. Instead you scale much better with items that each stack increases the chance they will proc or that always activate.
- Gasoline, Will-o’-the-Wisp, Ceremonial Dagger, Frost Relic, and Happiest Mask: On kill items are also fantastic on you. This is because you have some of the best trash clear out of any other character. And can convert these items into unreal chain kills. Huntress is going to want these too.
- Goat’s Hoof, Energy Drink, Hopoo Feather, Old War Stealth Kit Mobility is key in combat and these four bring it in spades. You really only need one of each, but more is always welcome.
- Bandolier More skills=win
- N’Kuhana’s Opinion: You are going to get a decent amount of healing making this a sizable damage increase.
- Soldier’s Syringe, Warbanner, Predatory Instincts, and Beserker’s Pauldron: Because you can attack during your other animations, this makes attack speed very powerful on you. The biggest downfall to building attack speed is that it can make timing your 3rd hit+Blinding Assault a little difficult to time. But if you ca get it down the damage is devastating.
- Rose Buckler: Since you can sprint and attack at the same time, this can provide a meaty amount of defense.
Acceptable
These are not bad items on you (in singleplayer there is no such thing as a bad item) but they aren’t particularly important either.
- Bustling Fungus, Cautious Slug, Rose Buckler: While you do have amazing disengage, the goal is to eventually never have to disengage to use these items. They can be god-sent early game but fall of mid.
- Bundle of Fireworks: These do a surprising amount of damage and if you have been building on kill items it can start some nasty chains. However, it is relatively inconsistent and cannot be used in boss fights making it fall dramatically in usage.
- Red Whip: No one doesn’t want this but no one really needs them either. Good for cleaning up the end of a level or speed running. If you do the later these may shoot up on the list.
- Chronobauble and Stun Grenade: Can help keep enemies lined up but requires a decent amount of stacks to be useful for this survivor.
- 57 Leaf Clover, Wake of the Vultures: No one doesn’t want these but no one really needs them either.
- Sentient Meat Hook 20% is a pretty good chance for you to be taking this item, however if you have someone like Commando or MUL-T with you it’s better off going to them.
- Disposable Missile Launcher, Primordial Cube, Ocular HUD, The Back-up, Preon Accumulator, Royal Capacitor, and Radar Scanner. These are all acceptable items once you no longer need the survivability active.
- Sticky Bomb, ATG Missile MK. 1, Ukulele, Runald’s Band, Kjaro,’s Band On-hit items need reliable multi-hit or high attack speed. Eviscerate does this but is squatting on a 6 second cooldown. Whirlwind also fits the bill but you are not JUST using Whirlwind, you are weaving in single hit attacks. They are just better off on other survivors (other than Alchemist). However in singleplayer, damage is damage. If you are fine on other higher tier items or just want to hit harder these aren’t terrible choices.
Don’t Want It
These are items you don’t need to worry yourself with. Just pass them off to someone else who can use them more. And if they don’t want them just take it without a second thought. Keep in mind in singleplayer there are no bad items so if it was from a chest or shrine its not a terrible thing. A buff is a buff. But don’t consciously pick them until you are solid on everything else.
- Crowbar: Only works on enemies at 90% or higher. This means this is a hardcore burst item. That is something you do NOT have.
- Milky Chrysalis: You already fly, this is redundant.
- The Crowdfunder You are NOT looking at a single target for long enough to make use of this thing.


Be the first to comment