
One setup to win games.
Viable for post launch, as possibly the game will change enough so part (or all) of this ain’t valid anymore. I’ll probably rewrite a guide from scratch rather than update it… so… yeah.
Other Shortest Trip to Earth Guides:
- Tips and Tricks for Beginners.
- Pumpkin Hammer Ship Guide.
- Fierce Sincerity Ship Guide.
- Nuke Runner Ship Guide.
- Rogue Rat Ship Guide.
- Tigerfish Ship Guide.
- Bluestar Ship Guide.
- Atlas Ship Guide.
Contents
One Reliable Setup
All credit goes to kasnavada!
What I found needed to win reliably:
- 4 weapons of the same type (either all lazors or all munition based) (with highest gun crew as possible). Each must do at least 3 or 4 damage per 10 seconds (ignore enemy evasion for this).
- 1 shield.
- 1 bridge at least 3 (with highest bridge crew as possible)
- 2 PD (with highest gun crew as possible)
- 2 reactors to power your ship.
- Enough storage to store about 700 of each resource, except metal, which you need to store at least 1000 of. And, of course, exotics should be kept lower =)
- Something to reduce your food costs (either). I usually have either 2 sleeping bunks (as high as possible), or 1 sleeping bunk + 1 food farm (at least 2 slots).
- And of course, bridge, scanner, warp, engine.
That fits (barely) in the base 16 slots ships.
You need to keep 1 medical bay and 1 drone repair bay in inventory, put them in after a fight to heal, put back whatever your removed once healing is done.
For latest encounters, you can keep 1 more weapon and 1 reactor in inventory. I switch the sleeping bunk and the farm with them at the start of the fight, then put back the farm and sleeping bunks afterward.
The only trick here is PD: you need to move it toward wherever the enemies spawned during a fight. PD and evasion and deflection given with this set-up will given you enough survivability so that your weapons can kill any enemy ship.
Keeping your core crew (highest level bridge & gun) alive is your highest responsability.
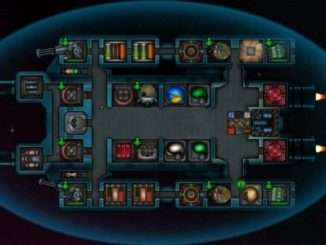
OK, But What Could This Look Like in Practice?
Looks like this.
")
I was extremely lucky in this start of sector 8 screeshot, as I have a bridge-5 too.
Global Strategy & Tips
1) During travel, just let the scanner guy and 1 bridge guy at their station, if possible.
2) Sell everything you can at each station, keep about 150 at start. Then keep more and more.
3) Upgrade everything you can.
- First: core slots.
- Second: upgrade your hybrid slots into weapon slots.
- Last, if you still have lots of stuff, upgrade one of the core slots into a weapon.
4) Buy as many drones as you can, period.
5) Keep as much crew as possible, as long as you’re above -40 food you should be ok.
Don’t hesitate to remove crew which eats too much food.
6) Fight as much as you can. Loot is worth it.
7) During a fight, switch your PD so they are in front of the enemy.
8) Switch your drones from firestarting and repairing (base) and keep crew idle. When being boarded, switch to: 3 firefighting, 3 repair, all idle crew and freed drone now are fighters.
9) Your extra crew should be backups for your “core crew”. Train at least 6 into bridge, 10 into guns, 2 into shields, 2 into scanners. When you get more crew, train more guns & bridges. For bigger ships, you can train more shields if you want to. If you get a hydra bridge, train a few more into bridge (and so on).
10) for “hard fights”, sent nukes into enemy nukes, or to neutralize 1 enemy ship while you kill others. Don’t hesitate to use nukes.
11) Try to keep, via perks and free slots (for bigger ships only) evasion and deflection as high as possible. Shielding is also pretty good when facing enemies with lots of energy weaponry.
Last: It’s just one strategy. Other strategies work. But this one is pretty solid for me.
Why These Weapons?
Weapons
There is 2 kind of weapons in the game. Lazors, and standard projectile based weapons. For simplicity’s sake I’ll call them guns.
Statistics: What makes a good weapon?
There are only so much statistics about it. The most important one for me is precision. It determines the size of the targetting “hit” box. The highest the better. I’m aiming for 20+ (including crew skill).
After that, I consider the cost (either energy or materials) and my global strategy (all lazors or all guns). Because, if you can’t power your weapon, you don’t have a weapon.
Last, its DPS. It seems fairly standard, but in truth there is an hidden stat. The firing animation is not in the weapon stats. For example, between 2 weapons:
- 1 damage, 4 seconds recharge
- 2 damage, 8 seconds recharge
The second one is often the best one. Because the shooting animation often takes about 1 for both weapons. Which means that the first weapon does 0.2 dps and the second one actually does 0.22 dps (10% more). However, different gun have different animations and this rule ain’t always right.
Statistics: shield-piercing “no deflection” modifier, and EMP.
Lots of later enemies have large amount of shields and deflection (deflection cancels your shot, even if sometimes it bounces on the enemy ship anyway), so it sounds like a good idea to have weapons that bypass them. However, the weapons with those modifiers often have a much lower base DPS (keeping them balanced). Same for EMP. On one side it disables large part of the enemy ship, but at the cost of damaging them far less if you do hit.
One thing though, if you do choose lasers, you do need some of them to down the enemy shield fast (a lot of lasers have extra damage to shields).
IMO, devs did a quite good job here and there isn’t really something that’s far out of the norm as to hover above other options. Which doesn’t mean that no weapons are weaker than others, just that at most level, weapons of each kind have similar power but different mechanics.
Guns
Enemy PD will eat up your shots. However, your shots will bypass the shields. Therefore it’s important to shoot either projectiles with high hp (so they don’t get erased by PD), often and in numbers.
The issue with cannon shots is that they require ammo, which in turn requires you to either build ammo (with dedicated component) or buy some. It’s entirely doable.
Lazors
The bigger, the better, as long as your energy can feed them. My preference goes to the single shot large lazors, like the insectoid megalaser. But I’ve done runs with mining laser 4-5-6 and the 2 damage lazor ones that do not deflect, they also work.
Why This Setup?
1 shield
The point is to soak up some laser damage. The idea here isn’t to tank multiple shots from the enemy, it’s that when you’re shot at, after the shield is depleted, and the shield restarts, you get 1 shield point. This shield point will block any number of enemy lazors if they come at the same time, so it will block the 8 damage lazor that was otherwise aimed at your ship.
You can and should, on larger ships, bring more shielding, but don’t go overboard because it only protects from enemy lasers (and requires a lot of energy).
1 bridge at least 3 (with highest bridge crew as possible)
Bridge gives evasion, 10 / crew skill.
With perks giving bonus to evasion, a bridge 3 and a good engine, you’re at 80 evasion, making a lot of enemy shots miss.
2 PD (with highest gun crew as possible)
Contrary to weapons, PD doesn’t have much of a firing animation. A “Commercial PD” (currently the max PD there is) shoots with a maxed crew every 0.4 seconds. Most shots spend about 1 second in the PD’s range, so highest level 2 PD will do 5 damage per second to incoming hostiles. They will clear most hostiles, nukes, and erase a lot shots which would otherwise hit your ship.
Again, don’t forget to MOVE THEM in front of wherever the enemy ship appeared.
This is why you upgrade hybrid slots as soon as you can, so you can switch your weapons (often at the 4 corners of the ship) with PD in case of a back attack.
2 reactors to power your ship
Or more if you have room. Purpose is quite obvious. Components don’t work without power.
Enough storage. 700 of each resource, except metal, which should be able to store above 1000, and exotics, between 25 and 50 is enough for me.
Basically, you should have food depending on your food income. Positive food income? Keep food stocks low. Can build food nukes? Do so. Have -40 food because of large crew? Keep about 10 / -food/RU would be my guideline. So if -20 / RU => 200. For -40? 400
Fuel, I usually keep in the 500 range or lower, only sell if I really can’t make nukes anymore.
Metal I use for upgrading your ship and, if I can’t sell, repairs. Otherwise I try to keep it at 150-200. One exception: the spideera sector, I stock up before this since it’s an entire sector nearly without metal (spideera is organic based, you will get organics and synthetics when recycling their stuff, but there is no stations to repair and you might need to). You need to be able to stock up 1000 because it’s the amount that’s needed to upgrade to hybrid slots and weapon slots.
And (spoiler) you need 750 metal for the quest thingy in sector 3. You know it’s coming, so stock up.
Synthetics I keep low. I only barely need it. Repair drones as soon as you can, sell the rest. Just keep about 200 so you can repair components / drones.
PS: Don’t forget that you can downgrade weapon slots into hybrids for an insta-500 metal. Which you can then repair with. And will make the difference between living and dying.
Something to reduce your food costs (either). I usually have either 2 sleeping bunks (as high as possible), or 1 sleeping bunk + 1 food farm (at least 2 slots).
The secret to having a large crew is this.
Boring part: assuming that awake crew eat 5 food (most of them) and that you find enough cooks among your crew, food farm are more efficient than sleeping bunks.
Example:
- 2 cooks with 5 food and a 2 place farm will feed 4 guys (as the ones assigned don’t need to eat). The advantage is that they are awake when under attack. Sleeping ones need a few seconds to wake up.
- A 4 size sleeping bunk requires less energy (which is pointless as, outside of combat, you can power down your weapons)… and that’s it.
Biggest sleeping bunk is size 8, biggest food farm is size 5. However, I don’t recommend boosting food unless you really have enough spares for guns and so, so biggest farms generally can’t be manned with 5+ crew.
You can man drones to farms, but IMO it’s most of the time not worth it. As crew assigned to farms don’t eat, a big eater (13) will produce 1 or 2 food and not consume 13, while a drone produce 5-10 at most. Just check and don’t blindly assign.
Remember that you can move stuff around. Manning your farm with your bridge crew and placing it near the bridge can gain you a dozen seconds on bigger ships before the crew is working.
And of course, bridge, scanner, warp, engine.
Not much to say here that wasn’t told before.
Warp => As low fuel as you can!


Be the first to comment