
Guide to various quests and potential ways to solve them in GreedFall. I will also attempt to showcase where and how to obtain rare items and monsters! This guide will be a combination of both written and video based content.
Other GreedFall Guides:
- Getting Started!
- Achievement Guide.
- Disappearance Among the Nauts Walkthrough.
- A Cure for Melichor Walkthrough.
- All Attributes with Benefits.
- All Classes List.
Contents
Native Quests
All credit goes to Shadowcoast!
The Battle of the Red Spears
The Battle of the Red Spears is the first mission for Siora and will help to build out reputation with the natives.
After completing The Battle of the Red Spears quest, I recommend knocking out Search the Ruins which will trigger once you complete Red Spears.
Search the Ruins
Companion Quests
This section is dedicated to companion quests!
Kurt’s Companion Quests
Kurt unlocks another companion quests in New Serene called Missing in Action. You should be able to trigger this quest talking to Kurt shortly after entering New Serene and completing Coin Guard Merchandise quest.
Vasco Companion Quests
Vasco’s first quest is A Name for a Family where we figure out who Vasco’s birth family is!
GreedFall Hidden Items and Locked Boxes!
This section is devoted to “hidden” or special items that you can obtain from locked boxes or hidden chests.
New Serene – Locked Boxed Lock Picking Level 3 – Outside De Sardet Residence in New Serene
I did some experimenting and it appears that the starting class (magic, warrior or technical) appears to influence what special gear you might find! Also note that starting with the lock picking talent does appear to have an impact vs. equipping Kurt’s torso piece which gives you +1 to lock picking!
Check out the video and the gear I found rolling a magic / lock picking character (some pretty cool pieces were found)!


The first two items I’ve found require lock picking (level 1) so if you like what you see, ensure you pick the lock picking talent.
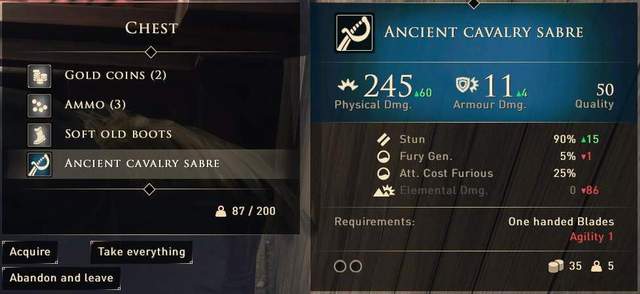
Ancient Calvary Sabre
Requires agility 1 to use.
The Ancient Calvary Sabre can be found in the tavern on the second floor in the room (the one without the charlatan around in the back). Be sure to pick up lock picking and agility if you want to use this item!
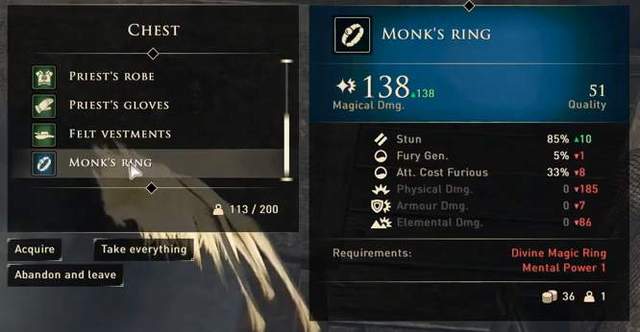
Monk’s Ring
Requires mental power 1 to use.
The Monk’s Ring can be found in the chest on the bottom floor of the Harbour Master’s building under the stairwell. Requires magic ability so roll magic and lock picking if you want to use this item early on.
Note: It is substantially better than your starting regular ring which is 88 magic damage only!
Random Tips and Tricks
5 Important Early Game Tips
- Use the workbench to upgrade your gear and add stats like Vigor and improve armor and weapon damage (equip your Goldsmith Gloves which give you +1 Craftsmanship).
- Carry the torso set for the faction/area you’re exploring (i.e. Coin Guard or Native).
- Check out the loading camp screen traveling merchant to purchase enhanced weapons.
- Check out your personal chest that contains gear as factions will add pieces as you gain reputation with that faction.
- Make sure you check back in various cities and areas to keep looting materials since it respawns after a period of time.
How to pass time or trigger a time lapse for missions that require a time of day or require time to pass in game?
Go to your residence in one of the cities and go up the stairs to your bed or go to a campfire.
Monster Hunting!
This section is dedicated to the optional bosses in GreedFall!
There are 5 optional bosses that I recommend you take on for gear sets, weapons, XP and just general fun.
- Nadaig Vedemen – Magasvar in “The Valley of the Great Battle”.
- Nadaig Frasamen – Wenshaganaw in the “Singing Waters”.
- Nadaig Glendemen – Wenshaganaw in the “Singing Waters”.
- Nadaig Glendemen – Glendgnamvar in “The Shore of the Tall Bones”.
- Nadaig Magamen – Glendvnamvar.
- Nadaig Vedemen – Magasvar in “The Valley of the Great Battle”.
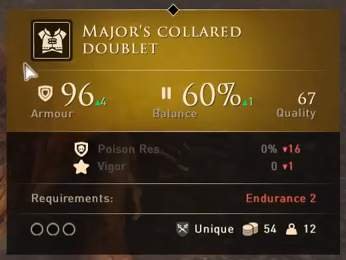
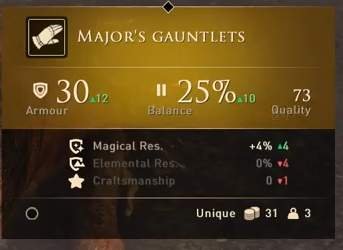
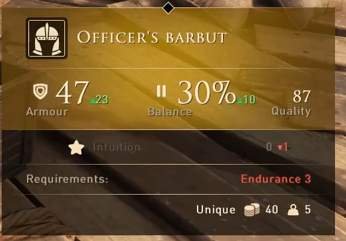
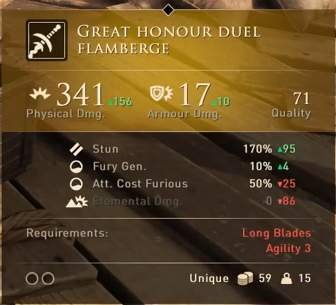
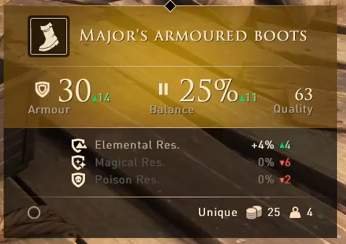
Nadaig is guarding the corpse of a Coin Guard who is carrying the chest piece and gloves of a 5 piece set. Looting this corpse also provides you a key which opens a chest that contains the Flamberge (awesome sword) and the helmet and boots of the remaining set. See below images for the pieces and the above video for the location and suggestions on how to prepare for the fight against Nadaig!
Greater Hekmit Quests
A Peculiar Alliance
Pick up the Peculiar Alliance quest from Ullan in the Village of Vignamri.
Attacks on Caravans
Pick up Attacks on Caravans from the Governor of Hekmit. He’ll direct you to speak with Captain Reinhild who will refer you to a merchant who survived an attack. After talking to the merchant, head out into greater Hekmit territory and find the site of attack. After reviewing clues, track down the natives who attacked the caravan!
Main branching options: either leave the natives once you find them or attack them. Either choice will have consequences!
Greater New Serene Quests
This section is dedicated to quests in New Serene on Teer Fradee!
Coin Guard Merchandise (Teer Fradee)
To finish the Coin Guard Merchandise quest for Kurt, you need to reach Teer Fradee.
To complete the Coin Guard Merchandise quest run up to the Coin Guard building and talk to Quartermaster Manfred. Manfred is distraught because the Nauts are holding on to the merchandise in their warehouses. To retrieve the goods, we need to break into the Naut’s warehouse and mark the merchandise for the Coin Guard to retrieve later. At this point, you probably have added Vasco to your party so sure to throw on the Naut uniform (Sailor’s Coat which you pick up in Serene/the Continent either from the Harbour Master’s building or in the building by Flavia).
Run over to the warehouses and jump over the wall and run into the warehouses until you find the right crates. Once you do, be sure to click on the crate again to mark it (you paint a white stripe over it). After doing this, return to Manfred to complete the quest for XP, gold and + reputation with the Coin Guard!
The Man with the Silver Coin
In this episode we review how to time lapse or have time pass in game. The quest starts with Manfred once you complete the Coin Guard Merchandise quest. Merchants are being terrorized by specific Coin Guard and Manfred wants us to investigate!
An Aspiring Merchant
Pick up the Aspiring Merchant quest from the Native Merchant in New Serene across from the Blacksmith. His wares keep getting confiscated from the Coin Guard because he does not have a patent to sell goods in New Serene.
The Continent (Serene) – Quests
This section is devoted to missions found in the starting area on the Continent in Serene.
The first main quest is Find the Charlatan.
Find the Charlatan
Pick up this quest from Ambassador Sahin of the Bridge Alliance. You’ll automatically pick this quest up by talking to Sahin. He is worried about a “charlatan” hawking fake potions.
Sahin is located in the Bridget Alliance Embassy. Talking to him will automatically trigger the Charlatan quest.
Head out of the door straight down across the bridge and hang a left then another left to trigger the cut scene. After going through the dialogue, head around back to a black gate (to the right if your facing the charlatan’s kiosk and down on the left). You’ll encounter 3 enemies, make short work and pick up the chest in the back (no lock picking needed).
From there, pick up the three items and go back to encounter the charlatan. He’ll eventually run away when you finish the dialogue.
You’ll find him on the second floor of the tavern. From there, you’ll have a choice to make.
- 1) Arrest him – to complete the quest return to Sahin and report the charlatan’s location to him to receive some gold and 1,000XP.
- 2) Help the charlatan escape – this gives you more branching options!
- 2a) Convince the mob to let him go by bribing them with potions (you’ll need 5 health potions which is tough to obtain), threatening them (might turn out in a massacre) or by trying option 2b.
- 2b) Go to the back room and look at the back entrance door. You’ll need to either bribe the tavern owner to open it (50 gold – jeesh that’s pricey) or you can find a store room key on the second floor (it’s around the wall by the staircase). The storeroom key opens the storeroom which is by the locked back door. In there you’ll find a chest that has the key to the back door. Open the back door then return to the charlatan.
You’ll need to escort the charlatan and take down 3-5 enemies if you go around back. From there you need to report into Sahin where you can confront the Bridge Alliance on their less than scrupulous behavior or let it slide (the choice is yours….)
Coin Guard Merchandise
This mission is automatically obtained from Kurt, your first companion on your journey. Kurt is tasked with getting Coin Guard supplies but a merchant is asking him to double pay!
To begin with, head to the merchant and hear how his boss is causing the trouble. You have a few options depending on your starting talents. If you have charisma, you can convince him otherwise use Intuition to bribe him. Once you get him to deliver the merchandise, head to the Coin Guard Quartermaster who tells you that you need to somehow get the merchandise on your ship. Unfortunately Captain Vasco is not wiling to “smuggle” the goods so we have to sneak into the Harbour Master’s lodgings and add in the Coin Guard merchandise in the ledgers.
From there we have to convince the guards to leave so we can smuggle the merchandise in the warehouse to then be loaded on the ship. Here you have a few options. You could poison the guards by creating a drink (Brandy and Sleeping Potion required and can be purchased from the merchant) or you can put on the appropriate uniform “sailors coat” which you can loot from one of the chest (no lock picking required) in the Harbour Master’s building.
Once you convince them to leave, head over to the porters to tell them to move the merchandise in. The rest of the quest takes place in New Serene… To be continued…
Disappearance Among the Nauts
This quest is automatically obtained from talking to Captain Vasco. One of his cabin boys hasn’t shown up for duty and foul play is presumed!
We learn from Vasco that Flavia and Lauro are the Nauts two best friends. Talking to Flavia reveals Lauro thinks he saw the Naut taken by a group of men! Talking to Lauro reveals that he saw the cabin boy taken and thinks there was another witness.
Head over to the tavern and talk to the tavern keeper who points you in the direction of a regular customer. Talking to the man (standing against the wall), the man tells you that a merchant Fontaine took the boy!
Head over to the Fontaine’s to speak with Mrs. Fontaine who reveals that the cabin boy is her son and was taken by Nauts. Confronting Vasco and our trusted adviser, it’s confirmed that it is common practice to sell children to the Nauts as part of contracts and it’s important for us to get the Naut back!
Returning to the Fontaine’s reveals a letter about a warehouse. Head over to the warehouse where you have two options – go around the back (kill 2 guards) and either lock pick, blow up a wall (science or alchemy) or go through the front and confront Fontaine and his men. If you confront Fontaine you can use Charisma (if you have it) to convince him he was wrong to take the boy, even if it is his son, and he should let him decide what he wants to do. If you don’t have charisma, you’ll have to threaten and potentially fight and kill everyone to obtain the jail cell key.
Talk to the cabin boy who wants to return to his ship then report back to Vasco. You receive 1,000XP on completion and +3 Reputation.
Heretic Hunt
Heretic Hunt is picked up from the Theleme Ambassador.
The Great Departure
Before leaving for Teer Fradee we need to find our friend Constatin who is slotted to be the next Governor of New Serene (the city built in Teer Fradee). The quest also requires you to inform the Bridge Alliance and Theleme factions of our journey to Teer Fradee.
In part 1 we focus on freeing Constatin.
In part 2 we focus on how to beat the Unknown Creature. While all different play styles can be used, I recommend purchasing several potions, stocking up on ammo and equipping your best gear!


Be the first to comment