
General Skillset Guide for New Players. Decided to upload at this point because a lot of my friends didn’t understand what moves were worth taking on certain characters and for people who are struggling with figuring out what to take in general.
Contents
Gameplay Tips For New Players
All credit goes to Wheelium!
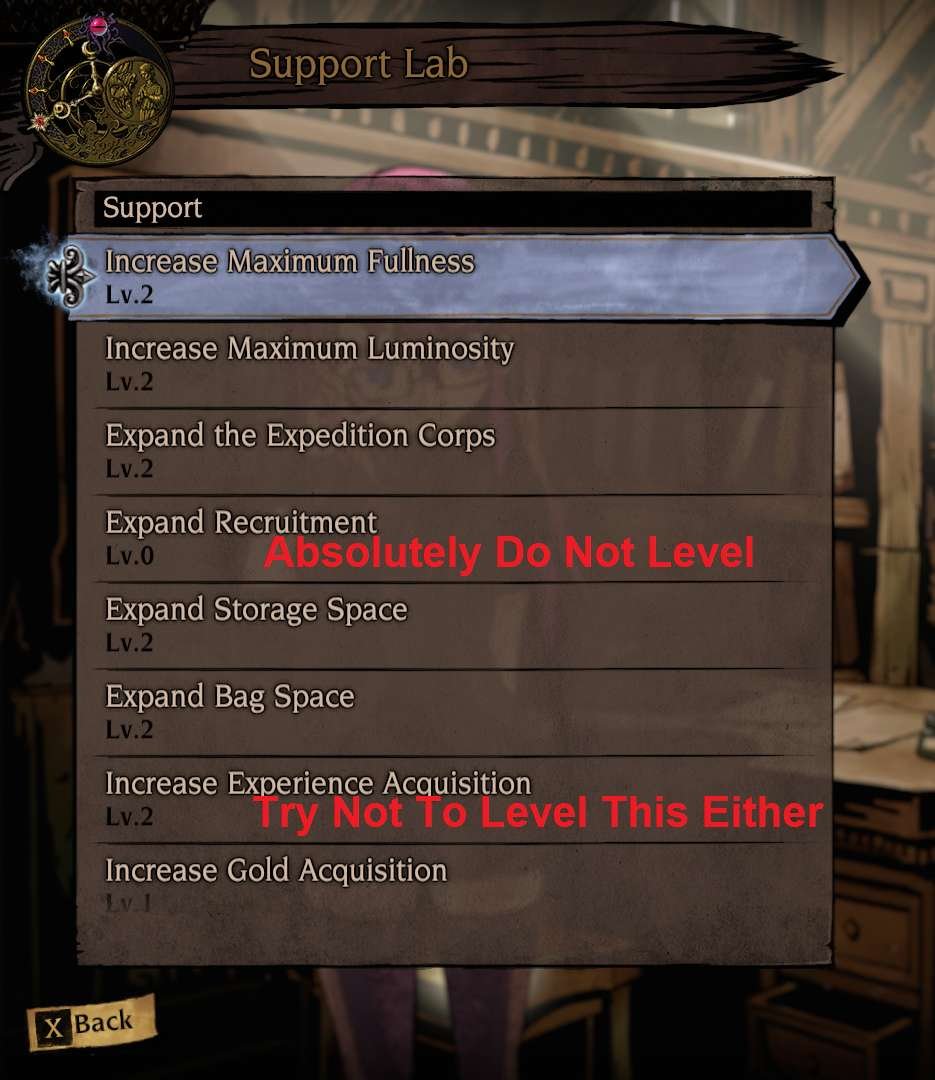
Both of the support upgrades here are traps that will force you to start a new game. The design of these two seemingly helpful upgrades really boggles my mind. New players will unknowingly upgrade these not knowing that it will be the reason why they can’t continue playing after a frustrating teamwipe.
To elaborate on this: Expand Recruitment muddies your recruitment slots with worthless, overleveled, and overpriced buyable units. Many of these recruits have their skillpoints randomly allocated and sometimes are flat out missing skill points.
That being said, you are better off sticking to recruiting level 1 units and having a higher level unit carry them through lower level dungeons to level them instead. The doomsday clock penalty for having an overleveled unit is a -1 tick but it can be easily mitigated by getting +1’s from
- Collecting all chests.
- Defeating red enemies.
- Gathering all collectables.
- Turning on all light plants.
Increase Experience Acquisition is an unintuitively bad upgrade for your playthrough. You may think that leveling your Heroes faster is a good thing, but as I stated before, the game punishes you for bringing overleveled characters to an area. On top of that, character level scaling in this game is piss poor. This means that even if you enter into a dungeon with a full party of level 7 characters into a maximum level 5 dungeon, you have a large chance of being absolutely teamwiped. You may be asking why at this point.
Equips are the foundation that this game balances enemy encounters around. If you go into a level 4-5 dungeon without any weapon or armor equips, you might as well be going in with level 1 characters.
This game expects you to grind equips without telling you to do so. THIS IS WHY NEW PLAYERS QUIT BEFORE THEY EVEN START.
With that being said, you actually have to farm for decent gear/equips before heading off to harder areas. Not upgrading your EXP gain allows you to spend more time in certain areas to potentially find the gear that you need inorder to have enough of a powerspike to progress in your game safely.
Viability Tierlist
- S: Good enough to take 2 copies of the same hero into a dungeon
- A: Strong but have some flaws
- B: Situational/Niche and have serious flaws
- C: Paladin

Positioning and Ranks
As you’ll quickly figure out, the center column is mainly for your damage dealers with few exceptions. The main reason for this is due to how the positioning restrictions on certain skills work. The middle column allows heroes to have access to their full skillset if need be.
Additionally, it is worth noting that certain characters fill specific niches depending on the maps that you are playing.
For example: the Witch and Onmyouji’s exploration skills make them critical to parties once you reach the Cursed Town region and later. The Witch saves you time and steps when you inevitably step into a far reaching dead end and the Onmyouji’s trap detection+disarm will save you headaches from the more severe trap penalties later on.
Cursed Town: Traps will spawn 2 to 3 enemy encounters in close proximity often surrounding you.
Frozen Mountain: There are traps that darken and erase your current dungeon run’s exploration data.
Damaging Team Attacks
AOE 225% Damage team attacks at skill level 5
- Shadow Blade [Witch]: Magic Shuriken
- Witch [Ronin]: Star*Striker
- Werewolf [Paladin]: Sudden Attack!
- Werewolf [Ronin]: Target Filtering
- Ronin [Shadow Blade]: Shadow Warrior
AOE 168% Damage team attacks at skill level 5
- Ronin [Werewolf]: Great Warrior
- Grim Reaper [Shadow Blade]: Shadow Raid
- Grim Reaper [Paladin]: Mighty Bad Luck
- Paladin [Werewolf]: Crash Fight
- Sister [Paladin]: Holy Spear
Paladin (Premiere Tank, Taunter, Stunbot)
Must haves


Situational
- Holy Bind (Great reach but positioning is limited).
- Divine Hands (Self heal for decent amount).
- Provoke (Taunting isn’t reliable).
- Holy Smite Cross (Strongest attack but bad hit% and position restrictions).
Do not take
- Shield Bash (Only ok when certain enemies lose access to skills from being moved).
- Holy Counter (Waste of action economy for the most part).
Unfortunately the Paladin class is just not very good.
If you’re dead set on using her however, she’s most likely going to be relegated to the front rank due to how valuable the middle column is for your team. Despite losing access to some very valuable skills, the Paladin cannot justify taking up a middle rank.
Pros
- ++++Most likely takes up a front rank, freeing up a middle column slot.
- ++Guarding is guaranteed, thus more reliable than taunt.
- ++Extremely self-sufficient in terms of staying healthy with Divine Hands and etc.
- +Guarding is pretty good at preventing death.
- +Good HP pool thus Divine Shield is always a reasonably large shield.
- +Holy Bind is incredible if you can somehow justify giving up a middle rank slot on your team.
Cons
- ——Extremely low damage.
- —-Draws out fights as she makes suboptimal use of action economy due to low damage.
- —-Best move: Holy Bind can’t be used in the front rank.
- -You are generally better off picking someone else.
Partners well with
- Shadow Blade (in same row).
- Ronin.
- Sister.
- Werewolf.
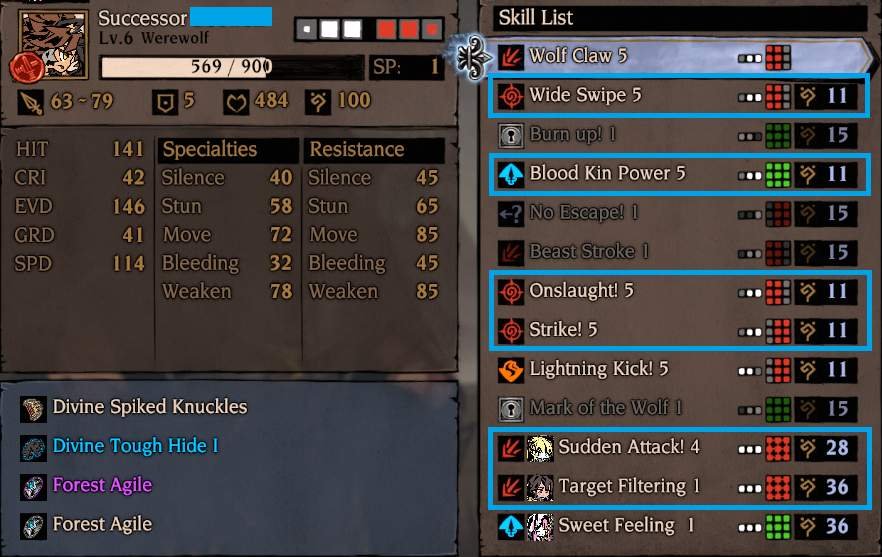
Werewolf
Must haves
- Wide Swipe (Fantastic Hit and Crit chance +Branding).
- Strike! (Reaches back rank).
- Onslaught (Better hit% than Strike!).
Situational
- Beast Stroke[choice] (Very similar to Onslaught and Strike!).
- Blood Kin Power (Buff Ally and remove Brand. Helps setup last hits for Ronin and Reaper).
- Mark of the Wolf (Clear Ally Brand, Self-Brand if removed, Taunt).
- Lightning Kick! (Taunt but requires awkward positioning).
Do not take
- No Escape! (Almost everything Werewolf has is better and the Move direction is random).
- Burn Up! (Very rarely do you ever want to waste a turn gaining a defense buff over attacking).
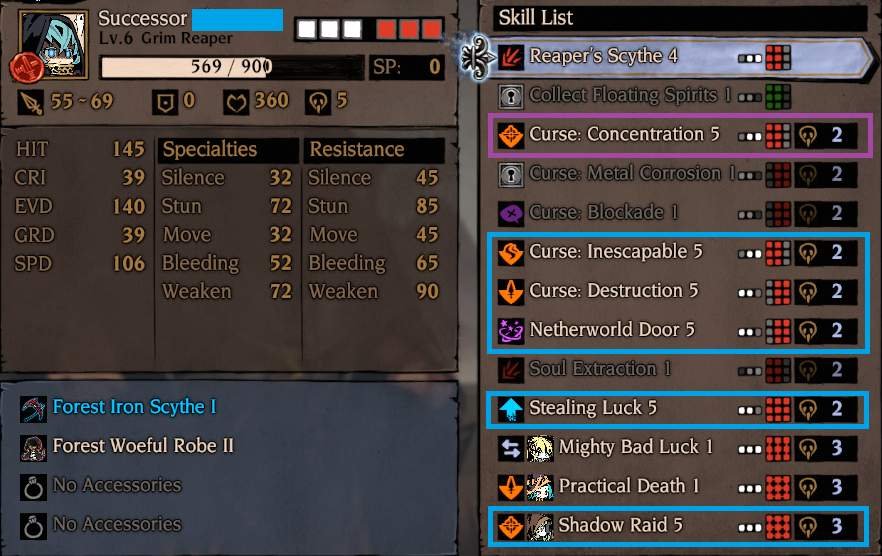
Grim Reaper
Must haves
- Curse: Inescapable (has a starting +10 hit modifier) <- Main ability to level.
- Curse: Destruction (has a starting +10 hit modifier, covers back ranks).
- Netherworld Door (Stun and Brand).
- Stealing Luck (Your buffs are now my buffs).
Situational
- Curse: Concentration (debuffs accuracy but lower starting hit chance) Marginally worse.
- Curse: Blockade (Silence) Difficult to rate due to how silence is treated enemy side.
Do not take
- Collect Floating Spirits (Manage your last hits. Don’t need this).
- Soul Extraction (Useless at level 1, useless vs bosses).
- Curse: Mental Corrosion (Defense for the most part is irrelevant).
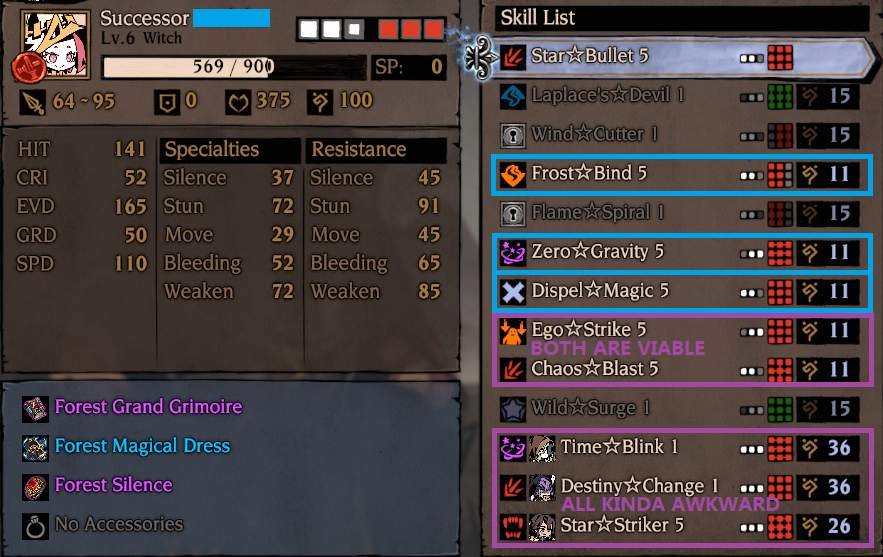
Witch
Must haves
- Frost*Bind (This move is the single spell that adds depth to combat) Manipulates turn order.
- Zero*Gravity (Row Stun).
- Dispel*Magic (Enemy buff removal if no Grim Reaper on your Team).
- Ego*Strike (Reduces enemy Debuff Resist).
Situational
- Laplace*Devil (Column Evade buff. Depends on team).
- Wind*Cutter (Sub par AOE damage +Speed).
- Chaos*Blast (Decent AOE damage but no free aim. Sometimes awkward to setup for).
Do not take
- Flame*Spiral (Useless).
- Wild*Surge (Pointless waste of action economy. 10/10 would rather just Move).
Sister / Cleric
Must haves
- Love (Very good nuke heal from back ranks) [I prefer this over Suspicious Love].
- Suspicious Love (Suspicious Love offers better nuke healing in exchange for positioning forward).
- Sweet Foe (Full board access Stunbot).
- Stable Cloud (Remove Bleed. Full party at max level).
- Overflowing Love (Good if multiple units go into Limbo. Low individual heal value).
- His Protection (Free Damage negation especially at max skill level).
Situational
- Masochistic Pleasure (Bestow Taunt to a column but can be manipulated easily enough).
- The Last Prayer (Requires that you predict where a nuke lands).
Do not take
- Prayer of Love (Column heal amount only marginally higher than full party heal).
Shadow Blade
Must haves
- Sting Hard (Good Damage, prioritize leveling this ability).
- Release Power (Jester Finale from Darkest Dungeon).
- Snake Eyes (Good Stun, but few windows to use over damage).
- Strike from Behind (Very good but not actually a must have. Moves units forward).
- Smoke Bomb (Pretty Good Evasion Buff).
Situational
- Invisible Throw (Depends on enemy formation in dungeon).
- Hide (Get out of tight situations).
- Secret Action (Crit Chance buff).
Do not take
- Bomb Toss (Useless).
Onmyouji
Must haves
- Misfortune Detector (Remove debuff and give Crit chance).
- Purification (Remove Bleed).
- Paper Koi (Row Stun but has a negative hit modifier).
- Muscle Amulet (Really great team Buff).
Situational
- Elemental Collapse (Not great but is damage).
- Paper Turtle (Summon a Taunt Turtle. Big part of what makes this class unique).
- Eyes Wide Open (Give up a turn to save another [More Important] unit’s turn).
- Mental Amulet (Column Buffs).
Do not take
- Paper Crow (Useless).
The Onmyouji Class is better than the Sister in the later stages of the game in terms of overall combat effectiveness despite his lack of intrinsic damage. He has great offensive buffing, AOE crowd control in Paper Koi, and is all around a great support.
His issues lie in that he’s specifically late game oriented and will provide almost nothing for your party in the early stages of the game. His buffs are great but if your core damage dealers aren’t strong enough to make up for his complete lack of self sufficient damage, then the Onmyouji will be more of a liability than an asset.
His lack of a basic healing ability makes it so that he is incapable of rescuing a Limbo’d character aside from spending his turn giving a potion to said character. This one shortcoming makes it so that you are still forced to take a Sister along for the ride despite signing on an additional support character.
Pros
- +++++Has access to the best ally buffs in the game.
- +++++Critical to 1 shot AOE Party compositions late game.
Cons
- ———–Does not have a heal (except his team skill that requires a Sister anyways).
- ———Completely lacks damage, and thus is purely a support oriented class.
Partners well with: High Damage AOE Team Skills and Sister
Ronin
Must haves
- Strike! (Strong regardless if paired with teammates that can utilize Branding or not).
- Bloodthirsty Sword (Respectable single target nuke +Healing +Taunt -Positioning restriction).
- Woodpecker Tactics (Very good but not actually a must have).
Situational
- Swallow Counter (Gives Crit chance and Counter).
- Showdown! (Taunt with a +Evade).
- Blood Streak (Decently strong single target bleed, but bleeds suck).
- Devil’s Eyes (Decent debuffer but low damage).
- Wicked Blade (AOE is generally not great. This is about as good as it gets).
Do not take
- Lightning Advance (Waste of action economy for the most part. Helps fix shuffling).
Overall the Ronin is a fairly fragile pseudo-tank. He doesn’t take hits very well and relies on allies like the Onmyouji’s or Werewolf to give up their turns to assist in buffing his rather weak defensive stats.
- The Ronin’s main flaw is that his Youmi Point system works in a way that is less convenient than the Grim Reaper’s Soul Point system. You’ll find that in your very first fight of dungeons he starts out of gas and needs you to feed him a last hit inorder to get going. This slow start can sometimes cause you issues early on if bad luck insues.
- The second reason the Ronin’s Youmi Point system is less convenient than the Grim Reaper’s Soul Point system is that he does not passively regenerate 1 point at the beginning of the turn for free. This means that if he misses a YP Ability, he is now at a net minus 2 YP. This is especially important if your Ronin’s accuracy isn’t as high as it can be at any stage of the game.
- The one saving grace for the Ronin’s YP system is that if you land a critical hit (even if it’s guarded) you will generate full YP.
The Ronin isn’t great in this game because his moveset is muddied by AOE and self-buff abilities that are a waste action economy. For the most part, the majority of Mistover will be played with 1 healer/support and 4 damage dealers. Tanks don’t really exist and you really don’t want to taunt unless you can survive up to 5 consecutive enemy hits. That being said, the Ronin class is really not that durable when compared to the likes of the Paladin. He is meant to be an evasion tank but spending a turn to buff evade for 3 turns is a rather waste of action economy when he can cast Strike! every turn instead.
Strike! is Ronin’s least committal and safest damaging ability. It has a high crit and hit modifier meaning that it will often grant you full YP even without getting last hits. It can also reach every tile. Bloodthirsty Sword is a fantastic damaging ability with lifesteal attached to it, but the Taunt that is applied can be detrimental to the safety of your Ronin if you do not spend actions beforehand buffing his defensive stats like Evade/Defense/Guard.
Pros
- ++++High damage and brands for your Werewolf.
- +Can somewhat be a pseudo tank.
- +Recharges full YP everytime you land a crit.
Cons
- ——Takes up a middle rank.
- —-Only truly has 1 good move (Strike!).
- —-Has to spend turns buffing self instead of attacking sometimes.
- -You’re forced to take mediocre abilities due to the taunt attached to Bloodthirsty Sword.
- -Has trouble surviving without a healer or additional tank.
Partners well with: Werewolf, Onmyouji, Sister, and Paladin
Completed Character Build Examples


Guide to Character Rolling
Don’t level your recruitment roster early on.
You’re better off seeing level 1 recruits than higher level ones with their skillpoints randomly used.
With the newly implemented system of Skill point inheritance you can build extremely powerful units at a very low level.
To do this, you have to somewhat understand what you’re looking for. I will be splitting this part of the character into 2 types of units. First the base unit and second, the fodder.
Base Unit
Essentially this is the unit that somewhat requires some pre-planning. You have to look for a unit that ‘lacks’ all the skills that you want in your final build. This means that all the skills that you deem desirable, must be unlearned or not yet obtained.
Fodder Unit
The fodder unit should have 1 desirable skill that you haven’t already fed to the base unit. You have to level this unit to 5 in order to obtain enough skill points to level the desirable skill to 5. Please note that this is quite gold intensive and is not recommended to be done if you do not have a sufficient surplus of gold. It takes 3750 Gold to level a skill from 1 to 5 and another 2000 to fodder off the skill to the base unit.
Once you’ve leveled the fodder unit’s desirable skill, it must then be inherited by the base unit. This means that you have to level the base unit so that it has at least 1 skill point to learn a desirable skill. When the fodder unit is used to teach the base unit the desirable skill, the skill level will be learned at 5, the max, as opposed to 1, effectively saving you 4 skill points on your base unit.
It should also be worth noting that Team Attacks are also inheritable but are awkward due to the randomness that their 1st levels are obtained at specific level intervals of characters.
Region Guide to Party Recommendations
Misty Forest
Although this is the starting region, it is worth noting that certain classes are less useful than others due to lacking skill points and levels. I would recommend not using the Onmyouji class for the 1st region due to the class’s inherent lack good damaging abilities. On top of this, his buffing capabilities will likely be hindered due to being underskilled.
Cathedral Ruins
Sisters and/or Onmyoujis are recommended here due to the abundance of enemy bleeds. The Black Goat type enemies are particularly annoying and should be dealt with as a priority. Your damage dealers can consist of any combination this early in the game still. I personally like the Witch+Shadow Blade combination as the Magic Shuriken team skill when maxed is great at bruising the entire board in 1 action.
Cursed Town
The Grim Reaper becomes quite good from here on forward. Bosses and enemies in this region will often cast buffs that the Grim Reaper can steal regardless of hit or miss. Also worth noting that barriers/shields count as buffs which can also be stolen.
Frozen Mountains
Onmyouji and Witch are both must haves to save you from potential headaches. The traps in this region can be avoided with patience, but I recommend just taking an Onmyouji to just save you the extra turns. There are also a lot of dead ends and winding paths that the Witch will save you time with her exploration skill.
Sleeping Lake
Grim Reaper is a must have if you want to hit anything. She can also steal the final boss’s barrier to give herself a 5000+ hp shield.


Be the first to comment