
A guide on how to get the most out of sectors in terms of navigation between beacons.
Contents
All credit goes to paper!
Purpose
Sector navigation is difficult to optimize and even at the highest levels of play it’s unlikely to be performed perfectly throughout all eight sectors. As a result it’s likely that a potentially game changing store might be missed or reached too late/soon, or that a critical amount of scrap for an important weapon or upgrade might not be met. And below the highest levels of play the situation only becomes more substantial.
The purpose of this guide is mostly to emphasize the importance of navigation and thinking hard and long before making a jump. There’s no magical method to perfect navigating so pondering about each jump deeply is the best. What I will provide in this guide is general information to know and some things that you might want to include in your deep thought.
I am not a strong player. I am an intermediate hard mode player who is trying to enjoy the game and get better. I also studied math so I often try to look at things from a mathematical perspective. Sector navigating in a practical manner is hard to mathematically analyze, so I instead tried to understand the general themes and methods by simply thinking hard about it and watching good players playing the game.
Information
- On normal beacons the fleet advances 1 space unit.
- On nebula beacons in non-nebula sectors the fleet advances 0.5 space units.
- On nebula beacons in nebula sectors the fleet advances 0.797 space units. That’s basically 0.8 space units.
- A sector map is ~11.63 space units wide.
- The rebel fleet begins 1.4 space units offscreen.
Tools
Sector navigation is best done with some kind of aid so that you can know how many jumps you can make before the rebel fleet overtakes a beacon. There is a mod called Extended Pursuit Indicator that shows exactly where the fleet will be in every number of turns. If you don’t want to use a mod like this then the next best option is to create a ruler. I recommend visiting the link above for explicit instructions on how to create this. The last option, for those who can’t be bothered, is to use your thumb or a finger as a measure of width. I’ve been doing this a lot as I haven’t made a measuring stick yet and it’s surprisingly effective. Everyone’s hands and screens are different but I can predict within a small margin of error where the rebel fleet will be in 6 or 8 turns for both regular sectors and nebula sectors. I put my thumb on the screen and carefully jump it across while counting. Any object approximately the width of a rebel fleet jump would also work. Still, the measuring stick is better. It’s nearly equivalent to the mod if made well. The mod gives away information about where the rebel fleet is the most advanced even before the pursuit indicator shows up on the map, so in in very rare cases that could make a difference.
Concepts
Evens and Odds
In a regular sector a nebula beacon gives you “0.5 more jumps,” but more specifically it either gives you 1 more jump or no more jumps. The situation where it gives you 1 more jump is called the odds case, and the situation where it gives you 0 more jumps is called the evens case. It will be one or the other, and each beacon is either an “odd beacon” or an “even beacon.” This is especially valuable to know for the exit beacon. As an example, if you visit 5 nebula beacons then in the odds case you get 3 more jumps but in the evens case you get 2 more jumps. Since nebula beacons are generally less valuable than regular beacons, this can allow you to avoid a nebula beacon that won’t save you a jump.
In nebula sectors there’s a similar concept in play where visiting 4 regular beacons costs you 1 jump. This time, though, there’s the mod 0 case, mod 1 case, mod 2 case, and mod 3 case for every beacon. If a beacon is a mod 1 beacon then that means you lose 1 jump after visiting 1 regular beacon. If a beacon is a mod 3 beacon then that means you lose 1 jump after visiting 3 regular beacons. In the mod 0 case it takes all 4 jumps to regular beacons to lose a jump.
Contingencies
Sometimes we know ahead of time exactly which beacons we are going to jump to in a row, but at some point we’re not sure because we don’t know what might happen. There might be a store that takes us off our intended path. When a beacon we jump to has 2 or more beacons next to it, and it’s possible that we might want to visit 2 or more of those beacons depending on what they are, then we must consider contingencies.
One core concept is that seeing a lot of beacons in and of itself is not valuable. It’s only valuable if we might visit those beacons. This is obvious when we see a beacon that goes to a dead end, but it also can arise in normal complicated navigating where one beacon, because of how the beacons are connected, is unappealing to visit. However, if we aren’t conscious of this fact, then we might be drawn towards a beacon just because it “sees 3 unseen beacons” when in reality maybe it only sees 1 unseen beacon that might be worth visiting.
Clusters of beacons tend to lead to more flexible choices, but sections of beacons that aren’t clustered together can still be worth visiting.
Reverse Pathing
Planning your first jumps also means planning your last jumps. Sometimes the last jumps might be less flexible so by knowing roughly or exactly what you want your last jumps to look like you can then work backwards to find out exactly what you want to do in your first series of jumps that will connect to your plan for the last jumps.
Visit Count
Typically visiting more beacons per sector is better, with the total number visited being the visit count. Maximizing one’s visit count is often a good idea.
Diving
Proper diving involves visiting the exit beacon before you leave a sector so that you can visit other beacons and then jump back to the exit beacon once it has been overtaken by the rebel fleet. If diving increases your visit count by 1 or more, and your ship is properly prepared, then it’s often worth diving. Diving is appealing on maps that have nodes far behind the exit beacon (and factoring in the curved boundary of the rebel fleet). It helps to have engines at level 4 to 5 at least, a crew member leveled some in engines, and anything that can stop the rebel ship from damaging your ship. If your weapon setup is strong enough then you might be able to damage their weapons significantly to prevent damage. If you have cloaking then this can simply buy you time and you can use it right away or during their volley. Hacking can either be used to help break through their defenses in order to destroy their weapons, or to simply hack their weapons. If you hack their weapons then you can start the hack halfway through their volley sometimes so that a dangerous volley becomes two harmless volleys. Diving in sector 1 or 2 is usually not a good idea. Also you might get hit by ABS, so be prepared to quickly repair your piloting just in case that’s what gets hit.
Store Planning
Often the sight of a store can significantly change how you plan your jumps. A common strategy is to jump around to as many nodes as possible before visiting a store, almost as if the store is the exit beacon. This way you gather as much scrap and stuff to sell as possible before visiting the store. Whenever you visit a store the first thing you should do is go back to the sector map and see what’s around you. If there’s another store next to you, then you’ll be glad you checked before buying a mediocre weapon only to realize that there was a Burst Laser II next door.
Long Ranged Scanners
If you have this augment (and you almost always should if you find it) then you’ll usually want to engage in as many ship battles as possible. For this purpose seeing more visitable beacons and early on is extra important, so go towards clusters as long as it doesn’t set you up to be funneled prematurely to the exit beacon. You’ll typically jump around between fights a lot.
Goals
- See as many visitable beacons as you can.
- Visit as many beacons as you can.
- Dive if it increases the number of beacons you can visit, and your ship is prepared.
- Uncover as many stores as possible if you’re looking to make purchases.
Methods
- Utilizing a mod, measuring stick, or fingers / thumb / object to be aware of how long it will take the rebel fleet to reach the exit beacon and any important beacons as you go.
- Plan your entire sector path before making the first jump. In a regular sector you usually have around 11~13 jumps before the rebel fleet reaches the exit beacon. With experience you can judge what the jump count more likely is going to be based on how far the exit beacon is to the right, but a rough estimate like 12 jumps is often good enough. Use this number to plan an “ideal path” to the exit beacon. The path gets bonus points for seeing as many visitable beacons as possible, and for visiting as many nodes as possible. Usually an ideal path doesn’t race towards the exit beacon, but rather meanders while moving rightwards.
- Take some time to carefully consider your jumps, and think hard. The very first jump is often the jump that requires the most thought because there are more possibilities.
- Eventually reaching a cluster of beacons near the exit tends to lead to more flexibility than reaching a sparser area of beacons near the exit. For example, if there’s a cluster of beacons above the horizontal line going through the exit beacon, but a sparser area of beacons below that line near the exit, then it’s usually better to make one’s way (gradually) to the upper area.
Brief Examples
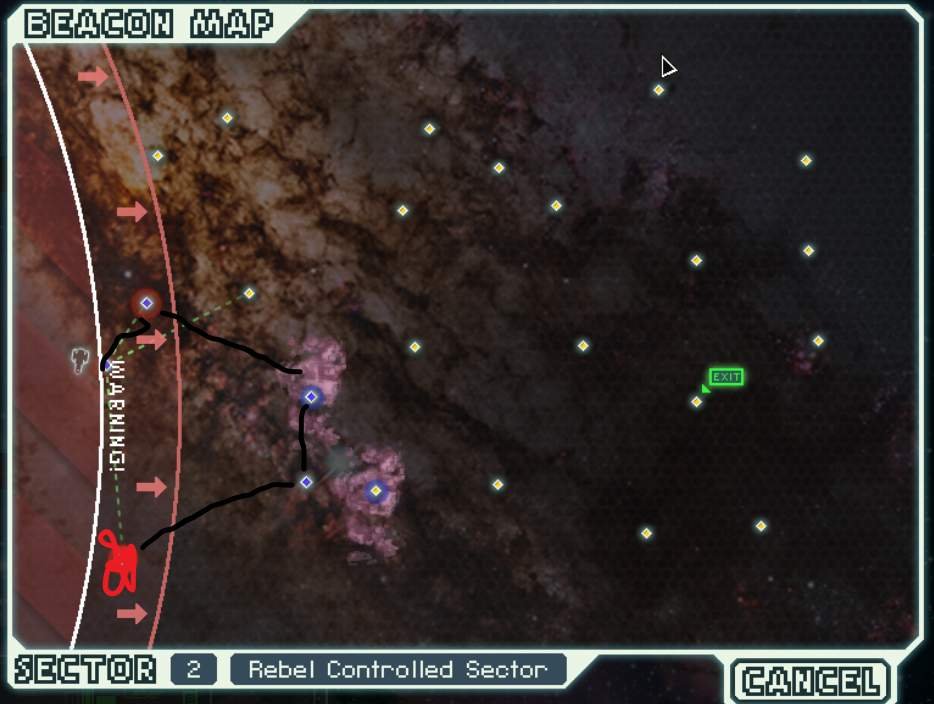
Here is an example of why simply knowing how much time you have to reach a beacon can be so valuable. The red scribbling is where I started, and there was a store right above me. Instead of going straight to the store, with little scrap, or ignoring the store altogether, I decided to make some jumps around to visit the store from the other side. Before doing that I had to know if I had enough time.
The fleet would advance 3.5 space units by the time I made it to the store, so I had to jump there while they were less than 2.5 space units advanced. They start 1.4 space units off-screen, so that means that if the store is anymore than 1.1 space units away from the edge then it’s a safe trip. I was able to measure that it was. I was able to make it to the store safely.
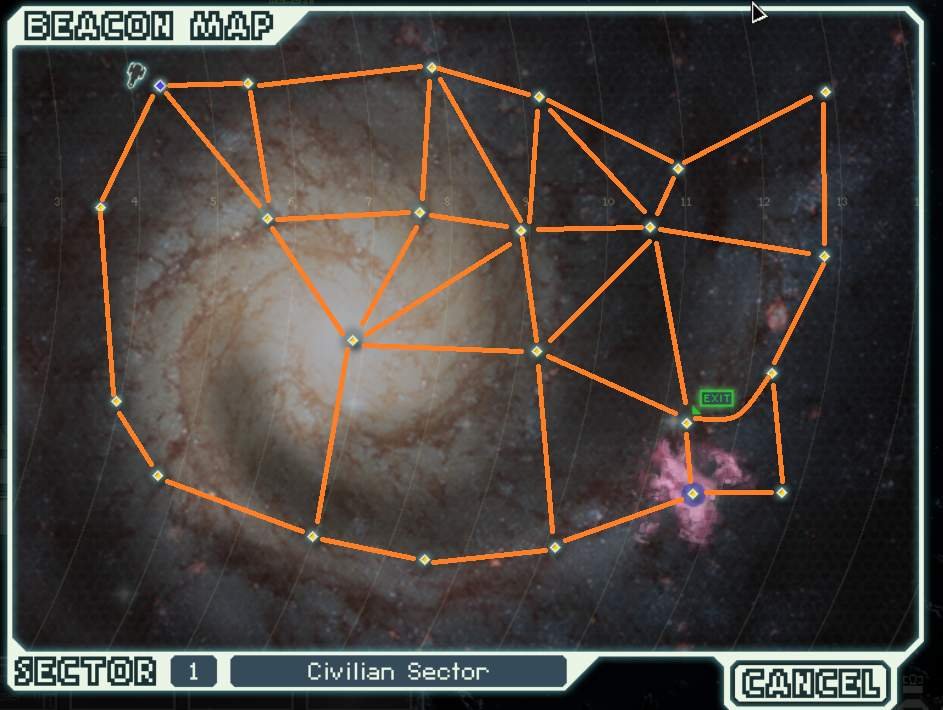
This is a complex example because it concerns the first jump on a brand new sector. I included the extended pursuit indicator mod to help with the visualization.
It’s possible to dive on this sector. You can only dive into the regular beacon by the exit. There’s also only one way to do this efficiently. You have to jump to the exit beacon from the beacon (let’s call it the star beacon) in the 10~11 range (the one connected to 6 other beacons). So if you want to have a whole extra beacon for this sector then that’s going to restrict your options: you need to reach the star beacon on your 9th jump. This is an example of reverse pathing.
Your next goal will be to have as many opportunities for distress beacons and store beacons as possible (if you’re looking for stores), or ship battles if you have long ranged scanners. Being ahead of the rebel fleet can sometimes make it easier to visit quest beacons too, in case it’s somewhere out of the way that will cost you extra jumps to reach. Also the nebula beacon here looks unappealing to visit all things considered. It doesn’t lead to an extra beacon being visited and it’s in an unhelpful location for good pathing.
Conclusion
One of the foremost goals it to know exactly how many jumps you have left to reach each important beacon in a sector (such as the exit beacon). You also want to utilize diving if at all possible to visit more beacons. A flexible path that reveals many potentially visitable beacons is ideal for discovering and visiting stores. To achieve this it’s good to go through areas of beacons that are clustered together, although areas where beacons aren’t clustered might still be worth visiting somewhat.
Sector navigating is a fun part of the game because it is so hard to perfect, and yet the better it is done the more scrap is gained on average and the higher the probability of a good store visit is.

Be the first to comment