
More Temtem Guides:
- How to Make Money.
- Comprehensive Breeding Guide.
- How to Rename or Delete Character.
- Chart of the Types (Defend / Attack).
- Guide to Single, Training Values and Base Stats.
- How to Get Pendant (First Side Quest on the Beach).
- Combat Guide (Tips and Tricks).
- Starters Overview Guide.
- Traits and Conditions.
Ever wondered what this or that is about ? Ever wanted to become the very best but you feel like you are missing something ? This guide aims to cover all the basics of the game and even more. From the obvious to the more advanced tips and strategies this guide is meant to be as exhaustive as possible while still letting you play the game the way you want because at the end of the day you are here to have fun.
Contents
- Introduction
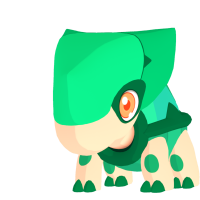
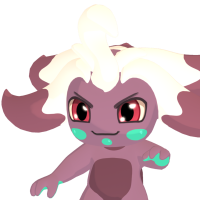
- Starting with the Starters: Crystle, Smazee and Houchic
- Basics of Combat
- Synergy
- Technique Courses
- BST, SV, TV, and Traits
- Basics of Breeding
- How to Breed a “Perfect” Temtem
- FreeTem
- How to Find Rare Temtems
- Each Island Specializes in 2 Types
- The Importance of Exploration and Side Quests
- How to Avoid Backtracking
- Luma Temtems
Introduction
All credit goes to Sombrero!
This guide is aimed at every type of player. I try my best to make it as accessible as possible while still providing useful information even for veterans.
While not fully exhaustive I did my best to go into as much details as possible so you can freely explore each topic and maybe avoid others you are already familiar with.
I always write guides with player’s choice and freedom in mind. I will not tell you how to do things, but rather how things work and how you can have fun and get better on your own.
I hope you enjoy the guide, have a good read.
Starting with the Starters: Crystle, Smazee and Houchic
The very first choice you make as a Temtem tamer is which starter you want to go with.
This section will focus on each starter to give you a better idea of what they are about.
Please keep in mind that all 3 starters are obtainable in-game in the wild so your choice is really not definitive in any capacity.
Crystle
Crystle is the most defensive oriented Temtem you are offered at the start.
- HP – 60
- Stamina – 41
- Speed – 33
- Attack – 61
- Defense – 69
- Special Attack – 46
- Special Defense – 42
With a focus on HP, Attack and Defense, Crystle is meant to deal physical damage while absorbing incoming physical damage for its team.
Its Crystal typing makes it weak to Fire, Earth and Melee techniques while its own Crystal techniques are twice as effective against Electric and Mental Temtems.
Pros
- A very capable tank who can absorb tons of physical damage while still dishing out its own physical damage to the enemy.
- Crystal is a rare type to encounter at the start of the game making Crystle the best option to deal with electric types early on such as Ganki and Nessla.
Cons
- Its low speed makes it hard for you to shut down your opponents before they can act which requires a more careful and tactical approach to be effective
- Its movepool is almost exclusively made of Crystal techniques which is very niche to use early on making Crystle slightly niche to use.
- Crystle’s defensive nature requires its tamer to know well if the opponents are about to deal physical or special damage to avoid getting destroyed by powerful special techniques.
Smazee
Fast and powerful, Smazee is the perfect starter for the hot-headed tamers in search of some fast heavy-hitting action!

- HP – 49
- Stamina – 55
- Speed – 66
- Attack – 69
- Defense – 44
- Special Attack – 37
- Special Defense – 37
Smazee’s specialty is hitting hard and fast using strong physical attacks helped by a decent Stamina pool.
Its Melee typing makes it very easy to use as it is only weak to Mental and Digital techniques (both being very rare early on in the game) and the only type it can’t deal heavy damage to is the same as itself, Melee.
Pros
- Smazee hits hard and fast making it a good candidate to shut down the opposition before they can even act.
- Its very simplistic hit as fast as possible approach makes it fairly easy to use and the typing matchup is even easier to memorize for new players.
- The Fever Rush trait given automatically for your Smazee starter is by far the best of the 3 starters’ traits as it boosts Smazee’s attack whenever it receives any status, including beneficial ones.
Cons
- Hitting hard and fast is great but that also means that Smazee can get shut down very easily if you are not careful because of all of its 3 defensive stats being really mediocre.
- The simplistic approach of Smazee may be boring to some player and can lead to frustrations at times when you need more than just hitting hard.
- Smazee can very hardly provide any support to its team.
Houchic
Faster, stronger and smarter, Houchic mixes raw power, speed and utility to help its team.
- HP – 38
- Stamina – 44
- Speed – 66
- Attack – 40
- Defense – 41
- Special Attack – 72
- Special Defense – 52
Houchic can be used both as a supportive Temtem or an offensive threat based on your needs, it relies very heavily on special attacks to deal its damage and benefits from a decent speed stat to get the job done quickly without suffering retaliation.
Its Mental type makes it weak to digital, electric and crystal techniques which are for the most part rare early on and most importantly very easy to predict. On the offensive side Houchic tends to massacre Neutral and Melee Temtems.
Pros
- Houchic hits fast and hard making it great at dealing with your opponents before they can react.
- It gains access to very useful moves for the team such as Energy Manipulation (makes enemy uses more Stamina when using a technique) or Hyponsis (puts target asleep for 2 turns).
- The Mental type is overall easy to use, its threats are very easy to identify and likewise you know which targets you can shut down or not fairly easily.
Cons
- Houchic tends to have access to good Techniques but they tend to have at least 2 Hold which means Houchic often needs to wait at least a turn before doing what it’s supposed to and is suscepitble to get shut down in the meantime.
- It’s very easy for Houchic to get knocked out as it has low HP and defensive stats overall.
- The Techniques Houchic learn can be Stamina intensive at times requiring its tamer to be careful not to waste Stamina when unnecessary.
Basics of Combat
Combats in Temtem can be against wild Temtems, NPC tamers or other human players. They play out for the most part the same the biggest difference being that you are able to catch new Temtems when facing wild Temtems whereas you can’t capture Temtems used by other tamers (whether they are controlle by the AI or human players).
Two teams of up to 6 Temtems fight against each other in a round based environment. Only 2 Temtems per team can be on the field at the same time.
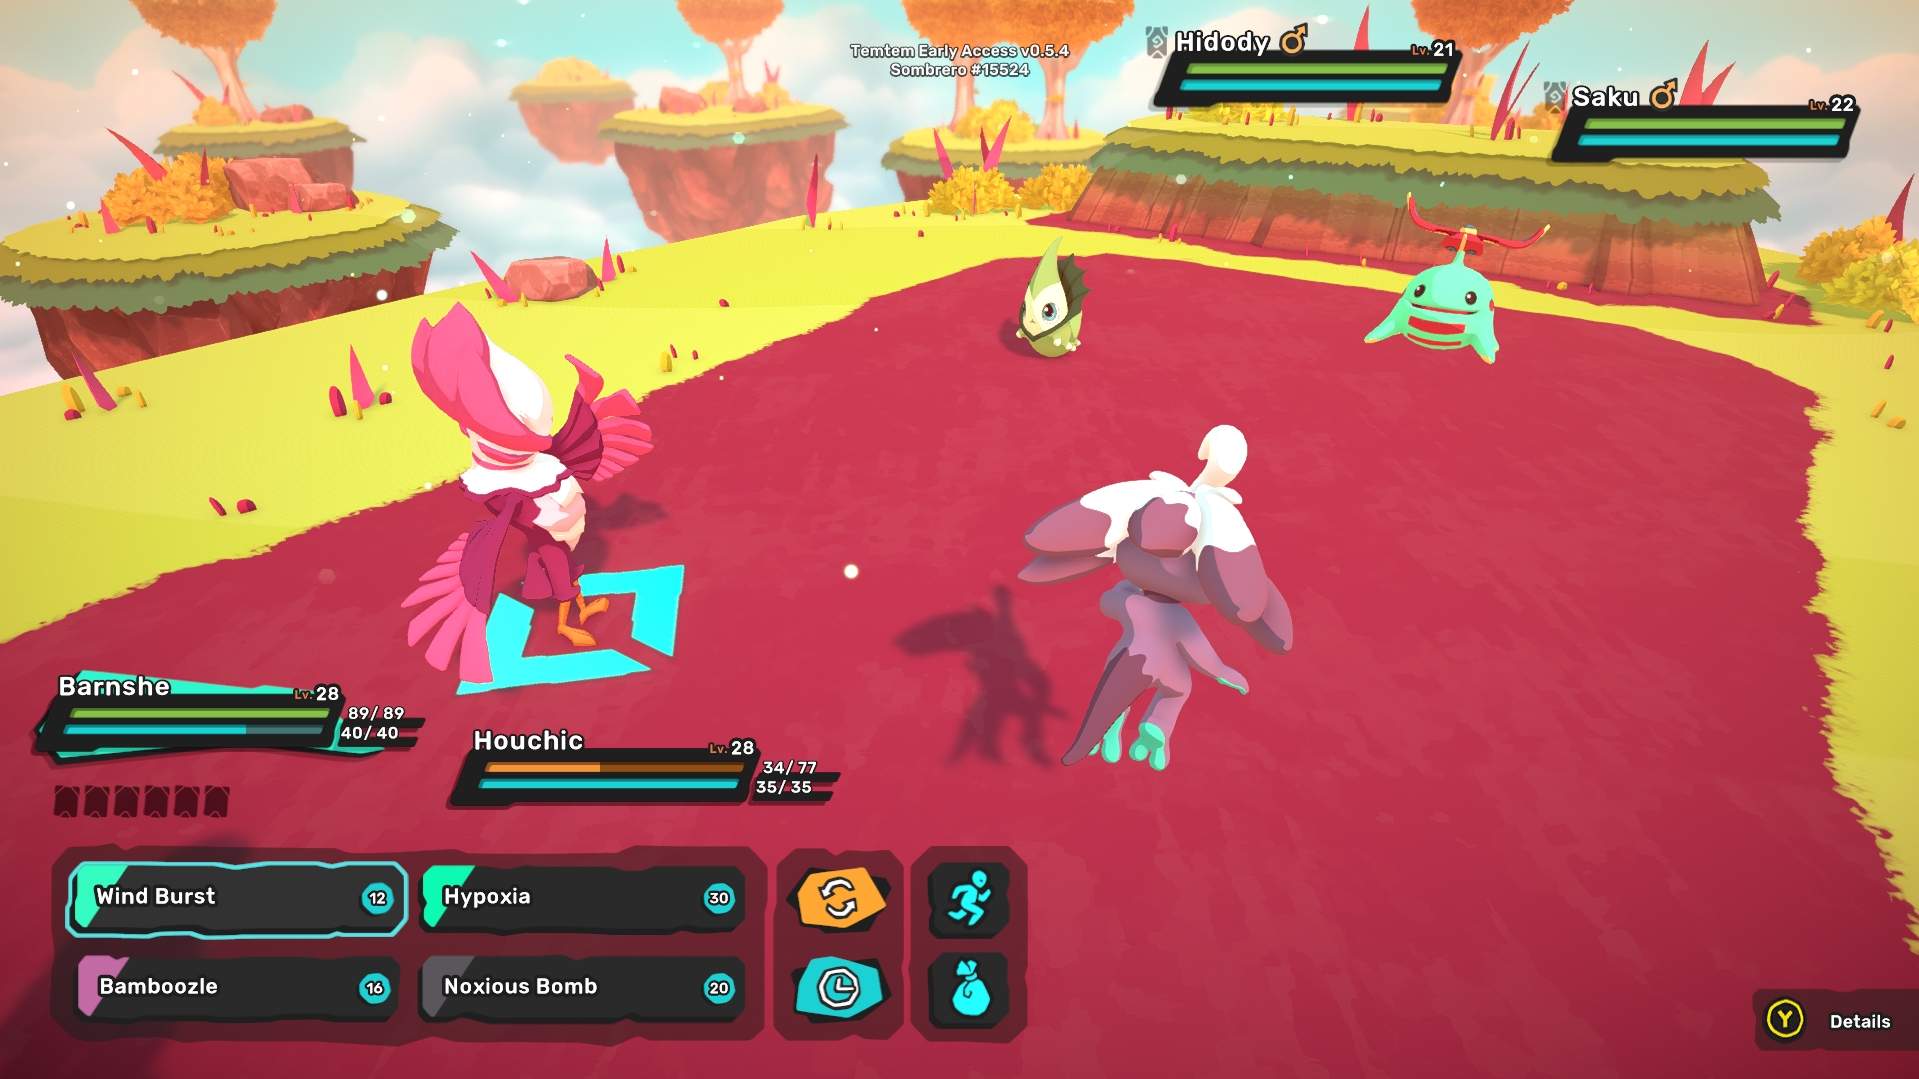
Example of a fight against an untamed Hidody and an untamed Saku.
Any Temtem knocked out is replaced automatically at the end of the round by the Temtem of its player’s choice and it is possible for either team to use a Temtem action to switch it out and replace it with another Temtem, such action is always performed at the start of a round (the order being decided by the Temtems’ speed stat).
A round allows each of the 4 Temtems to take an action which can be as follow:
- Use a technique
- Use an item
- Switch out for another Temtem
- Rest
- Run away (in the case of a wild encounter)
Each Temtem acts within the round by order of speed, the Temtem with the highest Speed acting first while the slowest acts last.
Temtems have HP (Health Point) and Stamina. Whenever they perform a technique they use some of their Stamina and they are knocked out whenever their HP count reaches 0.
It is possible for a Temtem to use a technique even if it doesn’t have enough Stamina. This causes the Temtem to overexert itself making it lose HP based on how many points of Stamina were missing to use the technique. In addition, the Temtem being overexerted cannot use any technique on its next turn forcing it to either rest, use an item or switch out.
A small amount of Stamina is recovered by each Temtem at the end of each round and Resting allows a Temtem to recover even more Stamina within the round.
It is possible for a Temtem to knock itself out after overexerting itself.
Techniques and Hold
Many Techniques have what is called a Hold value. A Technique with Hold requires 1 turn per Hold value to wait before the Technique is usable in combat (it is essentially the opposite of a cooldown, a heatup of sort).
For example Held Anger has a Hold value of 3 and requires to wait 3 turns to be used.

The number of turns until the Technique is ready is represented by the bars in the top left hand corner of a technique’s card. 1 bar means the Technique does not have any Hold, 2 bars and the Technique has 1 Hold and so on.
A Word on Co-op
The game allows for two players to play cooperatively throughout all the content offered in the game.
This means that both players can only bring 3 Temtems per battle (for a total of 6 for their team) and each player uses one of its 3 Temtems at a time. This means that it’s possible to end up in 1vs2 situations despite having more than 1 Temtem still standing in co-op if either player gets all its Temtems knocked out.
Even though each player brings only 3 Temtems within battle they still carry 6 Temtems around, only the 3 first in their squad are automatically brought in combat. This can be used to the player’s advantage to require less trips to towns to heal but has the side effect to spread the experience between 12 Temtems instead of 6.
Synergy
Some Techniques can trigger a Synergy in battle if the condition is met. Every Technique with a Synergy available requires a specific Type of Temtem for your partner to be.
For example Urushiol is a rather cheap and weak Toxic Technique which can also poison your target if you use it when your allied Temtem is a Toxic type.
You don’t need your ally to be a mono-type for a Synergy to work making double type Temtems especially useful to make use of Synergies.
Synergies can have really varied effects from reducing the cost in Stamina of the Technique, to improving the damage of the Technique or even giving it additional properties.
You can quickly see if a Technique has a Synergy attached to it by the little “+” symbol in the top left hand corner of the Technique’s card. The “+” shines in a green light when the condition to activate the Synergy is met (i.e the allied Temtem has the appropriate type).

Here is an example of the Technique Energy Manipulation having its synergy condition met.
The Technique will deal more damage and applies the Exhausted status for 2 turns instead of 1 thanks to the fact that the ally of the Temtem using this technique is of the Nature type.
Technique Courses
Technique Courses are special items allowing your Temtems to learn specific Techniques based on which course you use.
Not every Temtem can learn every Course but rather a select few. Most Techniques learned using Courses are situational Techniques but some of them can be very useful to pull-off some strategies or simply have more versatile and powerful Temtems.
Try to find all the Technique Courses in the world by completing side quests or looting them from certain chests!
BST, SV, TV, and Traits
It is important not to underestimate the impact of BST, SV, TV, and Traits as they can make your experience with the game much more enjoyable if you understand use them to your advantage.
And no, this section is not about min-maxxing and intense maths. I am talking about easy to understand easy to use mechanics that make your Temtems significantly strongers and your life essentially much easier.
Base Stat Total (BST)
The Base Stat Total, commonly called BST represents the statistical values of a Temtem species in general. Every Temtem of the same species will start from this base and then other values will have an impact.
To use an analogy with the real world dogs usually have four legs and human beings tend to walk on their legs and have 2 arms, some dogs may have lost a leg and some humans may have lost an arm or a leg but in general they all start with the same rough design.
Let’s use Goolder’s BST as an example to understand how it all works.
- HP – 120
- Stamina – 70
- Speed – 10
- Attack – 64
- Defense – 56
- Special Attack – 68
- Special Defense – 56
We can clearly see that Goolder has an awful Speed BST and a phenomenal HP BST. Even though HP and Stamina tend to behave differenly than the other BST you can quickly notice when a Temtem is around the average or not in terms of BST.
This means that every Goolder will have an exceptionnaly high HP value and exceptionnaly low Speed value no matter their “genetics” or training.
Standard Values (SV)
The Standard Values, or SVs are sort of the “genetic material” of a Temtem. Every Temtem has a value set between 1 and 50 for each of the 7 Stats With 1 being the worst possible and 50 being the best SV possible.
SVs are almost set in stone and can be modified only by using very rare items that are very hard to obtain. It is best to consider a Temtem to not be able to change its SV overall to make things easier to understand.
What is interesting is that SV are transferred to children when Temtems make babies. For each of the 7 stats, by default, the child has a:
- 40% chance to inherit the SV of its mother
- 40% chance to inherit the SV of its father
- 30% chance to inhterit the average of both its parents
This means that if the father has a SV of 10 and the mother a SV of 30 the child will have a:
- 40% chance to have a SV of 30 (from its mother)
- 40% chance to have a SV of 10 (from its father)
- 30% chance to have a SV of 20 (average of the parents)
It is possible to “lock” a SV from either parents by using special gear (more on that in the breeding section down below).
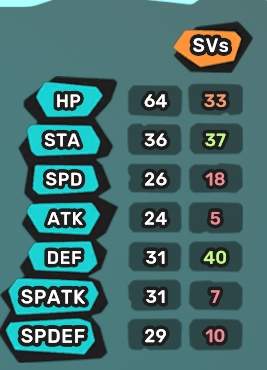
Here is an example of the UI showing the SVs of a Temtem freshly tamed.
Training Values (TV)
The Training Values, or TVs are, as the name implies, due to the Temtem’s training. For each of the 7 Stats a Temtem can obtain up to 500 TVs for a total of 1000 in total across the 7 Stats at maximum.
This guide is not a calculating tool to maximize your TV spread but very roughly TVs are as important as SVs to determine the final stats of your Temtems.
TVs can be obtained by defeating Temtems in combat (it also work when catching them): every Temtem that is elligible to gain experience from a defeated Temtem will obtain TVs based on the species of the Temtem defeated.
For example whenever a Sparzy is knocked out all of your Temtems who are elligible to gain experience from it will obtain 2 TV in Attack.
TVs can also be obtained by using special items, those items can be bought in Mokupuni at the fruit stall or sometimes found in the overworld in chests and as various rewards.
TVs can also be lost by using specific items. This is mostly done to remove the TVs you are not interested in for your Temtem as you can only have 1000 TVs per Temtem at maximum.
Traits
Traits are special abilities that each Temtem has in battle. Every Temtem species has 2 possible traits and there is a 50% chance to find either. Some Temtem species share the same traits while others are specific to some species making them even more unique.
It is worth noting that some Traits can make some unevolved Temtems worth considering.
For example some Temtem lines have the Camaraderie trait available for their first stage of the evolutionary line making all damage reduced by 50% if they are teamed up with another Temtem of the same evolutionary line.
The starter Temtems always have the same trait when offered to the player.
It is possible to pass down the trait of a Temtem to its baby when breeding by using a specific gear item available in the breeding center shop. Otherwise traits are chosen at random for the newborn Temtems.
Basics of Breeding
To access the Breeding Center you need to have access to the 2nd island you visit during your journey: Omninesia.

Here is the map with the shortest path to go to the Breeding Center from the moment you arrive for the first time in Omninesia.
The Breeding Center, as the name suggests, allow players to put Temtems in it to breed new baby Temtems.
It is possible to deposit up to two couples at the same time and they have to be pairs of a male and a female sharing at least one type in common. This means for example that any Water Temtem can have a baby with any other Water Temtem of the opposite gender (even if they have two types at the same time).
How Fertility Works
Each Temtem has a Fertility score ranging from 0 to 8. This score represents how many times at maximum the Temtem can still make babies. Everytime a Temtem has a baby its fertility score is lowered by one and the baby automatically obtains the fertility score of the parent with the lowest score after making the baby.
For example if the father has a fertility score of 4 and the mother a fertility score of 8 then they will respectively go down to 3 and 7 after making the baby and the baby will have a fertility score of 3 as well.
This means that it is highly recommended to match parents with the same fertility score to essentially not “wasting” fertility points for the new generation.
It is worth noting that there is no genealogy or anything and that a Temtem can more or less have a baby with any member of its technical “family” (even though it’s often times not recommended for various reasons making it way less productive).
The Fertility score is represented by a branch in the page of each Temtem with each leaf and the branch itself representing 1 of the 8 points of Fertility, with each part lit representing a point remaining.

In this example this Temtem has a fertility score of 6 (5 leaves + the branch are lit).
How the Species of the Baby is Determined
The baby is always from the least evolved species of the evolutionary line of the mother. For example if the mother is a Granpah the baby will always be a Paharo. The Paharo evolutionary line being Paharo > Paharac > Granpah.
What is the Point of Breeding?
Breeding is mostly used for two reasons:
- To possibily obtain a Luma
- To breed a “perfect” Temtem
To possibly obtain a Luma
Let’s start with the simplest being the chance to obtain a Luma. If a parent is a Luma then the baby will have 10 times more chance to become a Luma. This bonus can stack for both parents making the chance for the baby to be a Luma 100 times superior to the average.
Here is a table comparing the chances to obtain a Luma based on if none, either or both parents are Luma themselves.
Situation / Chance to obtain a baby Luma
- None of the parents is a Luma – 1/6000
- Either of the two parents is a Luma – 1/600
- Both parents are Luma – 1/60
Check the next section of this guide to learn more about how to breed a “perfect” Temtem.
How to Breed a “Perfect” Temtem
To breed a “perfect” Temtem
Many players will want to have “perfect” Temtems which are Temtems with all their SVs at maximum (or at least all the relevant one), the desired trait and eventually egg techniques.
How SVs are passed down
SVs are passed down to the child following a very simple formula. The baby has a 40% chance to obtain the SV of any given stat from its mother, 40% chance to get it from its mother and 30% chance to get the average of both parents.
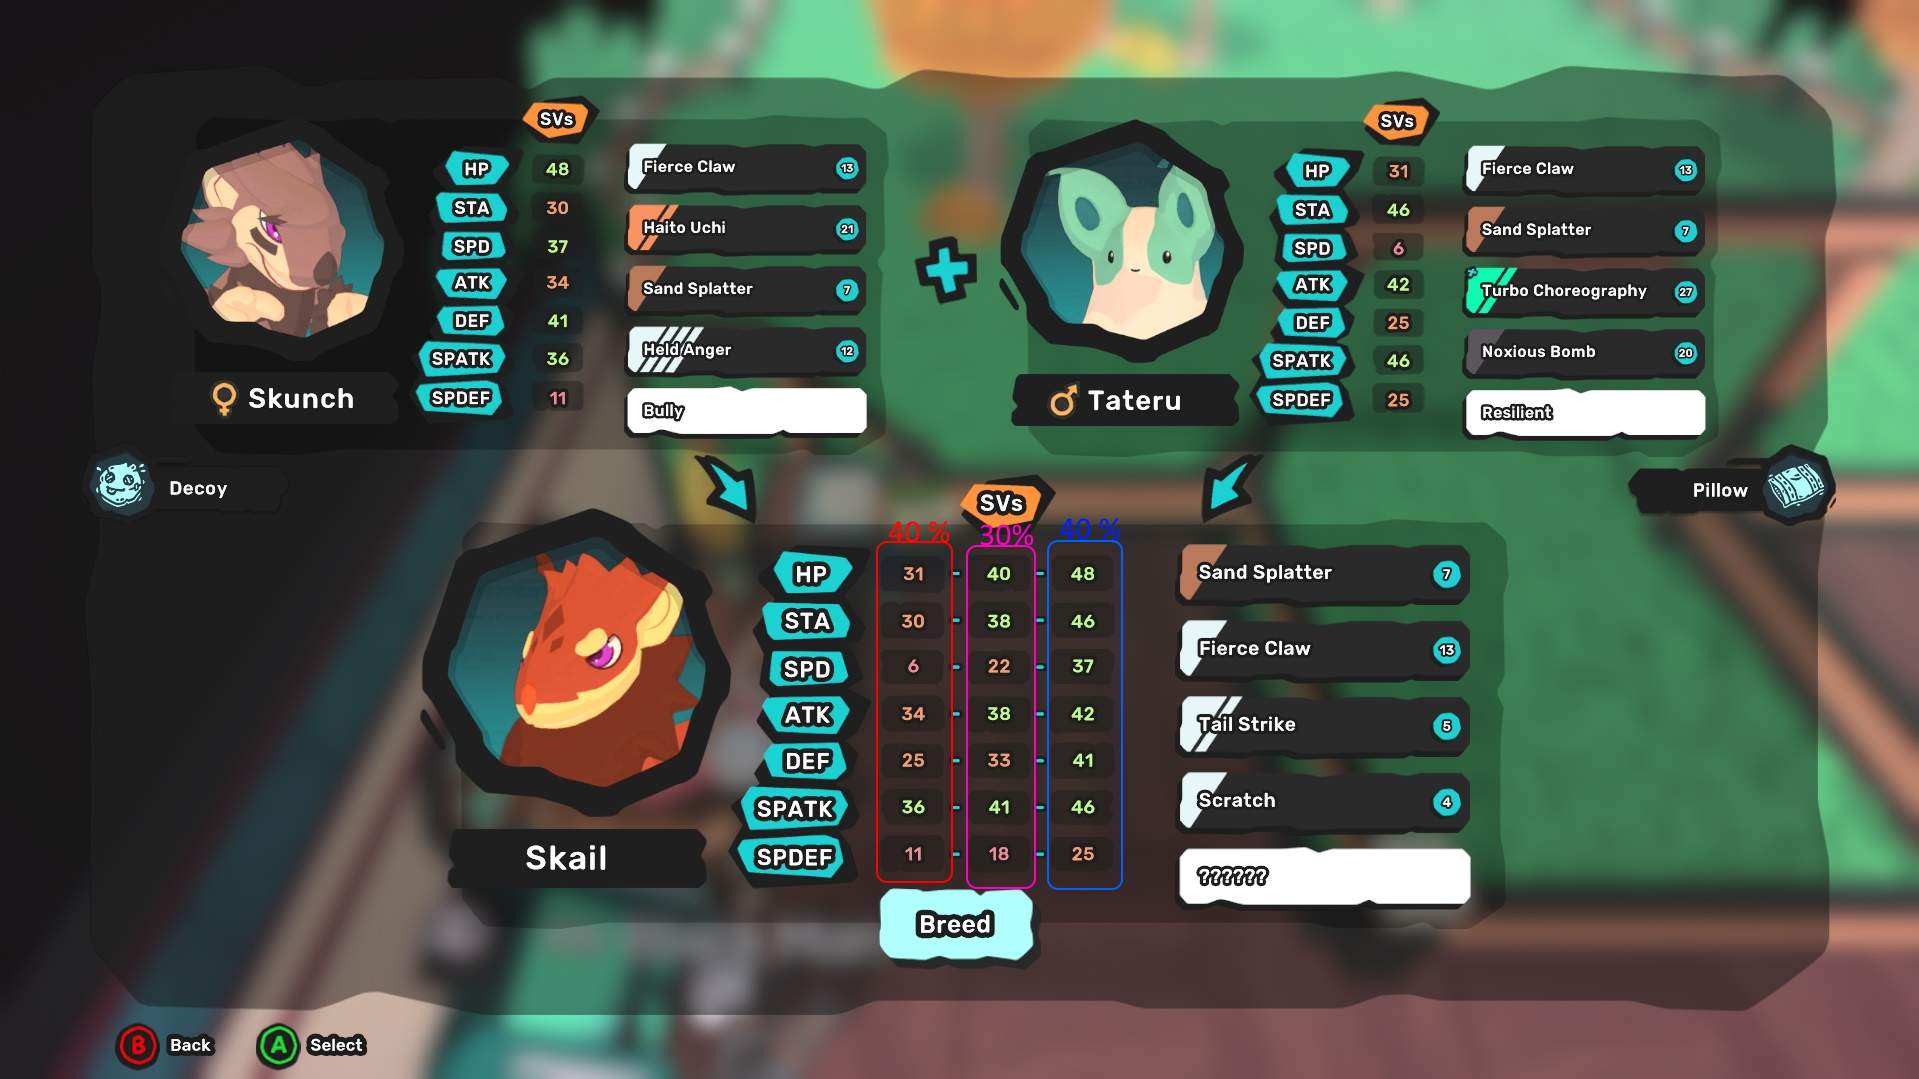
Here is the UI for the possible baby obtained through breeding.
In this example a female Skunch and a male Tateru are about to have a baby. The baby Skail will have 40% chance to get the SV from its mother, 40% chance to get it from its father or 30% chance to get an average of the two for each of the 7 Stats.
This essentially means that by default you have a 40% chance to get the best outcome, 40% chance to get the worst outcome and 30% chance to get the average of both outcomes.
It is worth nothing that this means that if both parents have the same SV to begin with then the child will always obtain the same SV as well, which is particularly useful when both parents have a perfect SV.
However this is the “default” situation without any intervention from the player.
It is possible to buy special gear items from the vendor inside the breeding center that allows the player to control which parent gives which SV to the baby and therefore remove a lot of the randomness of the process.
Currently there is 10 items available: 7 to ensure any of the 7 stat is passed down to the newborn while the 3 remaining can force two stats at once from either parents (HP/STA; ATT/DEF; SPATK/SPDEF).
There is many strategies out there about how to reach the “perfect” Temtem in terms of SVs. However it is very hard to truly plan out in advance your strategy and it is recommend to adapt on the fly depending on what you obtain as you go along.
Even if you always control your SVs the way you want you can never predict the gender of the baby which causes a huge variation in your results.
For example you may have planned an entire geneaology tree but if you keep obtaining boys after boys you might have to rethink your enitre tree to introduce girls into it or your entire plan willy simply never work.
The best way to tackle things to get a perfect Temtem is to capture an army of Temtems with at least one perfect SV (50). Then you start making the second generation of Temtems out of your freshly caught Temtems by using the special gears.
For example if I have a perfect HP and a perfect Attack I’ll use the appropriate item to obtain a baby with perfect HP and Attack.
Then the goal is to make another baby with every Stat except one in common. So in our example we want another baby of second generation with either perfect HP or Attack and something else, such as HP and Speed.
With our two babies of second generation we can start the third generation which will be in this case perfect HP, Speed and Attack.
From there we will need to make another 3rd generation with at least two of HP, Speed or Attack perfect and a 3rd Stat different. We could obtain HP, Attack and Special Defense for example.
And we go on and on like that until we have 2 parents with 6 perfect Stats ready to make a baby with the 7 perfect Stats.
This process can now be made much easier thanks to the gear items that guarantee two Stats at the same time (like Attack/Special Attack). If you calculate things right you can make way less generations that way and for example have 2 parents with 2 perfect SVs and obtain a baby with 4 perfect SVs all in one go.

Here is an example of a pyramid I built using a spreadsheet software to better visualize my genealogy tree.
I used abbreviations for the Stats and a color code for the males and females to make things easy to understand for me. That way I could quickly visualize what I’m missing to get to the next generation.
The point is not for you to make the exact same tree but rather to find your own way to better visualize the process and keep things organized. It may sound overwhelming when you read these lines but it’s actually very simple, you are basically building a tower or a pyramid and each generation means you added a new floor. For each floor you need about twice as many Temtems than the previous floor and you are one step closer to perfection.
Realistically you might not always want 7 perfect SVs. Maybe you’ll have a few that are at 49 or even 48, maybe you won’t need to have both Attack and Special Attack at max or maybe you can have a bit less Stamina. It depends on how much time you want to spend to your perfect little Temtem.
I would also recommend for you to build communities where you can trade Temtems of the same species. For example you might want to trade your 6th generation girl for another 6th generation boy. This way you can make the process of creating a perfect Temtem much faster but it requires a good network and likeminded people.
A Word on Marking
You can Mark your Temtems in the PC UI. I recommend to mark Temtems using your own code to know which Temtem has how many perfect SV (or however you prefer coding) to stay organized and on top of things.
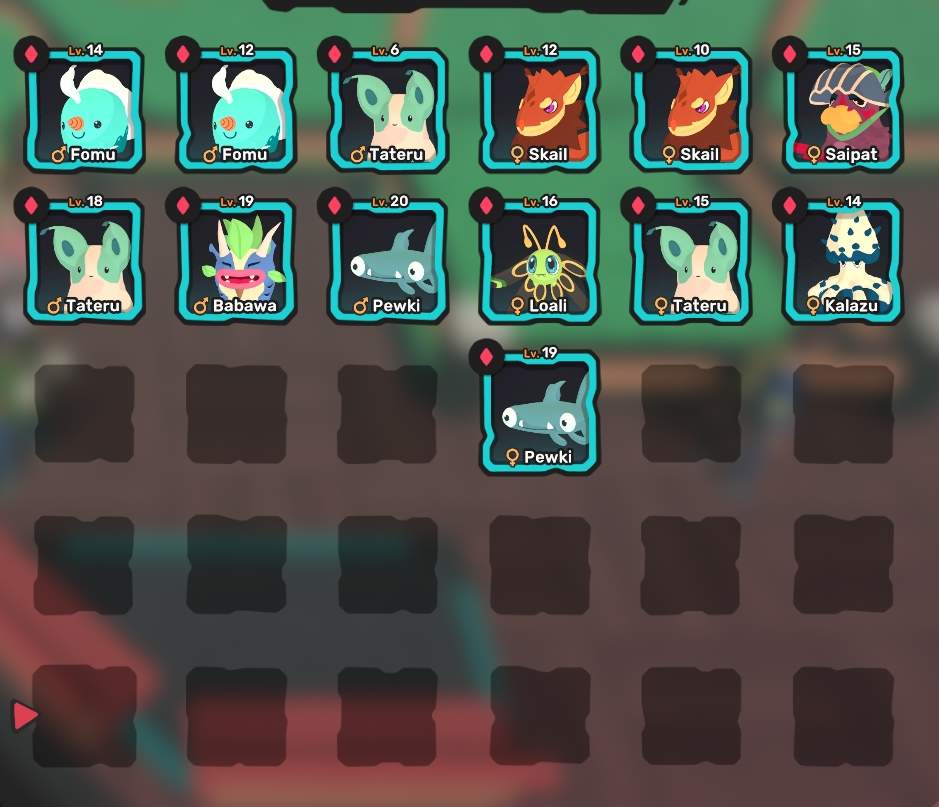
Here is my current early coding. These are all the Temtems I currently have with 1 perfect SV, I always split my boxes by gender with one gender on the 3 left colums and the other on the right columns to keep things as clear as possible.
And then I will put another mark for the 2 perfect SVs and so on.
Egg Techniques
Most Temtems can learn Techniques that they wouldn’t normally be able to learn thanks to breeding, these are called Egg Techniques. If either parent has a possible Egg Technique for baby in its current moveset it will be passed down to the baby (which can be seen in the preview screen so you know in advance which techniques can be learned that way).

Egg Techniques are signified by a small egg icon in the squad menu and on the baby preview screen.
Some egg techniques require a chain to be formed in cases where the technique is not possibly known by any compatible parent for the baby. In these cases it is required to find a compatible Temtem species which can learn the Egg Technique as well and which shares types with both the targeted Temtem and the Temtem you want to learn the technique from.
For these reasons it is vital to be wary of which Egg Techniques you want your baby to learn before starting the breeding process and it is best to introduce the egg technique very early on in the genealogy tree so that every baby can learn the Egg Technique. Otherwise you will have difficulties keeping perfect SVs and learning the Egg Technique at the last minute all while still having your fertility over 0.
Note About Traits
Traits have a 50% chance to be chosen for the baby. If you want to have a specific trait you can use a gear item to pass down the trait you want from the relevant parent to the baby. However you cannot pass down any SV from that parent while doing so which adds another difficulty regardinf your Fertility score and your quest for a perfect Temtem.
It is best to worry about the trait at the very end of the genealogy tree since you still have a 50% chance to have the “wrong” trait when making a baby even if both parents have the “right” trait you want.
FreeTem
In the world of Temtem exists an organization called FreeTem. Their goal is to promote the freedom of Temtems and to that end they want you to release in the wild Temtems you already captured.
FreeTem is located next to the Breeding Center in Omninesia.
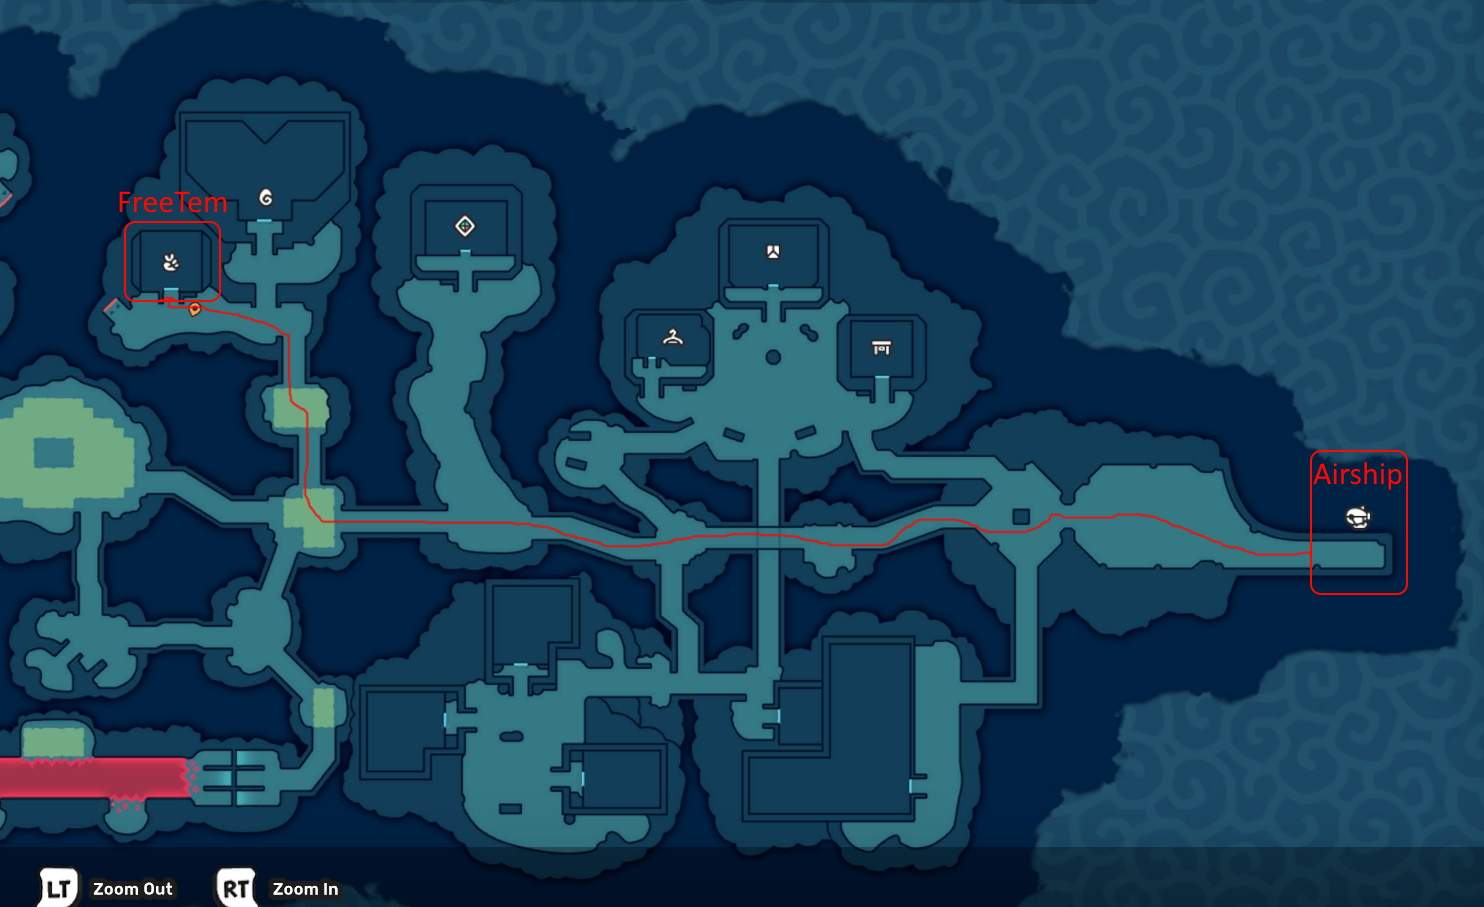
Here is the shortest path to FreeTem from the moment you arrive in Omninesia by airship.
In terms of gameplay FreeTem gives you rewards for every Temtem you release. Not only you get Pansuns (the currency of the game) for every Temtem released based on its level and difficulty to catch (the harder to catch the more Pansuns) but you also get a special reward once a week if you reach the goal they give you. The special reward and the goal changes every week and can sometimes be really interesting.
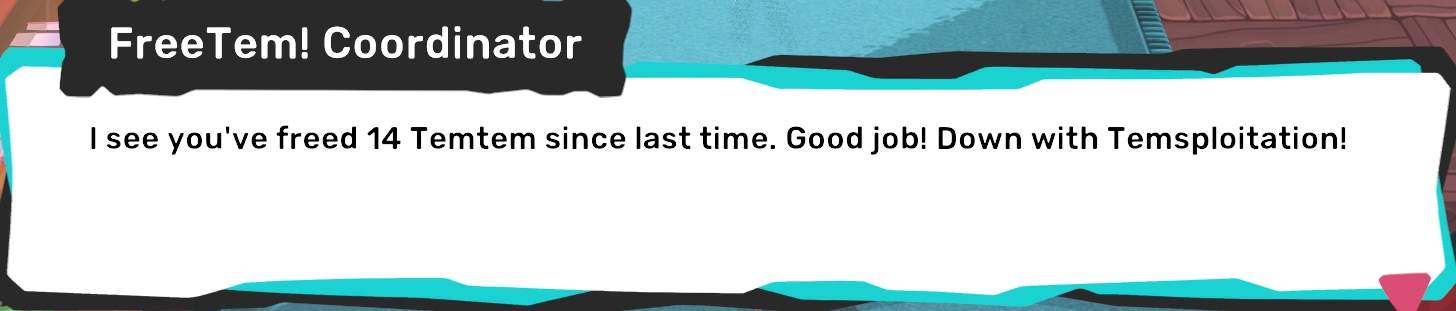

Here is an example of when I delivered 14 Temtems and got 819 Pansuns in reward.
If you avoid wasting Temcards and try to use the cheapest Temcards you can you will end up making a lot of Pansuns in the end.
For that reason it is highly recommend to try to catch as many Temtems in the wild as possible instead of knocking them out. You get the same rewards as if you knock them out but also get pansuns if you decide not to keep them. Also that way you have much better chances to frequently find Temtems with interesting SVs for breeding purposes (check the breeding section for more information).
Every Temtems caught and released count even before you even have access to FreeTem or Omninesia in general so you can start releasing Temtem from the very start of the game you will still accumulate all the rewards the first time you visit FreeTem.
How to Find Rare Temtems
Every area with untamed Temtems to encounter tends to have a unique distribution of Temtems you can encounter. In many cases you have a very high chance to meet a basic non evolved Temtem, a slightly lower chance to meet a slightly rarer Temtem and a very low chance to either find an evolved Temtem or a rare species.
These rare species are often times obtainable only that way in the wild and therefore it is interesting to check every area to see if there is a rare encounter to be found.
The first big example of this is the location to obtain Barnshe. Barnshe is required for a side quest on top of being a pretty unique Temtem and is available only on the roof of Windward Fort with a 5% chance to be encountered.
Many other species such as Oceara, Nessla, Kinu, Tuwai, the 3 starters, Shuine and others are encountered that way and in most cases the location they are encountered in make sense either in terms of geography or the story or important NPCs give some hint.
Each Island Specializes in 2 Types
The world of Temtem is a big archipelago in an ocean of clouds.
During your travels you will come across 6 islands with very distinct themes, cultures, lore and Temtems. This is further emphasized by the fact that each of the 6 islands focuses on 2 different types as follow:
- Deniz: Water / Wind
- Arbury: Melee / Mental
- Omninesia: Nature / Fire
- Tucma: Toxic / Crystal
- Kisiwa: Neutral / Earth
- Cipanku: Electric / Digital
Many tamers, the dojos and the wild temtems will mostly be of the main types of the island. This means that you can plan your team accordingly and possibily make adjustments to make your time in each of the islands easier.
For example in the island you start in, Deniz, there is a majority of Water and Wind Temtems which both share a weakness to Electricity. This makes a Temtem like Ganki very useful during your time in Deniz as it can take care of both types easily.
Not only that but most of the time you gradually encounter the non evolved versions of the Temtem species of the islands and then their evolved forms which are often used by the strongest tamers of the island (such as the dojo masters).
If you keep an eye open and learn how to fight against the Temtems of each island you will have a much easier time and enjoy yourself a lot more.
The Importance of Exploration and Side Quests
As simple as it sounds it is highly recommended for you to take your time and explore every nook and cranny the game has to offer. Not only you will find some interesting lore and fun details but you might also get some really good rewards in terms of gameplay.
A very significant amount of really good items are obtained by talking to various NPCs, helping them with side quests or in hidden chests. Try to always talk to every NPC you come across, do all the side quests you can and explore every inches of the map. I get that you want to progress as fast as possible and discover what’s next, but you will most likely have a much better experience if you take your time and do things at a more moderate pace.
How to Avoid Backtracking
After reaching the second town in Deniz you will quickly obtain the key item “Temmescence Vial”.
This Vial is a really useful item that allows you to fully heal your entire party for free. The catch is that the vial is emptied everytime you use it and to fill it back up you need to heal at a temporium.
This essentially means that you get a free heal wherever you go adventuring without having to backtrack all the way to the nearest temporium.
On top of that you can buy or find Smoke Bombs which is an item that teleports you back to the last temporium you visited (even if you didn’t use its healing station, as long as you went inside it). It is best not to abuse Smoke Bombs as it can cost you a fortune if you use it every other minute but by making clever use of Smoke Bombs alongside the Vial you can reduce your necessary backtracking to almost 0.
This may sounds silly but when you start making proper use of both you will save a lot of time, energy and even money and have an overall better experience.
Luma Temtems
A Luma is a Temtem with a unique and extremly rare variation in color.
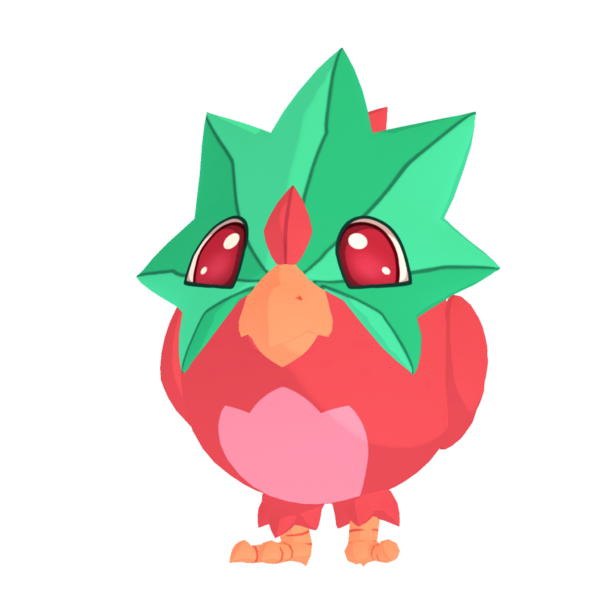
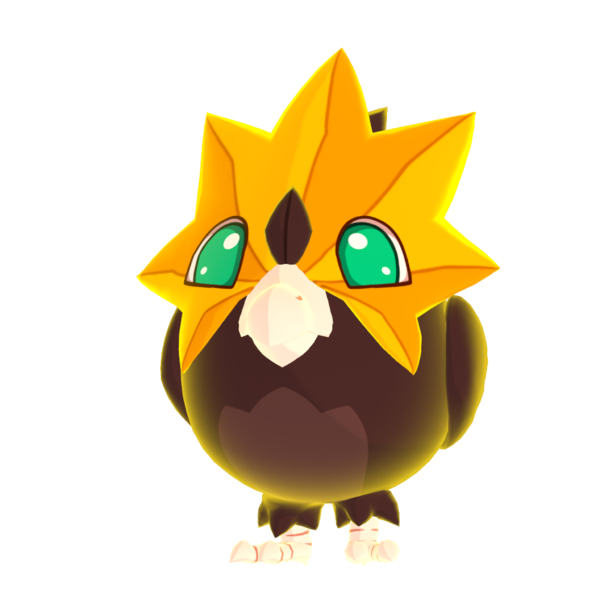
On the left the regular version of Paharo. On the right its Luma counterpart.
Any Temtem in the wild has a 1/6000 chance to be a Luma which is signified by a star icon next to its name in the combat UI, a special sparkly animation when entering battle and a special trail when the Temtem is running around in the overworld.
On top of that every Luma found in the wild is guaranteed to have at least 3 SVs at maximum (50) making them more likely to be stronger in combat than regular Temtems of the same species (though not guaranteed).


Be the first to comment