
This is a collection of hacks I have come up with for improving performance in Void Destroyer 2, especially on low-end systems.
Contents
Performance Hacks and Tweaks
All credit goes to Sayonara!
Introduction
I discovered this while stuck with a low-end laptop for a while, but some of the tweaks can also affect performance of high-end GPUs, especially if you’re running at 4k resolution.
Before we start: I can’t promise that these hacks will work on your system/GPU. In addition, some of these involve messing around with the game files, and it is possible you may mess up your installation so that the game won’t start. If this happens, you can fix it using the “Properties -> Local Files -> Verify Integrity of game files” command from within Steam (or as a last resort, uninstalling and reinstalling).
This will not affect your save games in any way (unless you for some reason manually delete them while browsing the game files… but why would you do that?!).
Adjust Your Options First
When using these tweaks, you should keep track of your actual performance so you can tell whether they are helping or not. There is a frame-rate counter available in-game by pressing Ctrl+Alt+F8. Make sure you actually go into game and fly your ship around; the frame-rate performance you see in the main menu or inside a space station are no indication of what you’ll get in-game.
Before messing with the game files, make sure you’ve done the obvious and adjusted the basic settings: lower the resolution; try full-screen and windowed mode and see if makes a difference; turn off toon shading and edge highlighting, FSAA, and SSAO; turn down / off any other game options that seem performance-related (in particular, turn off the ‘Space Cloud (Noise)’ option under Gameplay – General).
If your video card has a settings program (eg Nvidia Settings), check the settings that are applied there (both global settings and individual game profiles, if your settings program has that option), and make sure they are turned to the best performance settings, and not set to override game settings (such as forcing antialiasing on).
Use an Alternate Skybox
A recent patch has fixed the performance of the default skybox, so this is likely to no longer help with performance. However, feel free to try it just in case – perhaps there’s a few rare cases where it might help.
This is likely to help performance on all but the most powerful GPUs. Even on my reasonably powerful (though slightly older) GPU, this made the difference between 20fps and 50fps.
The default ‘skybox’ (background with space and stars) that you see while flying through space, is drawn using a GPU fragment shader program to calculate a fractal image. While it looks very pretty, it takes a lot of calculation, which is bad for performance on older or lower-spec graphics chips – or even high-end cards, if you’re running at high resolution.
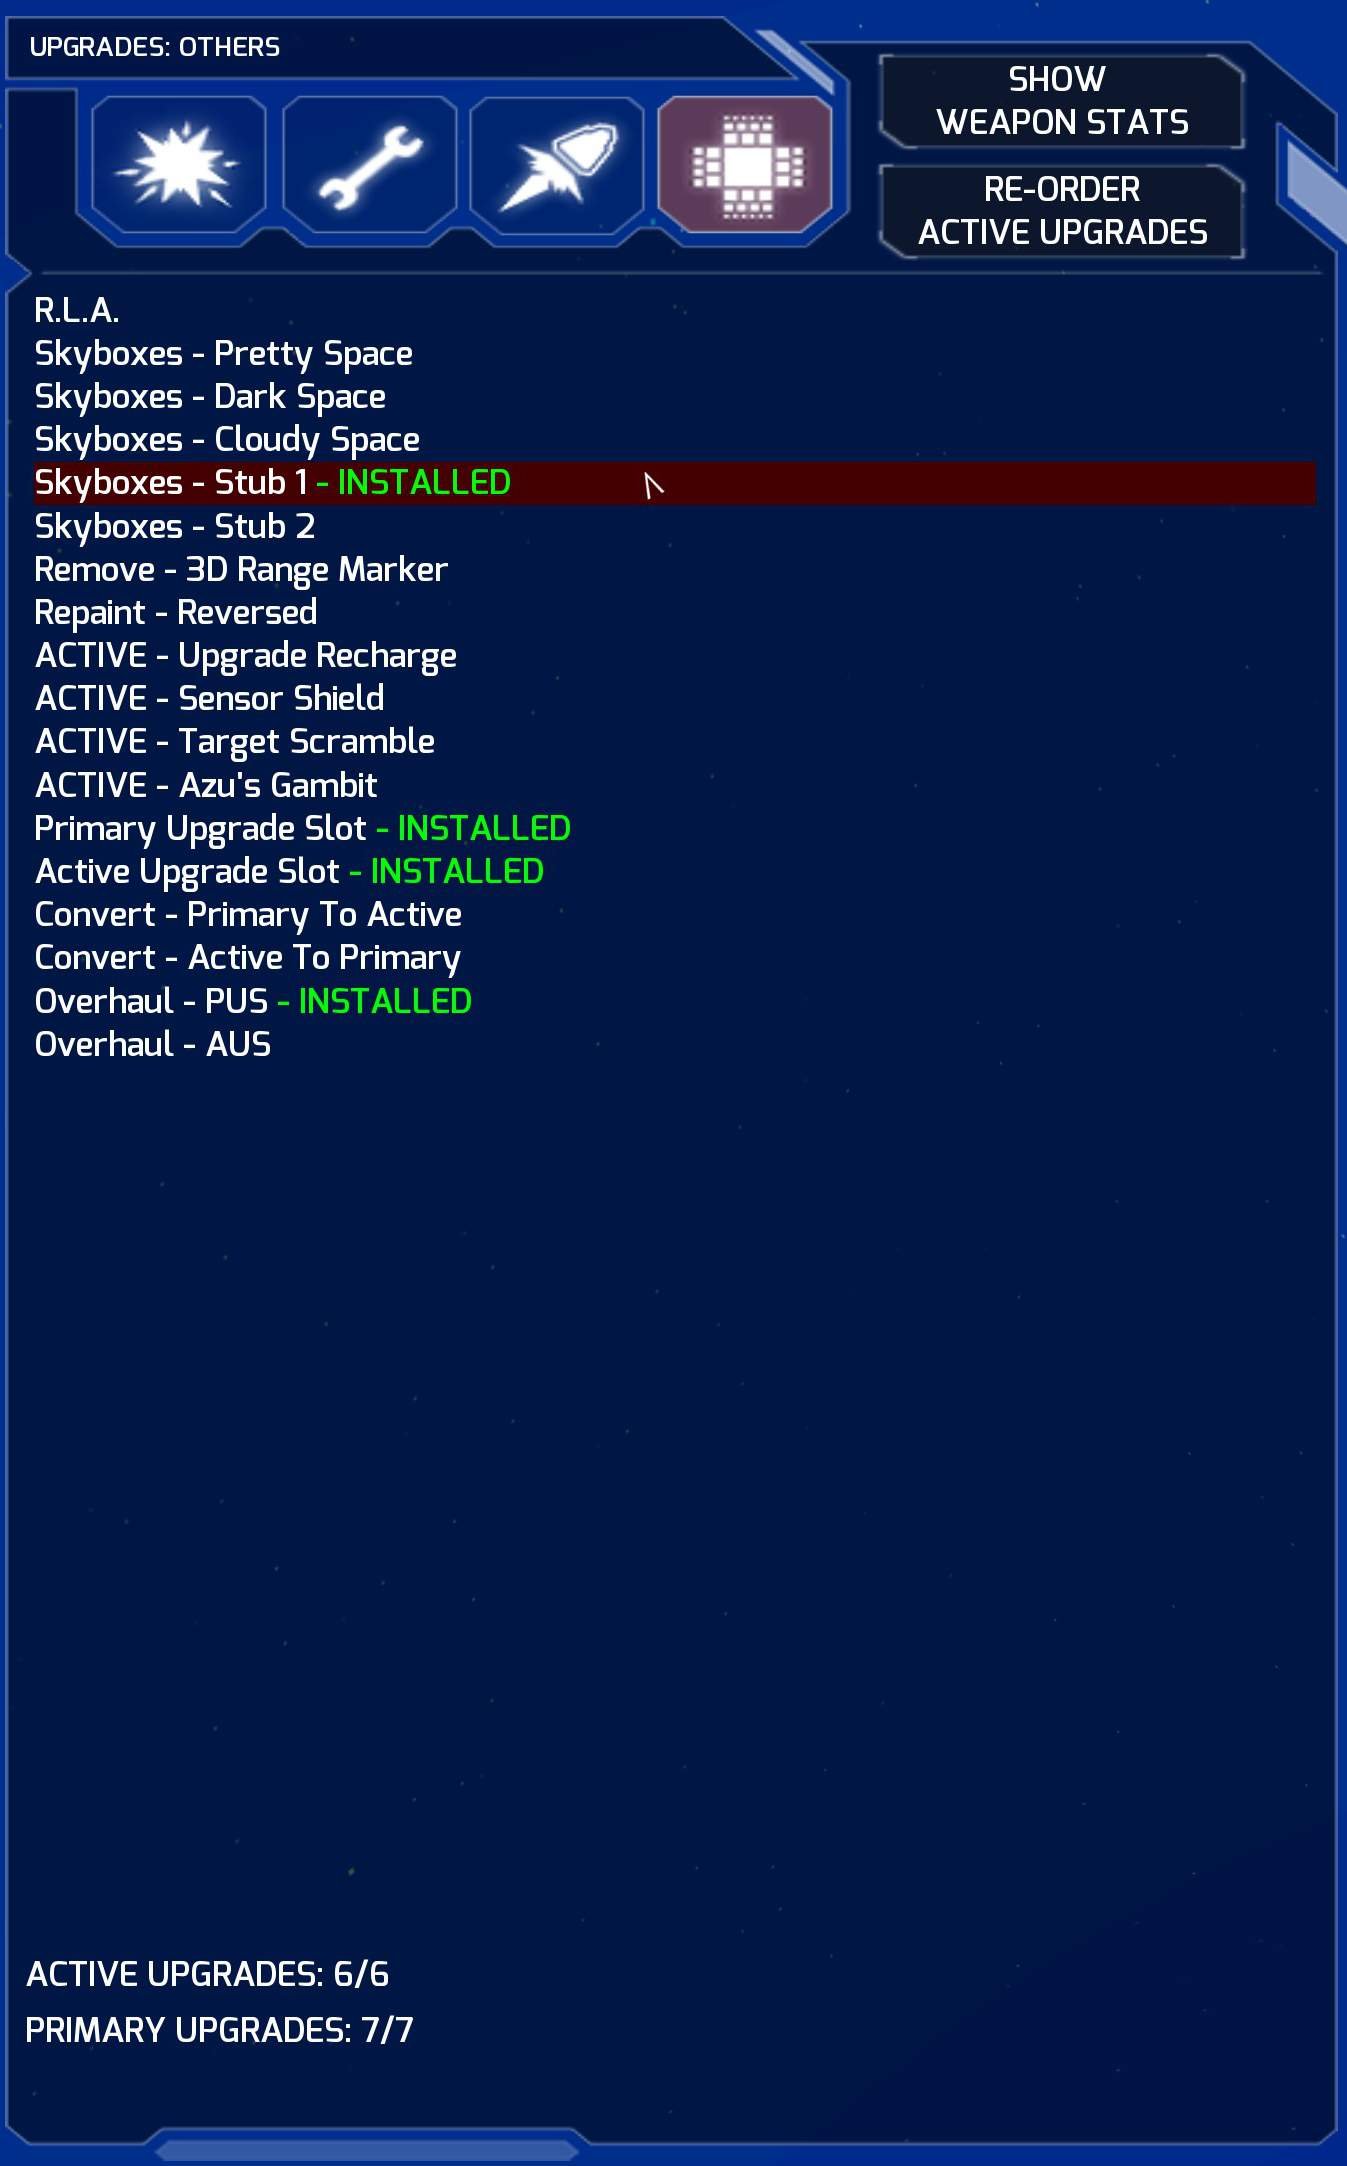
If you’re continuing a save from a different PC, or your game performance is just good enough to play through the intro and get to a station, but you really wish it was better (or that you could increase the screen resolution you play at), try going to a station, and in the ‘other upgrades’ menu, buy one of the skybox packs that you like the look of.
Completely Remove Edge-Highlighting Shader
Although you can turn off most edge-highlighting from the game options menu, the target selection display has an always-active edge highlight in blue, both in the HUD and in the lower-right box in tactical view. On some low-end cards, this can cause a significant performance hit (seen on Intel HD 515, for example). However, this does not appear to make a noticeable difference on a higher-performance video card (so probably most Nvidia and AMD cards, though I haven’t tested much).
Warning: This involves messing with game files. Be careful, and if you get in trouble use the ‘verify game install’ option to restore to normal state.
Lesser warning: Disabling the edge highlighting can make the HUD more confusing, as the target display will look the same as any other ship.
- Go to your Void Destroyer 2 install dir. Typically it’s c:Program Files (x86)SteamSteamAppsCommonVoid Destroyer 2, but it’s usually easier to use Steam’s “browse local files” option.
- Within the game directory, go to the Mediamaterialsprograms directory. You should see a list of files, most of them ending with “.hlsl”.
- Find the two files, “ToonEdge.hlsl’ and “ToonEdgeAlpha.hlsl”. We want to prevent the game from loading these, which will disable all edge highlighting.
- Rename those files to something else: I recommend adding “_d_” (for ‘disabled’) to the start of their names, that way you can easily see them in the list, and rename them back later if you need to.
- Launch the game. You should see the edge highlighting for targets is no longer present, and if you’re lucky, your FPS has improved.

Replace Fractal Skybox Shader with a Gradient
Chaosavy (game’s dev) has released a patch which fixes the performance of the default skybox – at least for desktop GPUs at high-resolution; I haven’t yet tested it on my laptop. Chances are that 2a and 2b are now not necessary – however, I will leave them in the guide for reference, in case anybody wants to experiment with replacing the shaders to see what happens.
Original text continues:
As mentioned earlier, the default space background is generated in real-time using a shader program in the GPU. This hack replaces that shader with a different one that generates a simple gradient from black horizon fading to colours above and below. If you are starting a new game and the performance makes it impossible to play, this hack may get you going – I was able to improve from 1 (one!) frame per second up to 30-40fps on an Intel HD515 laptop.
Note: One of these shaders is also used for the ‘Space Cloud (Noise)’ gameplay option; after this hack, the ‘space clouds’ will be replaced by a haze that grows thicker the higher you tilt your view – so you may want to turn that option off when using this.
Create gradient shader files
- First we need to create the alternate shaders that we’re going to use. Go to the game’s install folder, then create the following subdirectories: ModMediamaterialsprograms
- In that directory, create the following two files. They should be plain text files, but named with “.hlsl” extension – make sure it’s not “.hlsl.txt”. You can use any text editor to paste the contents into them. Note: the two files are very similar, but not identical! Make sure you paste the correct contents into each file.

spacescape_noise_hlsl_fbm_fp.hlsl
struct PS_INPUT {float3 vertexPos : TEXCOORD;};
float3 innerColor;
float3 outerColor;
float ditherAmt;
float gain;
float hdrMultiplier;
float hdrPowerAmt;
float lacunarity;
float noiseScale;
float powerAmt;
float shelfAmt;
int octaves;
float4 main(PS_INPUT input) : COLOR
{
float foo = ditherAmt + gain + hdrMultiplier + hdrPowerAmt + lacunarity + noiseScale + powerAmt + shelfAmt + octaves;
foo /= 131072;
float3 v = normalize(input.vertexPos);
return float4(lerp(outerColor, innerColor, v.y + foo) * hdrMultiplier, 1.0);
}
spacescape_noise_hlsl_ridged_fp.hlsl
struct PS_INPUT {float3 vertexPos : TEXCOORD;};
float3 innerColor;
float3 outerColor;
float ditherAmt;
float gain;
float hdrMultiplier;
float hdrPowerAmt;
float lacunarity;
float noiseScale;
float offset;
float powerAmt;
float shelfAmt;
int octaves;
float4 main(PS_INPUT input) : COLOR
{
float foo = ditherAmt + gain + hdrMultiplier + hdrPowerAmt + lacunarity + noiseScale + offset + powerAmt + shelfAmt + octaves;
foo /= 131072;
float3 v = normalize(input.vertexPos);
return float4(lerp(outerColor, innerColor, -v.y + foo) * hdrMultiplier, 1.0);
}
Disable the original shaders
I’m not sure if this is a bug, but the game will not read the new shaders from the ‘Mod’ directory unless the original shader files are missing. These files are found in the game’s install dir, under MediamaterialsPrograms. (Note: this is almost the same as the directory we put the new shaders in, but without the ‘Mod’ at the start.) Go and locate the ‘spacescape_noise_hlsl_…’ files in this directory.

There will be four of the spacescape_noise_… files, but you only need to disable two: ‘spacescape_noise_hlsl_fbm_fp.hlsl’ and ‘spacescape_noise_hlsl_ridged_fp.hlsl’. I recommend renaming them to add ‘_d_’ to the start of the name (indicating ‘disabled’), so that you can easily spot them and rename the back later if you need to.
Finally, go to the main game install directory, and look for a file named ‘VD2Shader.cache’. This is the cache of compiled shaders for the game; you need to delete it to force the game to recompile them using the new version we just added.

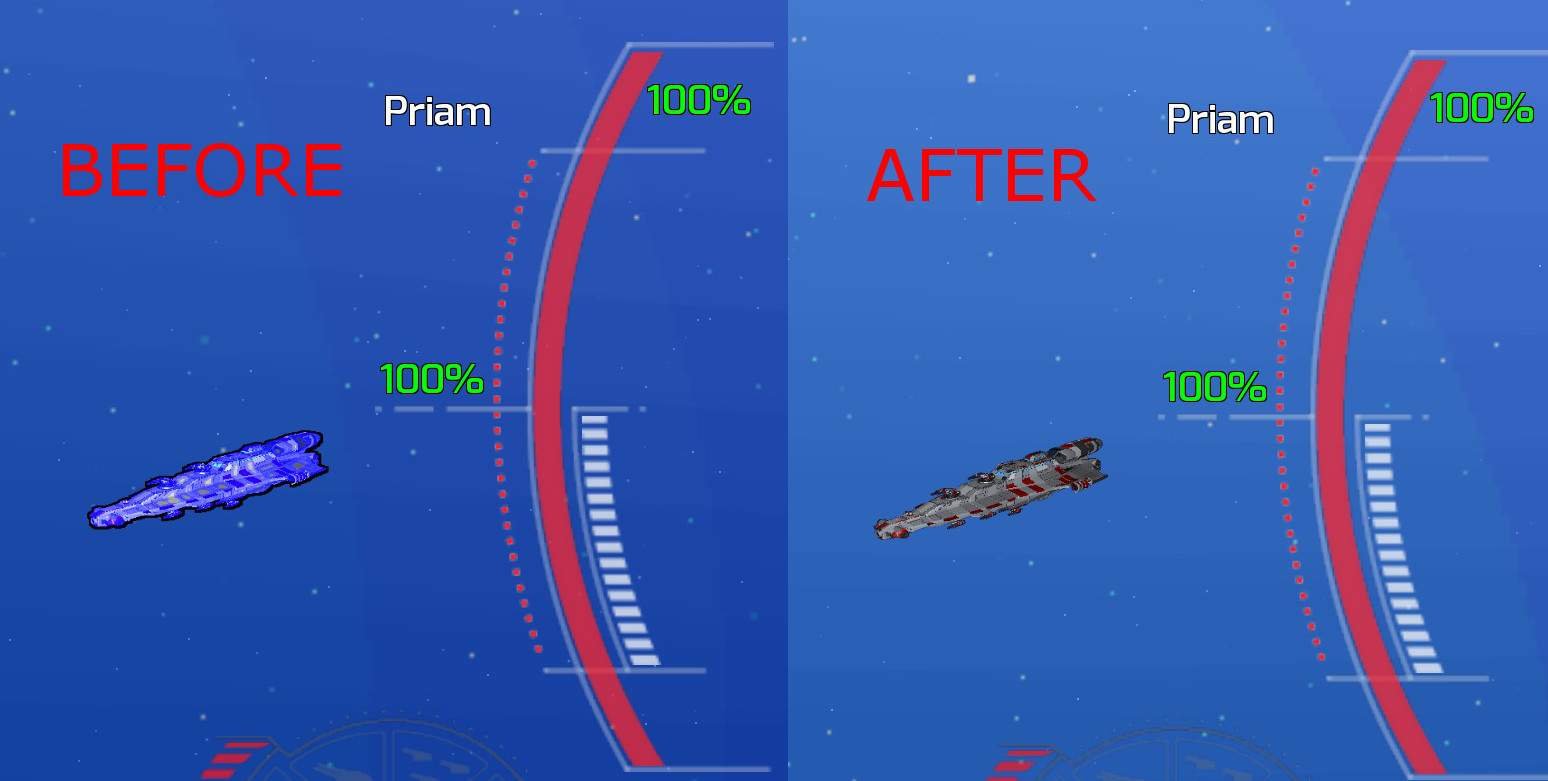
Launch the game – it will likely take a little longer than usual to start, due to recompiling all the shaders. You should now find that the default sky background is a simple gradient, with black at the horizon, and your frame rate should be much improved!
Reduce the Loop Count of the Skybox Shader
This is a variation of tweak 2a, suggested in a comment by user Otaku know that on my avatar. Instead of replacing the shader with a gradient, it tweaks the shader so that it doesn’t repeat its calculations as many times, resulting in a better framerate. The background will be prettier than the plain gradient, but still much simpler than the original version – here’s an example:

To do it this way, follow the same steps as it 4a, but at step 2, instead of creating new files with the listed contents, make a copy of the original two files from <game>Mediamaterialsprograms — spacescape_noise_hlsl_fbm_fp.hlsl and spacescape_noise_hlsl_ridged_fp.hlsl — and place them in the same location under mods (<game>ModMediamaterialsprograms).
Then, open each one with a text editor (you can drag and drop them onto Notepad, for example), and look for the following lines to change.
spacescape_noise_hlsl_fbm_fp.hlsl
change this
float noiseSum = fbmNoise(noiseScale * v, octaves, lacunarity, gain);
// add a crazy amount of dithering noise
noiseSum += fbmNoise(v * 10000.0, 2, lacunarity, gain) * ditherAmt;
to this
float noiseSum = fbmNoise(noiseScale * v, 2, lacunarity, gain) + octaves;
// add a crazy amount of dithering noise
noiseSum += fbmNoise(v * 10000.0, 2, lacunarity, gain) * ditherAmt – octaves;
spacescape_noise_hlsl_ridged_fp
change this
float noiseSum = ridgedFbmNoise(noiseScale * v, octaves, lacunarity, gain, offset);
// add a crazy amount of dithering noise
noiseSum += ridgedFbmNoise(v * 10000.0, octaves, lacunarity, gain, offset) * ditherAmt;
to this
float noiseSum = ridgedFbmNoise(noiseScale * v, 2, lacunarity, gain, offset) + octaves;
// add a crazy amount of dithering noise
noiseSum += ridgedFbmNoise(v * 10000.0, 2, lacunarity, gain, offset) * ditherAmt – octaves;
Then, continue with the steps in 4a to disable the original shaders and delete the VD2shader.cache file so that the new shaders are used.


Be the first to comment