
More Nioh 2 Guides:
- The Mysterious One Night Castle Walkthrough.
- The Hidden Monsters of Okehazama Walkthrough.
- The Viper’s Sanctum Walkthrough.
- The Hollow Fortress Walkthrough.
- All Spa Locations (Hot Springs).
- All Scampuss Locations.
- All Kodama Locations.
- All Sudama Locations.
The Beast Born of Smoke and Flames is a Main Mission in Nioh 2. This mission is recommended for level 8, has a level 3 difficulty, and features both human and yokai enemies. The Beast Born of Smoke and Flames tasks players with investigating the strange occurrences in Tatara and fulfilling Saito Dosan’s (Master Dosan) request.
Contents
The Beast Born of Smoke and Flames
First, let’s go and meet with a potential buyer for these Spirit Stones I’ve gathered. The client is, let’s say, pretty well known around these parts. He knows me now, and we’ve arranged a discreet meeting. Let’s really sell ourselves and see if he’ll send some more work our way.
That woman was no samurai. But then, who the hell was she!? Well, with moves like that, she’s someone you’d definitely want on your side, that’s for sure.
Anyway, at least we’re done with Master Dosan’s request. But let’s not stop now – we need to find ourselves more Spirit Stones! But we need to stay sharp. I’ve got a feeling we’re going to run into more trouble along the way. I’m counting on you, Hiddy!
Kodama Locations
- The first Kodama is behind a house on the east side near the slope leading to a well-structured house.
- The second Kodama is on the rooftop of a house behind some sacks. You can reach the top by using the plank that’s connected to the rooftop near the white torii gate leading to the Ippon-Datara.
- The third Kodama can be found at the cave under the shrine where you meet Senji Toyo, it’s behind some stacked wooden boxes where a Gaki is also hiding.
- The fourth Kodama can be found underground near the village engulfed with the Dark Realm, there’s a barn on the west side of the village near the entrance of the realm where you’ll encounter a Dweller for the first time. Climb down the ladder and you’ll find the Kodama behind the wooden boxes.
- The fifth Kodama is outside the entrance of the Great Forge, go around the left side corner of the torii gate and you’ll find it at the back being guarded by a Gaki.
- The sixth Kodama is on the rooftop of a building, you’ll have to climb to the second floor of the Burning Forge where you’ll encounter an Enki, then climb the ladder that will take you outside the Great Forge. The Kodama is on the northwestern edge of the rooftop.
- The last Kodama can be found on the third level of the Great Forge. It’s behind the pillar near the large chest and pale of water where you encounter a grown Gaki.
Sudama Locations
- The Sudama is found underground the village that was engulfed with the Dark Realm. The area you’ll find is surrounded by two Gaki and a large chest.
- Scampuss Locations
- The first Scampuss can be found near the starting point, you’ll find it behind the house that’s on the west side where you’ll see some stairs leading to an open barn.
- The second Scampuss is inside a house where you encounter the first dark realm that’s engulfed around the village. The house is near the path of a ladder that you can kick down to open up a shortcut leading the 2nd Kodama shrine.
- The third Scampuss can be found on the first floor of the burning Great Forge, it’s just by the entrance on the right side behind some wooden boxes.
Hot Springs Locations
- There’s a secret wall on the first floor of the burning Great Forge near the mission’s objective. You’ll have to taunt Nurikabe a wall Yokai for it to open up a path where you’ll find the Hot Spring.
Locks Locations
- You’ll find one inside a chest on the third floor of the burning Great Forge near the mission’s objective. It’s guarded by a grown Gaki.
The Beast Born of Smoke and Flames Walkthrough

The Beast Born of Smoke and Flames is the second main mission of the game. The date is September 1555 and you’ll arrive at Mt. Tatara in Mino Province. At the starting point, you’ll find Tokichiro and just up ahead the first shrine. At the opposite side of the shrine, there’s an open house and a corpse that can be looted for a memory and a random item, also, go behind the house and you’ll find another corpse containing another memory and x1 Small Spirit Stone.

Continue forward and you’ll encounter the first enemies in the area, there are two guys wielding a sword, one is looting a dead body and another standing next to the other house. Kill the enemies for a chance to obtain some random equipment and items, then search the corpse to find another memory. After that’s done, continue forward and go right, since the door to your left is locked.

You’ll find the third house and another bandit wielding a spear that’s guarding the spot, kill the bandit then walk inside the house and head back outside since there’s another bandit that will jump down from the above and attack you. There’s a corpse that you can loot inside the house as well, after searching the body, continue forward and you’ll find a watchtower that you can climb up to near the house. There’s another dead body there that you can loot for items or equipment.

Jump back down from the watchtower then go left. You’ll see some stacked up wooden boxes at the corner of another house, break it and you’ll find a well behind. Strike it with your weapon and you’ll get x1 Sacred Water. Next, go inside the house next to the well and you’ll find a corpse that you can loot, there are also two more bandits here, one is lying on the floor, and the other is above the house.

Instead of going straight from the house where you’ll see more bandits, go right and up the slope to find another house and 2 bandits. One is wielding a sword and the other is an archer, kill the enemies then go behind the house where you’ll find a corpse that you can loot and a Scampuss.

Next, go back to the front of the house and head up the stairs where you’ll find a large chest inside a hut containing random items. From here, you’ll find yourself on high ground and on the rooftops of the houses. Make sure to kick the ladder down that’s on the west side corner to open up a shortcut, there’s also an archer that’s on the east side of the rooftops.

Since you’re on high ground, use this advantage to take out the bandits below you by shooting one of them with your bow, there are three of them on the ground. After killing them, head inside the house that’s on your left and you’ll find a small chest that you can open.

After opening the chest, before going up the slope, go behind the house that’s on your right and you’ll find a lost Kodama.

Once you’ve guided the Kodama back to the shrine, head up the slope and go inside the well-structured house. There’s a large chest inside that you can open to obtain a couple of armor pieces and weapons. Go back outside and continue forward towards a white torii gate where you’ll encounter a bandit resting against the gate and another patrolling the area ahead. Kill the bandits, then before going through the torii gate, go straight so that you can unlock the locked door earlier to open up a shortcut near the starting area.

Before you proceed further towards the shrine, there’s a plank near the shortcut you just opened that you can use to get to the rooftops of the house. Head over there and you’ll find the second Kodama behind the sacks – after that’s done, head to the white torii gate.
Ippon-Datara Encounter

Now, for you to proceed any further, you’ll need to defeat the Yokai that’s guarding the spot inside the shrine which is an Ippon-Datara. Make sure you’ve made preparations since you’ll be locked in the shrine until you defeat it. It has quite a long reach due to its weapon and it can jump and hop around. Once it reaches about 30% of its health, it will conjure the dark realm. Watch out for its burst attack while it is in the dark realm since it leaves a field of fire that burns you if you’re caught in it after it slams its hammer on the ground – successfully killing it may drop an Ippon-Datara Soul Core, x1 Gourd, and random equipment. The field that was blocking the entrance, as well as the dark realm will also disappear.

After the battle, open the sliding door inside the shrine and you’ll find a large chest inside the room, collect the items then climb down the nearby ladder where you’ll find Senji Toyo, a blacksmith in training. Speak to her and she’ll tell you that her master is missing, to visit her smithy when “things settle down”, and she’ll warn you that there are more Yokai up ahead.
The Cave Under the Shrine

After speaking to Toyo, head inside the cave and you’ll encounter a Gaki feeding on a corpse near the entrance, kill the Gaki then loot the human corpse to obtain x1 Salt. Continue forward and you’ll see a stack of wooden boxes, there’s another Gaki hiding behind it, so be vigilant once you’re near the boxes.

From where the boxes and the hiding Gaki was, you’ll also find the third Kodama, so make sure you break all wooden boxes to find it. After guiding the Kodama back to the shrine, continue forward and you’ll find yourself back outside the area where you’ll also see a corpse that you can loot for another memory and x1 Small Spirit Stone.

Head straight and cross the bridge and you’ll find the second shrine of the area. Make sure to pray to replenish your recovery items, to level up, and to save as your checkpoint. From the second Kodama Shrine, go right and up the slope since you won’t be able to climb up the ladder that’s on the left side and the nearby gate is locked. You’ll see another house that has a burning bush next to it. There is a human wielding Hatchets inside the house, try to shoot him your bow first so that you can stun him then finish him off while he’s on the ground, he may drop a Smithing Text: Sohaya Garb, there’s also a corpse inside the house which you can loot – after searching the house, continue forward and you’ll enter an area engulfed with the dark realm.
The Dark Realm

Remember, the Yokai that are in the dark realm is empowered and you’ll lose stamina quickly but regain Anima easily so that you can use your Yokai Skills or Burst Counter Attacks frequently. First, you’ll encounter two Gaki ahead that are feeding on human corpses. You can try to bait one of the Gaki first by throwing a stone then lead it out of the dark realm – there’s nothing inside the first house so continue forward.

The next Yokai that will appear is a Yoki, again you can try to lead it outside the dark realm when it chases you so that you can have the advantage in terms of managing your stamina. There’s about three more Gaki ahead and at the backside of the houses at the east side, you’ll encounter a Dweller yokai feeding on a human corpse behind some wooden boxes. So try to take them out one by one since it’s dangerous to fight them all at once, especially in the dark realm.

The source of the Dark Realm is inside a house that’s in the middle of the area where you’ll see a large chest, and the Yokai you need to kill is the Enki – successfully killing the Enki drops its soul core, random equipment, and causes the Dark Realm to disappear and you’ll be able to open the locked chest inside the house of where the Enki was.

Once you’ve cleared out the area of the Dark Realm, head towards a barn that’s on the west side where you encountered the Dweller that was behind the wooden boxes and climb down the ladder to reach the underground area. There are some wooden boxes that are on the left side of the ladder, break it, and you’ll find the fourth Kodama behind the boxes. After guiding the Kodama back to the shrine, explore the area further and you’ll encounter x2 Dweller surrounding a human corpse, kill them and then search the body to find some items such as Stone and Antidote.

Continue forward towards the ladder, but be vigilant since there’s another Dweller blocking your path. It will immediately charge in when you’re near, so be ready to dodge. After killing it, continue forward and you’ll find another large chest that you can open beside the ladder – climb back up the ladder and you’ll find yourself back in the small village.

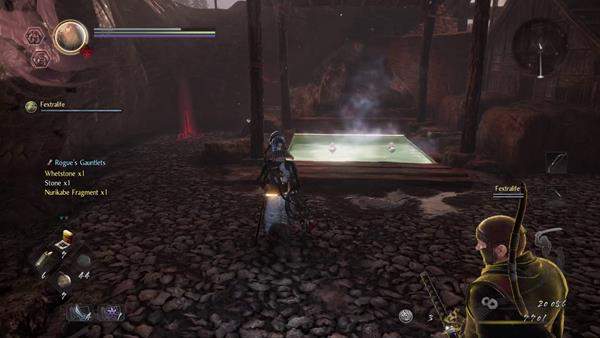
Next, from the bridge as shown in the image above, go right and you should find another dead body that’s against the wall of the house, search the body then head towards another barn where you’ll find a ladder that you can climb down to. Just be careful since a Gaki will ambush you when you walk up to the barn.

When you reach the lower area, you’ll see another large chest that you can open that’s on the right and 2 more Gaki that’s on your left and the other behind the chest. Kill the enemies and then open the chest before proceeding further.

You’ll find a Sudama ahead that is walking around near the other ladder and another corpse that’s on the left containing another memory and x1 Small Spirit Stone. The Sudama is a corrupted version of the Kodama, and instead of guiding it back to a shrine, it will ask for some items in exchange for a couple of unique things. Simply approach it, open your equipment menu, cycle through whichever you want to give and select “drop”. Once you drop the item, the Sudama will get the item and will give you a random item in exchange before disappearing – after that’s done, climb up the ladder and you’ll reach the high ground where you can manoeuver around the rooftops.

There are more Gaki on the rooftops and a Dweller, so try to deal with the Yokai one at a time since the area for you to fight is quite small and you can fall off. From the rooftops, head straight, then drop down to the left side and go east, the open house also has a Scampuss inside, it’s hiding in between the boxes. You’ll see another human wielding a pair of Hatchets, kill it then continue forward. You’ll see a ladder ahead that you can kick down which opens up a shortcut leading to the second shrine – take this opportunity to pray at the shrine to level up, save, and replenish your resources and health.

After praying, head back up towards the torii gate where you’ll see a heavy bandit patrolling the area.

Before going to the torii gate, make your way towards the path that’s on fire that’s on the left side and check the back where you’ll find the fifth Kodama that’s being guarded by a Gaki – when that’s done, go back and through the torii gate.

After killing the bandit that’s patrolling, go right and you’ll encounter two more bandits, one wielding dual hatchets and the other an archer that’s inside a barn where you’ll also find a large chest. Be careful since the chest has a Yokai inside, which is a Mujina. The Mujina is a badger that has the ability to shapeshift into your character, instead of attacking it, imitate whichever gesture it uses and it’ll reward you with random items before disappearing, you’ll also obtain the Gesture: Overjoyed, as well as the Mujina Soul Core – after that’s done, go back and head inside the shrine that’s in flames.
The Great Forge

When you enter the shrine, turn right and destroy the wooden boxes, you’ll find the second Scampuss in the area, pet it then search the nearby corpse to obtain a Spirit Stone – before the Scampuss disappears it may leave a Scampuss Soul Core.

Next, climb up the ladder where you’ll find the objective of the mission. But before heading to the door, kill the Gaki first, then kick down the huge pale of water, it will put out the flames from below. Head back down after kicking the pale and you’ll find another Yoki that will appear in the room that’s on the right, kill it, then go inside the room, and you’ll find another large chest containing random items.

From the room, turn right and you’ll hear a Yokai that’s groaning. Walk up to the wall that has cracks on it, and when you’re close, eyes will appear. Use your gesture “This Way!” followed by “Bring it on!” and Nurikabe a yokai, will appear and it will reveal a secret room as well as dropping some items before disappearing.
Behind Nurikabe, you’ll find a Hot Spring that you can use to obtain a temporary regenerative healing effect. After using the hot spring, head back inside the shrine and climb up the ladder that’s in front of you where you’ll encounter an Enki.

Once you’ve killed the Yokai, you’ll find another pale of water to your left and hole that you can drop down to your right. Make sure to knock down the pale to put out the flame below. After that’s done, drop down from the hole, you’ll land on the flames, so dodge forward as soon as you land and you’ll come across another large chest you can open. There’s also a nearby ladder containing another dark realm, but before you head down below, open the locked door then pray at the nearby shrine if you need to.

The yokai that contains the energy of the dark realm is another Ippon-Datara. You’ll need to kill it for the realm to disappear, it’s attacks are enhanced so be careful with its burst attacks and watch out for your stamina. There’s a chest nearby as well that you can open once you kill the yokai and a corpse containing another memory and 3x Water Amulet – when that’s done, climb back up to the shrine and head to the second level where you encountered the Enki.

There’s a ladder that you can climb down onto that will take you outside the shrine. There are two Gaki below, try to shoot them first with a headshot from above to get rid of them easily. You’ll find yourself again on the rooftop of a building, you’ll find the sixth Kodama on the edge of the rooftop. After guiding the Kodama, there’s another ladder that you can climb down to, there’s another Yoki inside that’s guarding a large chest, kill it, then open the chest before climbing down another nearby ladder.

You’ll find yourself in another underground area of the shrine. Below, there’s an empowered Gaki that’s guarding another large chest, a body that you can loot for an Abacus, and a gate that you can unlock to open up a shortcut near the 2nd shrine. After you’ve cleared the area, climb back up to the second level of the shrine, then head up another ladder to reach the third floor.

On the third floor, you’ll find another Yoki that’s on the corner right side, kill it then loot the nearby corpse. After that’s done, you’ll notice a couple of dead bodies on the ground, there are two Dweller enemies that are pretending to be dead, so be vigilant. One is near the other side of the plank, and the other just further.

After killing the Dwellers, go around and you’ll see a mist of dark realm around the large pale of water and a large chest. An overgrown Gaki will appear when you walk up close to the mist, kill it first, open the chest, then kick the down the pale. The chest contains x1 Onmyo Mage’s Locks.

Before you head down, go around the corner near the large chest, you’ll find the last Kodama behind the pillar.

Next, there’s a ladder near the Kodama. Climb down to the second floor and you’ll encounter another grown Gaki, at the right side, you’ll find a corpse that you can loot that’s on the edge. Search its body to obtain another memory and a Great Forge Key that opens the red door leading to the mission’s objective. After obtaining the key, there’s another ladder nearby that you can climb down to which leads you to the 3rd shrine that you can use to pray – when you’re done and have made further preparations, unlock the door next to the shrine and head towards the mission objective.
Boss: Enenra

Upon using the Great Forge Key, you’ll enter the arena and face the main boss of the mission, Enenra. Successfully defeating Enenra completes this main mission.


Be the first to comment