
This is a quick guide on the formatting required to upload to Steam Workshop using the provided upload program for Command and Conquer Remastered.
Contents
How to Upload Mod to Workshop
All credit goes to Mikebloke!
Introduction
This is a quick guide on the formatting required to upload to Steam Workshop using the provided upload program for Command and Conquer Remastered. This appears to be pretty generic, so presumably this guide can be used for other applications setup for other games.
Essentially, there is no easy way to upload a mod for any game to Steam Workshop, and both ways are convoluted. This is the shorter, easier version, using the application provided by EA. This guide assumes you already have a working mod to upload, the other guide by ViPeR will get you started, if you follow their instructions correctly and install all the optional components listed in the first image.
Final note before we start: This assumes that you might want to do more than one mod. This should help to avoid having to move files away from the uploader folder every time you start or edit a new mod. A bit of extra work, but should help keep files in one place.
First download the upload application and unzip/extract it somewhere on your drive. You can find it here.
Other than this, the EA FAQ page doesn’t provide anything particularly helpful towards actually uploading files, but this is more a fault with the workshop system on Steam than anything EA has done.
The files you have extracted will contain a readme file, you can try to follow with this or ignore it completely and stay with this guide.
Creating a Workshop Page
If this is your first submit to this workshop you’ll need to login to the workshop on a web browser and agree to the “Terms and Conditions” of the steam workshop license agreement.
Yes, do this first, I think you can do it inside the steam app itself as well if you can find the right page. Avoid disappointment and do it now!
- Launch uploader.exe – this is the first thing you need to do.
- Enter an Item name above the “Create Item” button..
- Press the Create Item button. – This creates a folder in the extracted files under the folder WorkshopContent this is where we will be doing the changes and adding files. Also note this also creates an entry that will remain hidden for now under your workshop files. You cannot use workshop to upload! But you can change most of the other details.
- If successful quit the uploader. – Do this.
- Find the newly created Item folder and fill it with your mod content.
Ok this is where I’ll stop everyone. For ease of use I suggest following the below. It means some doubling up, but its how I got it to work.
In WorkshopContent put in an image file you wish to use as a preview image for the workshop, I don’t think gif files work but png do.
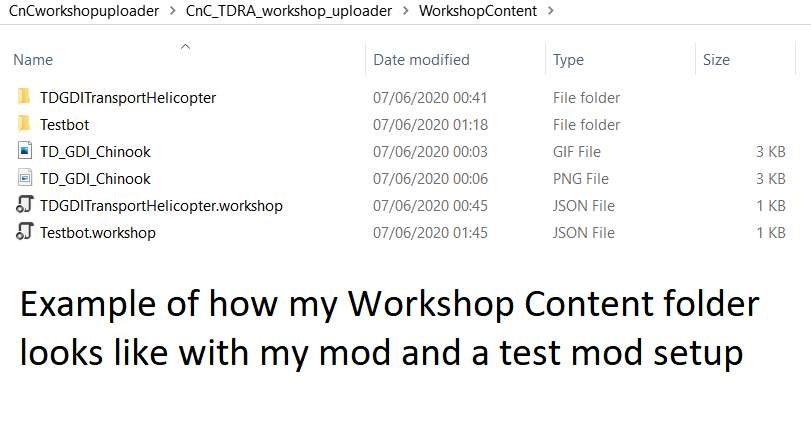
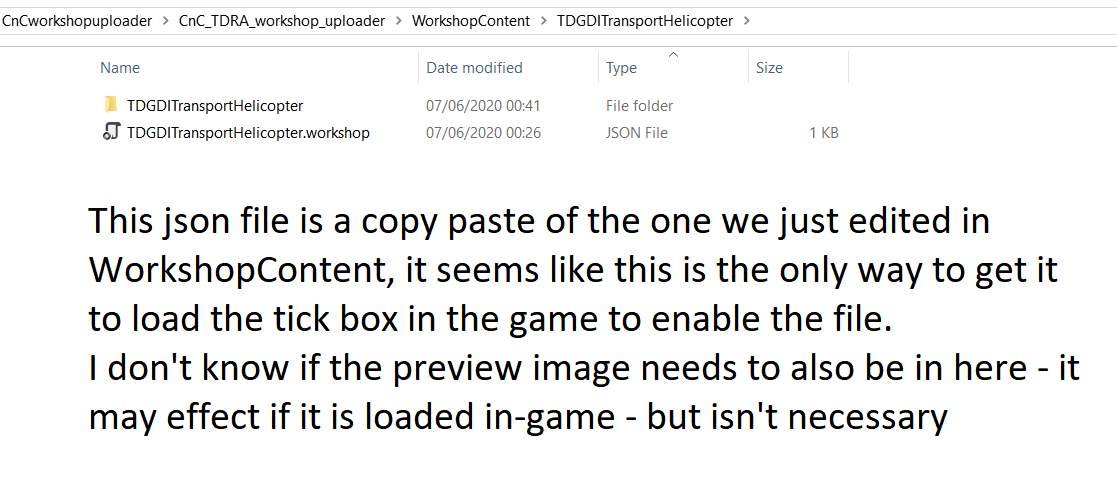
In the folder that the uploader program made, I make another folder of the same name. In that extra folder, insert a copy of your ccmod.json file and the data folder with TiberianDawn.dll in it.

Editing the Extra Json File
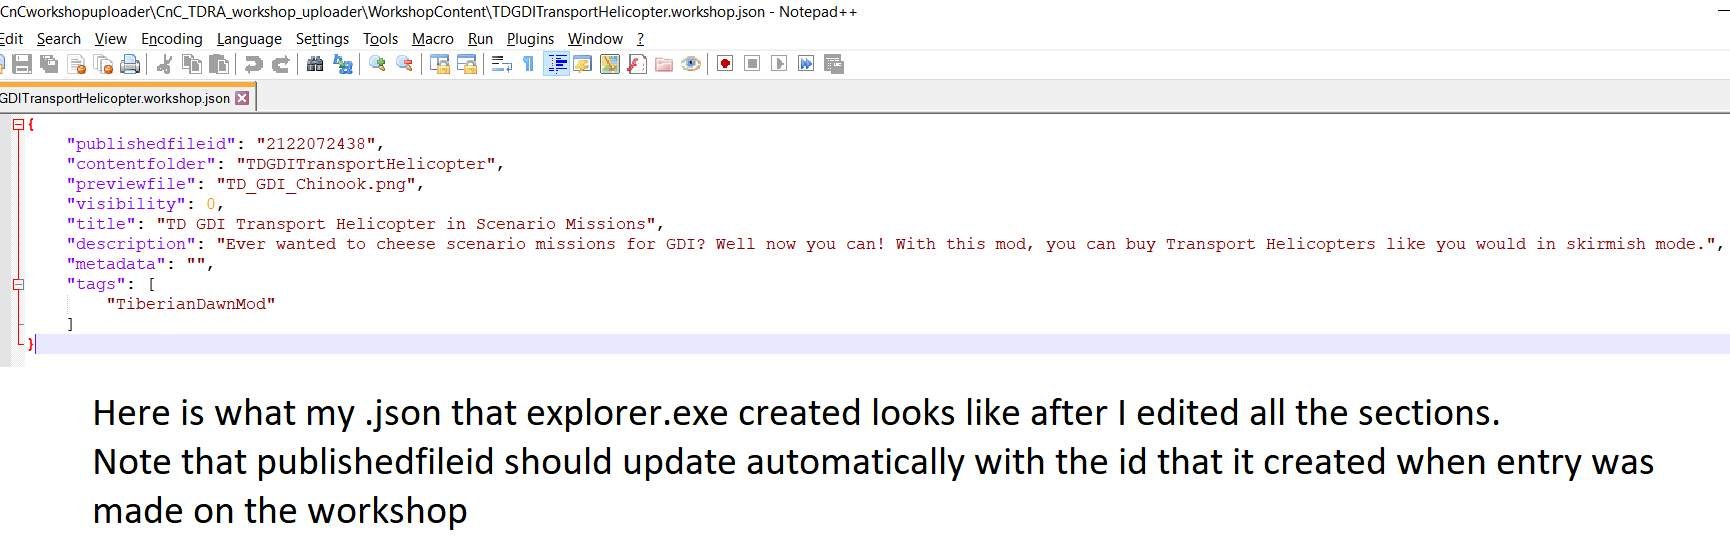
Edit the Item.workshop.json file and fill in the appropriate settings. – This is the json file that is in WorkshopContent and should be the same name with .workshop at the end that your folder is. Open it up (I use Notepad++, it works a charm!).
You should get something like this:
{
“publishedfileid”: “”,
“contentfolder”: “”,
“previewfile”: “”,
“visibility”: 2,
“title”: “My New Mod Pack”,
“description”: “Description goes here”,
“metadata”: “”,
“tags”: [
]
}
- “publishedfileid”: “”, << This should update with your workshop ID, it’ll be the same one that the uploader program quotes.
- “contentfolder”: “”, << This is just your folder name, and not the entire directory – so if your mod is “GDIBOSSMODE” it will be “contentfolder”: “GDIBOSSMODE”,
- “previewfile”: “”, << File name for preview image. Again, don’t use full directory, just the image file name, eg: “previewfile”: “GDI.png”,
- “visibility”: , << 2 is hidden, change to 0 or change it later when we reopen uploader program.
- “title”: “My New Mod Pack”, << change this for your Mod title…
- “description”: “Description goes here”, << and again… change this!
- “metadata”: “”, << I didn’t use this, so I don’t know what it does.
- “tags”: [“[inserttaghere]”]
Which tags is best to use? Well I would suggest basing it on what it is. Maps seem to be using “TD” or “RA” depending on whether it is TiberianDawn or RedAlert, so this might be useful to use for Map mods. For others, I might suggest using either “TiberianDawnMod” or “RedAlertMod”, these two have less mods in it as maps aren’t using these tags, might help both visibility and avoid getting gameplay mods lost in map workshop content. You can have multiple ones if you use a comma I believe. EG: “TiberianDawnMod”,”RedAlertMod”.
Save this file, then immediately copy this file over to your named mod folder. You should now see both the copied json file and the 2nd folder with the mod name on it. Why do I do this? Well, in the game, I couldn’t seem to select it in the mod list even if it was subscribed. Adding the json file again seemed to do the trick. This follows the behaviour that other mod makers have used too, so I believe this to be correct.
- Launch uploader.exe again. – yes you can do this now!
- Pick your item. Verify that the preview image is working and content folder is correct. – this is why we have to add it into the json file, while we can select some things in uploader.exe such as the visibility drop box, most of it has to be defined in the file itself. I recommend not editing anything again in this.
- Update the Visibility and Change note as desired. – unless its these two things these things is safe to change in uploader.exe
- Press the Submit button.
- Verify that Status says “Success! Item submitted! 😀 😀 :D” – well done, you have just uploaded it! It may take some time for it to be recognised inside the in-game list, but should hopefully pop up as a tick box when you reach the mod page in the game.

Be the first to comment