
Some things game won’t tell you, until your squad is dead.
Contents
Tips and Things You Need to Know
All credit goes to Af&Fix!
Introduction
The game has a very unique (not necessarily in a good way) progression path. And on top of that very gimmicky rogue-like elements, wich more or less just surving a purpose of being a rogue-like (and for lore, kinda). Down below I wil try to warn you of some mechanics and design choices, which are pretty counterintuitive, if you played similar games before, so you maybe won’t instantly get bored of pointless grind.
Mostly Pre-Recollect And First Era Related
Leveling and combat related
The game is extremely punishes you for squad favouritism, with a sacrifice mechanic. In case you only just finished a tutorial and already checking guides (no blame for that in this game), you will be faced with a sacrifice mechanic. Basically, you can only heal your squad unit by sacrificing another squad unit of the same level or higher. You maybe thought for a second, like: “Hmm, interesting stuff, makes a game more challenging, and demand a very strategic and smart play”. And well, you will be partially right, unfortunately it’s take very long time to level up, mainly because you can only do 1 mission with a character a day. So you can be in a situation, when you just won’t have time to level up sacrifice material. And it will just drop down to a pointless grind and self-restrictions on gameplay. Here is some tips regarding early gameplay.
- You should always prioritize equalising levels of “Daughters” in your pool (despite the fact, that you will get extremely fat stat boost for each level). You only have to complete 1 synapse a day, so use that to balance exp gain. Skip synapses if you don’t want to overlevel someone for example.
- Early it is better to spend your vitae for buying “Daughters”. Skill upgrades are too expensive at the start. When you have sufficient amount of squads to close as much synapses as you can, start to equip memories (and not hurting level equalising).
- You can face tank with 2 shieldbearers and gungirl. This will help you sustain life. Small guys deal almost 0 damage, and dungerous hunters can be bullied to death with a slam spam (and you will never see them on the timeline ever again). For the boss – it is better to switch 1 shield for a gun. I saw a guide about first boss, go lookup there the tactics.
- Enemies, that are about to spawn (you will see the hands on the ground), will only move closer to you on spawning, unless you are standing just in the next square. So you can camp spawn points at least 1 square away without fearing to take damage.
- If you don’t want to recollect more than you need, lookup boss tactics. Game is completly designed around absent knowledge (you will loose almost no matter what, if you fighting a boss with a wrong roster) and stat walls. Upon playing you will unlock extremely powerful buffs. Plus, you will be able to ressurect any Daughter of any level right from the start (or you can save them for boss).
- In combat you don’t really have to waste AP for moving to enemies. Just wait for them to come as close as possible and attack. Game penilize you for exceeding AP really hard, so save your AP, unless going burst is absolutely necessary or just safe.
- I will hardly recommend you to recollect immediately after beating 1st boss. You will unlock ability for fresh Daughters start from level 4. You will save time on healing in a long terms.
- Definetly check in-game codex. Mainly enemies descriptions. There are descriptions for ai attack priorities. So you can be almost certain who will be attacked and by whom. Extremely helpful.
- Pay a really careful attention to a random events. Sometimes they can help you (or ♥♥♥ you in a hole, that you are prefer the least) extremely in a boss fights. Like 50% enemy health reduction for example.
- Talking about strategic play. You can’t choose order of actions even if 2 unit’s are in the same point in a timeline, which is strange and basically hinders most of the combo possibilities.
Enemies related
In the 1st era you will be faced mostly with 6 enemy types (excluding boss and his minions). Most of the tips just recycled codex information, so you can probably come up with them by yourself. But in case, you just like back sitting a little, here you go.
- Scavengers: small and fast guys. First scav will choose a furthest “Daughter”, while others gonna try to help him surround “Daughter”. If you are using shields, there are not too much of a tactic, just keep your gunner as far as possible and attack, simple is that. Scavs have 2-hit low damage attack, so your shields will recieve from 50 to 0 damage, depending on a level and luck.
- Plague doctors: just usual, relatively slow melee enemy. He will aim at the nearest “Daughter”, so check his move radius and come close to an edge (1 tile away from border) and attack on next turn. (But remember spawn rule I was talking above)
- Plague butchers: pretty much the same as doctors, they just a little bit slower, tankier, but deal lower damage.
- Plague guards: very tanky and slow. Can sometimes buff themselves for armor. It’s almost pointless to attack him, while he has it (unless you have armor debuff bonuses or have blademaster in a squad). Just juke him, until armor wears off or slam spam him to death with shields (more realistic option).
- Curse therapists: arguably weaker than scavs. They will try to keep distance on the edge of thier attack radius. You can safely move 3-4 tiles close to them and attack on the next turn. (Sometimes they will flee and shoot you if you are 3 or less tiles close to them, but for most of the time 3 tiles is good enough). Their charged shot is very easy avoidable. Hover on their skill on a timeline and you will see squares, where you can break their charge. Usually it’s gonna be some cover, like a wall, or you can just come close to them, and this will break charge too. Plus, you can break charge and return back to your position, if you feel like you have good spot.
- Hunters: very scary, when you don’t know, what they do. And can pretty easily jump and kill your unprepared squad. But as I said before, all you need is at least 1 shield (2 if you are a bully) and 1 gun. Just move shiled closer to hunter and prepare interruption with a gunner. Hunter will jump on shield, gets interrupted and will cast aoe attack, which he, unfortunately for him, won’t be able to finish, because of the slam spam of course. You only need 1 shield to fully disable hunter, I’m telling you that, because you will sometimes encounter 2 at the same time, but not more (unless it’s a survival mission, or pretty far into the game). So, 2 shields 1 gun, as usual.
Initiative Stats Info
Note: read this before using strats for bosses below.
“Starting initiative” stat
I wanted to put this in a misinformation section, but decided, that you will need to know this before checking bosses’ strats and for fights in general. Game doesn’t explaing this stat to you. Naturally, from the name of the stat I thought: “Well it’s probably represents point in a timeline at the start”. And that’s kinda true, but not a full picture.
By thinkig that way the game teaches you a bad habbit – thinking that low number is good. Wich is certanly not the case at all.
Ok, cut it. How does it work?
“Daughter” with lowest “Starting initiative” will be a zero timeline pointer. And from her will be calculated positions of everyone else by using a difference betwen their “Starting initiative” and hers. What does that mean? That means that is actually doesn’t matter how much “Starting initiative” you have. What matters is a difference between your lowest “Starting initiative” and everyone else. This is especialy important for bosses. Because they have fixed point in a timeline no matter what. Synapse enemies will just get random point based on first “Daughter” in a timeline.
For example, 2nd and 3rd bosses would be at 30 points in a timeline. So, if you have let’s say “Daugher” with 25 “Starting initiative” and others with 56+, their turn will be after boss’s turn.
Yeah, yeah, cool text bro
Here is a spreadsheet from one synapse, so you will understand my point. Well it’s actually game’s own point.

“End of turn delay” stat
By deafult your “Daughters” have 50/100 “End of turn delay”. You know what it is, if you didn’t go burst you will be at 50 points in a timeline and 100 for burst. Decreases to “End of turn delay” stat – reduces correspondigh numbers. And here is a relatively simple math.
For example, if you have default values and you get -10 “End of turn delay”, that’s means, when you go burst, you will be at (100-10) points in a timeline, if you not, bonus is halfed with rounding to a lower number, so (100-5). And that’s pretty much it.
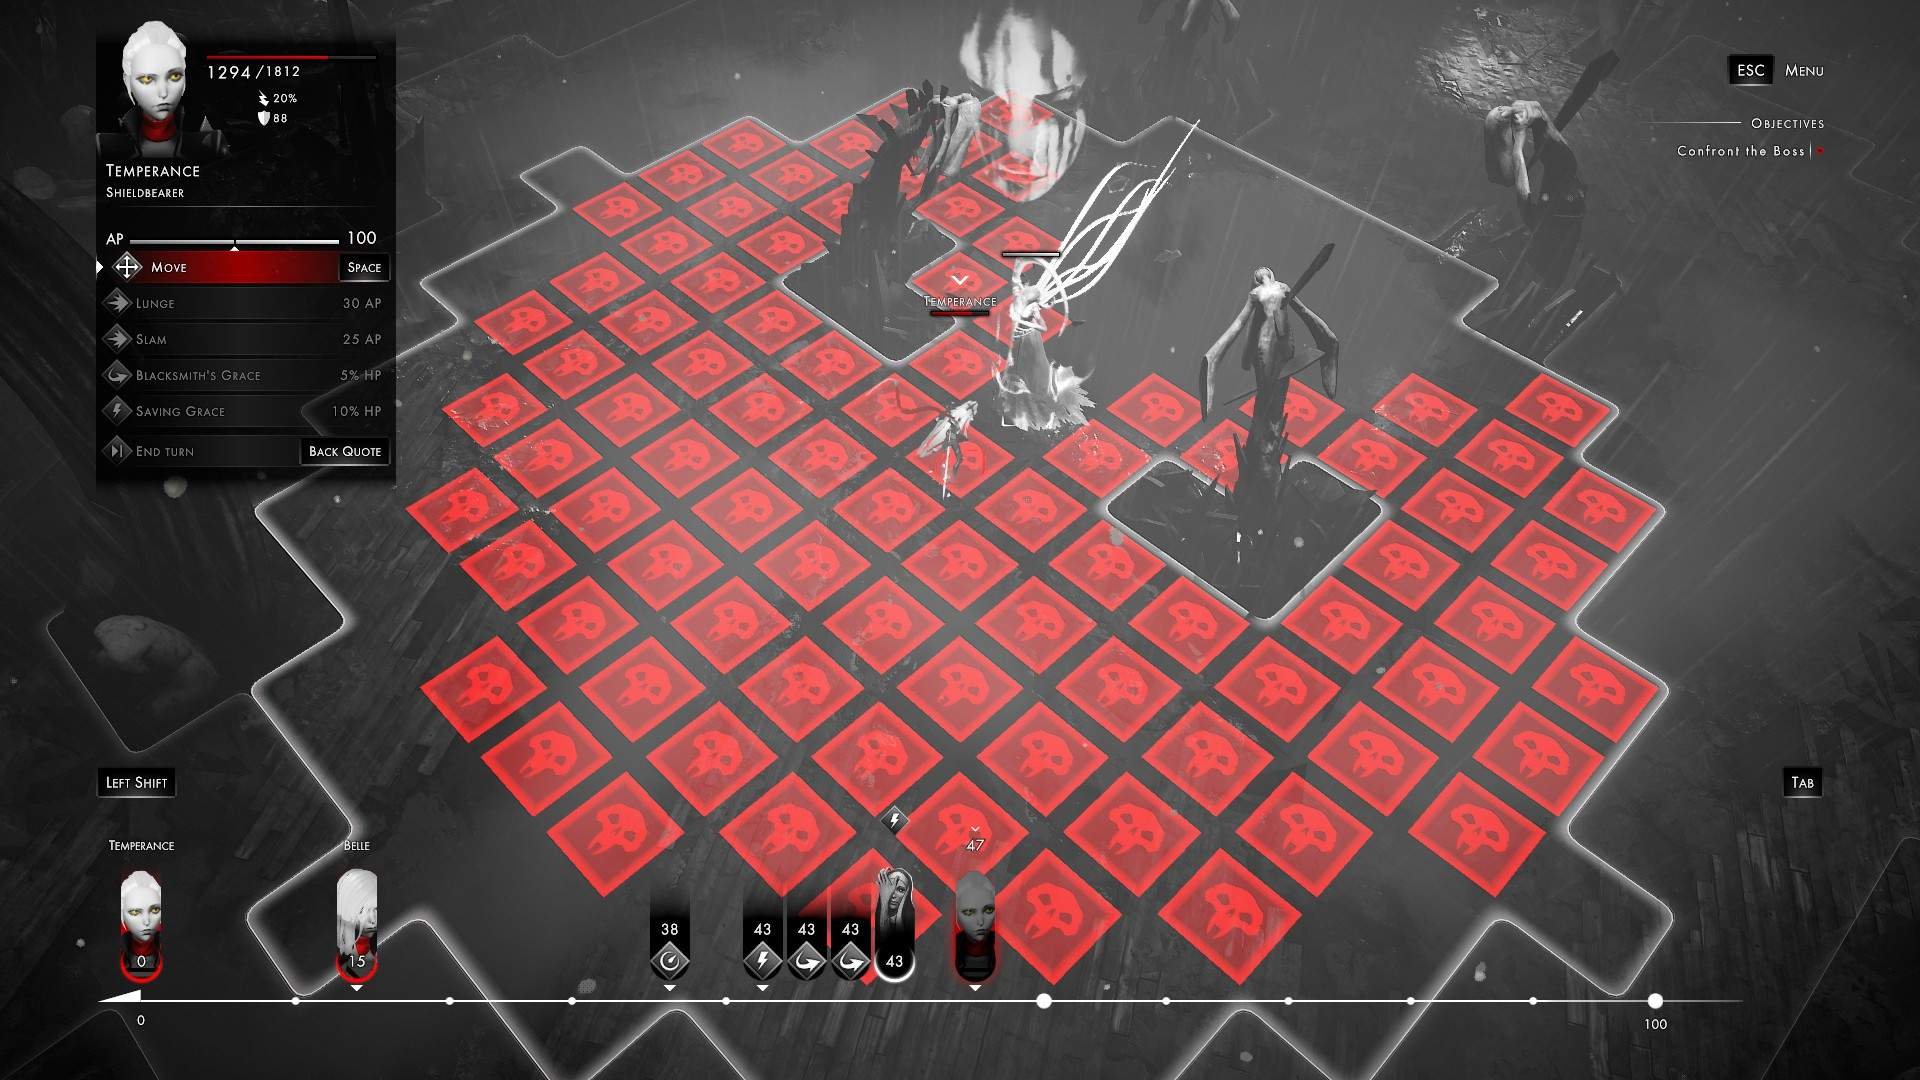
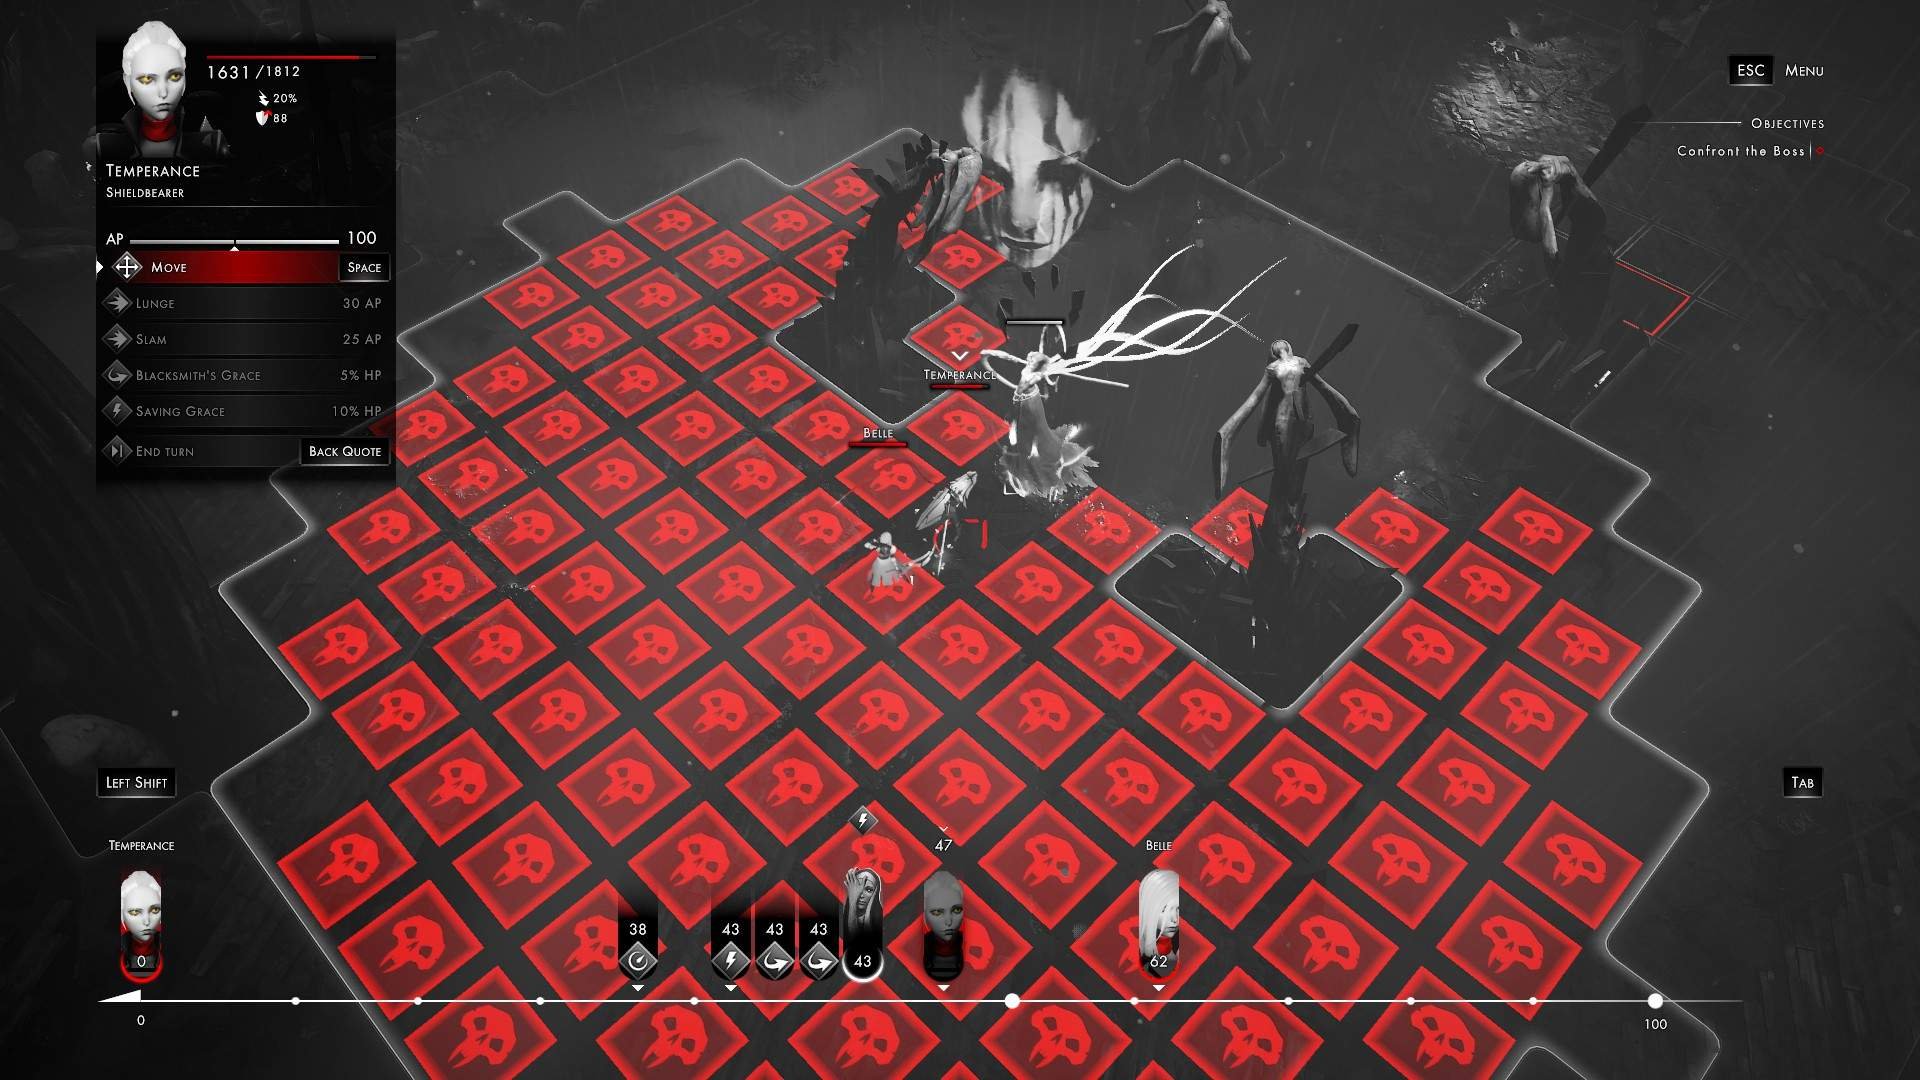
First Boss (The Surgeon)
Ok, so, I’ve looked up some guides. Too much for the easiest boss in the game. Don’t get me wrong, no disrespecting here, they are still very much viable boss guides, I will just show you the way with absolute minimum requirements. Spoiler: all you need is two ANY level gunners and blademaster or another gunner. I found myself liking 3 gunners more. What can I say, I just like to interrupt dudes.
Some explanations if you didn’t fully understand, what was happening in the vid
Initial setup will determine your success, but it’s simple.
First of all, if you afraid, that something will go wrong, just spam interruptions every turn, and you are pretty much safe. Boss minions have a really low priority for attacking you, unless you are close to the boss.
Burst is more efficient, until only one minion remains. It’s efficient not necessarily in terms of damage, but in terms of your move order.
On the first turn:
- One of your “Daughters” should move closer and damage minion to the left. This way, you will determine who will maintain aggro on the boss.
- Other two should kill closest minion to the right.
- Kill other minions, and slowly move with two “Daughters” behind the boss.
- Ideally, you want to finish last minion with last “Daughter” in move order. You need to have at least one interruption, when he switch phases.
- Almost forgot, your aggro gungirl should cast at least 1 interruption less, so she would be the most healthy one. Otherwise, boss may change his aggro, wich is not a big deal, but sometimes you can receive unnecessary damage.
*Fun fact: If you somehow manage to kill all “Caretakers” on the first round, the boss will still summons another one on his first turn.
In the vid, relatively 5 minutes in, you will see an example of something went wrong, but still pretty much manageable. The boss casts AOE, but I have only one prepared interruption left. So I’ve moved aggro gunner away from the AOE and the other one I moved so she would be further from the boss, than gunner, wich is keeping aggro (I was counting tiles there, math is hard dude).
After that, you just finishing him normally.
If You Really Want to Lvl Grind
After you beat first boss, you will have a possibility for more efficient leveling, but it’s a more demanding way than closing synapses. You only need to be able to kill first boss reliably.
So, all you need to do is to recollect and select ressurect token with your max lvl for born “Daughters”. Then, you just kill the boss and for that you will get roughly 500 XP. After that, you just recollect, ressurect “Daughter” that you want to level up, and repeat the proccess. After first boss, you will only be able to level one “Daughter” this way, but this number will increase each era.
P.S. Don’t forget to manage your graveyard, so you won’t loose your leveled “Daughters”.
Second Era
I hope you recollected already. Remember the fancy face-tank tactic in the 1st era? Well, forget it. First era is basically a tutorial. Now we get to a real deal.
General tips
- There will be much more enemies in a combat. So dealing high damage is better than trying to tank. Double blademaster setup with a gunlady is preferable or you can go with 2 guns and 1 blademaster (if you have armor debuff upgrades for skills).
- In the second era you will encounter 3 new enemies. 2 of them can buff themselfs or teammates for armor, to the point, that you will be unable to deal damage if you have low damage multi-hit attacks or no armor-debuff upgrades.
- Prepare to cycle your gunbabes really often. Their interruption skill is super powerful. It’s not specified in the description how much damage they deal with it, but it’s a lot, plus you can’t miss with this skill, and it’s interruption of course.
- Do not fall into hp abilities trap. Because they sacrificing percentage of your max hp, most of the time it will be more efficient to just take the damage from enemy, than sacrifice a bunch of hp for half or something of damage reduction overall, or some damage dealing. I am talking mostly about non-interruption abilities here.
Enemies related
Worms: not very dangerous and not really common enemies. They will teleport through the map to one of the “Daughters” and cast cross-shape charge attack. You can just side step it and pretty much ignore them. They are pretty tanky, so it may be worth to kill more accessible or more threatening enemies beforehand. Additional note: worms cannot move by themselves, they will only teleport on their turn, when “Daughter” enters teleport ability radius (Technicaly it’s not a teleport, but come on).
Infected: extremely annoying enemies to deal with. They will try to keep distance and either buff teammates for a ton of armor, heal them or spit on your “Daughters” (spitting deals low damage, but reduces armor, your armor and enemy armor cannot go below 0). Important note: they and enemies down below have a passive reaction attack. That means, they can attack you for free, if you too close to them at the start of thier turn. Hardly suggest you to just v-check their attack abilities and range of these abilities. By themselves infected are not really a threat.
Larvas: even more annoying, when paired with infected (which happends little less, than always). They will run as far as possible and will cast a cross-map root ability. Some side note about their castable root ability. I am not sure if it’s bugged or I’m missing something, but sometimes you can just escape the tile, sometimes you will be locked in there, forcing you to recieve damage. Additionaly, they can do a reaction root ability, if you come in it’s range, you will be rooted, obviously. Thier favourite tactic is casting armor and try to cast root on someone. Your best bet is blademaster’s “Imbued blade” ability. So you can deal heavy 1-hit blow from a distance, so you won’t be counterattacked twice.
Second Boss (The Deacon)
Actual cheapest and laughable strat, long have we waited
At the start of the vid I will be showing my preparations. Down below, I will explain everything.
Wow, only gunners boss fight again, such fun, much balanced.
P.S. Important note, I am using only those recollection upgrades, wich you would guaranteed to have, when encountering this boss. Any additional remembrances, memories etc will obviously make the fight easier and faster. Plus, if you trying to beat the boss after recollection, you have to have Soulslinger in your graveyard. Because you can only create two gunners, and you have one frome the start.
Prepearing for the fight
Check for “Starting initiative” here. If the difference between low and high is more than 30, it’s a reset. And that’s pretty much it. The boss will still be beatable, but it’s completely different flow of fight.
If you want to attack the boss with two units after a root, you need them to have “Starting initiative” difference less than 5. Also, your units with lowest “Starting initiative” stat should be on 1st and 4th slot on prep screen.
Starting the fight
As usual, Initial setup will determine your success (this should be my lifetime quote or something).
- Mainly, you want to move very close to the boss, but leaving enogh distance, so he would switch his phase.
- In the vid I was trying to be smart, and not casting abilities to save hp. But it’s still hard to calculate every cause of your actions. So, just like hot singles in your area, spam your life away (for interruption and “Shadow rounds”).
- I am still using my so called chess formation. But it’s kinda only used to counter “Holy cross”. Such a waste of brain power dude.
- After first damage cycle you will see, that the boss didn’t change phase, when he should. I have a theory, that he cannot do that until he touches (or will try to) his chosen “Daughter”.
- When he is in “Defensive phase” we are pretty much just tickling him with our damage, but it’s still enough to force him to switch.
Few words about bursting
- You want to go full Pepega burst after initial setup (after rooting). And every time the boss loses armor.
- When he has an armour you want to burst only if your “Daughter’ will be behind him on a timeline anyway, and if you casted “Shadow rounds” on everyone previously.
Boss phases explanation
So, the boss has two phases, wich he will be switching back and forth. At the start of a fight, he will be in “Defense” phase. In this phase he has 300 armor, average travel distance and gonna use 2 attacks. So, for your gunners he basically invincible. But, he has a second, more offensive phase, he will get big travel boost, bunch of attacks and looses all of his armor. So, when boss changes phases?
- If the boss cannot reach any “Daughter” on his turn in a “Defensive” phase. He will select the farthes “Daughter” from him as his attack priority and will root everyone else.
- After loosing 15% health (from the current phase, roughly every 3300 HP) he will switch phase to another. If your “Daughters” were rooted, he will unroot them.
- After killing someone in “Offensive” phase, he will go back to “Defensive”.
- If he cannot reach choosed “Daughter” in “Offensive” phase, he will deal massive damage to all rooted “Daughters” and will switch to “Defensive”.
- When 50% down on HP, boss will get additional abilities for each phase.
50% boss HP and “Holy cross” shenanigans
When the boss reaches 50% HP, he will cast “Holy cross” ability while in “Defensive” phase. On itsef it’s not too dangerous. It’s deals pretty small damage and pushes everyone in a straight cross-shape away for 2-3 tiles. Cross activates, when boss is attacked. But, it will only activates for one cycle of attacks, and can be interrupted. But because of our position, we are ignoring this cross pretty much entirely.
Third Era
Well, the third era unfortunately wouldn’t change anything regarding combat. Yeah, there is a significant power creep and you even can encounter a new enemy type, but other than that you are pretty much will play third era the same way you played second without much of a difference. Good or not for you to decide.
General information
You will observe not only a great power creep, but also insane stagnation in your squad power.
Almost nothing would change. Next skill unlock would be on lvl 10, but you will maybe reach lvl 9 at best. Equalising starts to be almost pointless, cause everyone is so slow in leveling you wouldn’t even care. It’s opposite even, you would be sacrificing full hp “Daughter” just to get traits, but not health. I should’ve probably mentioned traits from sacrificing “Daughters” earlier, but you are most likely sacrificed someone at least once and know about it, will do section regarding that at some point.
Vitae is kinda irrelevant too, nothing to spent it on. And even boss porbably not really gona give you too much troube. Ok, so lets see, what do we have here.
Enemies related
First of all, try to remember all enemies from first era. Now, just add them a little bit of hp, damage, and one new ability and there you go.
- Plague Prophets: almost identically the same as their predcessors “Plague Guards”. Follow the same attack pattern. The only differences are of course hp, speed, damage and their aromour ability just give them more armor. Not much to say.
- Curse Witches: upgraded “Curse Therapists”, bigger stats and now their charget shot has a little AOE. Funny enough it is making them a little bit weaker strategically. As you probably know, interruption skills usualy activate, when your ally is attacked. But now you can interrupt attack that is directed on a unit who casts interruption. You just move someone else in the radius of AOE, and now moved unit is under attack too, therefore it’s interruptable even if you are the initial target. But situations when you need to abuse that are pretty rare, but still useful.
- Ravagers: you guessed it, more powerful version of “Scavengers”. More stats as usual and a new reaction attack. When they cast their reaction, they can attack if someone in melee radius is attacked. Basically “Shadow rounds” for melee. I think they are additionaly got 5% evasion, but I am not sure.
- Reapers: well, Hunters v2.0. Stronger, beefier. Now they additionaly have a reaction attack. When casted, they will deal damage to anyone who finishes action in melee radius. That is including, moving, attacking and casting skills. Can be mitigated by shield bash, if you are still using shields for some reason, and other pushing skills.
- Corrupted Daughters: I think they are extremely rare in third era. I’ve only encountered one through it. I don’t realy see a point to describe them here. But in case you will encounter one:
- They are basically your “Daughters” but have less abilities.
- Usually they will attack any closest “Daughter”, but will prioritize “Daughter” corresponding their own class.
Not much to add for now. If you have got so far in the game you are pretty much set for the rest of it.
Third Boss (The Maid)
The strat is implies that you are already fought with the boss and got a new class, but didn’t manage to beat it for example.
Friendly reminder, that is borderline minimum requirements to beat the boss, I am like 95% sure, that you can’t go below that, and I spend 22+ hours in total testing setups, so you can trust me on that. Of course if you have higher lvl, damage memories etc, it’s a lot easier.
RNG?
Down bellow are examples of two fight variations. By the time of recording I wasn’t aware of a certain boss mecanic. While speedrunning, I have discovered, that there is actually no RNG at all. The boss will cast certain attack at the start of a new phase. But there is a catch. If the phase switch occured during boss’s turn, she will cast ability from previous phase. It’s still pretty hard to recreate, but possible, therefore making fight easier.
Strat with good RNG
Strat with bad RNG
Preparations
The main power of the boss is abusing disadvantages of your squad, so you kinda want to go with a balanced team. 90% of preparations and setup in general are made for countering one AOE ability of the boss in the second transform. I will talk about it later. Here is the list of all you need:
- Your two gunners should have at least 2k life. It doesn’t really matter how are you gonna achive that. In the vid I am showing cheapest way (2 resurrect tokens and shield sacrificing), but you can go with hp upgrades from recollection if you unlocked them before (you need all three of them) or both.
- You should take 2 powerfull memories from recollection and there will be an armor shred memory. Technically you can take 1 very powerful memory, but then you have to additionaly take all upgrades wich are reducing memory cost. Difference in fight almost nonexistent for these two options.
Manage starting initiative.
Skills requirements:
- Both Soulsingers – “Shadow rounds” and “Spirit haste”. Shadow rounds used only for very bad rng in the 2nd transform.
- Shield – “Saving grace” only one situation, when we use it. Shield is mainly here to take some damage.
- Blademaster – “Lightning strike” and “Accepting stance”.
Getting started
Order of selection on the preparation screen is matters. First in slot unit will be behind all others, second slot will be to the right side. And others to the sides a little bit closer to the statues. It’s important, so you can position your units on the first move.
Usefull tip, wich game doesn’t tell you about. Iterruptions are not considered as a direct attack, therefore they are not triggering interruptions. Important knowledge for this boss.
First two turns
You want to do a “simple” formation.
- Your shield should tank the boss in the middle of the edge of the small lake. I am achieving this through her interruption, because you want to save gunners hp.
- Blademaster behind the boss and one tile away.
- For gunners you better watch a vid. It’s to long to write. I am gonna explaing meaning of this formation piece by pice on the way.
*Dream patch Update: since you are no longer can abuse “Accepting stance” from safe distance, you should place armor memory on “Slash” or “Imbued blade”.
Pre-transfiguration
This is her first phase. In this phase she will always:
- Casts armor reaction, wich gives her 20 armor for each incoming attack.
- Casts melee interruption around her. (Imbued blade will be counter-attacked too if close to her).
- Casts one of two AOE attacks depending on last interruption, type of damage and your team formation.
- Do regular attacks to unit close to her.
- She will go to a first transfiguration after loosing 20% total HP.
Your rotation is simple:
- Recasting “Imbued blade” with blademaster.
- Recasting interruptions and hasting blademaster with gunners.
She will go to a second phase basically in one attack cycle.
First transfiguration
This is her second phase. In this phase she will additionaly get:
- Ranged attack interruption.
- New reaction, wich will heal her for every travel move of your “Daughters”.
- New cross-shape pushing AOE, wich has two delayed casts. After finishing it, she will teleport to more or less random position.
- She will go to a second and last transfiguration after loosing 50% total HP.
P.S. She can cast only one type of interruption and one type of reaction. Her second reaction icon is a phase change trigger
On her first or 2nd turn after switching phase, she will cast range interruption, new hp heal reaction and cross-shape AOE. If you following my formation, she will do it always. In the vid I am not even checking her buffs, because I know, that with this setup they always the same.
Naturally, because she doesn’t have melee reaction, you starting to burst with blademaster’s attacks. Plus you can do few slams for good measure. But, you should go burst only with blademaster.
Exactly for hers cross-shape AOE we have a “Saving grace”. As explained before, she will teleport after finishing AOE. And the only way to prevent this is to interrupt both delayed casts. Additionaly we are switching positions with blademaster for the future phase.
After that her interruptions are kinda random, so, you have to keep distance with blademaster to avoid selfkill, when you cast haste on her. Damage rotation is the same as previous.
Second transfiguration
Her last phase and the reason I’ve lost 50% of my brain cells and 20+ hours of my life.
In this phase she will additionaly get:
- New reaction skill, which boosts her initiative by 4 every time you make non-self action.
- New interruption, wich interrupts boosts.
- Ultimate AOE.
So, here is where actual challenge begins. Like you saw in the vids, there are two outcomes of her phase switch. She either casts her ultimate AOE right away, or will delay it, or even won’t cast entirely. Maybe it checks if you delayed her turn before or something. But I cannot confirm it, so for now it will be considered random.
If you got lucky
Not much to say, just do the same rotation as in previous phase.
If you didn’t
Now we connecting all formation preparations together. First of all, let me tell you about her ultimate AOE and why it’s so bad.
The ultimate AOE will create a zone around each “Daughter”, and after a short delay will deal around 1k damage. That’s all information you are given. She always casts it with initiative boost reaction. Now, what ability description doesn’t mention:
- Zones are circular 4×4.
- In the current state you cannot interrupt this skill. She will instatly recasts it again.
- *Update: “Scythedancer’s” interruption can actually interrupt her ult AOE, I still need some testing to see how reliable is that.
- After cast, overall zone is already established, doesn’t matter if you escaped from one part of it or not, damage still will be dealt there.
- Damage from each zone is a separate damage source. It means, that if zones overlapping each other the damage at the intersection will overlap too.
Now you probably understood everything. But just in case, lets summarize our actions.
- Our gunners stay 4-5 tiles away from blademaster, to avoid overlapping. We can’t save them all, so at least they will take only 1k damage.
- Shield escapes to the top. Because of initial formation, shield will be the closest to boss, so after AOE, the boss will aggro on shield.
- Blademaster escapes down, where she will be safe with guns.
After AOE, you go behind the boss with blademaster and gunners and finish her. But pay attention to her interruptions. So you won’t wipe at the end.
Fourth Era
Be hold on even bigger power creep. But hey, at least there are new types of enemies, new class for you and probably new skills unlocks. But before I go to the usual enemies description etc, I wanna talk a little about new class “Scythedancer”.
Scythedancer
Reminding you, everything I say about her is highly subjective.
In general
At the point when you get her, she will probably be weaker than anyone in your team as a class, but in a late game, she is very good.
Sacrifice trait
If you read my section about initiative, you will understand next point. So, her sacrifice bonus decrease your turn delay and starting initiative. Problem with that is if you give it to one of your units in squad, who is not really high on “Starting initiative”, she just push others at the start of the battle significantly, forcing them to take turn after most of the enemies. And if you have a balanced in terms of “Starting initiative” stat, this trait will just ruin everything. So it’s actually a downside, which only can be mitigated by equiping this trait on everyone in your team. And when you do that, you only left with “Turn delay” bonus, which is fine, but in a very late game.
Upsides
- Her helicopter dance is actually really good, escpecially if you boost her initiaitve. Tooltip showing damage only for one spin. And she does like four or five.
- Forgot to add really important thing wich I overlooked at first. Her standart attack cannot be dodged, because it’s considered AOE ability. And I am pretty sure that none of her abilities can be dodged too.
- On 10th level she will get one of the most powerfull abilities in the game. “Dance of Binding” it is an interruption. But it is the only interruption in the game, which interrupts actions instead of just attacks. And actions also includes: triggered reactions and interruptions on your squad, movement, etc. And she also can interrupt offensive actions against herself.
- And on 15th level she gets skill that hitting the enire map. Pretty neat.
Enemies related
Well, well, well. From here now on, you will be mostly fighting corrupted daughters. Plus upgraded versions of your favourite enemies (larvas and infected).
- Guitbearers: shiled class. Pretty dangerous, their shield slam deals ton of damage and can’t be dodged, plus they can buff themself for like 1k armor.
- Painslingers: gun class. The most dangerous in my opinion. They can boost initiative for anyone in the map and deal AOE delayed damage. And interestingly enough, they can attack you at spawn if you in a shooting range.
- Other corrupted “Daughters”: they are kinda just melee chicks with big damage, but relatively squishy.
- Maggots: upgraded versions of Larvas. Their root is now an AOE and they get more armor from buff. But overall they are not that big of a problem, apart from times, when they softlock you to death with neverending roots.
- Infested: upgraded versions of infected. These guys on another hand got insane upgrades. First of all, now their armor buff give 25 initiative boost. Their spit can now delay your units for 25 initiative. On top of that, they can swap positions with teammates if you come close. And on top on top of that they have mass heal with 25 initiative boost. It’s insane.
Fourth Boss (The Child)
The boss is made insanely easy, probably intentionaly. For lore I guess. I don’t see anyone having any trouble with this boss, maybe only if you go 4 melee. But anyways, here is a vid.
Preparations
Are there any? Well, to some extend. Just like with any boss you want to manage your team with “Starting initiative” in mind. The boss will be at 40 points in a timeline. So, be sure, that your “Daughters” have less than 40 “Starting initiative” difference. And if you starting boss fight from recollection, be sure you have “Soulsinger” in a graveyard.
Very complicated fight explanation
Stay in the shot radius, spam “Shadow rounds” and cast at least two interruptions.
The only thing you want to play around a little is one of his abilities. At the start of the turn he will cast instant AOE on the furthest “Daughter”, if noone is close to him. Chasing him after teleport a little annoying, but not a big deal. I don’t see any point in explaining evey AOE and every phase, because they are pretty much the same, just have a different coverage. That’s pretty much it, god bless.
Fifth Era
Basically everything is the same as in 4th era. You will encounter one new corrupted “Daughter”. And if you got so far into the game I don’t really think you need some kind of combat advices.
Enemies related
As I said, there is only one new corrupted “Daughter”.
- Hopebreakers: they are relatively tanky. They are kinda mix of all classes. They have Scythedancer’s”AOE, Shieldbearer’s interruption and Soulsinger’s AOE shot. Pretty dangerous enemies. They are more like saboteurs, so be carefull.
Last Boss (The Suffering)
The helicopter strat
The boss is truly lives up to his name. The only thing you will encounter when fighting this boss is suffering non the less. I did manage to beat him with level 10 squad with cheezy strat. But it’s so unrealiable and random, plus almost everyone died, and I could’ve failed at any point almost. I will try to think how to optimize this strat. But for now I can give you a glimpse, so you can pretty easy kill the boss if you have high level squad.
P.S. I will put link to twitch vod somewhere, to show you the main reason for using this strat. When it will be more reliable gonna upload on youtube.
Preparations
First of all, we are gonna use 5 “Scythedancers”. The boss mechanics themselves encourage us to do that it almost feels intentional. Ok, so, what skills do we need?
4 of the dancers should have
- “Dance of Revenge” – it allows us to attack the boss almost infinitely.
- “Deadly Dance” – very big dps plus armor steal, which we really need.
- “Dance of Binding” – to interrupt the boss at the begining.
On the remaining dancer you swap “Deadly Dance” for “Dance of Fury”.
On top of that you should get them all “A part of Blademaster” trait. The bigger roll, the better. And don’t forget to get as many hp/damage remembrances as possible for you, you need them all.
Start of the fight
Our main damage dealing skill is “Deadly Dance”. Cast it and slowly move to the top right corner. Boss will spawn there. Eventually you want to surround him there with 3 dancers and spam helicopter attack with interruptions to not let him teleport.
After the egg phase
WTF?
So, the boss has “Pain” ability, which he casts every turn, this ability steals 120 hp from all “Daughters” on the map every time the boss takes damage. Because of that we can abuse 2 stances.
- “Dance of Revenge” gives us 30 initiative boost for each attacked “Daughter”, so we can spam the boss with this and not move in a timeline. Of course this skill cost hp and we can’t do this forever, and can’t kill the boss with it. On top of that when switching phases he looses “Pain” buff, which forces us to give him a turn.
- And now the cherry on a cake. Again, because we take damage every time we attack boss, we can boost damage for our “Daughter”, who has “Dance of Fury”. I was able to boost it to 1200% or something.
After all boosts, our bosted damage dealer casts initiative boost too and starts killing the boss.
To summarize, one “Daughter” casts damage boost for received damage, while other casts initiative boost for received damage. Which makes almost neverending loop. And eventually allows us to 5-6 shot the boss.
P.S. As you can see, the strat is not really reliable at the current state, but the core of it (abusing 2 stances) is the way to go 100%. You can’t get more damage with anything else using 10 lvl squad. I am gonna try to think how to improve it.
Thoughts on what can be improved
- Technically it’s possible to grind bunch of armor with helicopter attack from spawning mobs. But it’s kinda long and hard. I’ve tried to do that by stealing armor from their shielder, when she casts her buff, but it’s kinda clunky.
- Maybe it’s possible to replace all but two dancers with shield to delay the boss at the start and mitigate hp steal with buff, but then squad damage will be a problem.
Known Bugs and Game’s Misinformation
Here I am gonna call out the game on it’s crap
*Dream patch update: most of the bugs are probably fixed in some way, but I am too lazy for now to check them all.
Interruption skills (kinda sorta fixed, not really)
- While testing, I have discovered some sort of bug or intentional mechanic regarding interuptions.
- So, turns out they have some kind of cooldown or hidden mechanic, or it’s just a bug, that not allows you to cast it again if your unit used interruption and after that, you boosted his initiative.
*Update: It’s not only interruption skills, all skills that have some sort of mechanic that is linked to a timeline can be bugged pretty much the same way.
**Update: You can still get a negative “Starting initiative”, wich will block any actions, but movement on the “Daughter’s” first turn.
Shieldbearer’s “Saving grace”
If your shield stays right begind “Daughter”, who is attaced, after shield’s interruption next 3rd boss’s AOE attack will be expaded more like adjusted to the direction of shield, leaving tile in front of the boss empty.
Normal AOE
Bugged AOE version
Damage memories
- There is a stat in game called “Damage bonus”. Every “Daughter” has the same amount of base damage of skill, that corresopnds to her class. But “Damage bonus” is randomized. And from this bonus calculates any additional damage. So, for example 20% bonus to damage is calculated only from that stat and not from tooltip damage.
- Flat added damage for some reason not applies at all. I’ve had time to only test +50 damage memory though.
- Very often your equiped damage memory will only apply after one fight or even only on the next day.
- Tooltip damage number may show you inaccurate information from time to time.


Be the first to comment