
Contents
Basics
All credit goes to kknd[3apa3a]!
This is “Extreme realism” collection old Soviet Mi-4 “Hound” helicopter, and it`s more extreme than ever. Few of these was in use by USSR Antarctic expedition in 1956-1960.
Design in general was inspired by Sikorsky H-19, but Mi-4 is bigger, heavier and can carry 1.5 times more weight.
- Weight – 4900 kg empty (in game way less, because it`s just impossible to make it that heavy and then fly it for any reasonable distance)
- Top speed – 185 km/h
- Range – about 400 km (in game 220)
- Max load – 1500 kg
What Is Realistic
- Engine fully simulated: behavior, heat management, oil system management, misfires and malfunctions, wearing, cold start, maintenance
- Transmission: same
- Electrics: malfunctions, power consumption and management
- Ice management: icing, deicing systems, malfunctions
- Body design and dimensions (except weight and range)
- Interior and cockpit design
Warning! This thing is very complicated to manage, and it will break down pretty often. It`s not “push the button and fly” thing, but at least there isn`t unmanageble catastrofic failures you can`t fight, like tail prop failure or control cables snap.
Cockpit: Left and Center Console
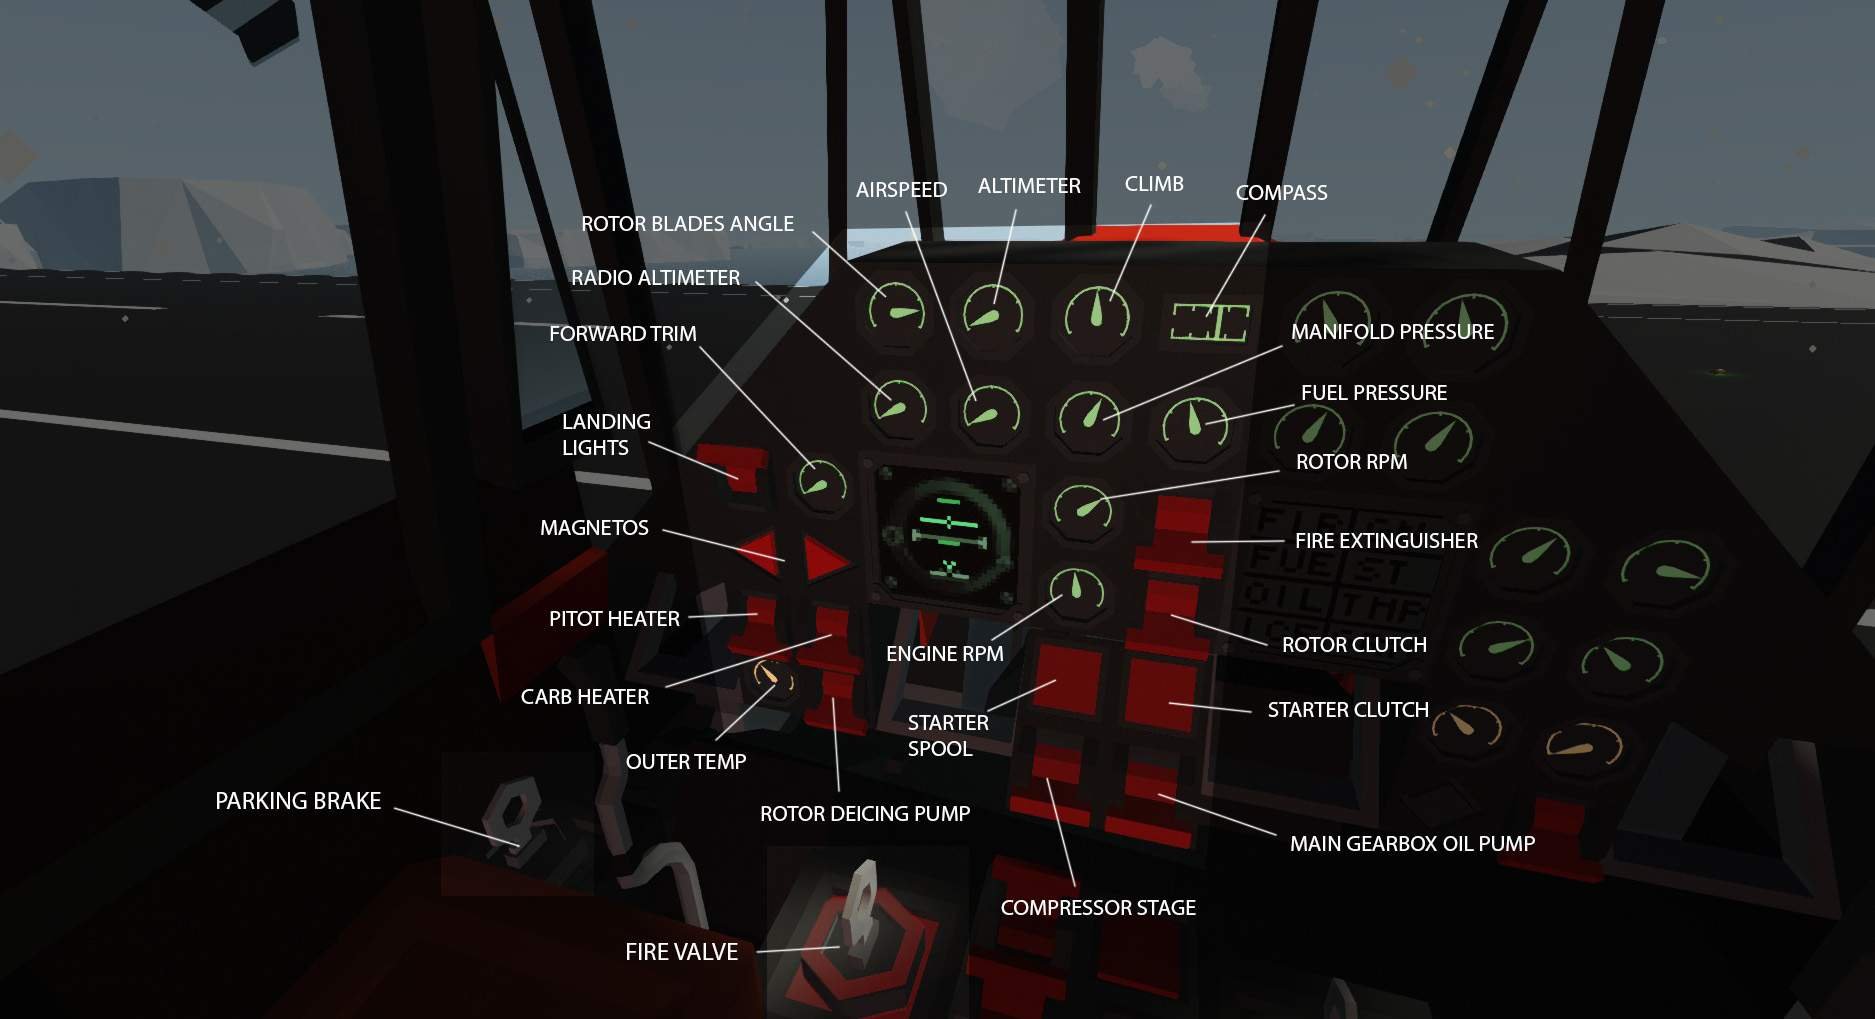
- Rotor blades angle – basically shows how much power you`re using. Range 0-18 degrees, bigger number means more power used. Can fail.
- Radio altimeter – measures altitude to the ground or water in rane 0-120 meters. Gauge can fail, sensor can fail, power source (PT-125) can fail. Uses some electricity.
- Forward trim – shows how fast you set “autopilot” to fly forward. 0-1 step 0.25. Can fail.
- Landing lights – uses electricity. Can fail.
- Magnetos – any of 2 magnetos can fail. Minor power loss in case of one magneto fail, deadly if failed both simultaniously.
- Pitot heater – can fail. To be used in bad weather when it`s cold, otherwise altimeter, speedometer and climb gauges eventually becomes unusable. If used when temperature more than +5 – very high risk of overheat and failure.
- Carb heater – to be used if weather is bad and it`s colder than 5-7 or so. There is no carb temperature or icing gauge or warning on this heli, so just watch how`s your engine running. If there`s significant and progressive power loss – probably you`re catching ice. Heater cause significant power loss but is vital to fly in Arctic. Can`t fail.
- Outer temp – can`t fail.
- Rotor deicing pump – to be used if bad weather, cold and “ICE” warning light came on, or if you noticed other sign of icing. Uses deicing liquid, tank, level gauge and refill inlet located on the top of the main part of heli. Can run up to 20 minutes, then have to be refilled with any liquid. Can fail.
- Parking brake – can`t fail.
- Fire valve – main fuel valve. Can`t fail.
- Altimeter – can fail. And freeze.
- Indicated airspeed – shows speed relative to the air, not ground. Can fail and freeze.
- Climb – can fail and freeze. Mi-4 can climb up to 5 m/s.
- Compass – gauge can fail, power source (PT-125) can fail.
- Manifold pressure – can fail. Shows how heavy is engine load.
- Fuel pressure – vital gauge. Should be more than 1.2 kg/cm2. Engine can`t run smoothly if it`s lower. Sensor can fail, main fuel pump can fail. If pressure drops below 1.2, engine will misfire and loose power. Immideatly enable BNC booster pump. Which can fail.
- Rotor RPM – to be more than 130 to fly properly. Can fail.
- Engine RMP – nominal RPM is 1800-1900. Higher RPM – higher probability of malfunctions, oil consumption and engine wearing. Can fail.
- Fire extinguisher – use in case of engine fire. After use don`t leave it enabled, or you won`t be able to recharge it. Remember, you have only one charge, so if you used it it would be clever to land and recharge. Recharge port is hidden in the ceiling of the cargo cabin.
- Rotor clutch – rotor clutch slowly enables and spools up rotor. Keep throttle around 50. Check for gearbox oil pressure. After flight disengage clutch before shutting down the engine.
- Starter spool – controls starter motor to build up starter flywheel rotation. Running for more than 20 seconds leads to overheat and starter motor fail. You have to wait 20 seconds for each 10 seconds of starter usage to cool it down. Can fail, overheat or burn by current. Repair by doing Maintenance for more than 10 seconds, or use manual starter.
- Starter clutch – connects starter flywheel to engine. Do not try to connect before flywheel spooled, it will lead to starter motor failure due to too high current. After flywheel spooled, you should keep starter and clutch buttons pressed until engine starts or 15-20 seconds passed. If engine doesn`t start, let starter motor to cool down 40 seconds before making another attempt. Clutch can`t fail.
- Compressor stage – this engine is supercharged, and have two supercharger speeds. Low speed used for regular flights, high speed – to lift heavy load or any other high power demanding situation. Using high speed generates massive amount of heat and makes engine wear out and loose oil much quicker. Hint – you can use higher boost and lower throttle, to improve fuel consumption by around 10%, but it doubles oil consumption and engine wear. This system can fail.
- Main gearbox pump – vital to keep main gearbox alive. Auxillary pump to create about 3 kg/cm2 oil pressure. Always use this pump before rotor spool, to keep oil pressure higher than 1.2 kg/cm2. Otherwise, you`ll ruin the gearbox very fast. Keep in mind that as rotor spools up, oil pump in gearbox begins to create pressure, and auxilary pump should be switched off to keep pressure lower than 6.5 kg/cm2.
Cockpit: Right Console
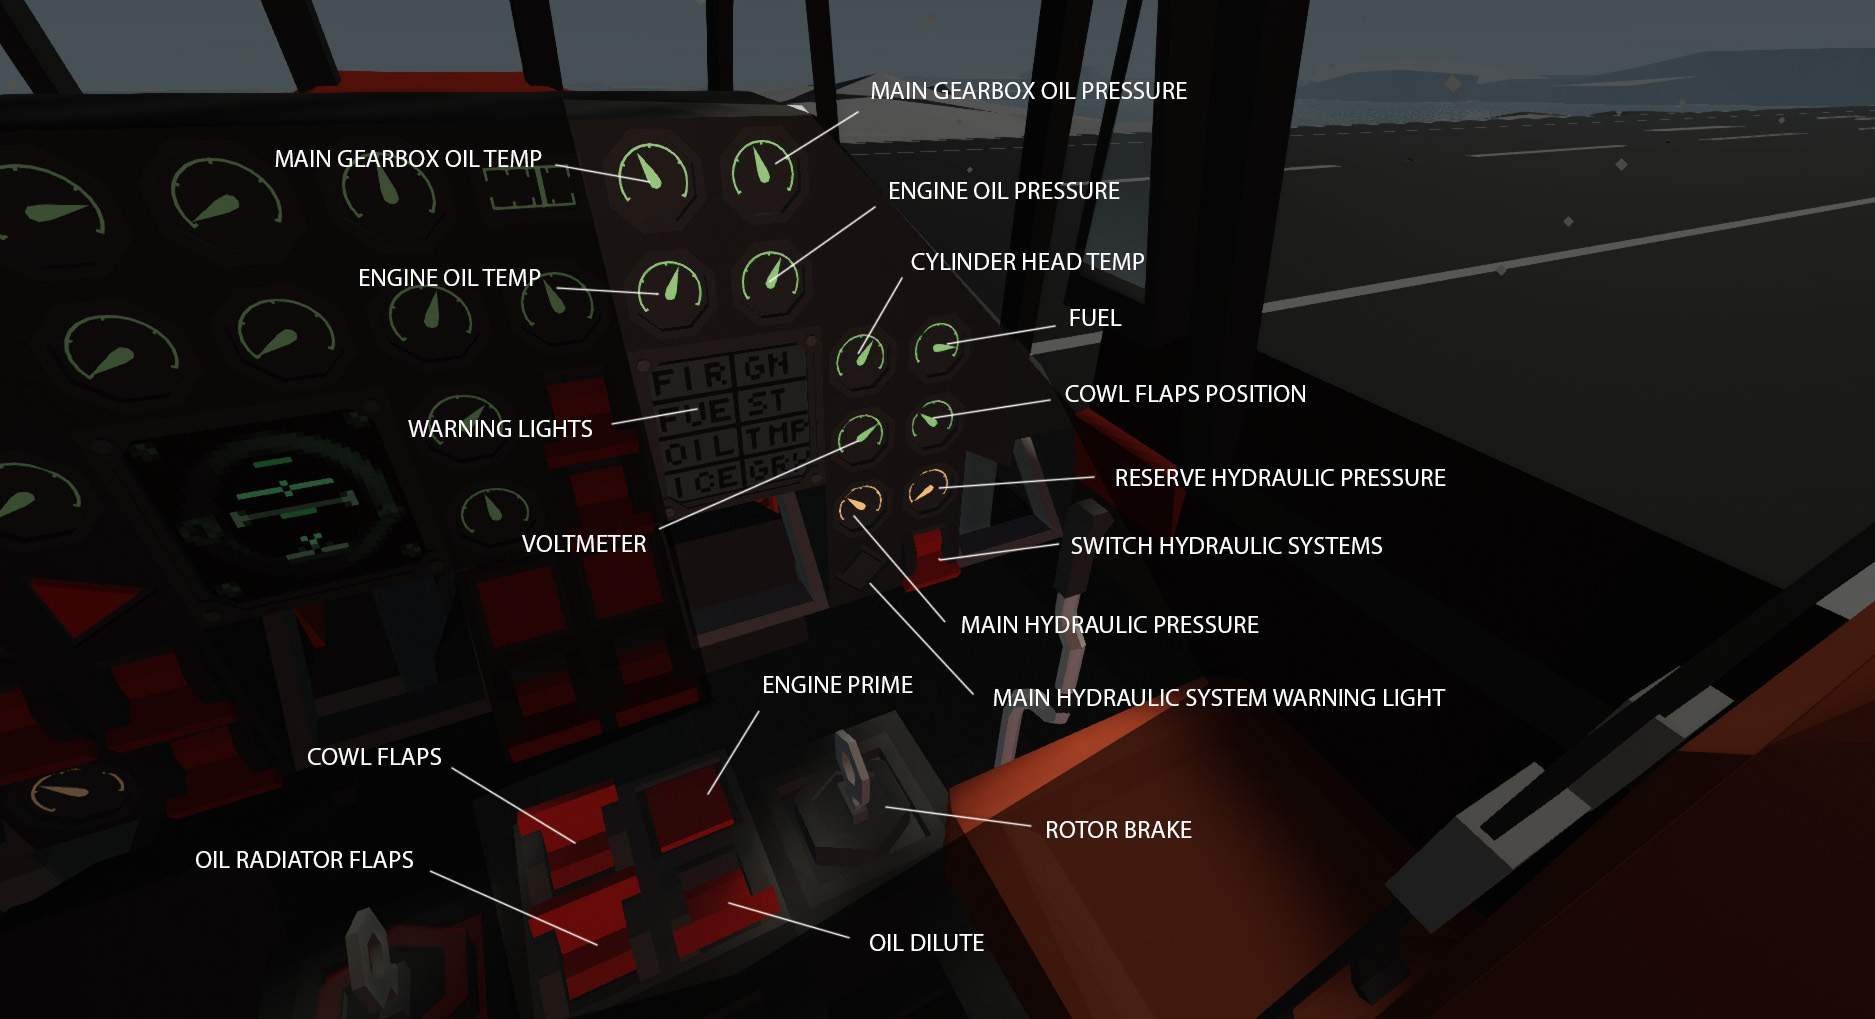
- Main gearbox oil temp – should be in 40-70C range. If too high – gearbox life and oil goes away faster then it should. If too low – oil pressure will be to high, which means oil goes away and gearbox eventually dies. Adjust load and RPM to heat up the gearbox before flight. Can fail.
- Main gearbox oil pressure – should be in range 3-6.5 kg/cm2 in flight. Lower means increased gearbox wear, and lower than 1.2 with any rotor rotating speed – imminent gearbox death. Higher means spiting out oil and imminent, but deferred death. Can fail.
- The worse the gearbox condition, the more heat will be generated and lower oil pressure maintained.
- Engine oil temp – should be in range 40-70C. Lower means too high oil pressure, higher means increased engine wear. It`s acceptably to exceed temp for a short periods of time. Can fail.
- Engine oil pressure – vital gauge, to be in range 5-6.5 kg/cm2 in flight. If it`s lower or pressure is unstable – you`re out of oil, engine will pass away shortly. Land ASAP. Or it`s just gauge failed. Again.
- Yes, vital gauge can fail.
- Hint: gague lower than 5 and shaking slightly – probably oil leak. Gauge shaking wildly – probably gauge fail.
- Cylinder head temp – vital gauge. Can be operated in range 120-225C, for short periods if time is allowed to exceed it up to 245. Low temp means engine misfiring under load an stall. Heat it too much and face worn engine. Gauge can fail.
- Hint: in emergency situation you can heat it up to 270 for no longer than 30 seconds. Get ready to catch fire and repair engine after that.
- The worse the engine condition, the more heat will be generated, lower oil pressure maintained and less power will be produced.
Warning lights – vital instrument to observe.
- FIR – engine compartment fire. Alarm will sound. Use extinguisher ASAP.
- FUE – less then 125 liters of fuel left.
- OIL – engine oil pressure too low. Alarm will sound.
- ICE – rotor icing detected.
- GN – generator failure or not enough charging current. Alarm will sound. It`s ok if GN comes on with RPM lower than 1400 or blinks sometimes.
- ST – starter motor in use. If you push starter button and ST light stays dead – starter motor is dead.
- TMP – engine temp exceeds 245. Alarm will sound.
- GBX – gearbox oil pressure is too low to operate.
Warning lights panel can`t fail.
- Voltmeter – if lower 9 all the gauges stops working. Should be about 25.5 in flight and 23-24 on ground if everything works well. Can fail.
- Fuel – 955 liters maximum capacity. Can fail.
- Cowl flaps position – range 0-0.5. Basicaly shows how struggle cooling system to cool down the engine. Can fail.
- Main and reserve hydraulic pressure – range 40-60 kg/cm2. Used to power controls servo boosters. Both systems fed by two pumps, which are powered by gearbox. No rotor rotation – no hydraulic pressure. Normal flight position – 40-60 for main system, 0 for reserve. Gauges can`t fail.
- Switch hydraulic systems – used to check condition of reserve hyd system in flight. If enabled, reserve pressure should raise to 40-60 kg/cm2 and power servo booster. If enabled but pressure remains low – reserve system failed.
- Main hydraulic system warning light – comes on if main hyd system failed or reserve system enabled manually. If pressure in main system drops below 35 kg/cm2, system will automaticaly switch to reserve and light will come on. It`s ok if sometimes light blinks. To repair failed system, find repair button in gearbox compartment.
- Cowl flaps – to be enabled if cyl head temp exceeds 225. Automatically maintains engine temp.
- Oil radiator flaps – to be enabled if oil temp exceeds 70. Automatically maintains engine oil temp.
- Engine prime – to be used in case of cold start. Right before start press the button and keep it depressed for few seconds. Important – feeds fuel from main fuel system. No pressure – no priming.
- Oil dilute – also to be used in case of cold start. Dilutes engine oil with fuel. Recommended to use if it`s colder than -10. Switch off after engine heated up to 0. Same thing about fuel pressure.
- Rotor brake – to be off before rotor spool up. Rotor brake have it`s own durability and can stop rotor from full RPM to complete stop about 4 times, so stopping from full RPM is not recommended. Lower RPM if possible and do not use brake for more than 10 seconds if rotor is still rotating. Switch if off, let cool for few seconds end enable again. If you burned brake and it`s not working – to restore it you need to do Maintenance.
Cockpit: Overhead Console
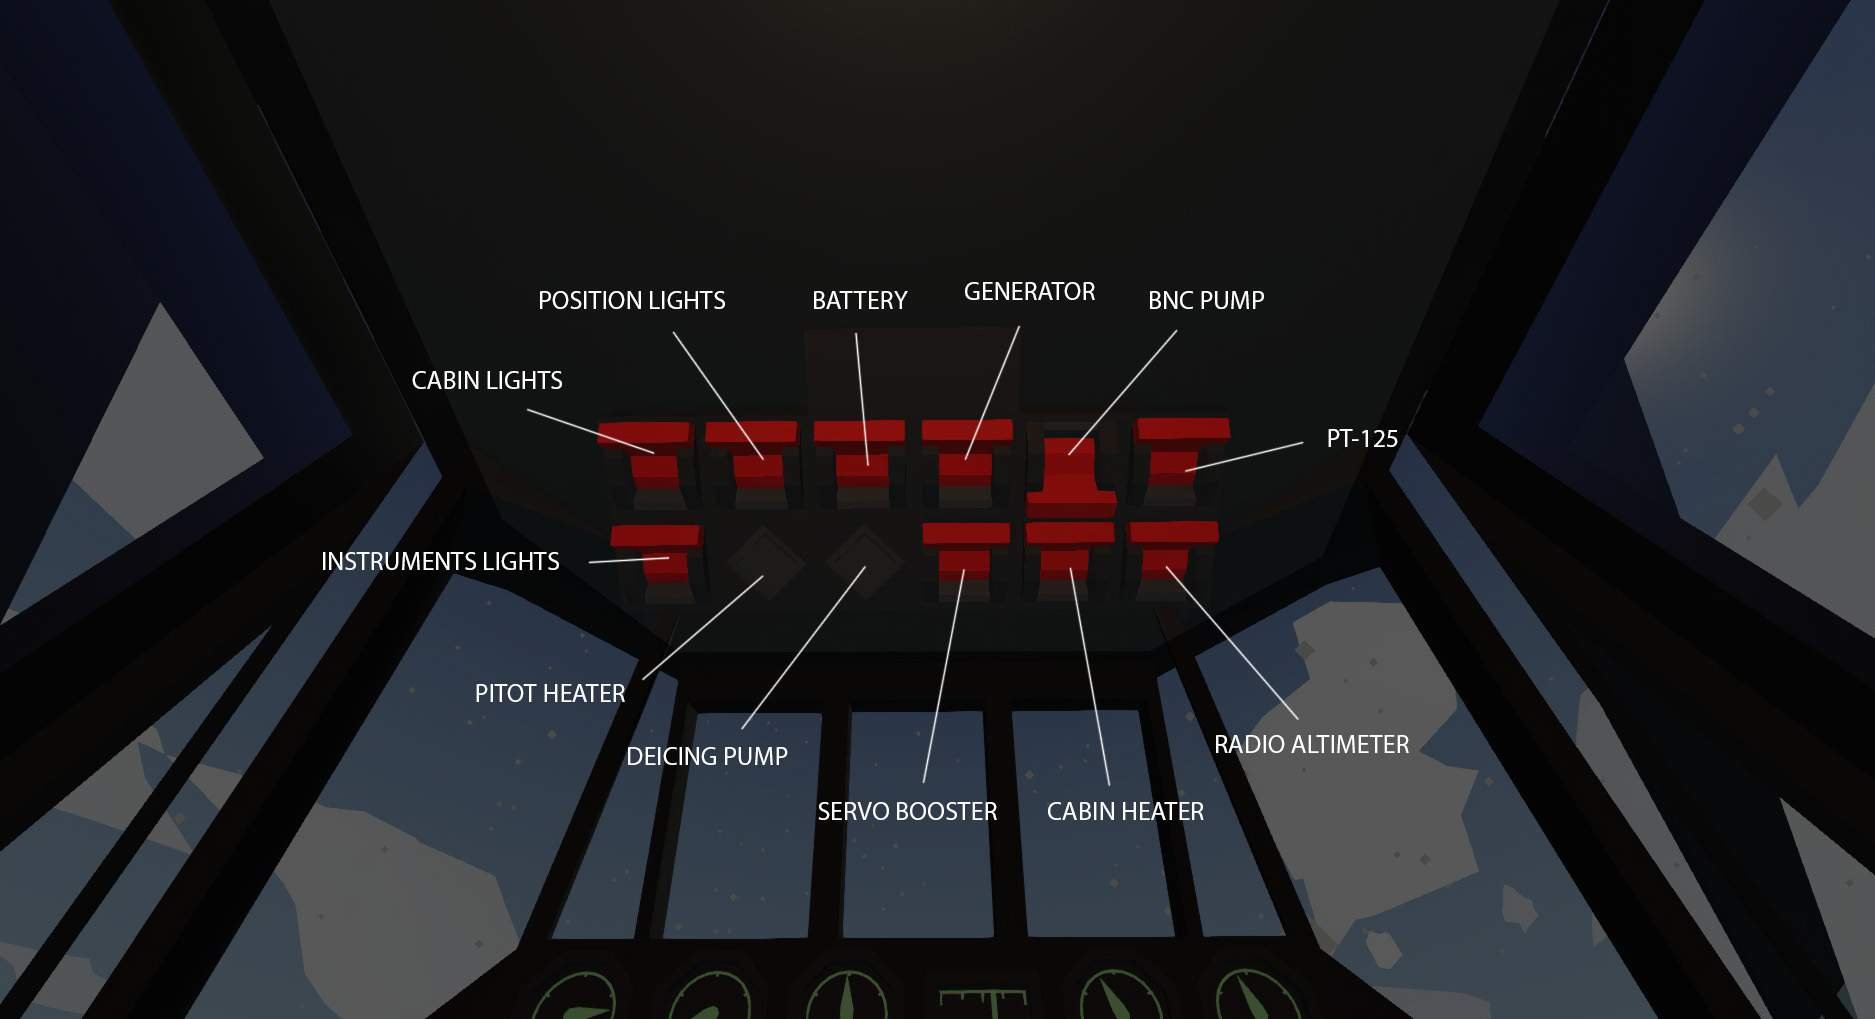
- Cabin lights – can fail.
- Instruments lights – can fail.
- Position lights – uses electricity. Can fail.
- Battery – main battery switch. Main battery relay can fail.
- Generator – can fail. Drains engine power.
- BNC pump – auxillary fuel pump. Used to create fuel pressure to start the engine, use primer and oil dilute, to counter the main fuel pump failure, to refill main tank. Can fail.
- PT-125 – DC/AC power converter. Used to power AGK-47 attitude gyro, radio altimeter and compass. Can fail.
- Pitot heater – indicates pitot heater working. No indication – heater broken.
- Deicing pump – indicates rotor deicing pump working. No indication – pump broken or no deicing fluid left.
- Servo booster – used to boost pilot`s efforts to control helicopter. In game, basically, enables “auto-pilot”. Not autopilot, which this heli doesn`t have. Auto-pilot doing some part of players job to control, maintain altitude, speed, or stable hovering. It`s flyable without booster, but it`s harder to control. Powered by two hydraulic systems, each of them can fail and boosters system itself can fail.
- Cabin heater – can fail.
- Radio altimeter – can fail.
Engine
Engine: front hood

- General durability – lower means higher probability of failures. Decreases as you fly. To restore – do Maintenance for 10 seconds or more.
- Engine built-in fuel pump indicator – literally picture of the working pump. Becomes not working if failed. Repair to repair.
Mechanical malfunctions:
- BST – booster stage switch failed
- MAG – one or both magnetoes failed
- BNC – BNC pump failed
- RAL – radio altimeter sensor failed
- GN – generator failed
- ST – starter failed
- 125 – PT-125 convertor failed
- SB – servo booster failed
Engine: left side
Under left side hoods you can find youself:
- Repair
- Maintenance
- Chicken switch (disable failures)
- Controls keybinding change (A/D for yaw Left/Right for roll or otherwise)
Engine: right side
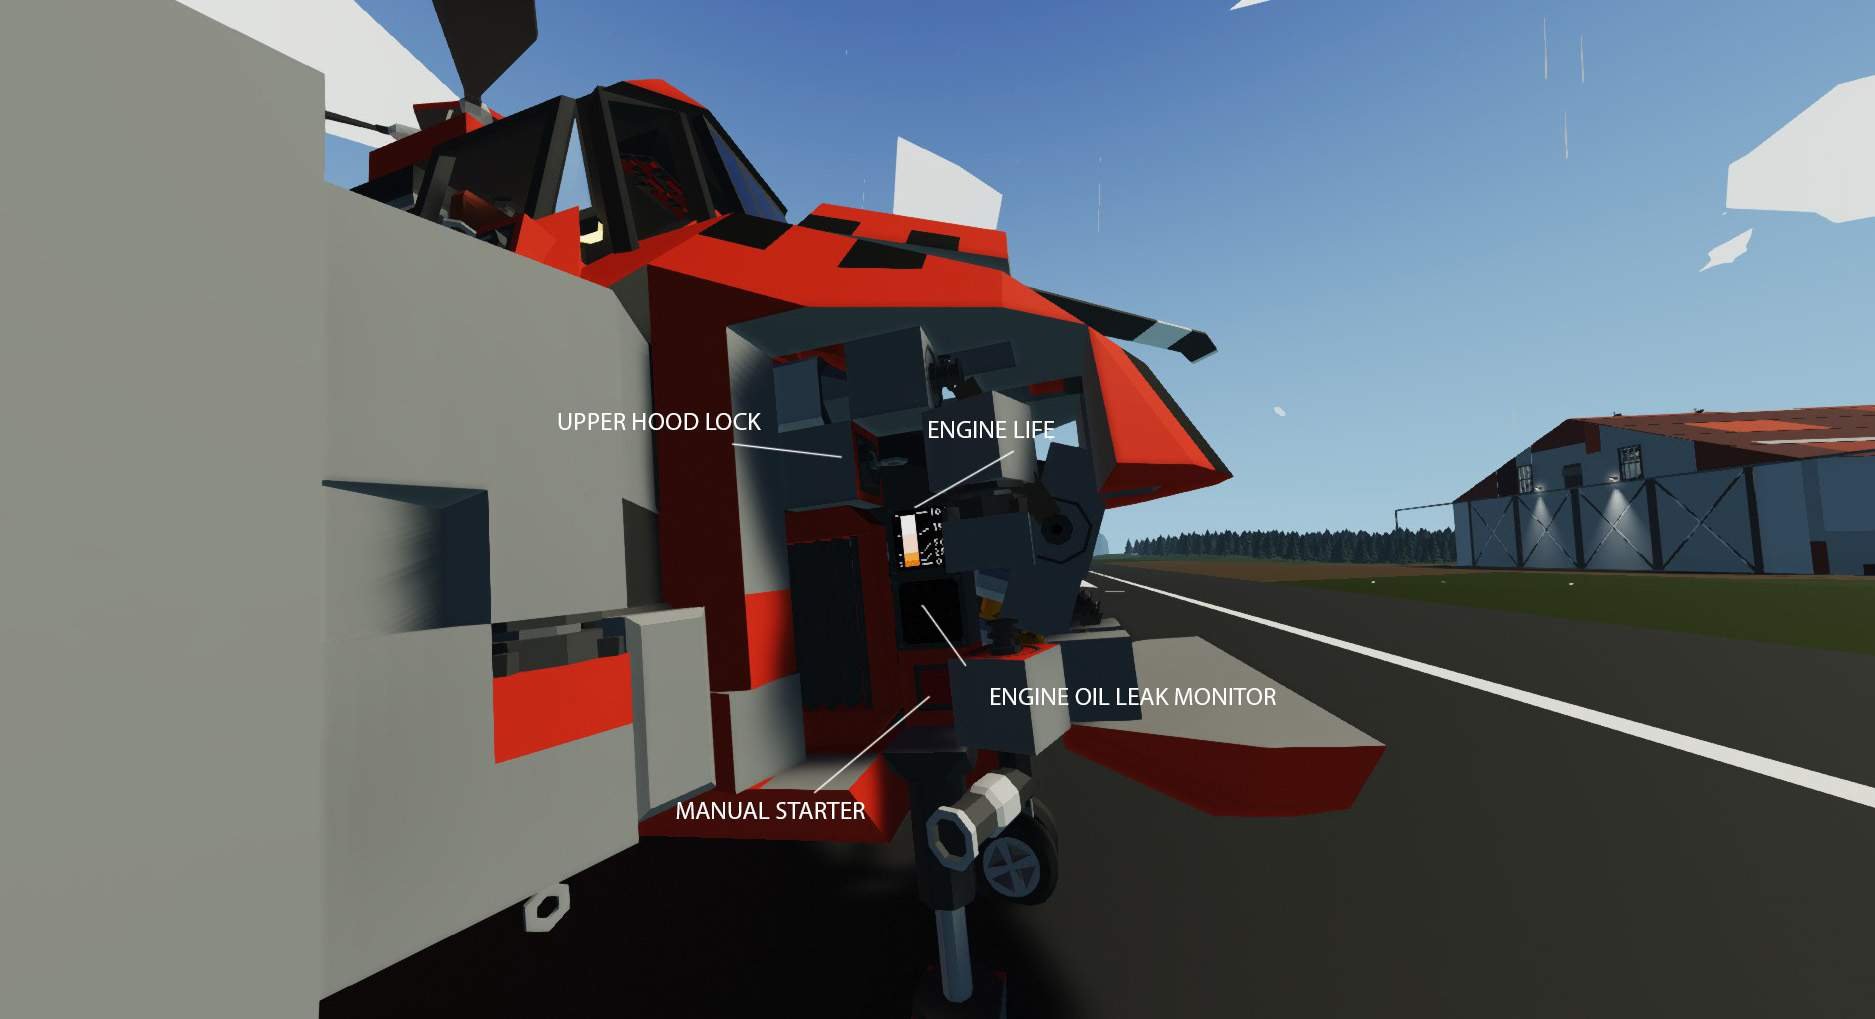
- Engine life – lower life means less power, more heat, higher oil consumption and higher chance of oil leaks. Decreases because of use, overheat, underheat, low oil pressure or level, high RPM. To restore – do Maintenance for 10 seconds or more. Keep in mind – if engine is completely broken, it will take a lot of time to fix it. Do maintanence before you run out of life.
- Engine oil leak monitor – obvious function.
- Manual starter – in case of failed starter motor you can use manual starter. Set all systems to startup config, push this button and wait.
- Under upper hood – engine oil level and refill port.
Gearbox Compartment
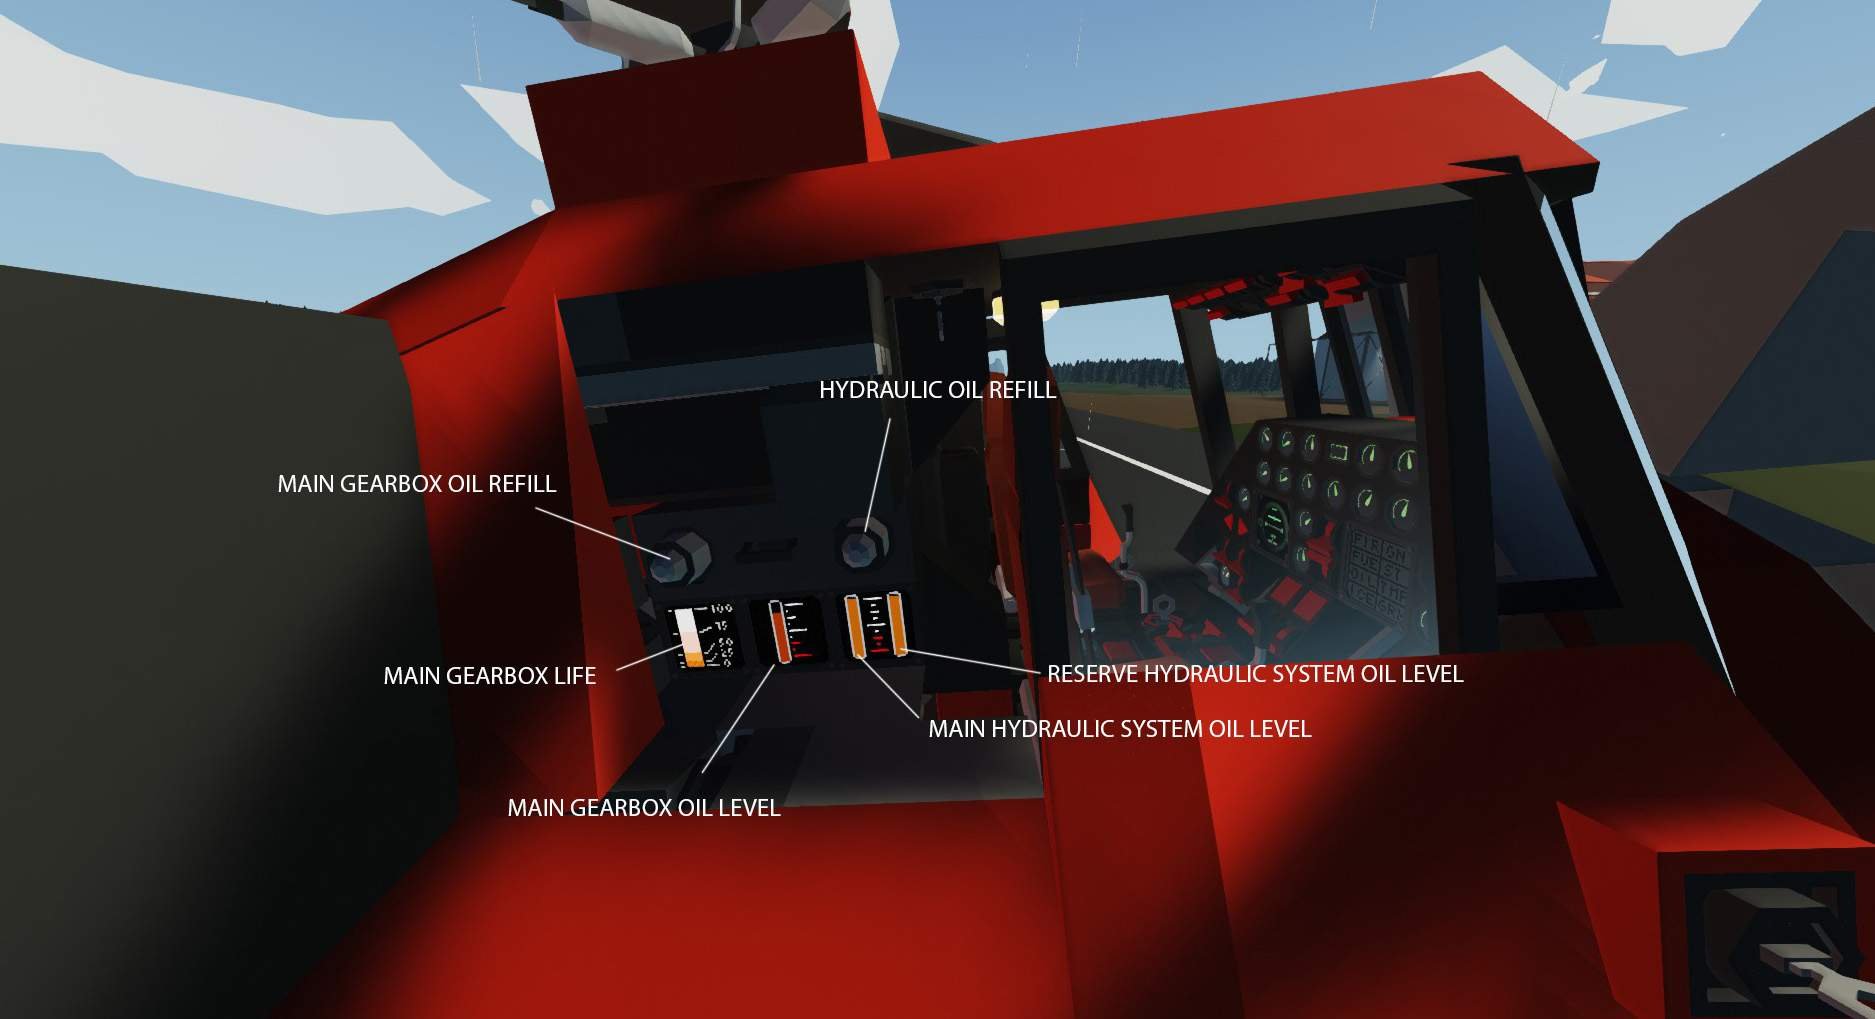
- Main gearbox life – lower life means more heat, higher oil consumption. Decreases because of use, overheat, low oil pressure or level. To restore – do Maintenance for 10 seconds or more. Keep in mind – if gearbox is completely broken, it will take a lot of time to fix it. Do maintanence before you run out of life.
- Main gearbox oil level – only decreases of gearbox usage, too high temp or pressure. If drops too low, gearbox suffers.
- Hydraulic systems oil levels – level decreases as you use controls. In case of system failure, all the oil escapes and you need to refill it after repairs.
Also there`s repair button for hydraulic systems.
Outside Ports, Cabin and Fuel Management Console
Outside

- Ground power port – port is hidden. Used to connect ground power source. Just move connector close enough and it will connect. Place marked with arrow.
- Fuel refill – Fast port. There`s also slow port on the right side of the hull, but it`s slow. This is fast, but have to be used only if rotor is stopped.
Deicing refill port and gauge – refill with any liquid or canister.
Cabin
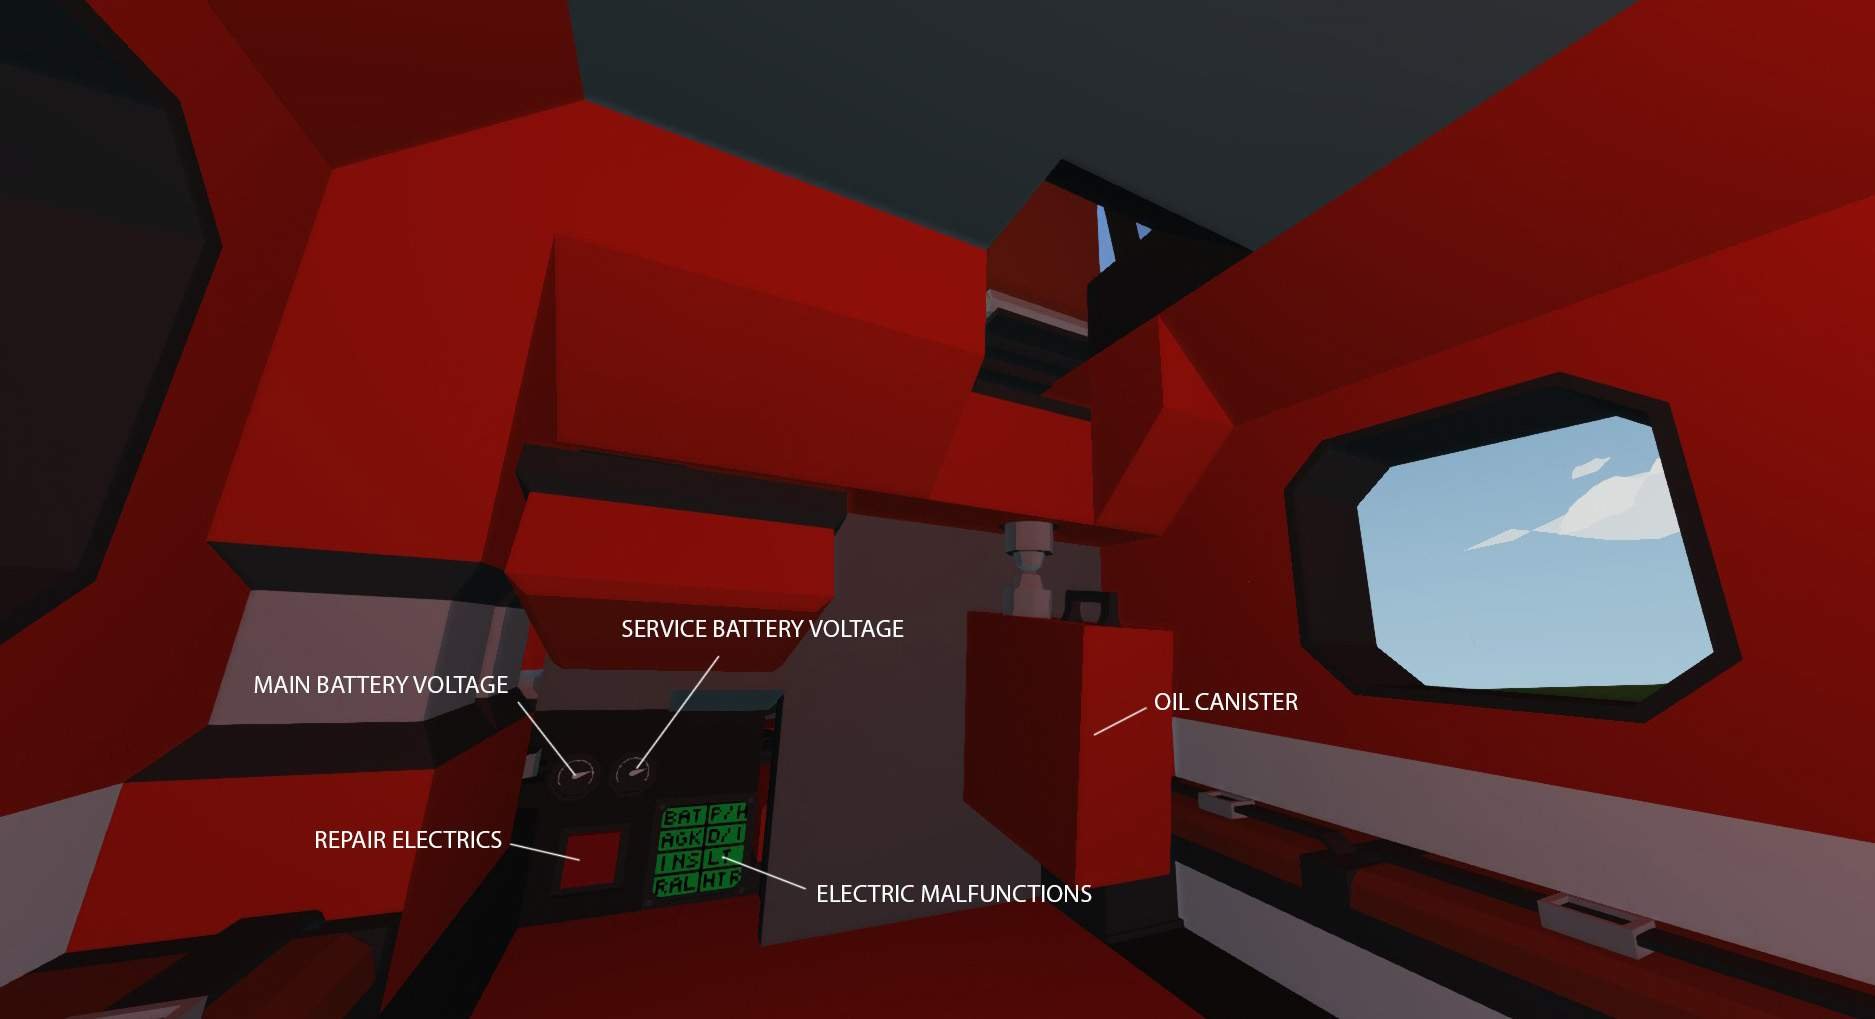
There is electric box, canister, winch, cargo doors controls etc. but only complicated thing is electric box.
- BAT – main batt relay fail. Makes all electric equipmeny to go haywire.
- AGK – AGK-47 gyro attidude indicator fail
- INS – any of gauges fail
- RAL – radio altimiter gauge fail
- P/H – pitot heater fail
- D/I – deicing pump fail
- LT – any of lights fail
- HTR – cabin heater fail
Fuel management console
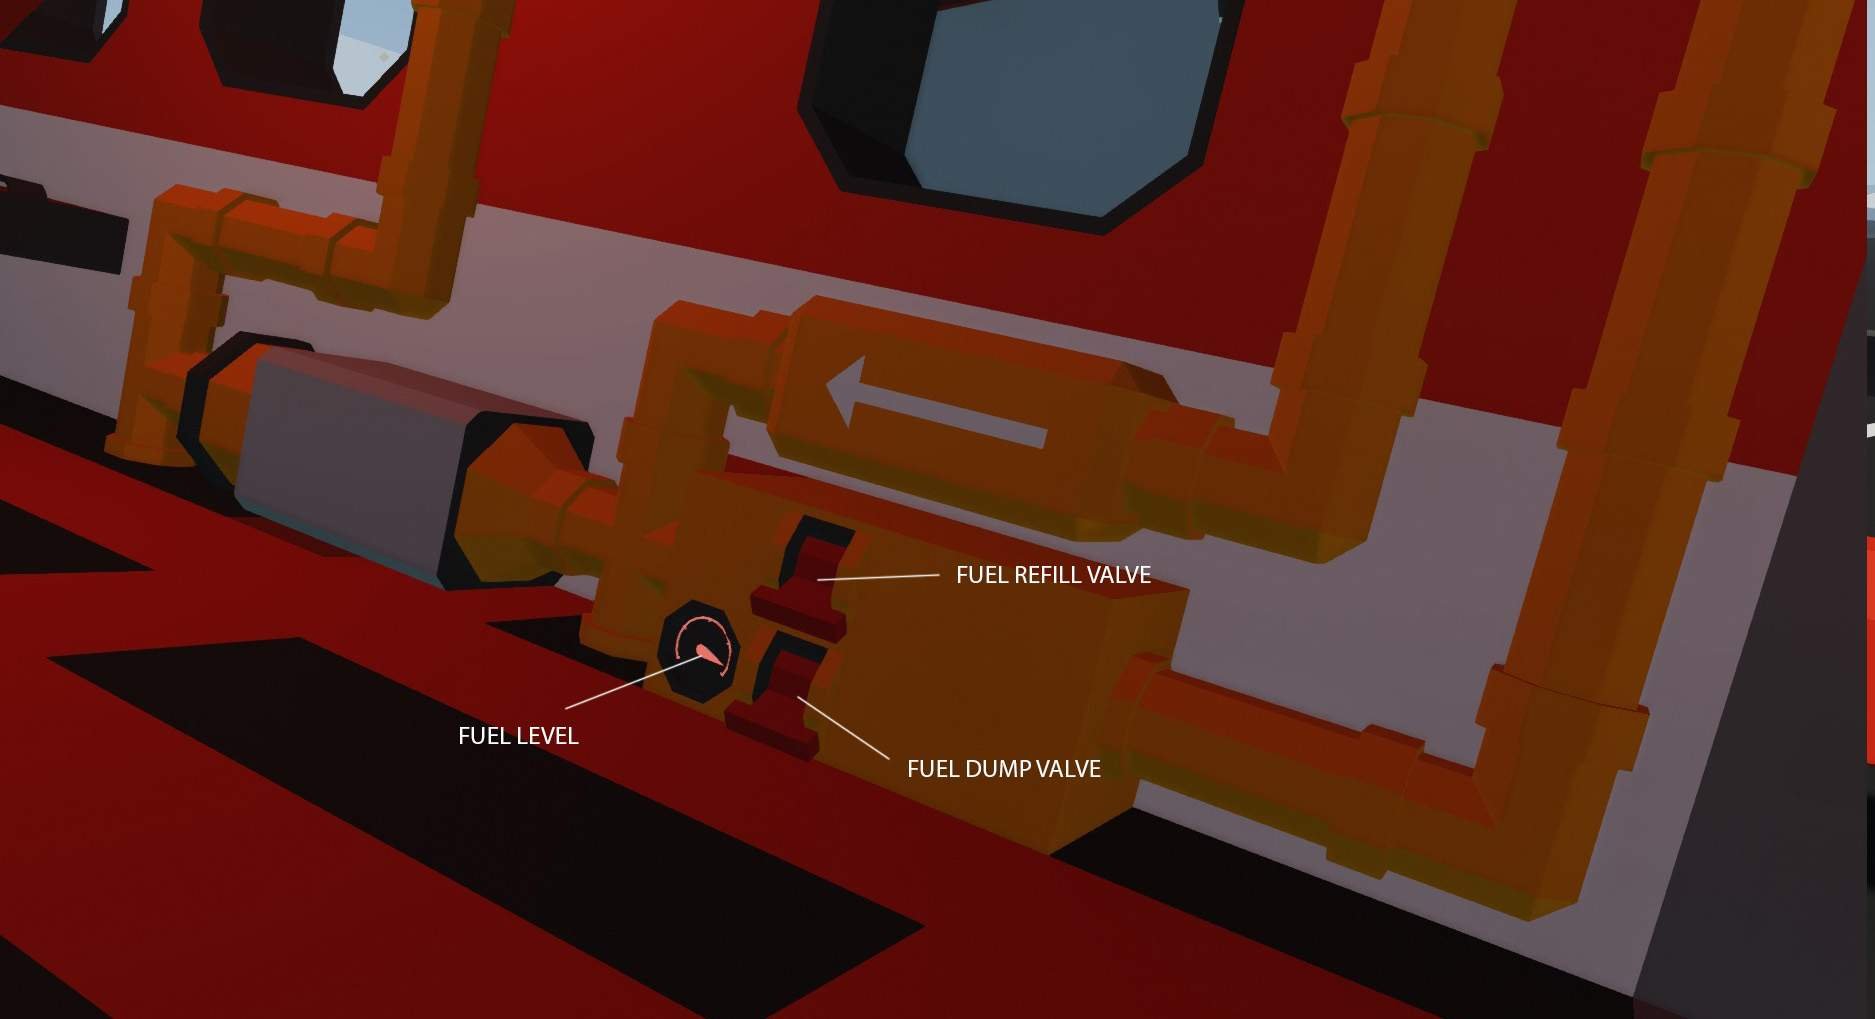
- Fuel dump valve – to use when you need to lose weight to get maximum lifting performance. You can carry 1,5 tons only with about 200-250 liters in the tank.
- Fuel refill valve – to refill fuel tank with starboard port. It`s slower and requiers BNC pump to be turn on, but you can refill it without stopping rotor. Also, you can use this port to feed engine with auxillary fuel tank (not included) in flight.
- There`s also winch in the cabin, to be used with both cargo or pasenger doors.
- Warning! There`s no “idiot protection” for the winch crane, be careful or you`ll brake it down.
Startup Procedure

- Check for failures and liquids levels (if neccesary)
- Get in
- Turn battery on
- Turn cockpit and instruments lights (if neccesary)
- Open fire valve
- Set throttle to 0.05
- Turn magnetos on
- Turn BNC pump for a few seconds to build up fuel pressure
- Check fuel pressure higher than 1.3 kg/cm2
- (Cold Start) Turn oil dilute on. Press and hold Prime Eng with “E”
- Press Starter Spin button with “Q” and keep it depressed
- Wait few seconds for flywheel to spool up
- (Cold Start) Release Prime Eng
- Press Clutch with “E” and wait for engine to start. Maximum starter motor working time – 20 sec per startup attempt. Wait 40 seconds for it to cool down after 20 sec usage
- As engine started, watch oil pressure and temp. As temp gets to 30, or pressure is lower than 6.5, set throttle 0.1
- (Cold Start) Turn oil dilute off, watch oil pressure
- Open oil radiator flaps
- Turn generator on
- Watch for cyl head temp more than 90. Increase throttle if necessary
- Turn PT-125 and position lights on
- Turn rotor brake off
- Turn gearbox oil pressure on, wait for oil pressure more than 3 kg/cm2
- Turn servo booster on
- Turn clutch on
- As rotor spools up, increase throttle to keep RPM above 1000. Throttle 0.5 is fine.
- Watch gearbox oil pressure. As it reaches more than 5 kg/cm2, turn off gearbox oil pump
- Watch cyl head temp. As it reaches 225, open cowl flaps
- Watch for hyd systems oil pressure. It should increase in both, and than it should fall to 0 for reserve system
- As hyd system warning light goes away, and rotor RPM reaches 110, you`re ready for taxi
- Set throttle to 0.5
- Disable parking brake an taxi out
Before takeoff check for parameters:
- Gearbox temp 40-70, pressure >3
- Engine oil temp 40-70, pressure >5
- Cyl head temp >120
- Voltage >25
- Rotor RPM >110
- Engine RPM >1600
- Fuel pressure >1.2
- Main hyd pressure >40
If everything is fine, you`re good to takeoff.

- Set throttle to 0.8, wait rotor RMP >135 and takeoff
- Use “1” and “2” to adjust forward trim to fly forward
- Keep rpm >130
- Keep rotor angle <18
- Watch for cyl head, engine and gearbox oil temp. Decrease throttle or increase speed if something overheats.
- Best economy mode – throttle 0.9 fwd trim 1.
Throttle chart:
- Idle – 0.05-0.3
- Taxi – 0.5
- Hover – 0.8
- Normal flight – 0.85-0.9
If in flight engine misfiring – check for fuel pressure ASAP. Use BNC pump if it`s too low.
In case of engine or gearbox failure you`ll have just few seconds to land helicopter, while it`s autorotating.
It`s calibrated to traver to Arctic, so you`ll definetly have some fun with malfunctions, repairs, refilling, restarting and so on, but only on long enough trip.
If you still want “easy mode” – there`s Disable Failures key switch under upper left hood. Turn in on and it will stop breaking down, catch fire and use oil etc.


Be the first to comment