
This guide will show how to make a stone stairway between the height elevations on a Stronghold Crusader HD game map (min height, mid plain and hi plain). We will also discuss how to use stone stairways to add strategy to a game.
Contents
What This Guide is About
All credit goes to albriradios!
The topics in this “how-to” guide are:
- The Five Steps to Build A Stone Stairway
- Examples of Stone Stairways
- A Rival’s Stone – Some Precautions
- Using Stairways in Game Strategy
- Summary
- Design Hints
- Others Ways to Move Between Elevations
This guide is for the map creator, not for a game player. The guide talks about both pre-building a stairway on a map and designing a spot where steps can be built during a game by a player.

Step One: Prepare the Rock Cliff
“Rock cliff” means the columns of rock which bound the mid and hi plains. As you know, people and beasts cannot climb up or down a rock cliff. Rocks are barriers between the elevations.

There are two ways to prepare the rock cliff to accept a stone stairway:
- Draw an angled face of rock using the Freelance Or Snap tool. This aligns the rock face perfectly with a stone wall.
- Use elevation tools to push back the rock cliff temporarily to build the stairway, then later bring the rock cliff back. (See the elevation tools below.)

I find it easier to push back the rock cliff temporarily, allowing lots of room to build the stairway.
We are ready for the brace wall.
Elevation Tools
- Minimum height (ground level) tool
- Mid plain (middle elevation) tool
- Hi plain (highest elevation) tool
Step Two: Brace Wall & Flights of Steps

Always use the low wall (vs high wall) as the wall which supports the steps, which is called a brace wall.
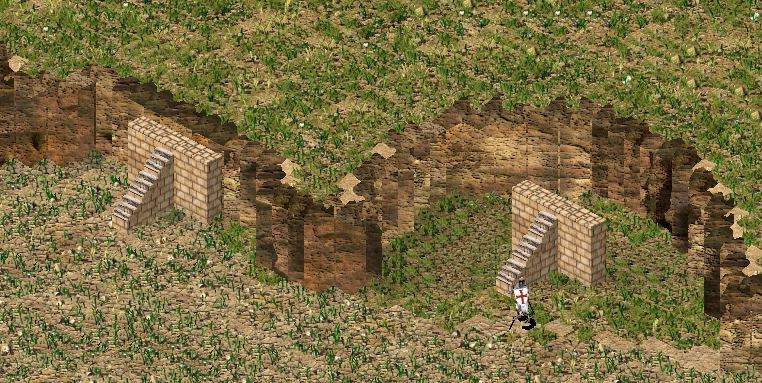
If you prepared an angled face of rock in Step One, then place the stone brace wall against the rock cliff, as shown below (it is easier to see this in flattened 2D view using the spacebar). Otherwise, build the brace wall where you want the top of the steps.
I typically use a run of five stone columns as a brace wall with three flights of steps. It seems to work very well and not be too large of a feature on the map.
With the brace wall in place, build the first flight of steps. This is your foundation so to speak. The rest of the stairway will be based on this foundation.
Add the rest of the steps to the stairway.
We are now ready for the decor.
(I also like to embed the stairway a little into the higher elevation instead of letting the steps jut out from a rock cliff. For this reason, I build the brace wall several spaces beyond the cliff face. This way the steps may jut out just a little or none at all.)
Step Three: Add Decor
A simple set of steps is really all that is needed, but the story line of the game may require something more regal, more fancy, more stylish than simple steps.
This is the time to build wing walls (retaining walls which adjoin the brace wall), column posts (using high wall and crenellated wall), landings (flat stone area behind the brace wall), gardens, water features, walkways and more.
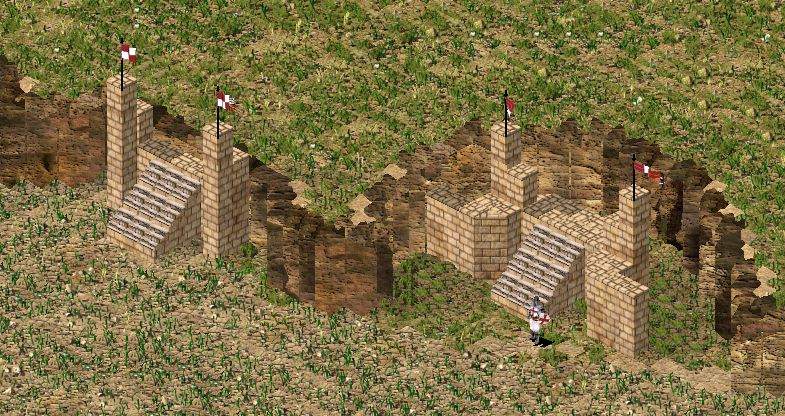
Remember that flags and banners can be attached to crenellated wall columns (not low or high wall columns).
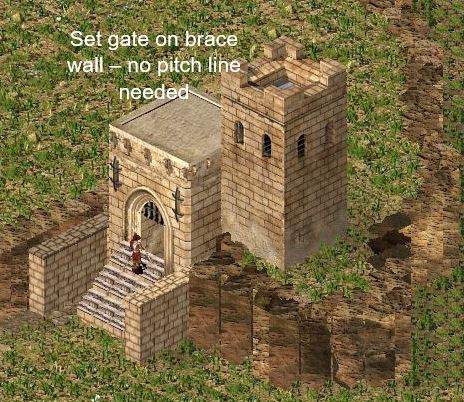
A stone gate can be situated at the top of the steps as shown in the Examples of Stone Stairways section. (Ahhh, this allows a castle to be built upon all three elevations!)
In the next step, we’ll finish the landscaping.

Step Four: Bring The Cliff Face Forward
You can skip this step if you did not temporarily push back the cliff face in Step One.
Work in flattened 2D view (spacebar), select a very small brush, elevation tool, and bring the higher elevation forward so it presses against the back of the stairway (brace wall, wing walls, landing, etc).
Check your work in 3D and at different view angles until you are happy with how it looks. Use the elevation tools to add rock or remove rock where needed. Adjust the decor if necessary.
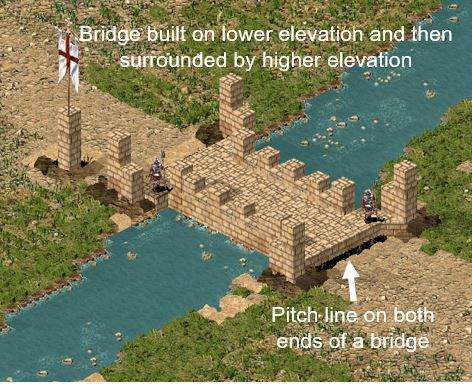
This is important: there should be a continuous line of rock between the back of brace wall or landing and the higher elevation. No gaps. (See top image.)
Lastly, paint back the grass or earth landscape on the higher elevation.
Your stairway now looks wonderful! But, it is useless. It doesn’t work. In the last step, we will make the stairway work with a little editing trick.

Step Five: The Pitch Line
At this point, the stone stairway does not allow passage to the higher elevation. A barrier of rock stands in the way.
We are going to use a simple trick to remove the rock barrier and allow people (and animals) to use the stairway.
Step Five has three sub-steps, each one very important.
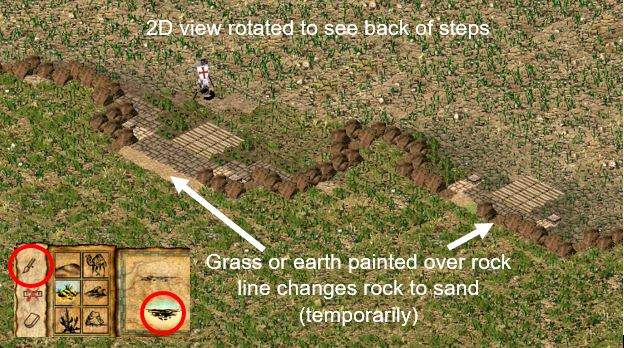
(1) With the stone stairway centered on your screen, and in flattened 2D view (spacebar), rotate the view by 180 degrees (press “X” key twice) so you can see the back of the stairway.
(2) In landscape mode, select a land type (earth or grass but no rocks or sand), use the smallest brush possible and paint over the rock line which touches the back of the brace wall or landing. It will change the rock to sand. Stay at this view and in 2D.
(3) In castle mode, select pitch pit and place a line of pitch over the sand, over where the rock line once was. You can paint a double wide line if you wish.
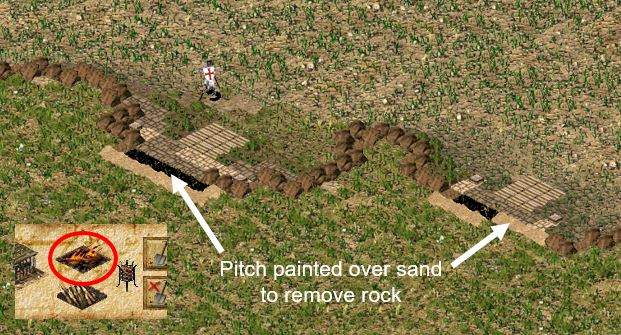
The pitch line replaces the rock line. People can walk on pitch, so they can then come off the steps and onto the higher elevation. The rock barrier is gone.
Yeah! The stairway now works!

There are some cautions.
- If you paint over the pitch line with grass or earth, the rocks will reappear and block the steps. You have to go through Step Five again to regain the pitch line.
- Pitch, as a defense, should probably be disabled in the game. If the pitch line above the stairway burns, then the rocks reappear and the stairway becomes useless during the game.
- One can use wood kill pits instead of pitch, but each time an enemy triggers a wood kill pit the rock will reappear in its spot. If all the wood kill pits are triggered above a stairway, then it becomes useless.
(I use wood kill pits in economic games which have no enemies. I think the wood pits look nicer.)
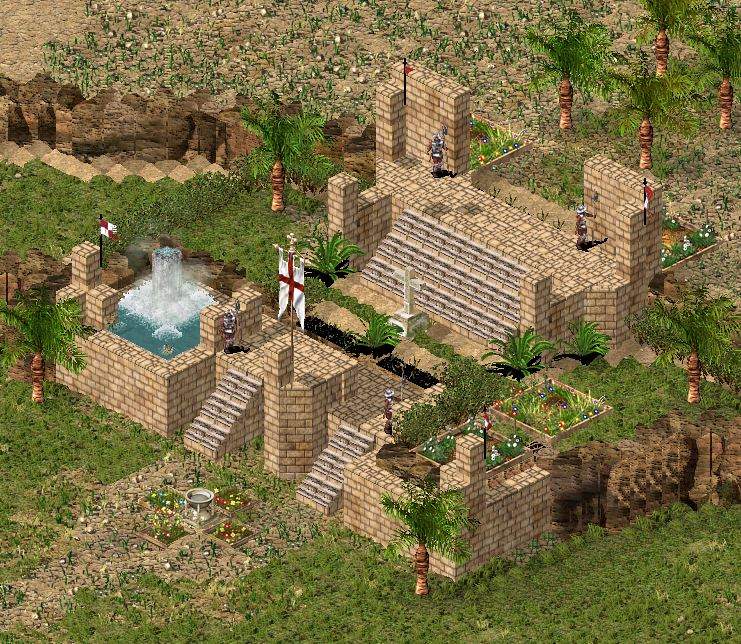
Examples of Stone Stairways
This section offers an assortment of ways to build stone stairways as examples to either follow, adjust or improve upon.


(Build the above stairway by placing the brace wall (low wall) on edge of mid plain and then pushing back the min height to reveal an “elevated” low wall. Build flights of steps against this elevated low wall.)

Rival Stone – Some Precautions
The map creator can pre-build a stairway with stone from any rival Lord (any colored shield), but not a mix. A player’s stone and a rival’s stone cannot build the same stairway.
Workers, villagers and soldiers don’t care if a stairway belongs to friend or foe, they use them regardless. Animals use them as well, maybe too well.

There are two things a map creator needs to know about pre-building stairways for different rivals:
- A pre-built rival stone stairway can be rendered useless by a player’s troops but cannot be rebuilt by the player. Once the steps are destroyed, they are permanently destroyed for the rest of the game.
- Any player’s troops, on aggressive stance, will destroy rival stone steps on their own. It is what they do.
The ability to destroy a rival’s stairway may be used as part of the game strategy, but should be used in caution since it may trap a player on an elevation.
Using Stairways in Game Strategy
Stairways and walkways are great features to add strategy within a game because they control access. Let me say that again because it is powerful: they control access, both into and out of an area of the map.
Enemy can be kept in an area or out of an area until the player builds steps or a walkway. Same goes for lions, rabbits and deer.
Or, pre-built features can be left off a map which forces the player to quarry or buy stone in order to build steps or walkway and gain access to key areas, like farm land, iron and trees.
In both scenarios, the questions of when and where to build steps or walkway becomes an important part of a player’s strategy.
Conversely, the player might destroy their own steps or a rival’s steps as part of the strategy. Their own steps could be rebuilt as the strategy changes. Rival steps cannot be rebuilt which conveys a strategy of its own.
Walkways, built across small valleys, not only control access but can shortening routes and speed up haul routes (see a walkway in Examples of Stairways section).
As one can easily see, there are several avenues of creativity for the map maker in the matter of stairways and walkways.

There are two ways to design incomplete stairways or walkways on a map, to be later completed by the player as part of the game: With a brace wall (and pitch line) – shown above.
Without a brace wall (only a pitch line). Build the brace wall, place the pitch, then delete the brace wall. This is the one I prefer.
Summary
In this guide we have been shown how to build a stone stairway between the elevations in a Stronghold Crusader HD map.
We have also seen how to build walkways and bridges.
The only tricky part is applying a line of pitch over a line of barrier rock.
There are plenty of ways to become creative with stairways, walkways and bridges and their decor. Also, plenty of ways to situate these features to add challenge and fun to a game.
Most importantly, not all stairways or walkways must be pre-built on a map (bridges must be). Leaving steps and walkways to be built by the player adds strategy to the game. It can add important elements of timing and access control.
In addition, a well designed stone stairway looks so cool.
A section on design hints follows.
Have fun!
Design Hints
This section contains some helpful tips and hints about building stone steps.
Avoiding A Glitch
Sometimes, if a stone column or post is placed on the brace wall and right beside a flight of steps, it causes those going UP the steps to become trapped at the top of the steps. It doesn’t affect everyone, but wood choppers seem most susceptible. Dozens of them will become frozen (twitching slightly) in a single block on the landing.
To correct this in a game, the column must be deleted. This releases all those trapped.
Avoid the glitch by leaving a block’s space between the edges of the steps and the nearest column or post. A low wall column does not create this glitch.

Wonky Steps
This is another stone column problem with stone steps.
Steps snap nicely to a low wall, but become wonky when re-snapped to a large wall placed beside them. They will unsnap from the low wall and twist towards the high wall. It doesn’t stop people from using them, the steps still work, but it looks weird.
To avoid this, keep high walls away from the flights of steps (as shown above). There are plenty of places to put high wall columns to create a stylish stairway without touching them to the flights of steps.
Double Lines of Pitch
I use double lines of pitch above a stairway to keep trees from encroaching too close and destroying the pitch line. The line of pitch next to the stone blocks is the critical line. It cannot be lost else the rocks reappear and block the stairway. The second line of pitch is only for protection. It can be lost without shutting down the stairway.
Alternate Pathway
I have found it useful to create a small pathway on a hill which has an enemy stairway to an enemy tower (this would be outside of a castle). This is an alternate route to the tower should the player’s mace men inadvertently destroy the steps. With no steps, the tower cannot be stormed. Thus the need for a small pathway to the tower.
Attacking soldiers will choose the stairway over the pathway because the steps are a shorter route.

Short Crenellated Wall
A crenellated wall (the one with crenels) is supposed to be the tallest of stone walls. It is the tallest unless placed against a low wall. It then becomes shorter than a high wall.
Use this feature in the decor of a bridge and stone steps. It adds another wall height to be creative with.
Other Ways to Move Between Elevations
I added this section after realizing that some might be interested in other ways for people to move between elevations not using a stairway.
Obviously, pathways work very well between elevations. Their drawbacks are that they are permanent on a map (cannot be built by the player) and they slow people down.

The only way I have found to move people between elevations (besides a stairway) is to use an “elevated” low wall. This is when a low wall is built on the edge of a cliff and then the cliff is moved back one space (with elevation tool) to reveal a tall stone wall and not rock (as shown below).
An elevated low wall opens up numerous (and creative) ways to design a means for people to go from one elevation to another. Here are some examples.

Either a stone gate (large or small) or stone tower must be placed against the elevated low wall for access to the higher elevation.
Recall that gates close with the approach of an enemy which also closes enemy access to the other elevation.


Be the first to comment