
Contents
Beginners Guide to Strategy
All credit goes to [LSB] Aroliacue!
Introduction
Welcome to The Strategist’s Guide, a compendium of basic and advanced information for Blood of Steel. If you’re interested in playing the game or just starting out, the material within this guide will assist you with your first few hours. Important information within includes server selection, UI details, starter heroes, your first match and hero combat.
Server Selection
Upon installing and starting up the game, the very first screen you’ll be greeted with in the server selection menu. This is the most important decision you’ll have to make when beginning out – All progress is saved per server, which means progress made on, say, the Asian server will be separate from progress made on the North American server.
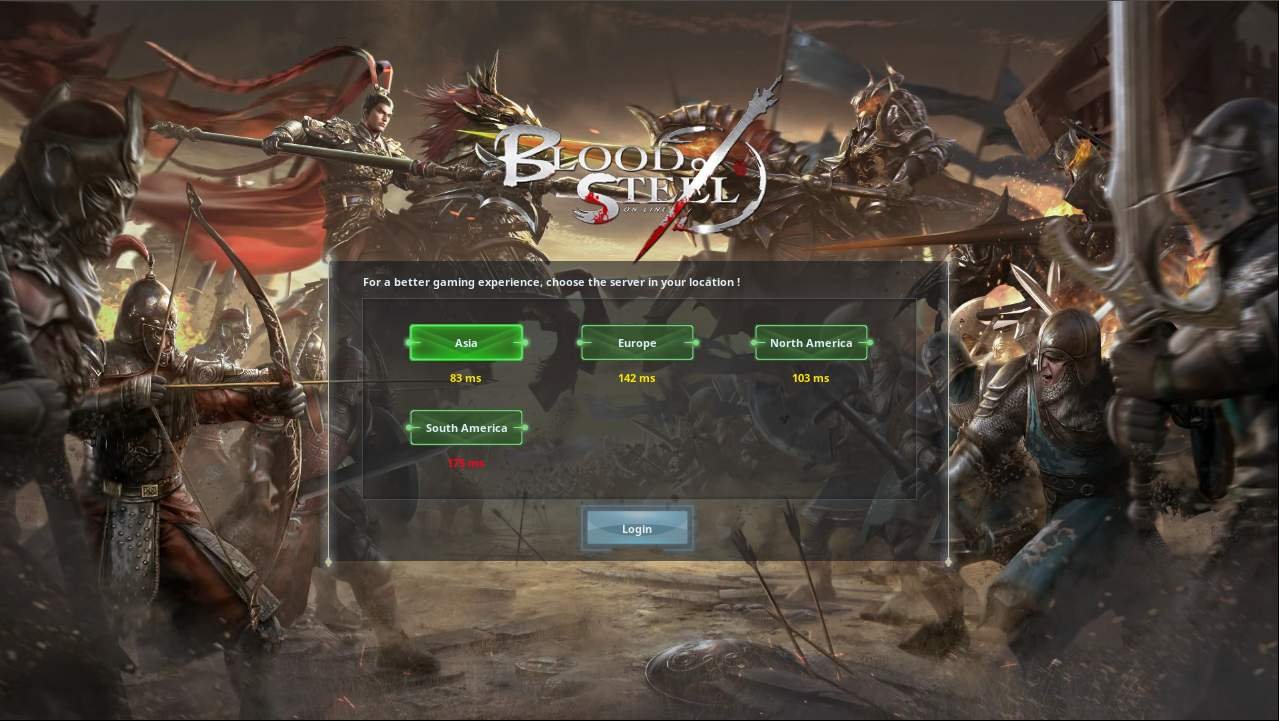
It is recommended to pick whichever server has the best corresponding ping, as ping is a significant contributor to the melee system. Ping is not as important when commanding your troops, as unit commands are quite responsive.
If you reside in a country that doesn’t specifically belong to any of these categories (Such as Australia), your best bet is to either pick a server that would have the largest collection of players with your native language, or the best ping you can get. In an Australian player’s case, this would either be the NA servers (For language) or Asian servers (For ping). As an Australian player myself, I choose to play on the Asian servers.
Once you’ve picked a server, simply click Login to progress to the game. This menu will appear every time you start the game, so if you dislike the server you’ve chosen, it’d be a good idea to pick an alternate one early on.
UI Details: In-Match
The first time you login, you’ll be greeted with an automatic tutorial. I’d recommend playing through it as the translations are solid and it gives you an excellent introduction to basic controls; almost everything you’ll be taught here will cover the stuff you need to know. The UI Elements are also explained during the tutorial, but this section will give a more broad illustration.
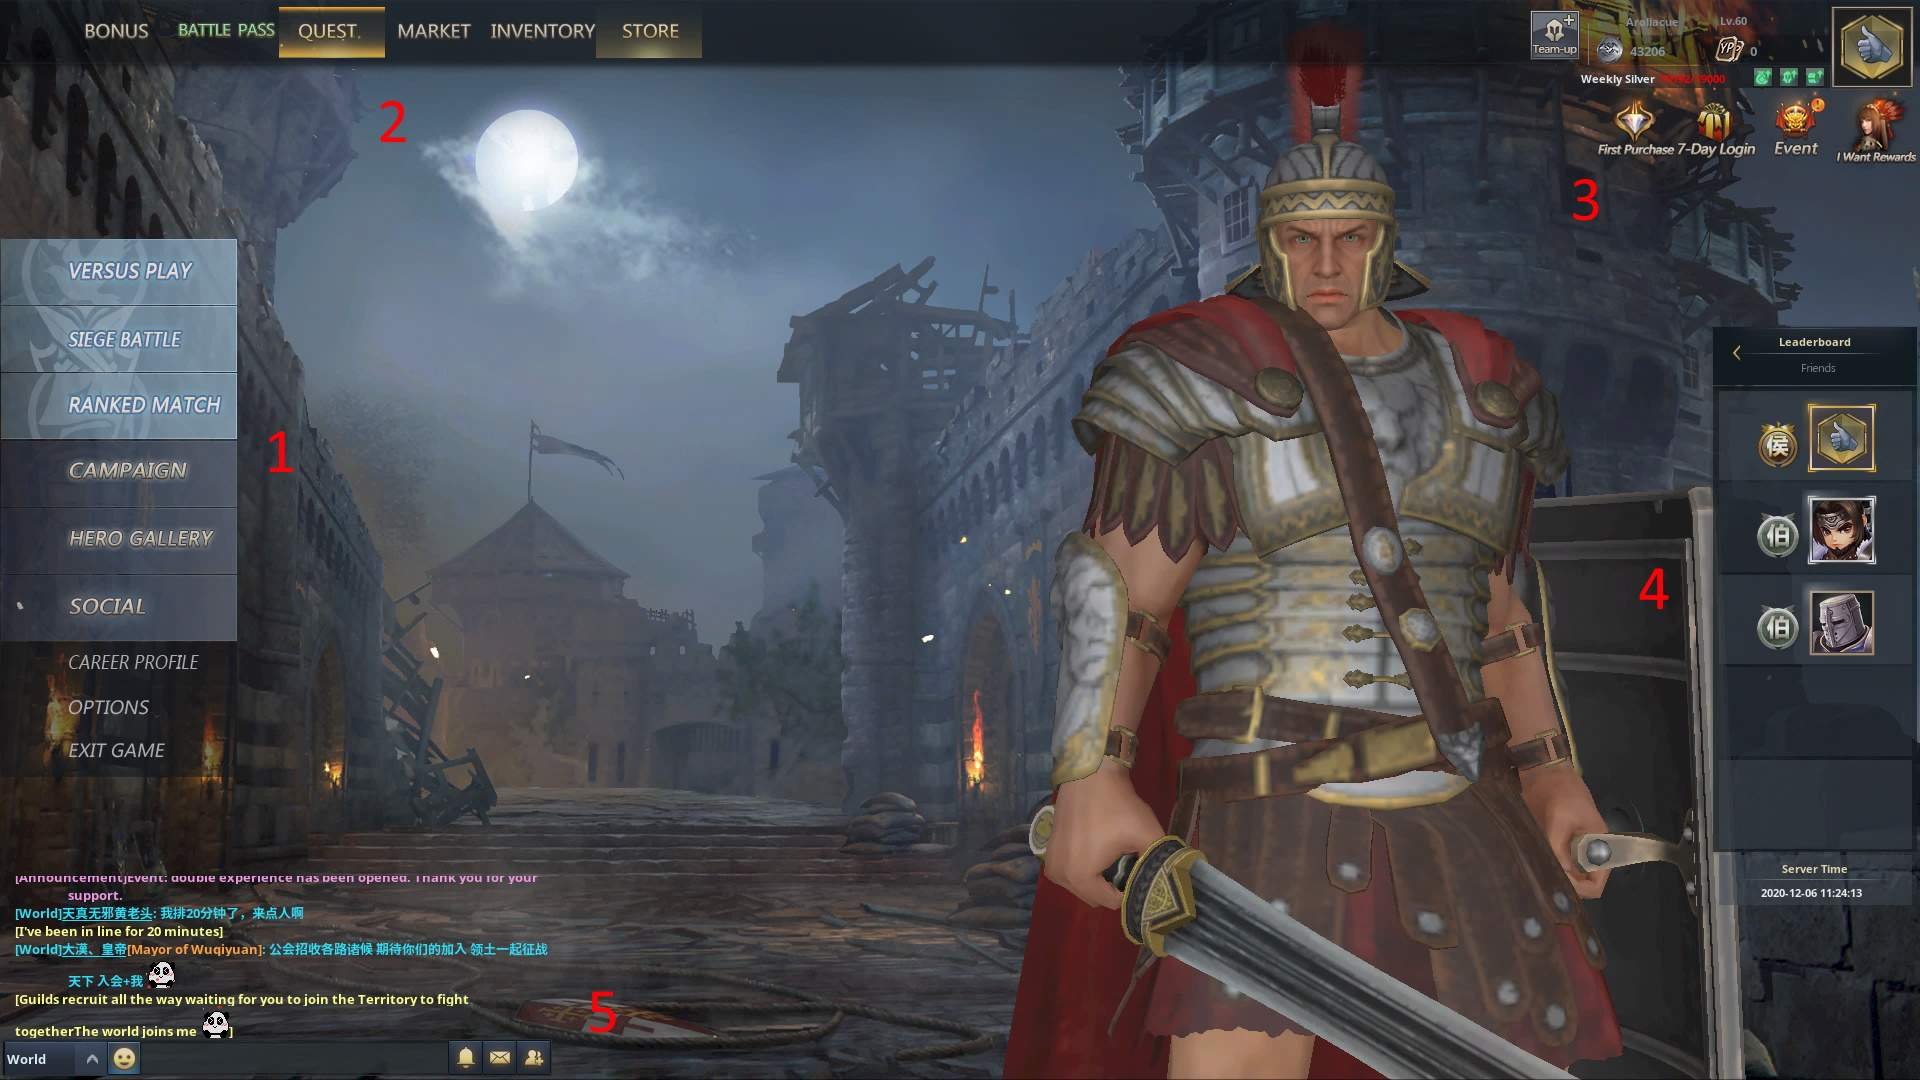
When starting a match, the first screen you’ll be introduced to is Pre-Battle Deployment/Hero Selection. In Ranked matches, this screen will also include the Hero Banning options, but that will be elaborated on further in an alternate guide.
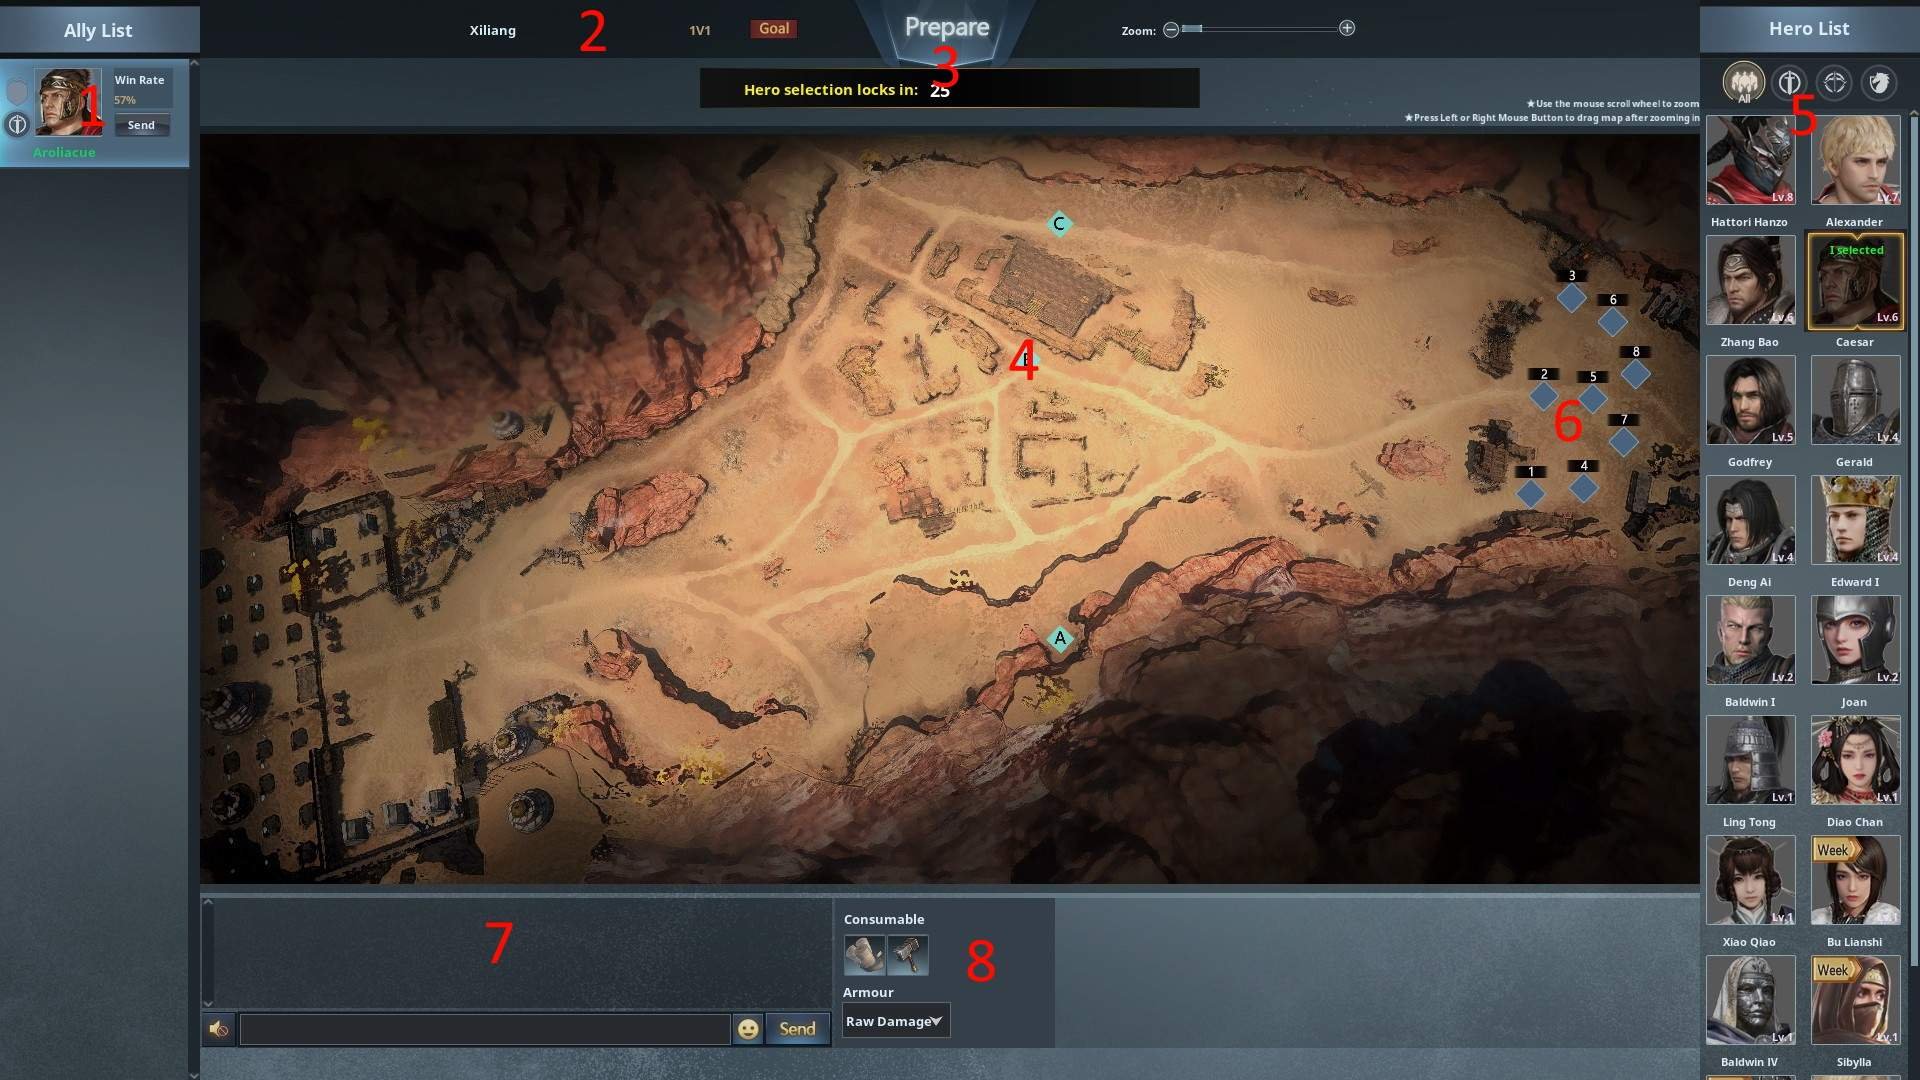
- This is the Ally List. This shows the heroes your allies have picked, what rank they are, what class they are and the position they have picked to deploy at (Corresponds with 6).
- These are the Match Details. It includes basic information such as the map name (In this case, Xiliang) and the size of the match (1v1).
- This is the Prepare Button. As of current, it doesn’t do anything except lock in your selection and show the rest of your team you’re ready to start. You do not need to click Prepare for the match to begin; it’ll start automatically after 30 seconds have passed (Counter is shown below the Prepare button).
- These icons on the map are the Objectives. To capture them, you need to stand in the circle for around 10 seconds. In a standard match, you do not need to capture these objectives to win; killing all enemy heroes will automatically result in a victory.
- This is the Hero List. Any Hero you have unlocked will show up here; to select it, simply click on the icon. The top of the Hero List lets you sort by category (Between Infantry, Archer and Cavalry), and your heroes will be listed in order of level.
- This is the Deployment Zone. Clicking on the diamond-shaped box will set where you spawn; if an ally has selected a box, you will not be able to select it yourself. On larger maps, I’d recommend staying close to the rest of your team, especially if you’re an Archer class.
- This is the Chatbox. This will include system messages, as well as communication between team members. As of writing, there is no option to speak to the enemy team. The bottom-left corner of the chatbox has the mute option, which allows you to disable or enable voice chat.
- This is the Consumables/Armour Section. You’re able to choose between Armour types and Consumable types by clicking on the corresponding icons. For a beginner, these are not all that important.
Once everyone has picked their heroes, you’ll be taken to the loading screen. Along with a summary on what heroes your team has chosen, you’ll also see who your enemies are.
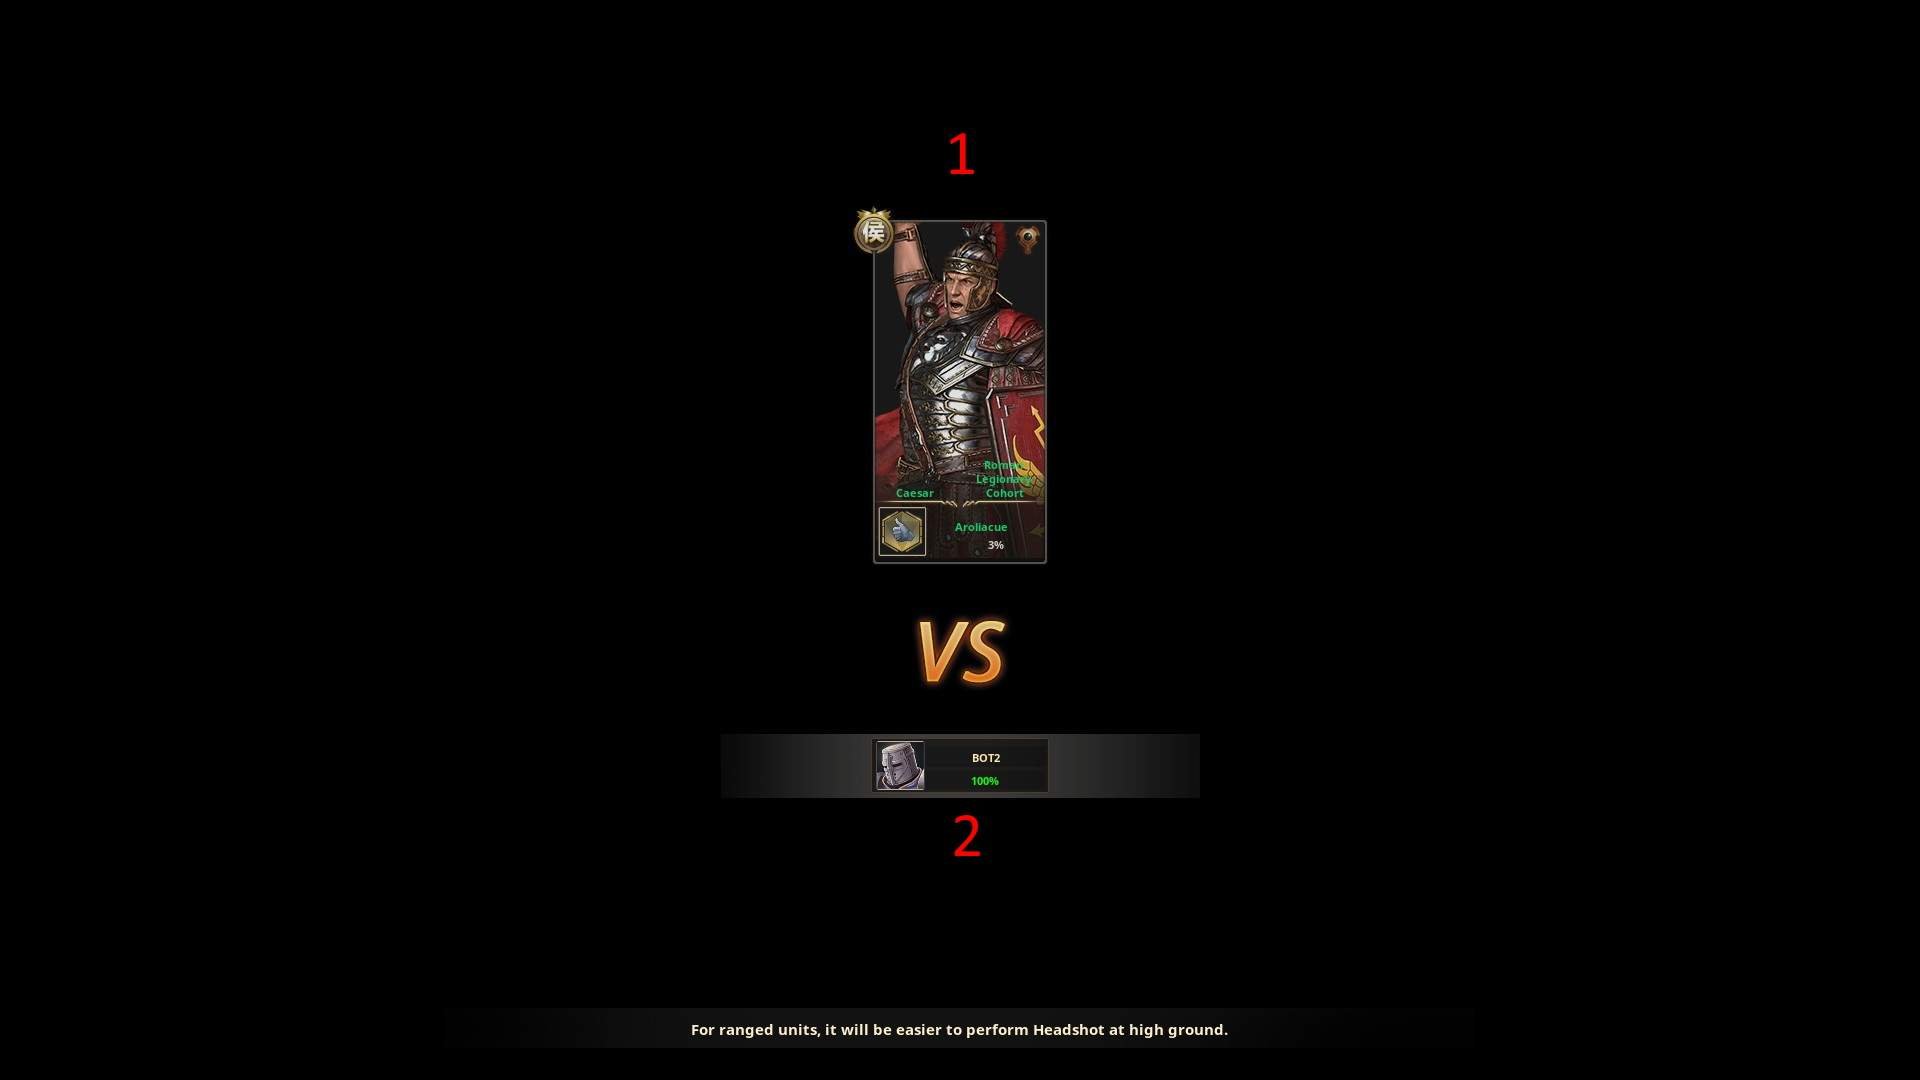
- This is a list of you and your team’s picked Heroes, as well as your profile pictures and your loading percentage. The Hero portrait will change depending on what skin you have selected.
- This is a list of the enemy’s players. You won’t be able to see what heroes they have selected, but you will see their loading percentage and their profile pictures.
When everyone has finished loading, the match will begin. Your camera will zoom in on your hero, and you’ll be able to move and give commands.

This is the Command Bar. Along with basic movement commands, this bar displays how many units are alive, your unit’s individual health values (The white bars) and their ammo capacity (The white circle).
- F1 = Follow. This orders your unit to follow you.
- F2 = Move. A UI display will show up on the ground wherever you are aiming; left-clicking will order your unit to move to that position and hold it.
- F3 = Attack. Similar to the previous order, except units will abandon their formation and attack the closest hostiles, pursuing them should they retreat.
- F4 = Retreat. Forces your units to disengage from combat and follow you. I’d recommend spamming between F1 and F4 as F4 does not always make them follow you directly, instead making them walk backwards slowly. hitting F1 will negate this.
- This is the Objectives Bar. Depending on the gamemode, this will display the objectives, each team’s score and the time until the match finishes. In King of the Hill matches, this will instead be a percentage bar; whichever team reaches 100% will automatically win. Keep in mind that no matter what the objective is, in standard (Legion War) matches, killing all enemy Heroes will result in a win.
- This is the Minimap. It’s arranged in a Gridsquare pattern, and pings made by friendlies will display here. It also shows where friendly heroes/units are, and if they have been discovered, enemy heroes/units, too.
- This is your health (white) and stamina (yellow) bar. When you take damage, your health bar will drop; when it fully empties, you’ll go into a DBNO (Down But Not Out) state. In this state, an enemy hero can either execute you, fully killing you, or you can self-revive/have a friendly Hero revive you. Keep in mind that you will not go into a DBNO state after being downed twice, instead instantly dying. Stamina dictates special moves made by the Hero, such as dodging (double-tapping WASD keys to dodge in the corresponding direction) and performing heavy attacks (middle mouse button).
- This is the Ability Bar. Hero-specific abilities can be cast by pressing the corresponding keys; these may include temporary abilities, toggleable abilities and formations. In this case, Caesar has 3 abilities, from left to right: Shields Up, Throw Javelins and Form Testudo. In addition, every hero has bandages, and depending on their secondary equipment, may have a hammer (used to repair shield durability) and/or hay (used to heal mounts). Your shield durability is the orange shield icon to the left of your weapon selection (keybinds 1/2). If you’re on a mount, its health will appear beneath your own health bar.
- These are basic game hints. They show basic keybinds, and can be disabled in the options.
In addition to all of this, holding Left Control on your keyboard will unlock your mouse and show some more UI elements.
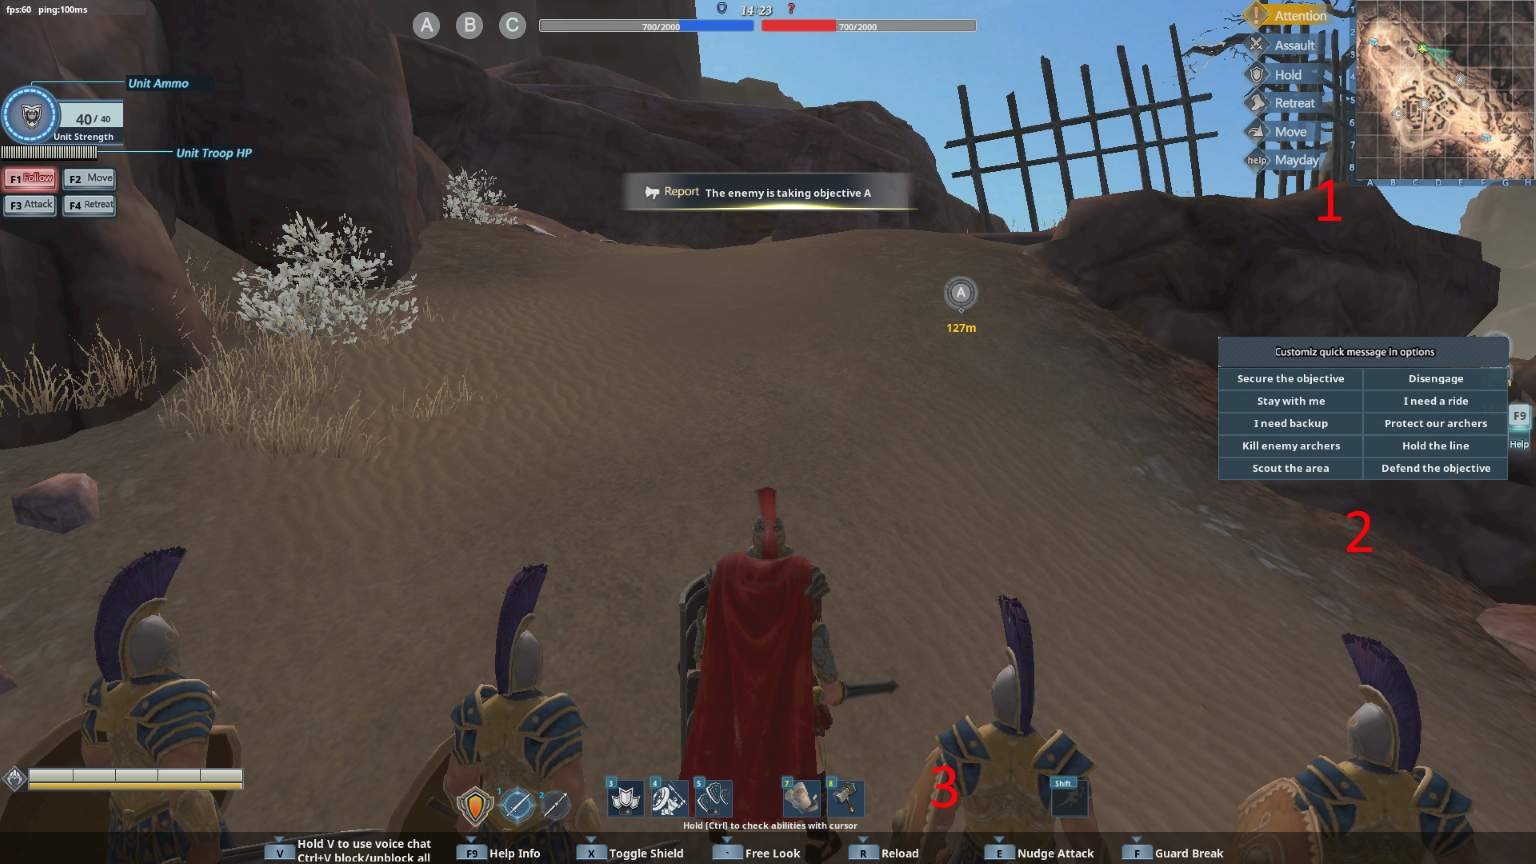
- This is the Ping System. Holding control, you may select one of the options from the list to the left of the minimap; clicking on a point on the map will broadcast the ping to your team, along with a basic message in the chat, a dinging sound and a flashing icon on the minimap.
- This is the Quick Message System. Holding control, clicking on one of the options will broadcast a message to the chatbox, useful if you don’t have time to type it out.
- Please keep in mind that for both the Ping System and the Quick Message System, it will NOT automatically translate to your teammate’s game languages, unlike the case with other games. The opposite applies to you – If someone pings/quickchats in Mandarin, it will not automatically translate to English.
- The bar at the bottom will appear when you hold control, and will show you basic keybinds in the case that you forget one.
UI Details: Out-of-Match
Due to the complexity of the Main Menu’s UI, I won’t be going into too much detail here. If necessary, I’ll add to this category in the future, but here are the basics.
- This is the Gamemode Selection Menu. Included is Versus Play (Unranked Legion War, Hero Arena, Territory War, Arcade/Custom Games, Training, and Versus AI Legion War) Siege Battle, Ranked (Ranked Legion War and Ranked Hero Arena) and the Campaign(Campaign category includes alternate gamemodes). In addition, this menu also has the Hero Gallery (A list of all your Heroes and systems to do with Heroes) Social (Guilds, Warbands and Mentoring) and basic stuff like your profile and game options. Versus Play will be the most important of these for starters, as the other categories will be locked behind level restrictions.
- The top-left bar relates to all the item acquisition systems; from left to right, they include Bonus (Used for inputting promotion codes), the Battle Pass (Reward system for matches played) Quests (Reward systems for completing different achievements) the Market (Used for trading skins and special items between players) your Inventory (A collection of all the things you own, not including heroes) and the Store (Used for buying new things with in-game currencies).
- The top-right bar includes your currency amount, your squad status, quick links to various promotions, your name and level, and finally, your profile picture. The green icons are bonuses applied to you by various in-game effects, such as XP bonuses from rare skins; putting your mouse over them will give you more information.
- This is the Leaderboard. It’s pretty self-explanatory; clicking on the golden arrow at the top will allow you to swap between the global leaderboard and friends leaderboard. Server information is also listed underneath the leaderboard, including the server time; this is useful for working out event times if you’re not in the corresponding timezone.
- This is the Global Chat. System messages and messages from other players will display here.
For the purposes of this guide, we’ll assume you clicked on Versus Play.
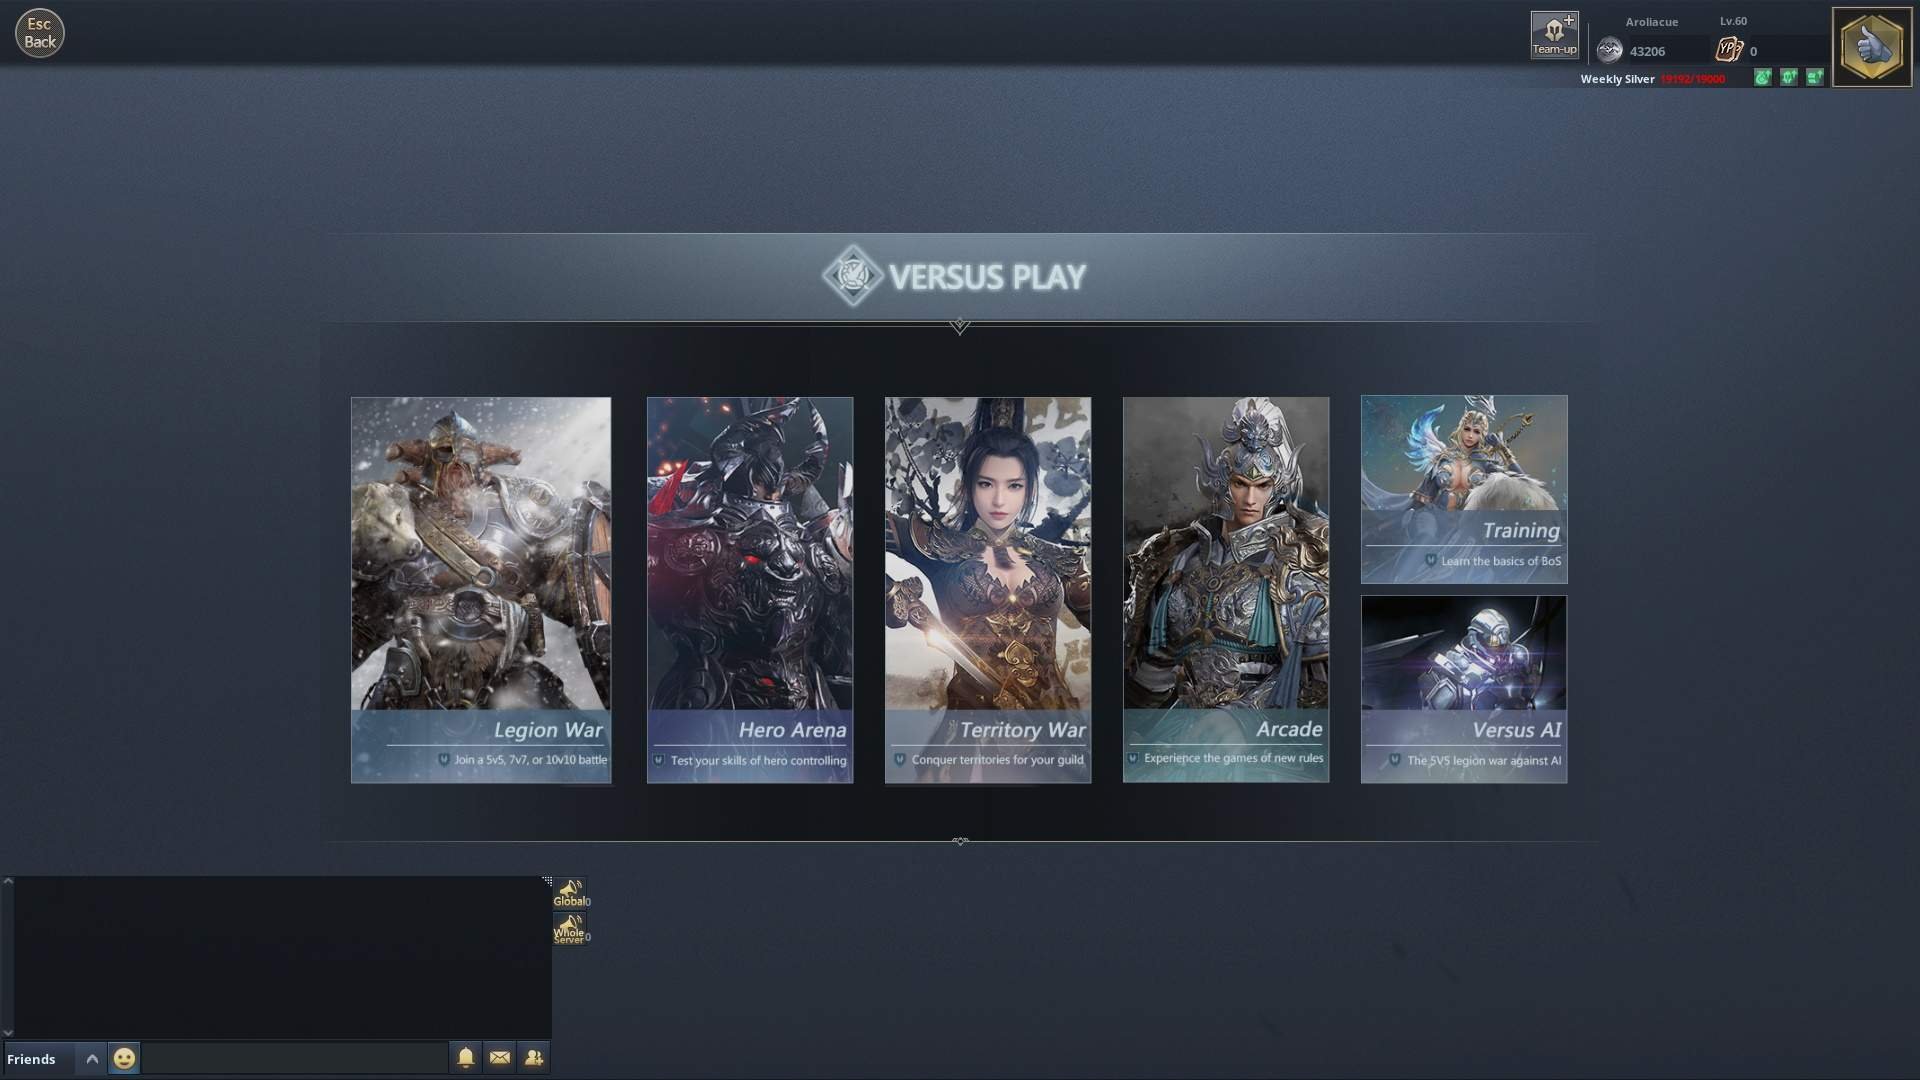
This will take you to the gamemode selection screen. When you’re starting out, most of these will be locked; Legion War, which is the most basic gamemode, will be unlocked for everyone.
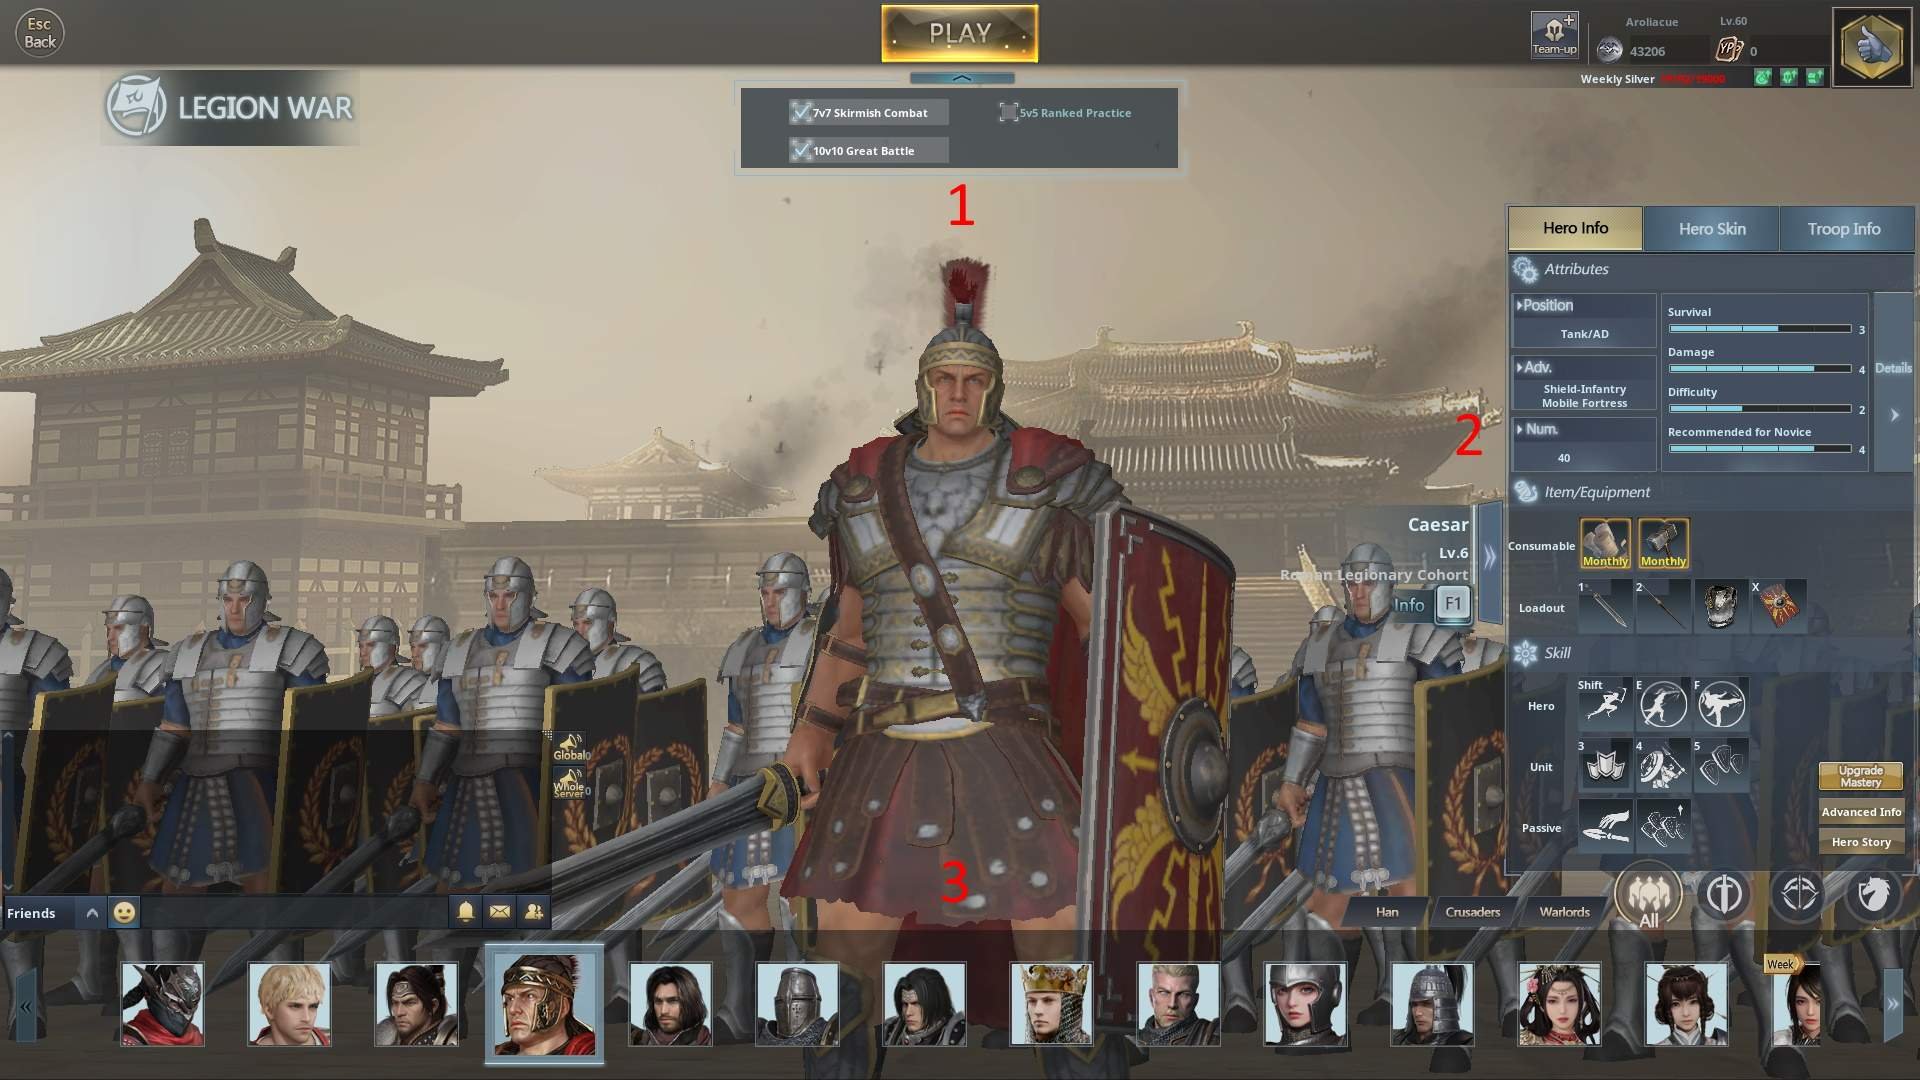
- Here, you’re able to change what size of game you’d like to play, as well as the ruleset. 7v7 is the most common gamemode out of the three listed, although you may tick as many or as few as you’d like if you want to spend less time looking for a match. When you start out, only 7v7 will be unlocked.
- This is the Hero Information Panel. This includes all the information you’ll need to know about the hero, including abilities, stats, units, unit stats, passive effects, skins, backstories, level progress, and so on. Putting your mouse over any of the information displayed here will give you even more information on it, including effects and more in-depth stat values.
- This lets you select a hero to view their information. Having one selected will also automatically set them as your active hero when you start a match; you can always change this during the hero selection phase.
When you’re ready to go, just hit Play and matchmaking will begin. In Asia, most matches take around 1-2 minutes to start.
Starter Heroes
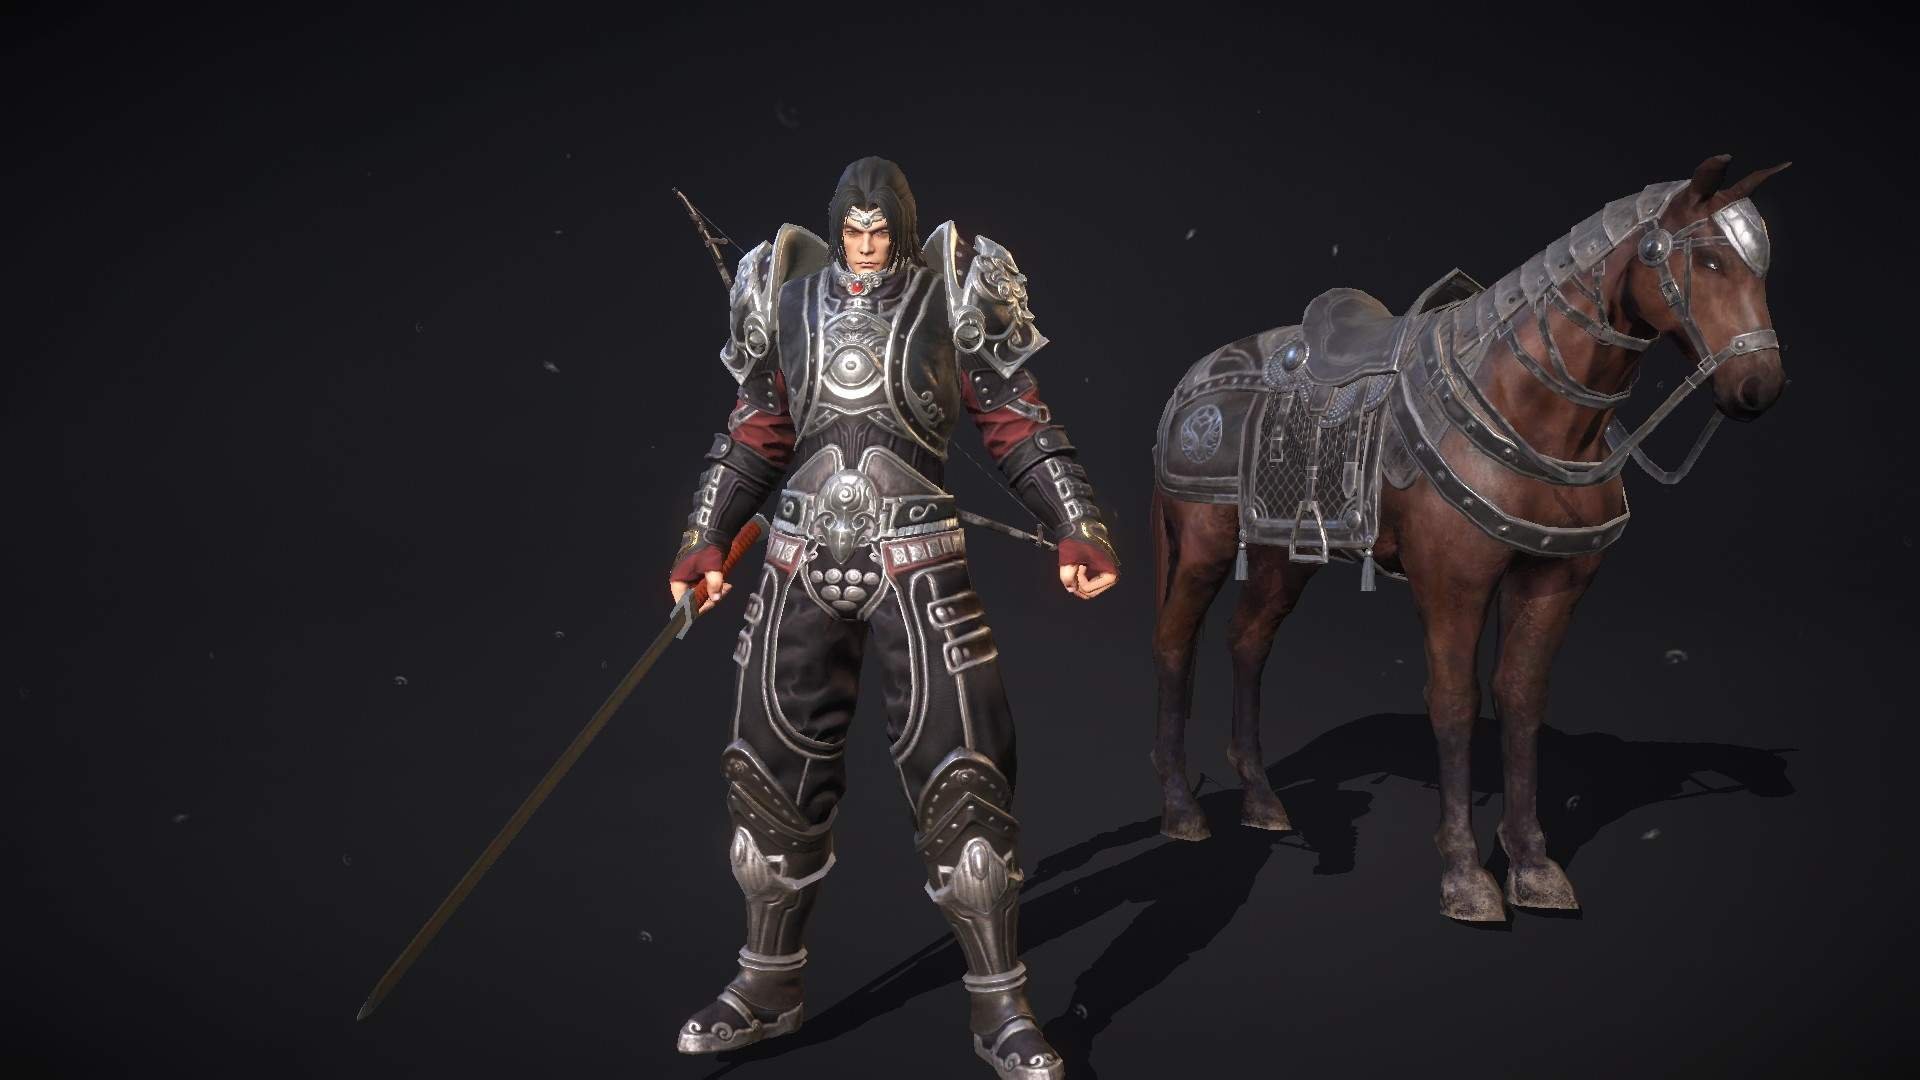
Thus far, you’ve seen a lot of imagery of Caesar, one of the game’s beginning heroes. I’ll be showcasing some of his abilities and strategies, along with the Archer hero Xiao Qiao and the Cavalry hero Deng Ai.

Caesar
Caesar is a tank hero focused around absorbing attacks and dishing out punishment against weakened foes. He and his unit accomplish this with very high armour stats, as well as extremely efficient Roman shields, which are most effectively used in their Testudo formation.
Testudo is an incredibly powerful formation useful in almost every situation; while most effective at near-entirely negating the damage output of enemy archers, it can also be used to give your unit extra protection while in a melee, extending your survivability but lessening your damage output.
Shields Up is the middle ground between full melee effectiveness and damage negation, and is useful when you’re being bombarded by enemy archers during a melee engagement or need to maintain a loose formation during a siege.
Throw Javelins is a powerful yet limited ranged attack. When activated, every individual member of your unit will throw up to 2 Javelins, dealing around 50-100 damage on a hit. They will not be able to throw more Javelins until the ability recharges. Activating the ability also reloads your own Javelin count. Throw Javelins is most effective against infantry units that do not have shields, allowing you to soften them up before engaging in melee; it’s also useful when closing in on archers or mowing down fleeing hostiles, although the inherent inaccuracy of the throwing weapon may not yield fruit at longer ranges.
It’s important to note that Caesar’s strong point is not his mobility. With no movement-related abilities, he’s easily one of the slowest Heroes in the game; good early-game positioning is vital for success. Always make sure to watch the map, and use the ~ tilde key to keep an eye on your flanks.
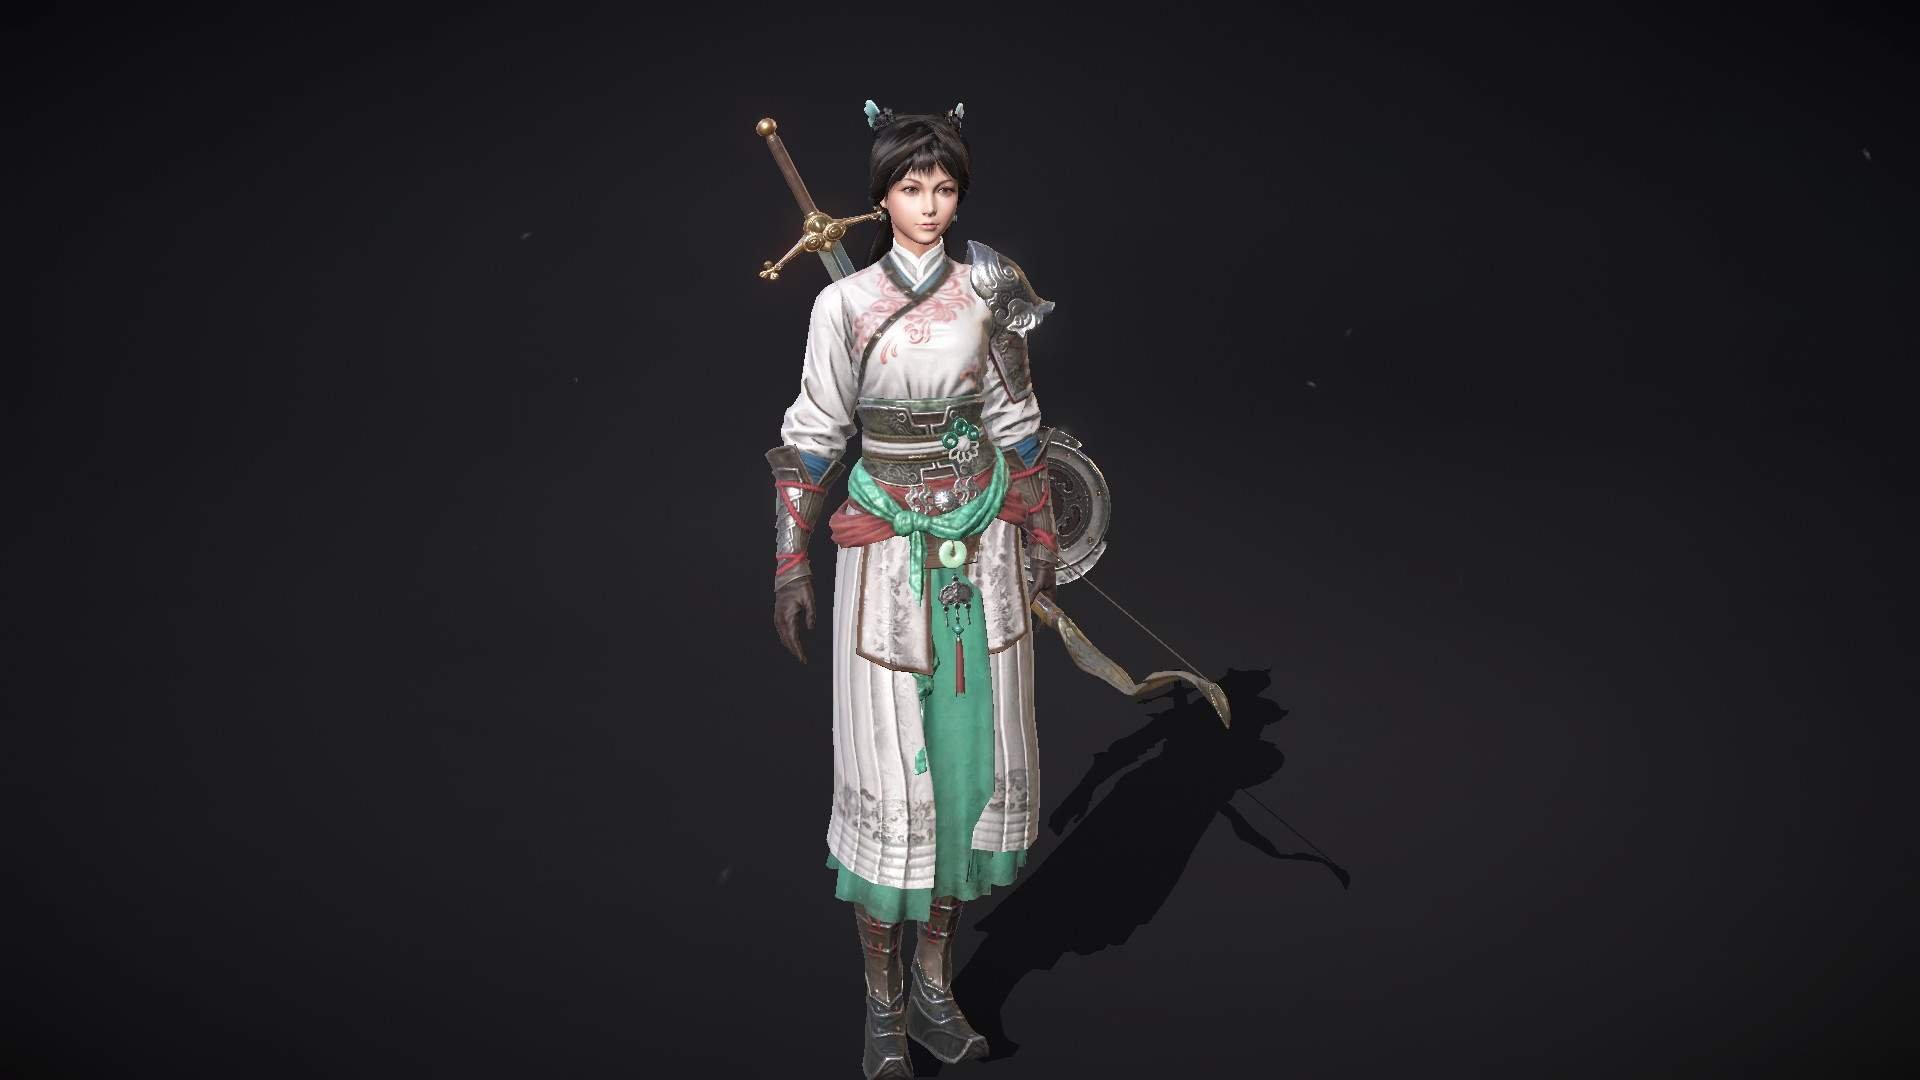
Xiao Qiao
Xiao Qiao is a mobile Archer hero that excels when positioned well, able to deal significant amounts of damage from a distance. Possessing a low armour value and health pool, Xiao Qiao’s survivability is entirely dependent on the player’s skill, particularly map knowledge.
Volley Fire is a universal archer ability that forces the unit to fire in sync with the hero. This has numerous benefits; it allows you to hold fire, make your unit fire at distances well above the normal, deal massive amounts of damage to singular targets and promote synergy with other abilities.
Fire Arrows is a damage-over-time/debuff ability that’s applied whenever an arrow hits the enemy. This is a very powerful ability due to it being able to spread; even a single arrow will be able to cause a significant amount of damage. The effect lasts 18 seconds (the damage-over-time effect lasts 9 seconds) and consecutive hits refresh the duration. The debuff can still be inflicted even if the arrow hits a shield as of writing this guide.
Cavalry is Xiao Qiao’s nemesis; her mobility can allow her to escape from confrontations with infantry, but horses are significantly faster. Remaining close to your team is a necessity no matter which archer hero you’re playing, as running off alone will get you picked off quickly.
Deng Ai
When you first start the game, you will not have any cavalry heroes; however, Deng Ai is easily the most affordable and versatile of the bunch. Costing a little under 10K silver (Pocket change when you’re starting off), he’s an excellent introduction to the intimacies of cavalry, giving you a taste of mounted archery, infantry harassment and archer annihilation.
Sprint increases the movement speed of Deng Ai and his horsemen for 45 seconds, with a cooldown of 90 seconds. Activating it makes Deng Ai one of the fastest heroes in the game, able to chase down other cavalry and easily run down archers. On the inverse, it also allows you to disengage from combat quickly with fewer losses, should you get caught by an opponent stronger than yourself. It’s important to not become reliant on Sprint, too; there’s a 45-second period where the ability isn’t activated, and this will allow other cavalry and spearmen to potentially catch up with you.
Diamond Formation increases the melee strength of your unit but decreases the charge bonus. When engaging in extended fights, Diamond Formation can be a turning point to ensure a victory; however, it lessens the impact of charging through formations, especially archers. There’s no cooldown for this ability, so it’s up to the player to know when to toggle it and when not to.
Fire-At-Will will make your cavalry fire at opponents with their bows. This is off by default, so make sure to enable it when you plan to attack enemies from range. You will not be able to compete with dedicated horse archers when you’re using this ability, so make sure to use your strong point – melee, in this case – to eliminate them.
Unlike dedicated melee/lancer cavalry, Deng Ai does not have the survivability to deal with heavy infantry in an extended fight. Spears are your nemesis; every spear unit possesses the Scare Horse trait, which stops your horse right in its tracks, usually resulting in death. Cavalry is complex and describing its intricacies is well beyond the scope of this guide; It’s important to stay on your toes, but with the right know-how you’ll be able to rule the battlefield.
Your First Match
Nervous about your first game, worried you’ll let the team down? Don’t fret! Unranked Legion War is very casual, and the chances of you winning – Or at least, doing quite a bit of damage to the enemy team – is quite high. For your first match, I’d suggest picking Caesar as he’s the least punishing and you’ll already be familiar with him after the tutorial, but if you want to jump right into the fire you’re welcome to pick any of the other options you’re given.
The beginning
Once the match has begun and you’re controlling your hero, your first objective should be getting your bearings. Check the map to see where your teammates are; archers are identified with a bow icon, and cavalry has a horse icon, while infantry has a shield icon. As infantry, try and stick close to archers and deal with enemy infantry; archers should focus on dealing with enemy infantry, whilst cavalry should try to protect the flanks and harass the enemy’s archers. More advanced infantry and archer players will try and navigate to positions where they can attack the enemy’s sides or rear – Attacking enemies in either direction will allow your units to deal a lot more damage.
The midgame
By now, the armies would have fought for a bit; this is usually the point where objectives become more important, as the losing side will attempt to consolidate their forces and stick together to hold key points of the map. Hopefully by now you haven’t died; stick with your teammates and attempt to surround any hostiles trying to run. Use your superior numbers to deal with smaller targets efficiently and reduce your losses.
The endgame
Either everyone will have suffered severe causalities, or one side will have a lot more men than the other. Focus on dealing with enemy heroes and/or securing the points to ensure a clean victory. If the enemy team’s focusing on you, don’t be afraid to run so you can regroup with your own team. One hero can make all the difference.
Once the match has come to a close, you’ll be presented with the statistics screen. Once you’re done lamenting over your untimely demise/stroking your own ego over how good you are, press escape to return to the matchmaking screen.
If you lost the fight, don’t worry. There will be plenty more matches in the future for you to excel in. Stick to it, find heroes you enjoy the playstyle of, and team up with friends, and you’ll be Emperor in no time.
Hero Combat
Hero Combat refers to the melee system. If you’ve ever played Mount and Blade, you’ll find it very similar in functionality. Like Mount and Blade, the combat is also heavily based on your ping; you’ll find it playable at values under 80, but anything above that, and you’ll start seeing significant delays. For this reason, I can’t give you an incredibly in-depth guide on the many ins and outs of the system, but I can give you basic pointers that’ll allow you to succeed early on.
Blocking
Knowing how to block is one of the most important skills when you’re just starting out. You move your mouse in the direction you want to block and hold RMB. Sounds easy, right? Wrong. The most difficult part of this is actually knowing which way your opponent’s attacking; you have a split-second window to block in the corresponding direction of the attack. Too early, and they might feint, attacking from a different direction; too late, and they’ll land a hit. There’s four directions of attack, however not every weapon uses all four weapons. Most swords make use of all four directions, whereas spears can only attack downwards. Knowing the directions that the enemy’s weapon can attack will help with predicting patterns, resulting in more successful blocks. Shields will allow you to block any attack regardless of the direction; however, they have limited durability. Shields can be repaired with a hammer (usually 8 on your keyboard), but should the shield fully break, you won’t be able to repair it. Don’t want your shield to break? Simply press X to put it on your back.
Attacking
Executed in a similar way to blocking, except you press LMB instead. This will perform a light attack, which is the most basic form of hitting your enemy. There’s a lot of complex mechanics at play here, such as momentum (faster speeds = more damage) hitboxes (hitting the head = more damage) and random critical hits. This applies to both you and all your units, with the only differences being health values and damage values. You can press MMB (scrollwheel) to perform a heavy attack; most heroes have ‘combo’ attacks, which allows them to combine LMB/MMB attacks to deal more complex manoeuvres and attain certain effects. Pressing E will perform a ‘nudge attack’ this will break the opponent’s block, giving you a brief period to hit them. Pressing F will perform a kick; this is similar to the nudge attack, except it lowers the defence value of the opponent for several seconds, allowing you to deal more damage with each hit. Missing a nudge attack will leave you less open and vulnerable than a kick will.
Overall, you’ll become a lot more familiar with the melee system the longer you play. Focus on learning how to block effectively, and you’ll become one of the better hero-centric players out there.


Be the first to comment