
A list of ways you can shove yourself off this mortal coil for an achievement!
Guide to Battle-Tested Achievement
All credit goes to Jurttu!
Introduction
Apparently, quite a few people are having trouble figuring out 25 different ways to kick the bucket in this game for the Battle-Tested achievement. So let me give back to the community by telling you how to end your existence! No, really, it’s a “HOW 2 DIE” guide that’s actually useful…
You may notice that there are more than 25 ways listed here.
Aliens
This section lists various ways to get killed by the Swarm.
- Get killed by a drone
Pretty self-explanatory, really. If you need to find a drone, you probably won’t have to look very far.
- Get stung by a Buzzer one too many times
Buzzers are those flying little buggers (pun most definitely intended), and they don’t do much damage by themselves. As such, you’ll likely need to kill all of the tougher aliens in the vicinity so that they won’t “steal” the kill (that’s you).
- Get Shieldbugged
Shieldbugs are big, tough, and more than capable of stomping you into the dirt by themselves. Odds are you have been already killed by one already, but if you’re not sure, just walk up to one and don’t resist. One is guaranteed to spawn in Jacob’s Rest – Deima Surface Bridge, but they can be found in most campaigns as well.
- Get blown up by a Boomer projectile
Boomers are the three-legged, yellowish creatures that inflate their pouch when sufficiently annoyed. When it does, give it a few seconds to reach full size and then kill it – this ensures that the maximum amount of projectiles is spawned when it dies. Then just try to catch as many as you can; for best results, kill the Boomer in a narrow corridor.
- Fail to roll under Ranger projectile
Rangers are another alien type that appears very frequently. This is very straight-forward; instead of rolling out of the way like a sensible person, try to catch as many of the green spit projectiles as possible. You may wish to kill other aliens in the vicinity beforehand, if possible.
- Attempt to catch a Mortarbug projectile
Mortarbugs are not very common, but getting killed by them is fairly easy. I recommend Jacob’s Rest – Timor Station for this: at one point, you must activate a console to turn a rotating bridge. A Mortarbug spawns on a inaccessible walkway to the north (on Normal and above): you can let it do its thing, as there should be very few other aliens to deal with.
- Succumb to parasitic infestation
This is another one you most likely already have. If you’re not sure, load up Jacob’s Rest – SynTek Residential and go find an egg, wait for it to hatch and meet your new companion. Your time together will be brief, though.
- Die due to contact with biomass
This is a little less obvious than the ones before. While not particularly damaging, touching biomass can indeed kill you. When you find some, deal with any nearby space bugs and go give it a hug!
- Get Xenomites all over yourself
Xenomites are the small aliens that Harvesters release, although they do spawn by themselves on occassion. However, Xenomites do not deal that much damage and die as they burst all over your face, so you’ll likely need to find a Harvester – it comes with an endless supply of them.
- Get kicked out of the way by a Boomer (unconfirmed)
Before they inflate, Boomers are able to attack you by sweeping kick with one of their legs. You’ll want to find an uninflated one and then stay right next to it. You may need to eliminate some other aliens as you stand there, as they rarely come alone.
- Die due to contact with Harvester (unconfirmed)
Like biomass, Harvesters have corrosive skin. Dying of skin contact with one is pretty hard, though, as they prefer to get away from you while laying down Xenomites. I honestly don’t recommend going for this if you can help it.
- Die due to contact with Mortarbug (unconfirmed)
Ditto. Find a Mortarbug and get a little too close to comfort, all while you avoid the projectiles and keep the smaller bugs off your back.
- Get killed by a crossover creature, the Antlion Guard (unconfirmed)
These repurposed assets visitors from another universe only appear in a handful of maps, such as Paranoia – Hostile Places and Accident 32 – Lab Ruins. It is an above-average opponent (depending on difficulty and level), so getting killed by one shouldn’t be too difficult.
- Get spat on by the Queen (unconfirmed)
There are two Alien Queens in vanilla maps: one in Research 7 – Jericho Mines and another in the IAF Academy. This one is only possible in Jericho Mines: you first need to progress through the mission until you open a large gate to the north, then run to the south into a room with the laser. Once the Queen catches up with you, it will periodically spit green acid at you. Drones will trickle in during this part, so you need to deal with them as you’re trying to get corroded.
- Get close and personal with the Queen’s tentacles
This one is only possible in the IAF Academy. One of the zones involves fighting the Queen, but instead of that, you must stay out of her reach while fending off Drones and Buzzers. She will periodically attack you with tentacles that come out of the ground, so hold your position and wait…you weirdo.
- Get whacked by the Queen (unconfirmed)
Also possible only in the IAF Academy. Same place as the previous one, only now you need to get close the Queen and let her beat you to submission.
Weapons
Whether by accident or sheer stupidity, there are also a couple of ways to use your weapons against yourself.
- Blow yourself up
Let’s face it: sometimes you end up being collateral damage yourself. So why not save the trouble and get it out of the way right now?
You can blow yourself up with the following weapons:
- Assault Rifle Alternate Fire (always available): Walk into a wall, aim at it and pop goes the marine
- Hornet Barrage (level 6 required): Hug a wall and look right at it, then blast off
- Hand Grenades (level 22 required): Throw at nearby surfaces as fast as you can
- Smart Bomb (level 26 required): Same as the Hornet Barrage
- Grenade Launcher (level 27 required): Aim at something close by and let loose
- Attempt to fumigate yourself
There are right ways to deal with a parasite infestation, there are wrong ways, and then there’s the special kind of stupid described here. You’ll need to unlock gas grenades by reaching level 32, but once that’s taken care of, just throw one of these suckers at your feet and watch as both parasites and life all leave your body for good! Definitely don’t do this in a public game, because you will lose all credibility as a medic in the process.
Level Specific
Much like how Europeans go to Switzerland for euthanasia and Americans knock on stranger’s doors, you too can find an exotic place to end your existence!
Disclaimer: Since I don’t know what exactly counts as an unique environmental death, this list may not be complete or certain ways may only count once.
A more technical explanation:
Many of these ways rely on an internal entity called “trigger_hurt”. Each of them has a set “damage type” that affects physics behavior and killicons in other Source Games (among other things), and I assume this what defines which deaths are unique from each other. Since these properties are set by mappers, they may not necessarily count as unique if a different map uses the same damage type (for example, the large spinning mixer in Lana’s Sewer uses “GENERIC” damage type – this is likely used somewhere else in the game as well). For the same reason, they may not also correspond to what one would assume.
I also don’t know if unique entity names for these trigger_hurts are also a factor; this would require extensive testing by the community.
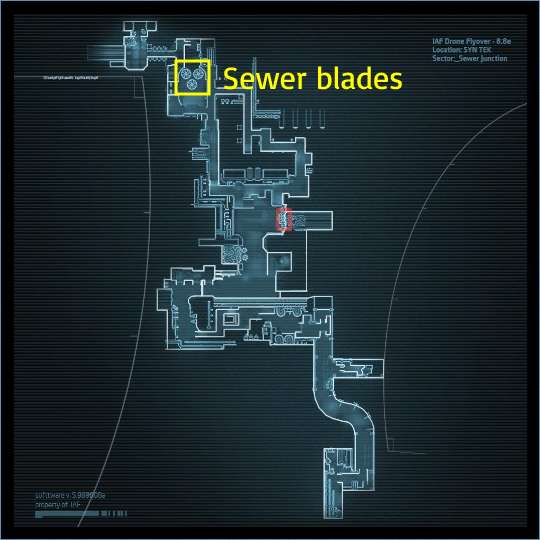
- Walk into a shredder (Jacob’s Rest – Sewer Junction B5)
This is pretty straightforward: there are three spinning shredders near the end of the level. A sensible person would shoot the barrel near the control console to stop them, but since sensibility has nothing to do with this achievement…You get the point. Just get within touching distance of them and wait.
- Step on a landmine (Lana’s Escape – Lana’s Bridge)
Landmines – the polar opposite of foot fetish! The minefield covers a large area at the start of Lana’s Bridge, and there are more than enough mines for you to blow yourself to hell. Of course, the mines are buried – you can periodically see red lights blink briefly under the snow, indicating a prime place for a tap dance. The closer you are to the explosion, the more damage it deals to you. If locating mines is too much effort, just go running around the indicated area like an headless chicken.

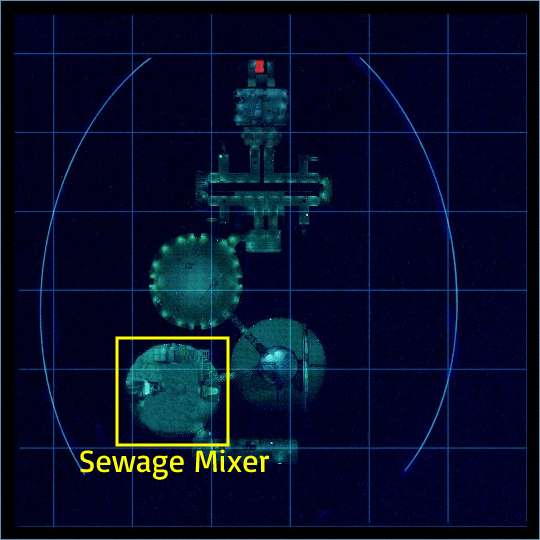
- Get caught in a giant sewage mixer (Lana’s Escape – Lana’s Sewer)(unconfirmed)
What’s with the sewers and large spinning things of death? Doesn’t matter – what does is that this map offers another way to be treated like s**t…literally!
Once you reach the spinning blades, just wait in their path. Easy peasy.
- Step into a generator energy beam (Tears for Tarnor – Abandoned Maintenance Tunnels)
This one requires a little bit of walking. You’ll have to progress fairly far into the mission to reach the generator. Switch it on and wait a few seconds until the machine comes to life, and you’ll see an energy beam block the walkway you just crossed. Instead of going around it like a smart person, walk right into it! Instant results guaranteed.

- Get run over by a burning forklift (Accident 32 – Lab Ruins)
This map features not one, not two, but four unique ways to die! I’ve listed them in order, from closest to farthest. Check the map below for exact locations.
The first one involves a special kind of OSHA violation – namely getting run over by a speeding forklift that is also on fire and isn’t driven by anyone. From the start of the level, just run left until you get hit. Maybe next time you’ll look both ways before crossing.
24. Get possessed by a weird-ass gem (Accident 32 – Lab Ruins)
Directly north of the forklift, in a large crater, is a big green crystal. Touch it to get possessed and turn against your teammates – they’ll be sure to love it.
There is also a gas stream to the east of the crystal, near a chainlink gate. Dying from it also counts as getting possessed (doing both yields no additional progress towards the achievement).
I don’t know if getting killed by a possessed marine counts. Let me know if you can confirm it.
- Get crushed between moving walls (Accident 32 – Lab Ruins)
While the exact purpose of an in-floor, handrailless garbage compactor remains a mystery, it nonetheless offers you a way to get flattened in the name of achievements. Just find a rectangular hole in the floor just northeast of the crystal crater, jump in and wait for the flattening.
- Get run over by a train (Accident 32 – Lab Ruins)(unconfirmed)
At the end of the level you must call a train to take you to safety. Joke’s on them, you’re going to use it to take you out for good! Once you’ve called the train, just run to the tracks and keep the space bugs away until you successfully become an easily preventable traffic casualty.

Other
This section includes everything that doesn’t fit into any of the previous categories. None of these are technically level specific, but many of them require a level feature. Check each description for recommended levels.
- Fall to your death
While Reactive Drop does not have fall damage in technical sense, you can still walk off a high place and leave a crater below. There are too many locations to list here, so I’ll just give a few examples:
- Jacob’s Rest – Cargo Elevator: The dark pit with the concrete pipe and metal plate walkway
- Accident 32 – Research Center: The part with the wide metal walkways and obnoxious blur
- Tears for Tarnor – Insertion Point: In the caves near the start
- Blow yourself up with an explosive red barrel
In Half-Life 2, the Civil Protection officers made a habit of standing right next to highly explosive barrels. Follow their example by finding some, getting close and then shooting them! You may need to do this twice, since one barrel may not be enough to kill you.
You can find these barrels just about everywhere, but I recommend Jacob’s Rest – Sewer Junction B5for this.
- Irradiate yourself with a green barrel
Radiation poisoning – the ultimate gruesome way to go! Instead of superpowers, you will get hair loss, nonstop vomiting and fever, and then you’ll probably die from having your own innards fall out of your arse. Fortunately it’s a hell of a lot cleaner and faster in video games than real life, so you don’t need to wait 2-3 weeks for death.
Green barrels are much rarer than red explosive ones, but you can reliably find a few in Jacob’s Rest – Sewer Junction B5.
30. Burn to death
Fire is great for cooking meat, fish, vegetables and careless marines. There are plenty of ways to catch fire:
Environmental fire, such as in Jacob’s Rest – SynTek Residential
Incendiary Mines
Teammate with flamethrower but no situational awareness


Be the first to comment