
A short & sweet guide to handling Industrial Sabotage missions!
Rival Survival Guide (Season 1)
All credit goes to HEKILLZALOT !
Know the Basics
Rival robots aren’t really susceptible to elemental damage (electricity is ok), so using upgrades that focus on direct/area damage is your best bet. The loadouts I use to fight the Caretaker aren’t really practical against bugs, but you’re just gonna have to make due until the boss fight.

I highly recommend using these 3 perks. Iron Will cuz it’s basically standard at this point, Dash for escaping a bad situation during the boss fight, and Field Medic for players who are still kinda new to Sabotage missions.

Nitra, nitra, nitra. Try to reserve your nitra and resupplies for the final boss fight.

Follow the core’s big ass cable management to the power stations, and hack the power stations to call down the hacker pod. You can save some of your ammo by running passed robot turrets whenever possible.
Hacker Bot Antennas can stick to walls, not just the floor. Antennas need to be in each other’s line of sight at all times, so avoid blocking them with Engineer’s platforms or destroying the terrain that they’re stuck to. If this happens during the hacking process, the progress bar will turn red and you’ll have to reconnect the antennas while fighting bugs and bots at the same time.

Once you’re done hacking the Power Stations, head back to the Caretaker’s core, set yourselves up for the big boss battle (using each class’s techniques written below), and rip out the core’s batteries when you’re ready to fight it.
The Caretaker can be taken care of by avoiding it’s zapper platform, killing its robot minions, tentacle laser gun/stabby arms, and prioritising its weakspots which include;
- 4 electrical vents located at the top 4 corners of the Caretaker (4 yellow bars)
- Big red eyeball when it’s exposed by destroying electric vents (3 health bars)

After beating the boss, be careful not to get tossed 1000ft when it explodes. Also, don’t stand on the vault’s lid when it opens. Attach the glowy data cell to molly, go home, and get totally plastered at the Abyss Bar to celebrate.
Driller
Preparing the Space
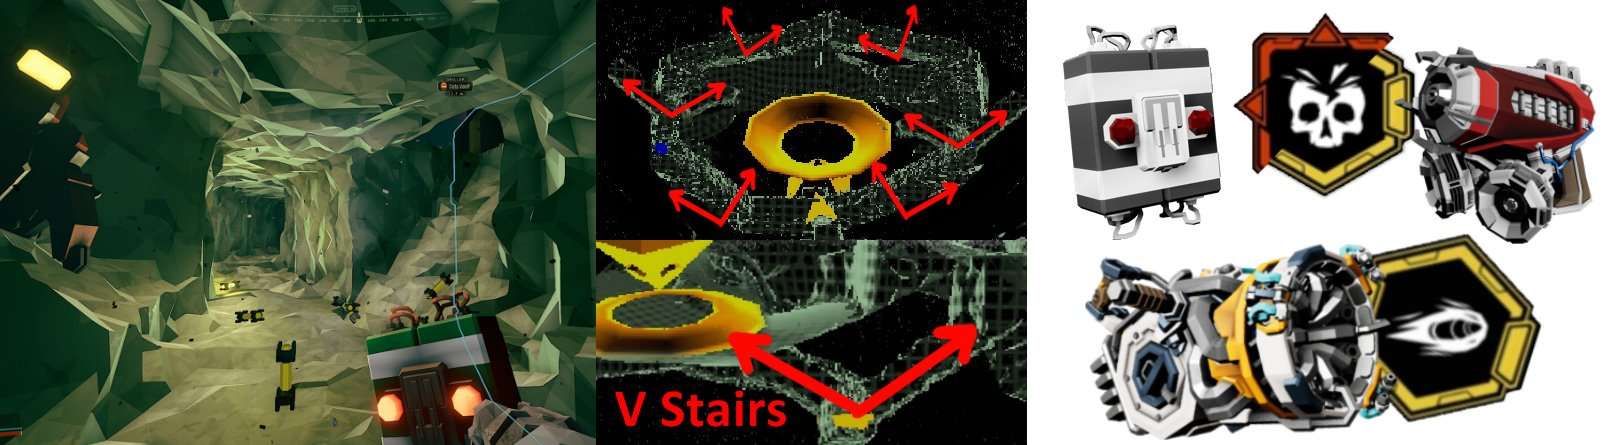
A good way to take cover from incoming attacks is by building an underground tunnel system that goes around the Caretaker’s foundation. The tunnels don’t need to go all the way around, but it does allow for more options. I also like to build “V-shaped” stairs where one entry point starts closer to the Caretaker’s platform at the surface (that way Driller can still maintain close quarters combat from cover), the bottom of the stairs meets at the underground tunnels, and the other side has a convenient access point for other dwarves to enter/exit from the surface. It won’t protect you from phase bombs or other robot minions from entering the tunnels, but still better than dealing with sniper turrets, force field walls, and robot tentacle lasers. Make sure your tunnels are around 5m to 10m deep to avoid force field walls.
Fighting the Caretaker
C4 explosives are excellent at taking care of the electric vents quickly, but placing them in the right spot can be tricky to maximize the blast range of hitting all 4 vents. However, if you’re on Engineer’s over hanging platform bridge (explained in Engi’s section), tossing the C4 right on the centre of the Caretaker’s head will guarantee you to explode all 4 vents. If you’re having trouble getting the hang of it, you could also bring Throwing axes, HE grenades, or the EPC to do a lot of damage to the Caretaker’s vents one at a time. Driller’s primary weapons aren’t really useful, except the Cryo Cannon’s Ice Spear overclock on the Caretaker’s eyeball if you can hit it.
Engineer
Preparing the Space
There’s a few things that Engineer can do to prepare for the boss fight. Build cover from the robot tentacles either below or above its head level. Keep in mind that the tentacles can still stab through platforms sometimes, so you may have to patch up those holes again. However, dropping some proximity mines at the base of tentacles usually takes care of them for a bit. Building a bridge that hangs over the top of the Caretaker is very useful for staying above force field walls (about 5m to 10m above the Caretaker) and if you plan on bringing Engi’s nukes &/or turrets with the Stubby SMG electric discharge overclock. Getting the turrets set up on top of the Caretaker after its shield is down requires some tricky timing, but if you can manage it just before the boss boots up, electric discharges can damage parts of the Caretaker while your turrets simultaneously deal with any other robot tentacles or minions. Building an overhang bridge will also be useful for Driller to drop down C4 onto the Caretaker from above.

Fighting the Caretaker
Nukes are best used if you can hit the Caretaker on top of its head from Engi’s overhead bridge, that way it can hit all 4 electrical vents. However, if you’re bringing the SMG’s discharge OC, you could just use discharges on the vents and save your nukes for the Caretaker’s eyeball. The discharge method is best used by bringing 2 sentry turrets to shoot at. As mentioned before, you can also take care of robot tentacles by dropping proximity mines at their platform.
Gunner
Preparing the Space
Find some good spots to ride down ziplines for quick transportation. Try to maximize the distance you can travel at an angle of about minimum -10 degrees slightly away from the Caretaker, as well as setting up downward ziplines as close as possible to each other to do laps around the Caretaker in a clockwise or counter-clockwise fashion. This is a lot easier to do with a little help from the Engineer’s platforms. You could build a zipline that hangs over the Caretaker to replace Engi’s bridge, but that may leave you exposed to enemy fire.

Fighting the Caretaker
Gunner’s shield is very useful for being able to stay in cover while dealing damage to the Caretaker at close range… temporarily. However, the shield won’t protect you from phase bombs, force field walls, or patrol bots running you over, so be mindful of that. Otherwise, Gunner’s strategy of “shoot all the things” is pretty ♥-simple. Works especially well while using Driller’s tunnel system. I also recommend bringing the blue field medic perk as Gunner to heal dwarves while using the shield, but that’s up to you. If you are going to bring the GRS, I’d bring either Jet Fuel or Plasma missiles while firing at vents from above the Caretaker’s force field walls, that way your guided missiles won’t crash into them.
Scout
Preparing the Space
I’m a little biased when I say that Scout’s kinda useless, but there really isn’t much for Scout to do in terms of preparing the space… other than lighting up the area for the other classes to see better when they’re building stuff.
Fighting the Caretaker
Scout’s main advantage is having long range weapons that can be fired from a safe distance away from the Caretaker without worrying too much about getting attacked by robot tentacles, unless they emerge out of the ground near you. I highly recommend bringing the blue field medic perk as Scout to quickly revive other dwarves.


Elementals aren’t entirely useless. They don’t deal bonus damage, but if you can actually ignite bots, they go down instantly, even the tentacles.