
I found this to be one of the harder achievements, so here’s a short little guide for you.
Contents
How to Obtain The Lone Wolf Achievement
All credit goes to CelestialLizzie!
General Tips
- The key to this is time management; it’s important to make sure you know what order to things in, so I recommend you get The Savior achievement first, with Jeremy, Father Bernard, and Bill at least once.
- Do not shoot anything or anyone, for two reasons; one is that you need literally every last bullet you can find, the other being that the noise caused by the gun will bring more undead at the end, making it impossible to survive.
- I have not found a way to use the car and survive solo, and I don’t think it can be done. It may save time traveling from location to location, but your gas is best used somewhere else since playing carefully means you will not be traveling much anyways.
- Do not give Bill alcohol or pain medication at any point just in case being kind to him or him being around counts as him working with you – which happens if you give him something for the pain.
- There are some very small, minor things you need to do in the last minutes before night comes, like closing the door and locking it, that will be capitalized, underlined, in bold, and in italics, because these stupid little things that are so easy to forget will cost you the game and you will have to start the whole game over just because you forgot to close the hatch or something.
Map
- You will have to go to each location once in order to have it listed as what it is.
- Walking to each location will take 10 minutes if you are right next to that location, if you are further away, it will take 20 minutes.
- I wasn’t able to find a way to utilize the car and survive solo, as the best way to utilize the one gas can you find is for the fence.
- Here is the completed map for you to look at ahead of time.
- Center is Main Base.
- Upper right is the Store.
- Upper left is the Gas Station.
- Lower left is the Crash Site.
- Lower right is the Church.
Items Needed + Locations
- There are several more items not listed here, but these are the only ones you need.
- Shovel – At main base, to the left.
- Gold Key – Garbage can outside base.
- Wires – Garbage can outside base.
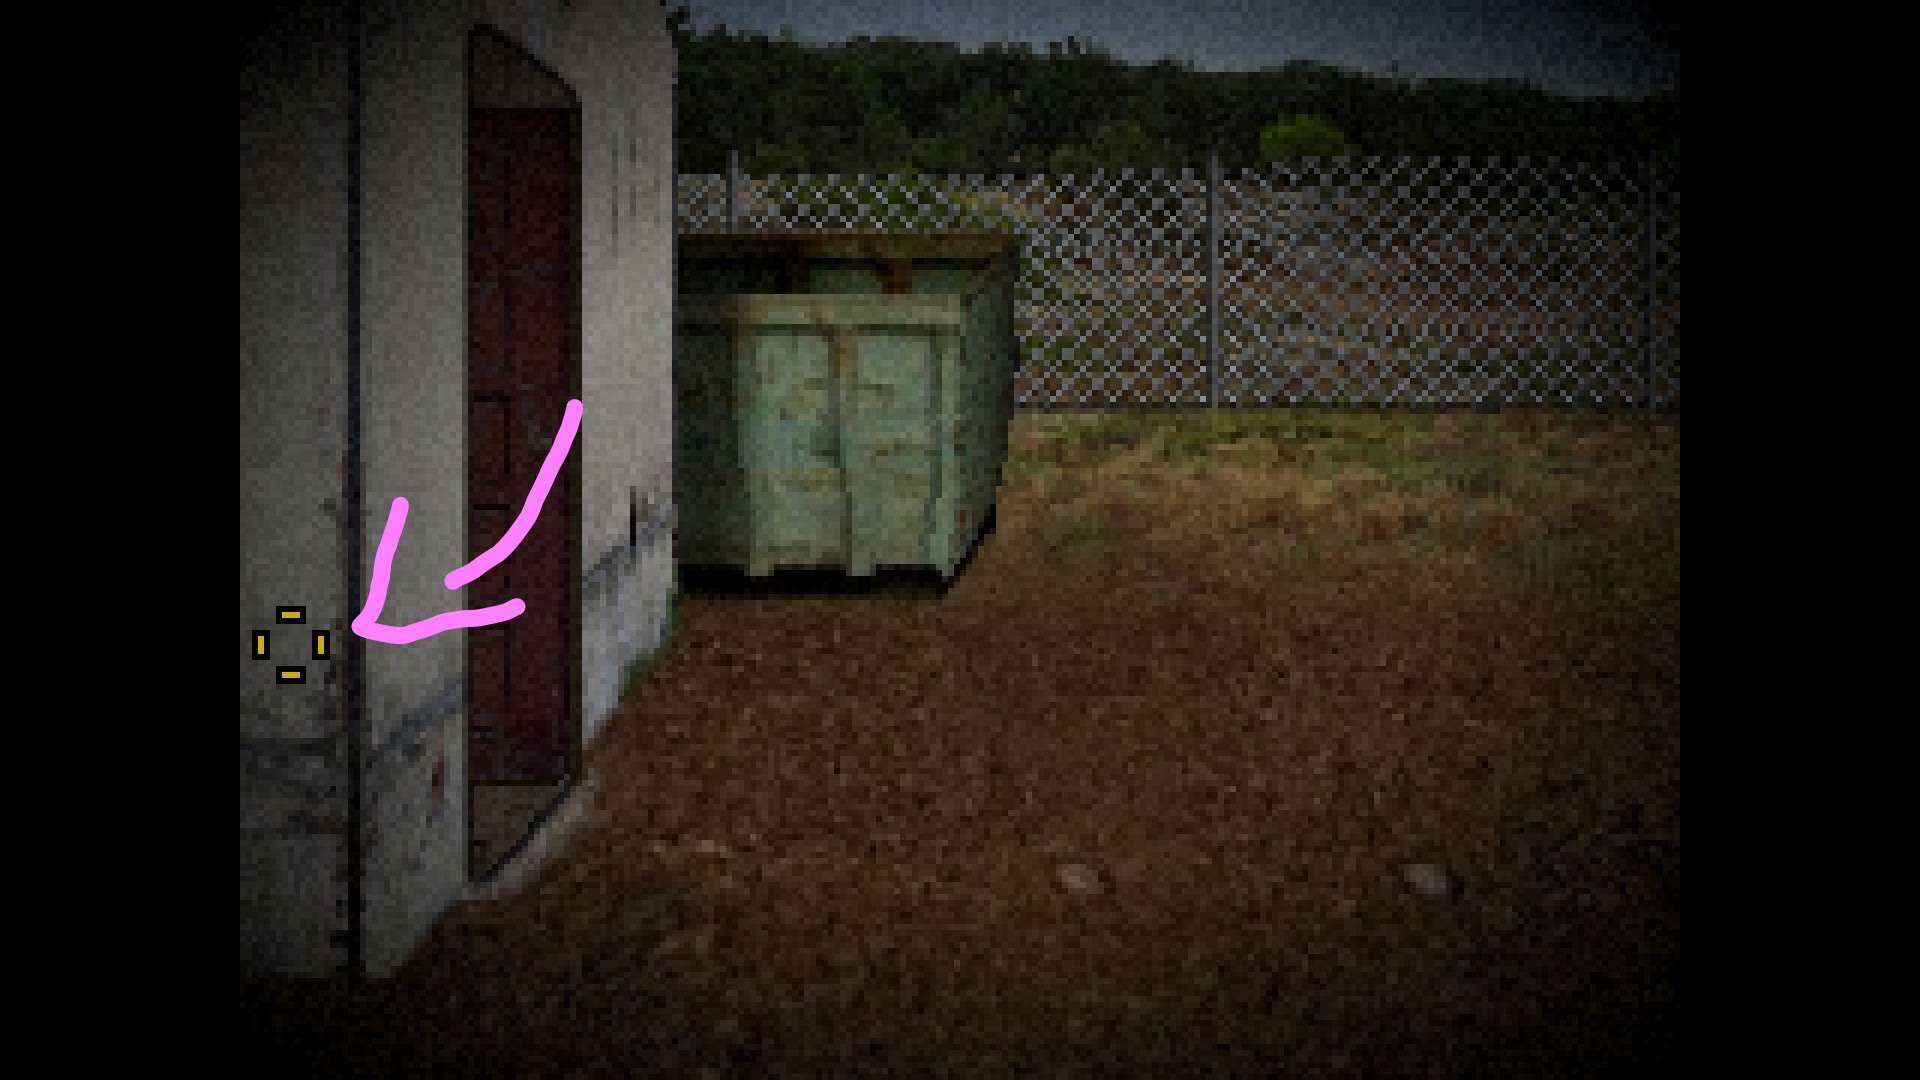
- Wire Cutters – To the left of outside base.
I didn’t know this area existed for my first go around, so here is a screenshot of where it is and where to click.
- Bullets – As far as I know, there are four:
- One is in the wall to the left of outside base.
- One is in front of the church, by a wooden post out front.
- One is in the gas station, by the front most gas pump.
- The last one is inside the employees only office in the gas station, tucked under the side of the armchair.
- Gas Can – Leaning up against the wall on the outside of the gas station.
- Water Bottle – On the shelf inside the gas station.
- Coin – Inside the register, in the gas station.
- Rubber Hose – Inside the employees only room of the gas station.
- Shopping Cart – Locked in the trolley in front of the store.
- Spare Wire Fence – Out front of the store, behind Jeremy.
- Gun – On the ground at the crash site, by the police car.
- Bag of Cement – Outside the church, leaning up against the right side.
- Bricks – Behind the bag of cement.
Steps + Time Taken
8 hours left
- Pick up shovel, golden key, wires, bullet, and wire cutters
- Go to the right and click on the space in the fence to leave, go to the lower right location (the Church)
7 hours 50 minutes left
- Pick up axe and bullet
- Leave and go to the upper right location (Gas Station)
7 hours 40 minutes left
- Pick up bullet and gas can
- Go inside
- Pick up water and coin
- Use the axe on door to get in, as it’s locked
- Pick up bullet and rubber hose
- Leave and go to the upper left location (Store)
7 hours 30 minutes left
- Use coin of shopping cart trolley to get a shopping cart
- To pick up heavy items, you will always have to manually click the shopping cart on them
- Use shopping cart to get spare wire fence behind Jeremy
- Leave and go to lower left location (Crash Site)
7 hours 20 minutes left
- Pick up gun, load each bullet individually by dragging them onto the gun
- You should have 4 total bullets in the gun
- Use rubber hose on police car, then gas can
- Leave and go back to the lower right (Church)
7 hours 10 minutes left
- Use shopping cart on bag of cement and bricks to take them
- Leave and go back to the center (Main Base)
7 hours left
- Do this before you do anything else, enter the base and use axe on Bill
- Use bag of cement and water bottle on box of sand next to Bill’s festering corpse
- Use shovel on box to mix it
- This will take 10 minutes
- Don’t use the axe, you will run out of time as it takes 40 minutes
6 hours 50 minutes left
- Use bricks on window to block it up
- This will take 2 hours and 50 minutes
4 hours left
- Use spare fence on the empty space of fence outside the base to repair it
- This will take 3 hours 30 minutes
30 minutes left
- Use wires and gas on generator next to fence
- Turn the generator on
- Go back inside, close the door, lock door with gold key
- Go back inside, all the way to the left, and use bolt cutters on the padlock on floor
- Go down the hatch, close the hatch, and click on the clock
Congratulations! You barely survived, with 30 minutes to spare, by the skin of your teeth!
Be the first to comment