
Everything you need to know to complete Halo Infinite LASO (Headmaster Achievement).
Contents
How to Complete Halo Infinite LASO (Headmaster Achievement)
All credit goes to N7 Spectre!
Introduction
Note: Before attempting LASO you will need to have collected all twelve skulls on a previous game.
If you are new to LASO (Legendary All Skulls On) it was originally created by fans who wanted a harder challenge above Legendary difficulty. The accomplishment gained popularity and now is supported through official playlists found in Halo: The Master Chief Collection (MCC) and achievements in MCC and Infinite.
Infinite’s LASO difficulty is very easy when compared to the other games because of the new equipment, open world map, lack of an Iron Skull (resets current mission/checkpoint on death), Bandana Skull is allowed now (unlimited ammo, grenades, no equipment cooldowns), and most importantly the secret Scorpion Gun.
While this may be slightly disappointing to the more hardcore end of my fellow LASO Masters, it’s worth pointing out that some of these things were circumvented in the other games anyway (e.g. save/quit to avoid the Iron Skull penalty, unlimited ammo glitch in CE, and jumping outside the map). Therefore, I think it’s best to view Infinite’s LASO as a more fluid and enjoyable version that primarily acts as a good starting point for those who are new to the challenge.
Skulls
Here are all twelve skulls for Halo Infinite and their game effects. Some of the skulls are only available during missions and, at this time, there is currently no way to replay individual missions so you’ll need to start a new campaign if you missed any.
- Black Eye – Shields begin recharging when you melee enemies (similar to Halo 5).
- Catch – Enemies throw and drop more grenades.
- Fog – Disables motion tracker.
- Famine – Weapons dropped by enemies only have half ammo (mitigated by Bandana).
- Thunderstorm – Upgrades the rank of most enemies.
- Mythic – Enemies have increased health.
- Blind – HUD and weapon do not display on screen.
- Boom – Doubles explosion radius.
- Cowbell – Accelerations from explosions increased.
- Grunt Birthday Party – Grunt headshots lead to glorious celebrations.
- IWHBYD – Rare combat dialog becomes more common.
- Bandana – Unlimited weapon ammo, grenades, no equipment cooldowns.
Key Details
Checkpoints are only triggered when the player has full shields. The best tactic is to kill all the dangerous enemies while saving one Grunt or Jackal last to melee for the shield recharge. Remember that checkpoint saves will be invisible because of the disabled HUD but are usually frequent. This is very important because a lot of progress can be lost otherwise.
The Scorpion Gun can only be acquired during the Outpost Tremonius mission (instructions below). If you plan to use it on your LASO run then make sure to obtain it before entering the Pelican on the landing platform otherwise the mission will end and it will become unavailable for the rest of the game.
If using the Scorpion Gun it is imperative that you never drop it otherwise it immediately despawns and cannot be reacquired if permanently lost. Be cautious when interacting with objects and using the Grappleshot because it’s very easy to pick up another weapon. If you do accidentally drop it you can either quickly kill your spartan to reset the checkpoint, manually end game and reload to the prior checkpoint, or restart the current mission from the beginning.
When returning to your LASO campaign, be sure to use the manual “Load” option versus choosing to “Continue.” Some players have experienced the skulls becoming disabled when choosing continue which could potentially affect the achievement.
Strategy
To start your LASO run begin a new campaign with the difficulty set to Legendary and enable ALL twelve skulls, yes even Bandana! The first three missions are the hardest but once you make it to Outpost Tremonius and obtain the Scorpion Gun things become significantly easier. Until then you can use a charged Plasma Pistol to bring down enemy shields and then a precision weapon for the headshot. You can choose to skip the Scorpion Gun opting for a rocket launcher instead but it will be more difficult.
There is no splash damage to the player from the Scorpion Gun so you can fire point blank if needed. However, if there are fusion coils in range you risk causing those to explode and damaging your shields. When using the Scorpion Gun note that it basically fires from your boots (as if standing on a tank) so you’ll have to jump, line up the shot, then fire. You can have a secondary weapon along with the Scorpion Gun. I preferred the Pulse Carbine because it fired quickly (causing some enemies to flinch) and allowed me to take down the shields on Grunts and Sentinels at range and then move in for the melee kill to recharge my shields before they could counter attack.
The Blind Skull disables the HUD so make sure you are familiar with the missions. The AI Scan feature still reveals the items that need to be interacted with to progress but no mission or waypoint navigation icons. The TACMAP can be used to set waypoints and it will show the pillar of light in the distance for open world navigation. If aiming is too difficult check your monitor settings for a built in reticle that can be turned on or use a tiny piece of painter’s tape. Additionally, you should also be comfortable with the controller button combos that select the different grenades and equipment options.
Grenades
- Fragmentation: Left, Left
- Plasma: Left, Up
- Spike: Left, Down
- Dynamo: Left, Right
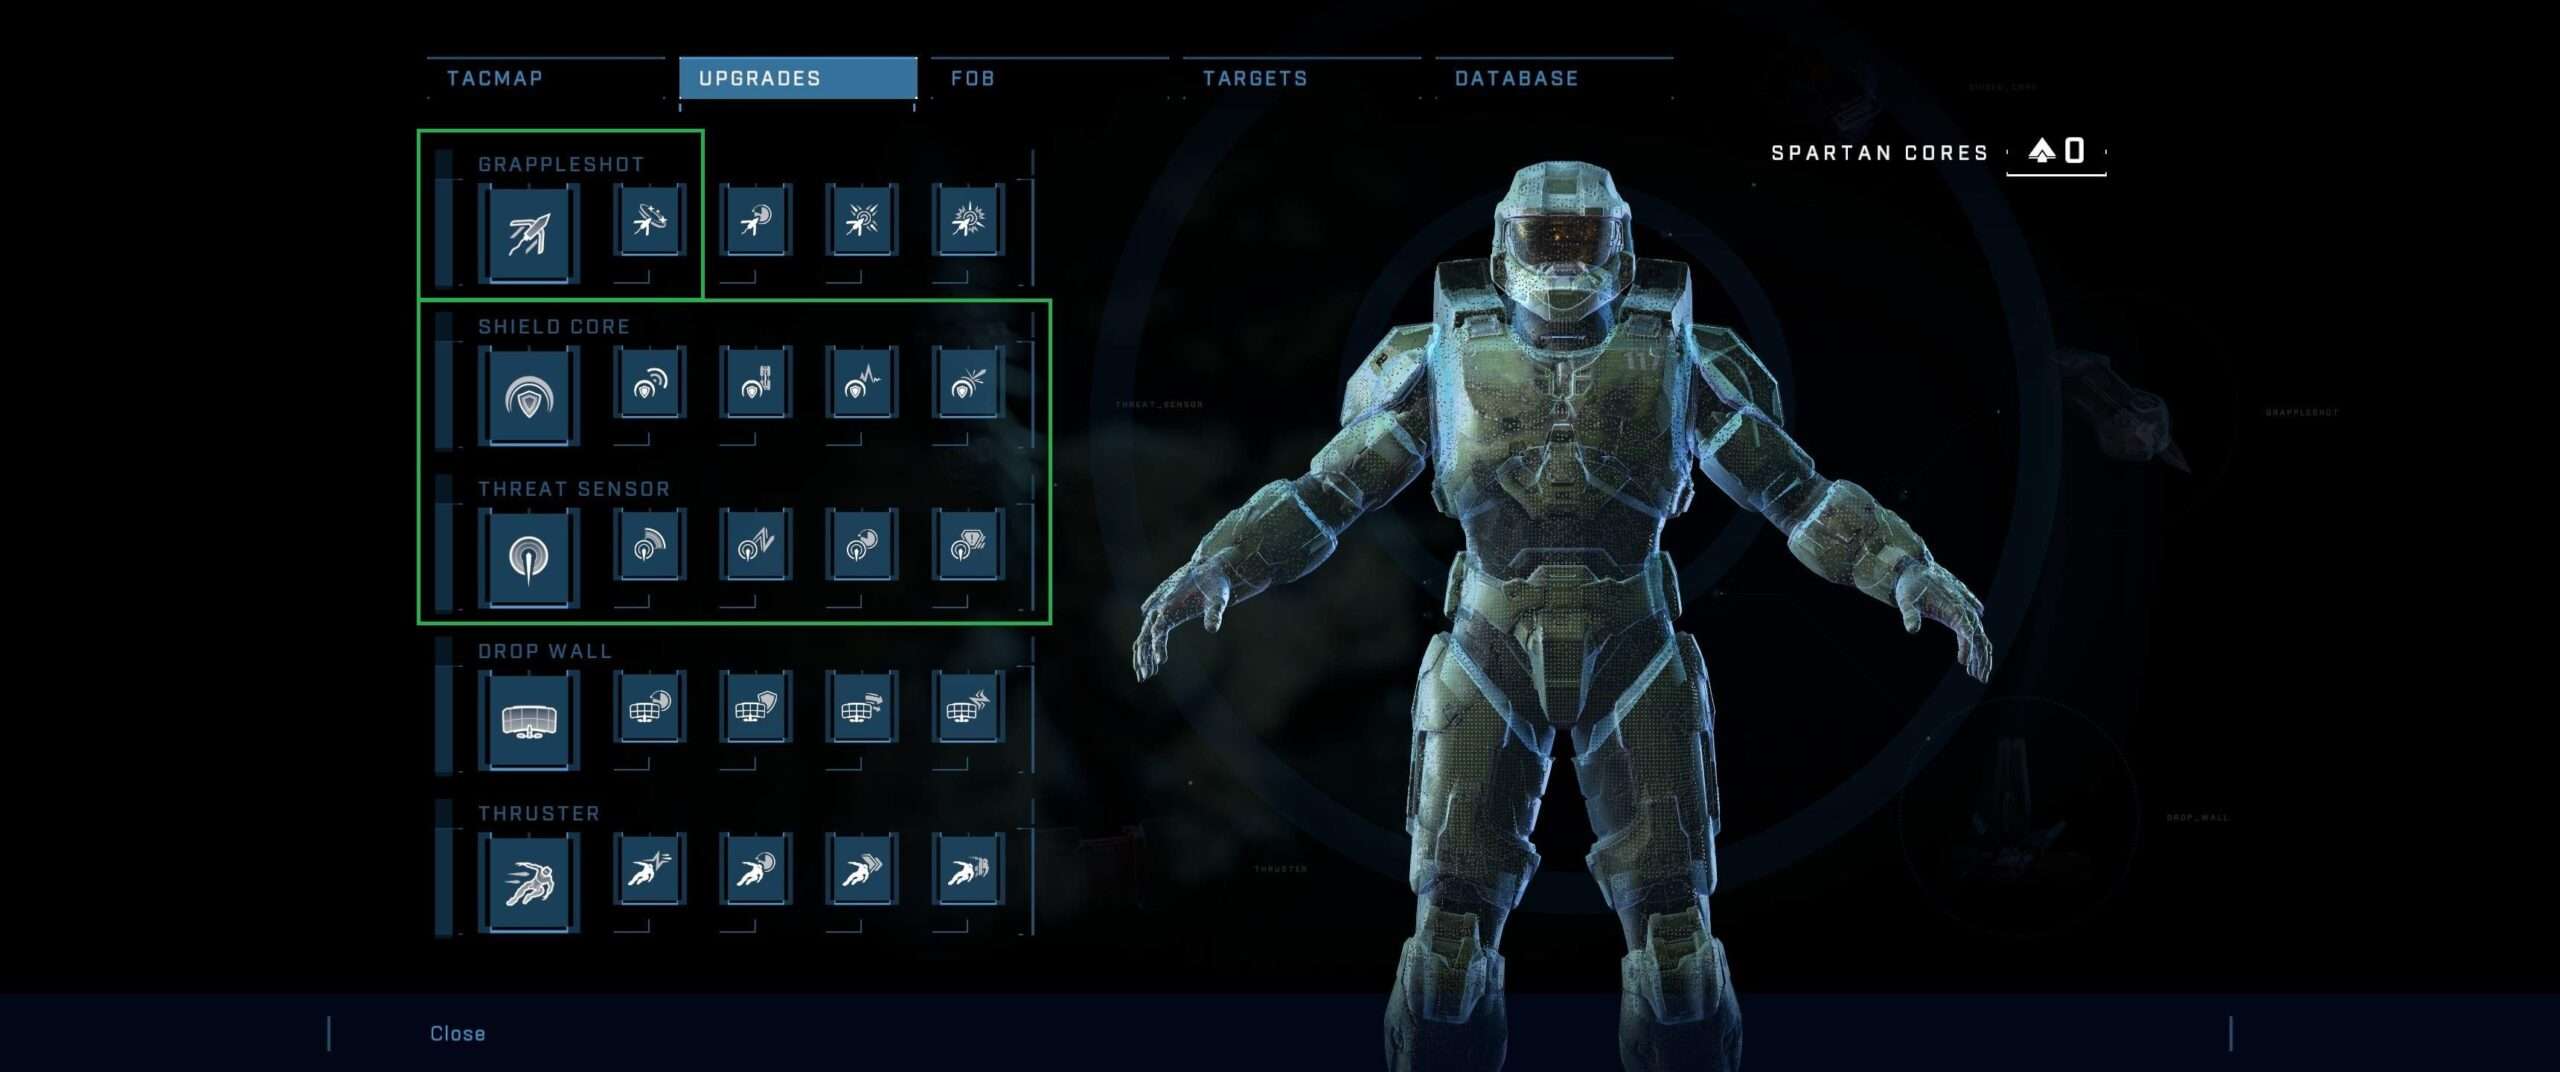
Equipment
- Grappleshot: Right, Right
- Thruster: Right, Up
- Threat Sensor: Right, Down
- Drop Wall: Right, Left
Regarding the grenades, I recommend Dynamo which is basically all I used on my run. They provide a short AOE stun and damage to enemies which can be used to escape in a pinch or line up a shot without taking return fire. Spamming them will also eventually kill enemies and they affect most of the bosses too. Grenades cannot be thrown while using the Scorpion Gun so you’ll need to switch to your secondary weapon when you want to use them.
The new equipment benefits greatly from the Bandana Skull which removes all cooldowns. The most useful are the Grappleshot and Threat Sensor. Scaling sheer cliffs is a breeze and spamming sensors will help to locate enemies from a safe distance or move in for that sweet melee shield recharge. Thrusters can be very useful but only with the final upgrade that provides temporary cloaking. However, based on my experience enemies will still be able to intermittently see you especially if you’re very close to them. The Drop Wall isn’t worthwhile with the Scorpion Gun.
There are a few limitations you should be aware of when using the Scorpion Gun. The Drop Wall cannot be deployed, the Thrusters cause you to crouch instead of moving, and the cloaking doesn’t really work. It is also impossible to melee with the Scorpion Gun. If you want to use these just switch to your secondary weapon and then back again when finished.
You’ll come across some Spartan Cores while playing and it’s entirely optional if you want to capture more FOBs to reveal additional cores for further upgrades (I did on my run) and for quicker travel around the map. The basic abilities with no upgrades should be sufficient. Keep in mind though that between the Cowbell/Boom Skulls and the Scorpion Gun enemies are liable to go flying off into space and sometimes this prevents the mission trigger for all enemies being defeated and thus the FOB cannot be claimed (I encountered this several times). In that case simply Fast Travel to another FOB to reset the area and then go back and try again.
Minimum Recommended Upgrades
- Grappleshot – 1 Core for the enemy stun on grapple.
- Threat Sensor – 9 Cores for the uninterrupted enemy visibility.
- Shield Core – 9 Cores for the increased shield strength.
Boss Fights
The boss battles are very straightforward and the Scorpion Gun usually makes short work of them. That’s the reason I don’t believe it necessary to go into greater detail for each fight but I do want to provide the essential tactic advice. Additionally, it’s very important to be able to switch abilities quickly (so start practicing), keep good situational awareness, and stay moving!
Tremonius – I recommend grabbing the Pulse Carbine from the nearby weapon rack which is ideally paired with a rocket launcher. When the fight starts throw a Dynamo grenade at the boss then head directly to the back of the room, down the ramp, and to the end of the short corridor stopping at the top of the final ramp down (can scout out ahead of time). Start throwing Dynamo grenades back the way you came and wait to see them start sparking toward an enemy (keep in mind the two Jackals that accompany the boss). Keep spamming grenades while using the Pulse Carbine to bring down his shields then follow up with rockets. If the boss follows you retreat down the ramp and go all the way to the entrance on the other side. Do not try to fight the boss in the lowest area because it’s too open.
Chak ‘Lok – This is probably the most dicey fight because of the confined space. The key here is to throw out a Threat Sensor immediately so you can see your enemy and then start hitting him with the Scorpion Gun or a rocket launcher and hope the Cowbell Skull keeps him at a distance. Use the Grappleshot if he gets too close. Dynamo grenades can also be useful but keep in mind that both they and explosives can destroy the Threat Sensor so place it high enough it won’t fail at a critical moment.
Bassus – When the fight starts head into the room directly behind you that has two ramps. Move up and down both ramps in a circle throughout the battle but know that this boss can cover a lot of ground quickly so you’ll want to constantly be moving and using the Grappleshot to escape when needed.
Adjutant Resolution Pt. 1 – Use cover to avoid the devastating ranged attacks and target the weak points (lights) on the four arms. You’ll have the opportunity to attack the monitor when he is exposed each time one of the arms is destroyed.
Tovarus & Hyperius – These are the only bosses you’ll face in the open world map and therefore can be cleared at range. However, because of the aforementioned Cowbell Skull they’re liable to launch a great distance. If this happens don’t panic, they should walk back to the area but it can take them some time. If possible, try to shoot them when they have a backstop to keep this from happening. Be mindful of all the other random enemies found in this open area too.
Adjutant Resolution Pt. 2 – Similar to the first fight with him except you’ll need to keep moving as the monitor will cause the pillars you’ll be using for cover to disappear. Additionally, Sentinels will spawn to assist the boss and need to be destroyed immediately. There is plenty of cover around the room.
Jega ‘Rdomnai – This is certainly the scariest fight. Once it starts immediately launch a Threat Sensor (pro tip: if it’s on the boss it won’t blow up though it will disappear when he does) then start knocking him back with the Scorpion Gun. If he gets too close drop down one of the two square holes in the floor and head for a ramp. Watch the boss and most of the time he’ll follow you which will provide an opportunity for one more shot before he completely disappears. Once he does, redeploy new Threat Sensors while heading back up top. Choose one of the holes and continuously jump over the opening from one side to the other while turning 360 degrees in the process waiting for him to reappear right next to you. When he does jump to the opposite side and start shooting. If he gets too close drop down the hole and then rinse and repeat.
Escharum – This fight is actually really easy as the boss will be knocked back with every shot from the Scorpion Gun. The main things are to keep your Threat Sensors up and give the boss time to come back to the middle room to recharge his shields while you take out the conduits. After the final conduit he’ll be so low on health a single shot should end the fight.
The Harbinger – There are three phases to this fight and it’s all about controlling the enemy reinforcements. Harbinger is very easy to defeat and you face her alone after each wave. Try to eliminate the enemies on one side of the room as quickly as possible. Because of the rocket launcher wielding Skimmers you’ll want to constantly be on the move. After each wave a few shots will weaken the Harbinger and she’ll fall down – make sure to melee her first to get the checkpoint for that phase before making a final shot to progress! She does have an attack that looks like blue electric orbs and they can one shot you so watch out for those.
Scorpion Gun (Secret)
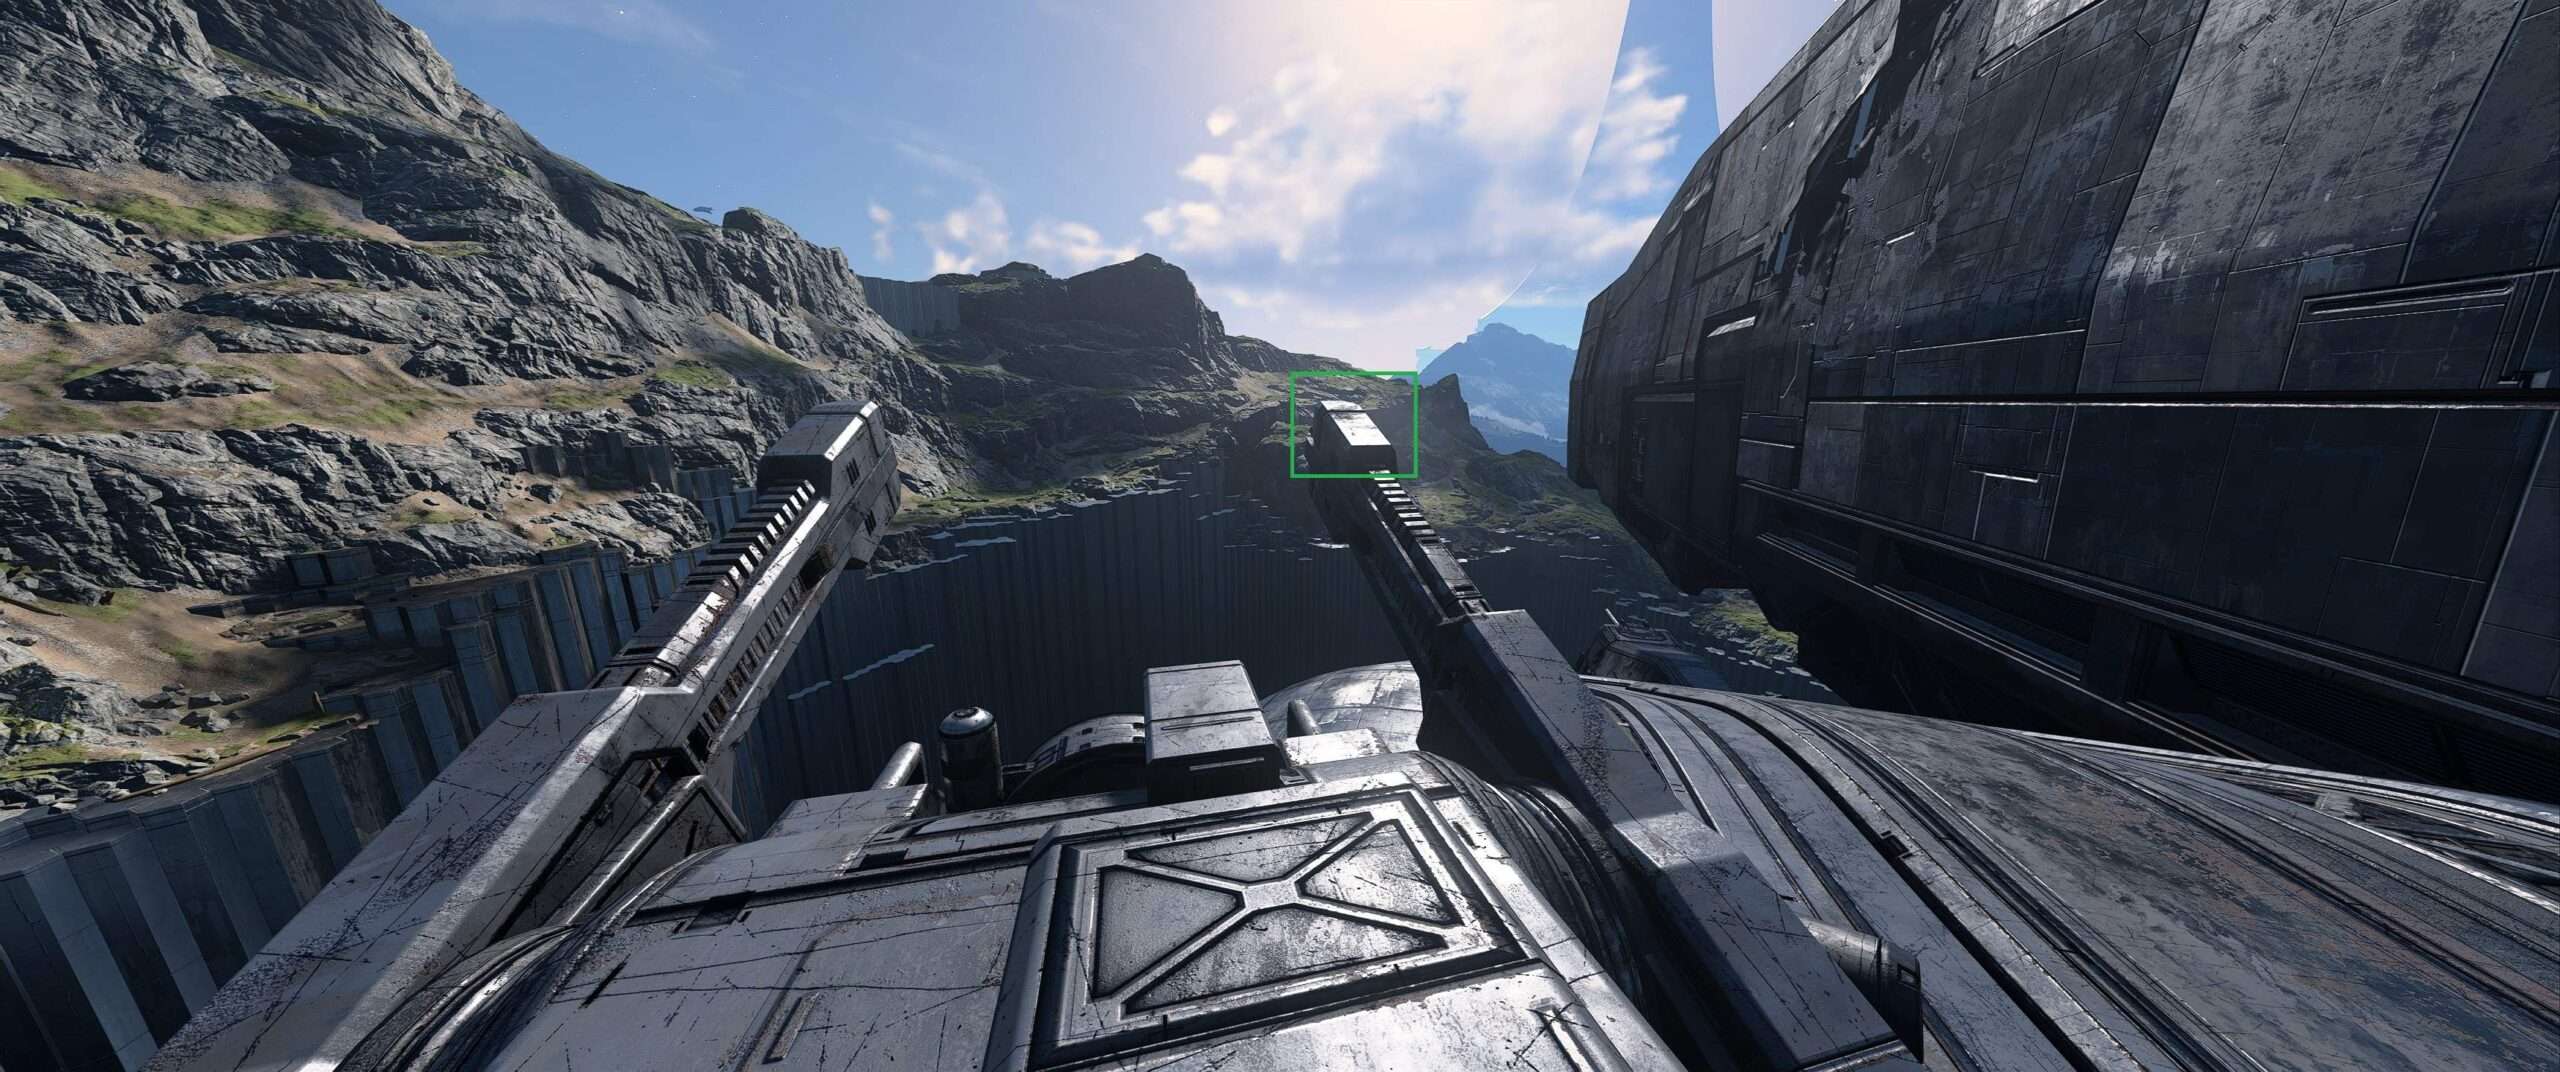
The secret Scorpion Gun is very easy to obtain but as previously noted it must be done during the Outpost Tremonius mission and before boarding the Pelican. You can return to the outpost later but the special datapad will no longer be present. It is highly useful for a LASO run.
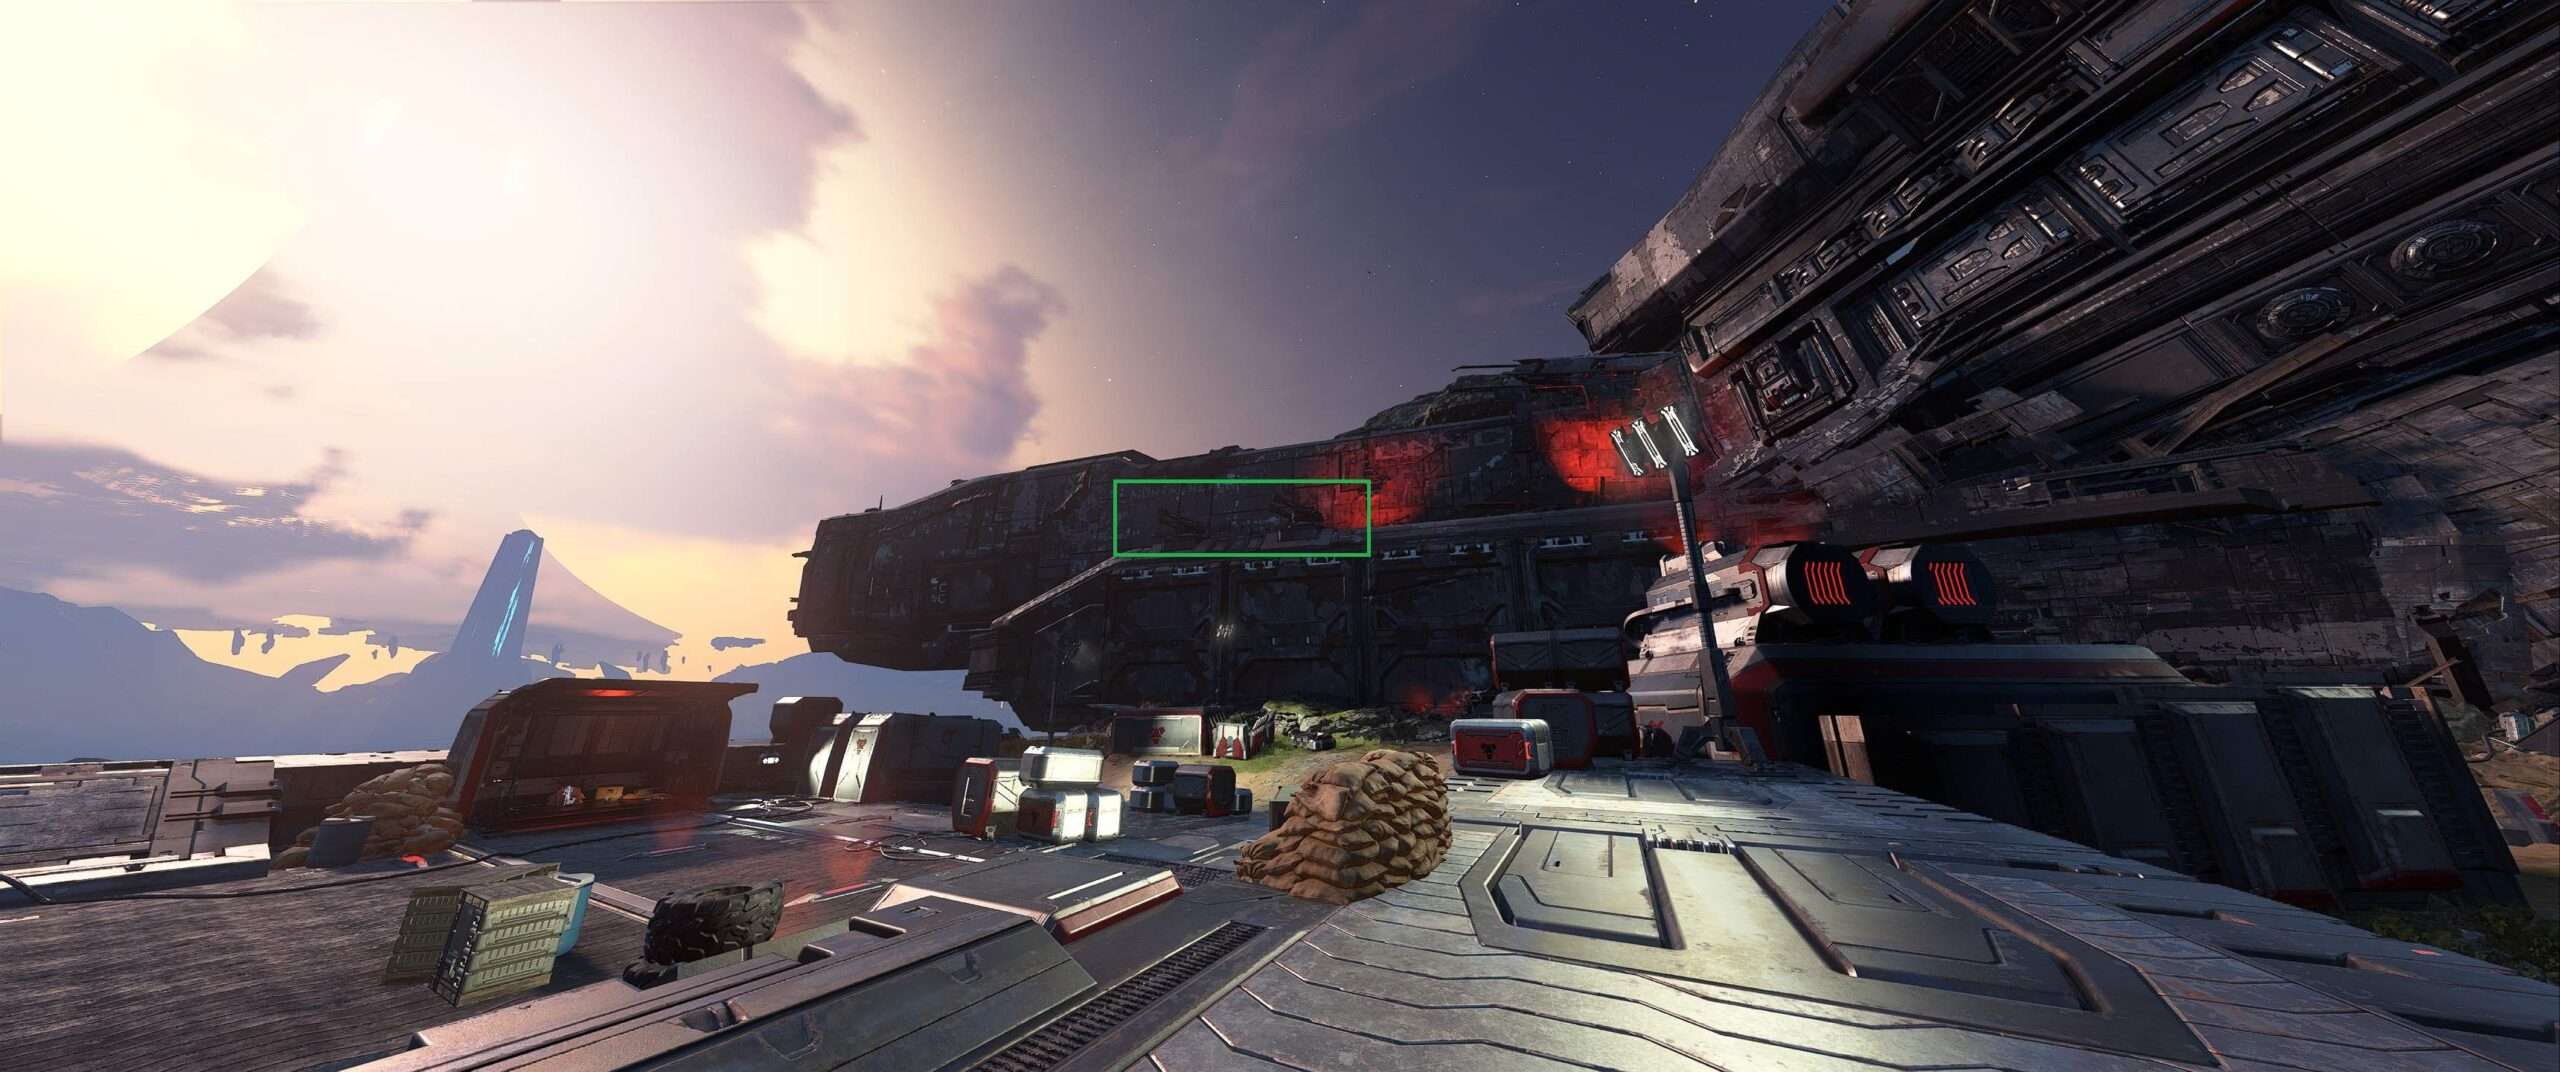
At the end of the mission there will be a large courtyard with buildings, a crashed ship, and landing pad. Grappleshot up the side of the ship to the two turrets outlined in the image.
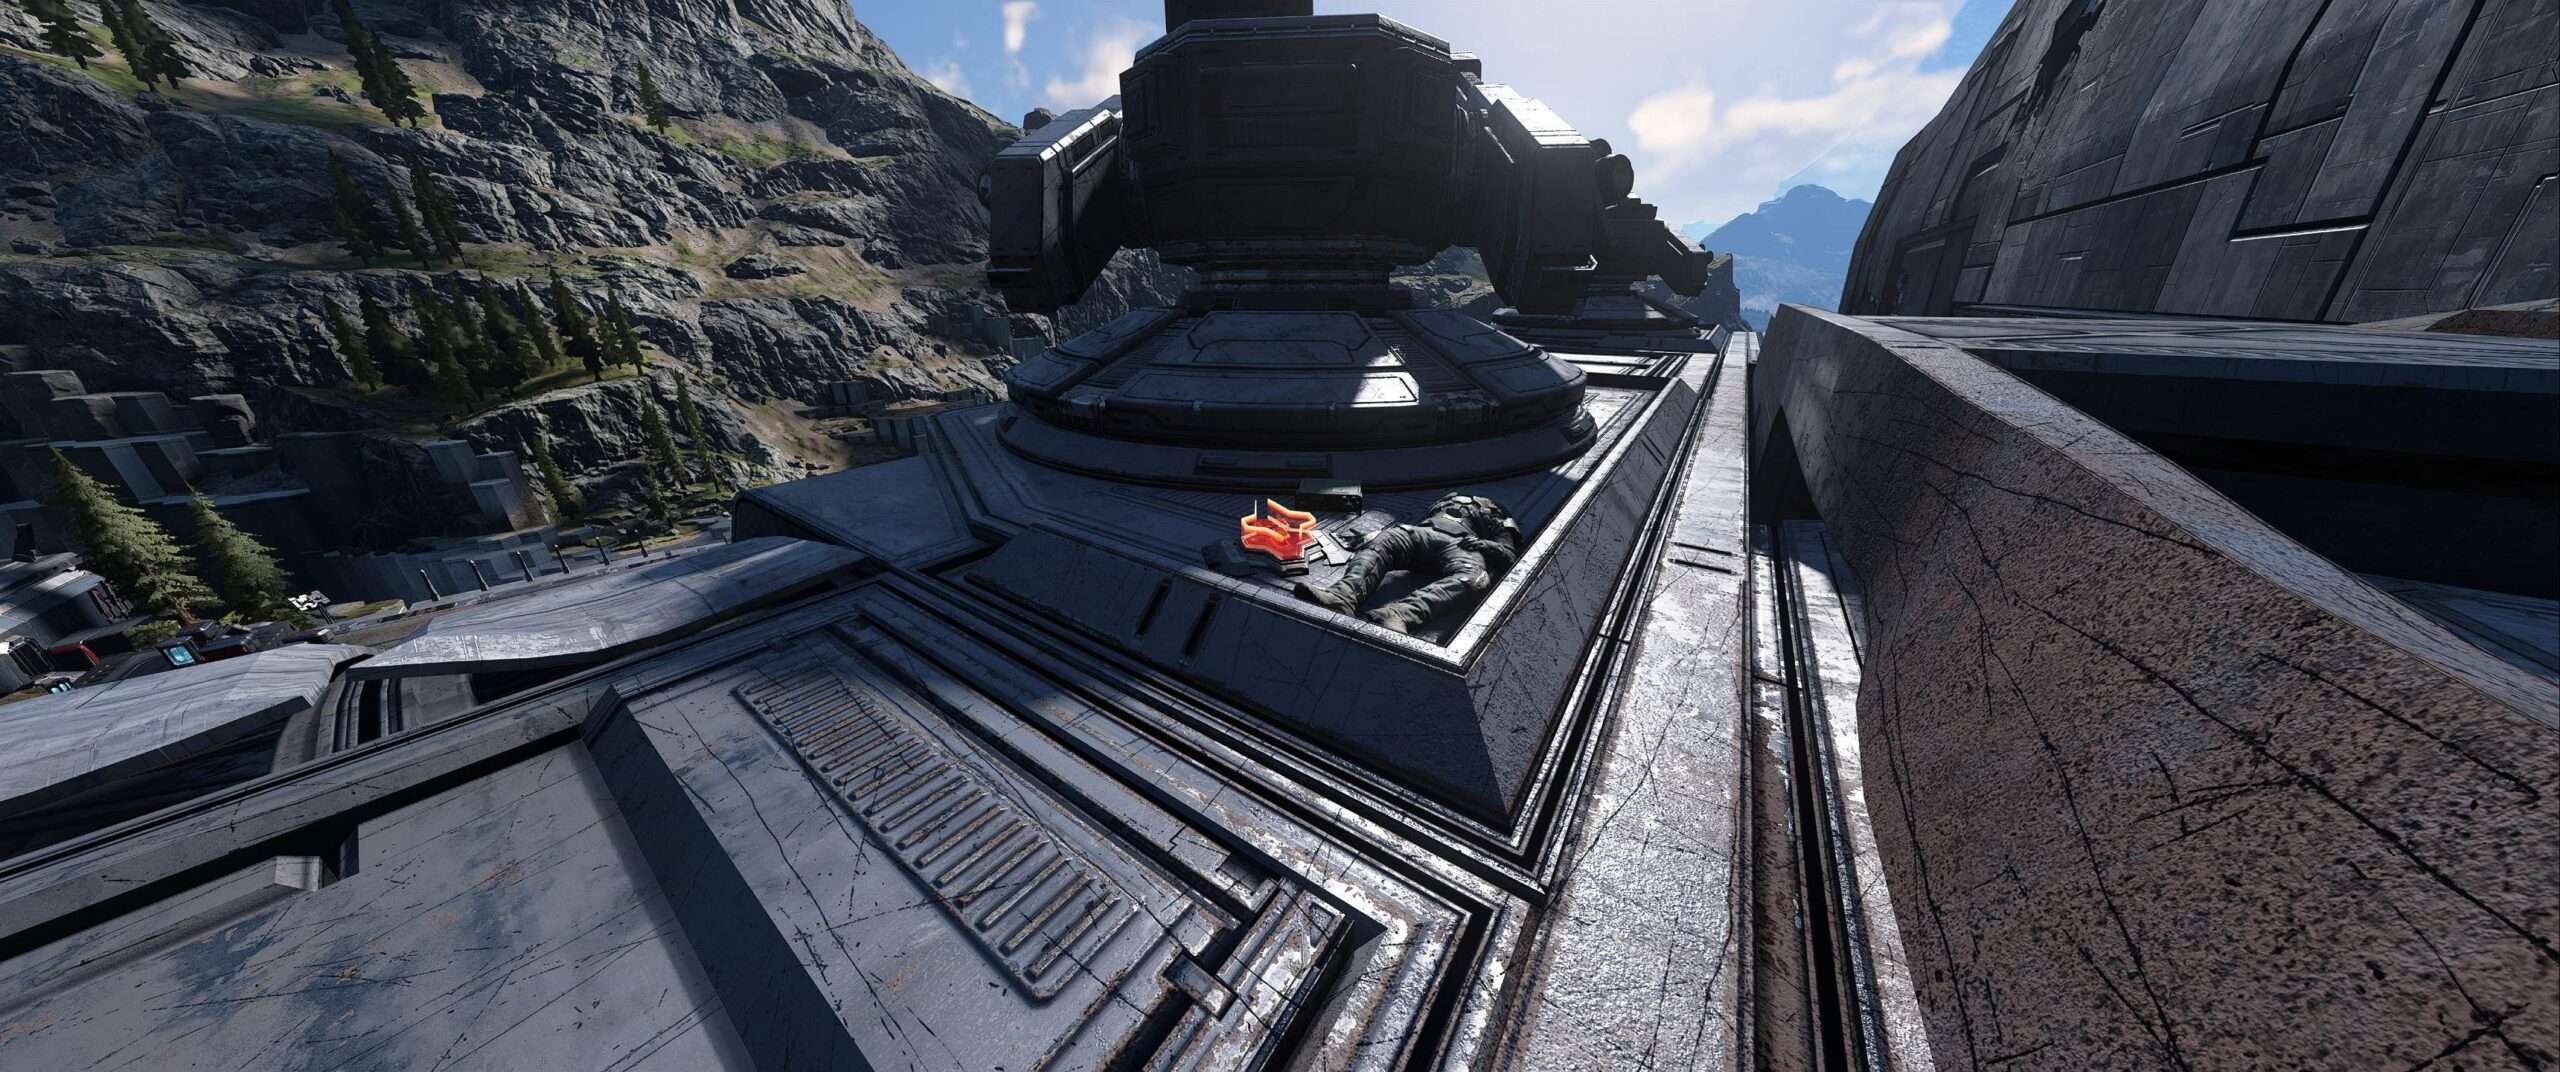
Once atop the ship proceed to the rightmost turret (as viewed from below) and you’ll see a fallen marine and red datapad. Interact with the datapad until it powers down.
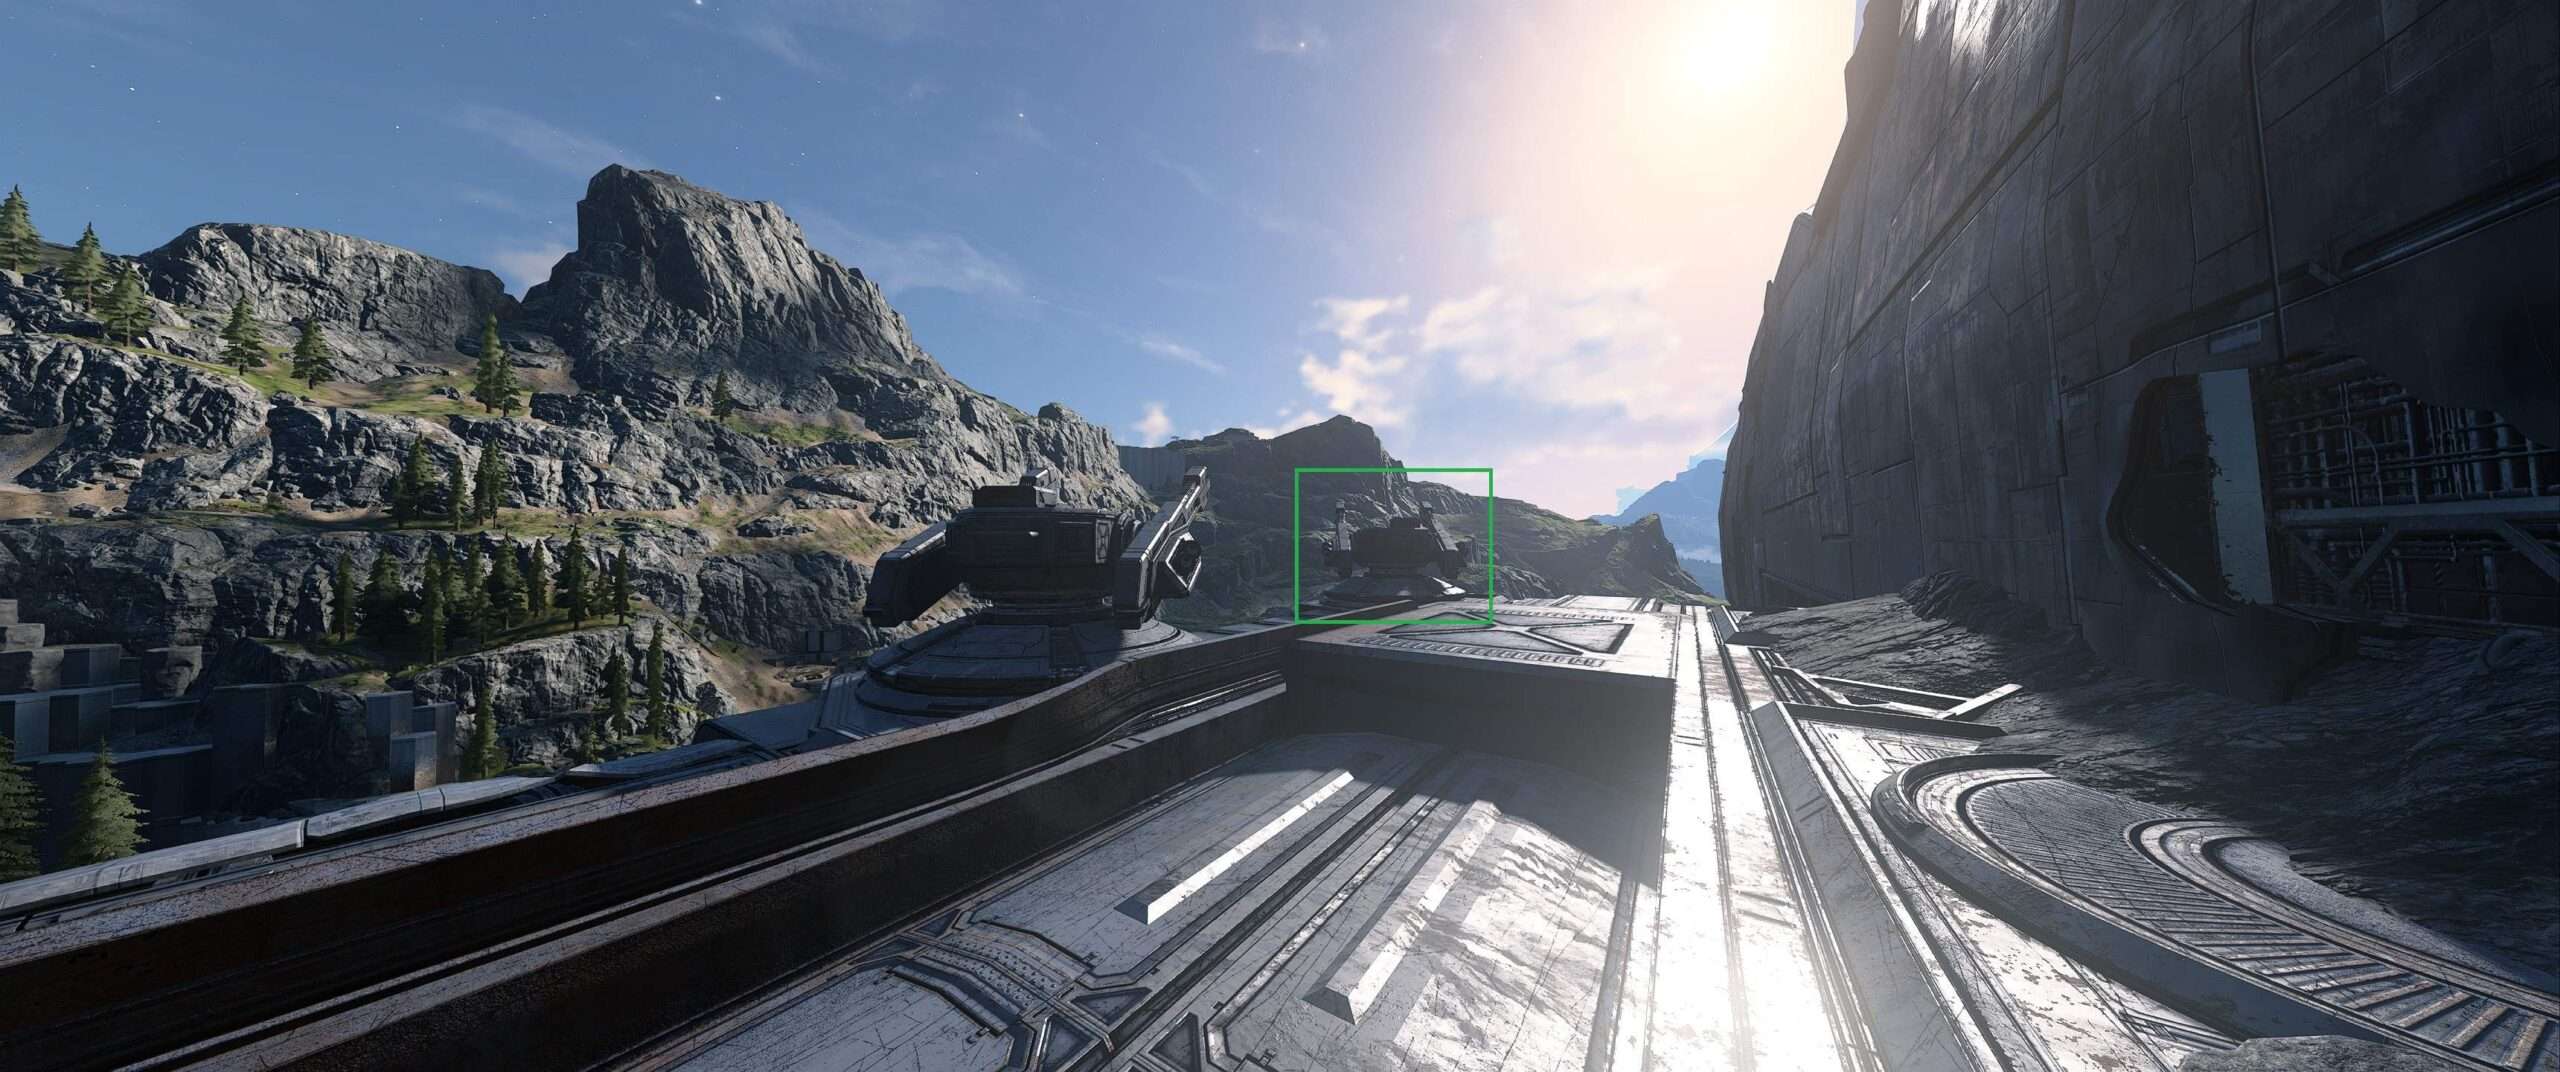
Next, proceed to the foremost turret.
Jump up onto the right barrel, walk to the end, and look down at the tip of it. Hold down the action button until you drop your current weapon. Find a target and fire!


I saw in a video (and I repeated it) that you can grapple up on the ledge above the door in the room with the ramps when fighting Bassus. I had the tank gun so it only took me two shots to beat him, but that place may be safe from attack with his hammer.
I finished LSAO with the scorpion gun today and the achievement didn’t pop.
i finished it yesterday after the update and i still did it. but yeah, it was using LOAD, not continue because it delete the skulls.
I don’t get achievment too, but do all right (once press continue, but unpress before this starts, and start from load)
So i think this achievment bugged
Nope not patched out my just popped now, as I finished it.
Thanks OP this guide helped.
Sword & scorp gun seamed to be the way to go, with getting the duelist sword asap.
For my run I used the mangler + dynamo grenades for the first 3 missions. After I got the scorpion gun I had a energy sword as my secondary for a easy melee hit and shield regen. Getting the duellist energy sword and later Jega’s sword helps too because of their buffs
I am the author of this guide. Please visit the official guide on Steam by this link: https://steamcommunity.com/sharedfiles/filedetails/?id=2680230207
I recommend using a sword for the secondary, mainly because you can grapple to the last enemy in an encounter to quickly recharge your shield and trigger a checkpoint.