
In this guide, we will show you all game settings: graphics, combat, vehicle control and button layout.
Contents
Graphics Settings
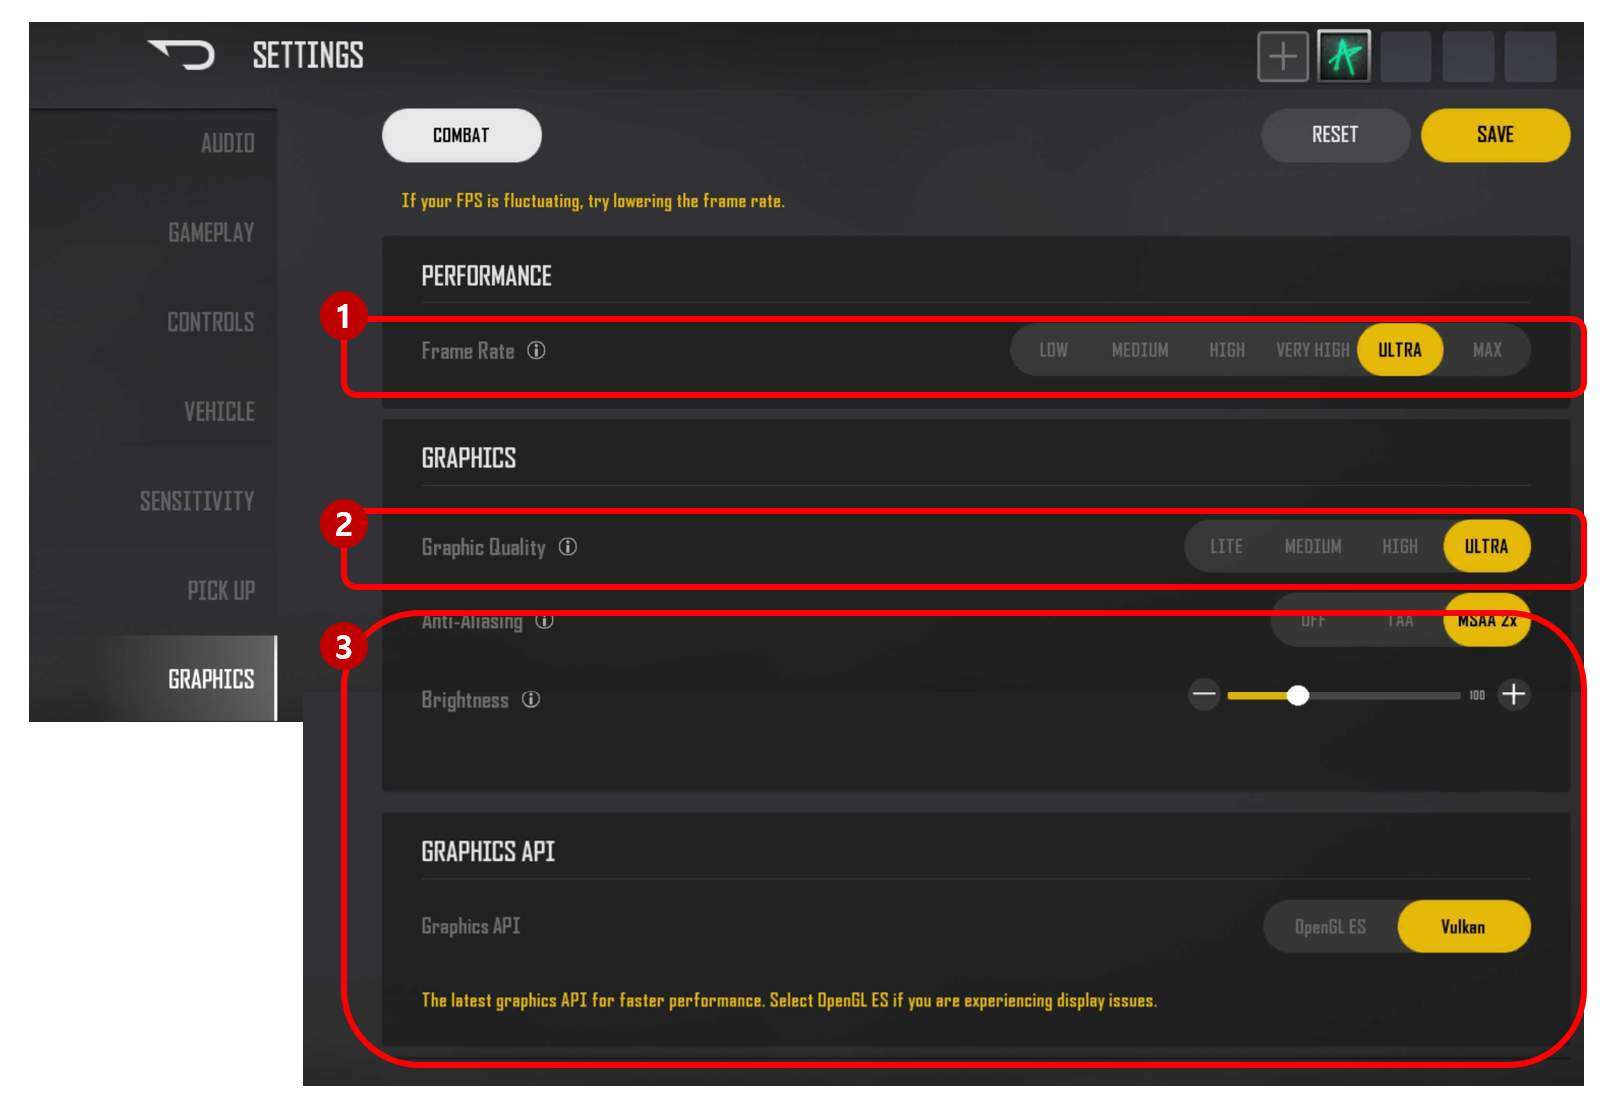
You can adjust graphics settings in [SETTINGS] -> [GRAPHICS].
- Performance / Frame Rate
- Adjust frames per second (Recommended option: ULTRA / If you want a higher frame rate: MAX, EXTREME)
- Graphics / Graphic Quality
- Select graphics options (Recommended option: Use ULTRA settings for the best graphical experience during the test)
- As the game is optimized to the test device, we recommend not changing the options in this section.
Combat Settings

You can set up combat options in [SETTINGS] -> [GAMEPLAY].
- Sound Tracker
- An option to show a sound indicator on the center of the screen.
- Sound Tracker with Icon
- An option to add an icon to the Sound Tracker. If disabled, only sound-related colors are displayed.
- 3D HUD
- An option to display an immersive 3D HUD on the center of the screen.
- Heal Widget Instant Use
- An option to add an icon to the Sound Tracker. If disabled, only sound-related colors are displayed.
Vehicle Control Settings

You can set up vehicle controls in [SETTINGS] -> [VEHICLE].
- Button Controls
- The most common control scheme with Forward/Back and Left/Right buttons.
- Single Joystick
- Control the vehicle with a joystick.
- Split Joystick
- A mixture of schemes 1 and 2. Control the vehicle with Forward/Back buttons and a joystick.
Control Settings

- Set up Basic Controls in [SETTINGS] -> [CONTROL].
- #1 LEFT: Movement, RIGHT: Fire (Fixed)
- Move with the left-side screen. / Aim with the right-side screen and fire with the fire button.
- #2 LEFT: Movement (Fixed), RIGHT : Fire (Floating)
- Move with the left-side screen. / Aim and fire with the right-side screen only.-
- #3 LEFT: Movement (Fixed), RIGHT : Fire (Fixed)
- Move with the left joystick only. / Aim on full screen. / Fire with the fire button on the right.
- Separate Parkour from Jump.
- Separate Left/Right Peek from Peek and change the control option to Swipe.
- Left/Right Peek is “None” by default. To use it in the game, you must select “Divide” or “Swipe”.
- Divide Roll from Crouch (Default = double tap to roll).
- Use Gyroscope.
- Separate Shoulder Aim from ADS Button.
- Separate: Able to use Shoulder Aim button
- Combined: Tap and hold to aim over the shoulder
- Toggle Aim Assist on or off.
- Continuously shoot at a certain rate by tapping and holding the fire button in single/burst mode
- When firing, you will automatically aim over the shoulder.
Button Layout
- You can customize the button layout by going to [SETTINGS] -> [CONTROL] -> <Control Scheme> and tapping [Customize].
- You can adjust the position of a UI element by tapping and dragging the element or selecting Custom UI.
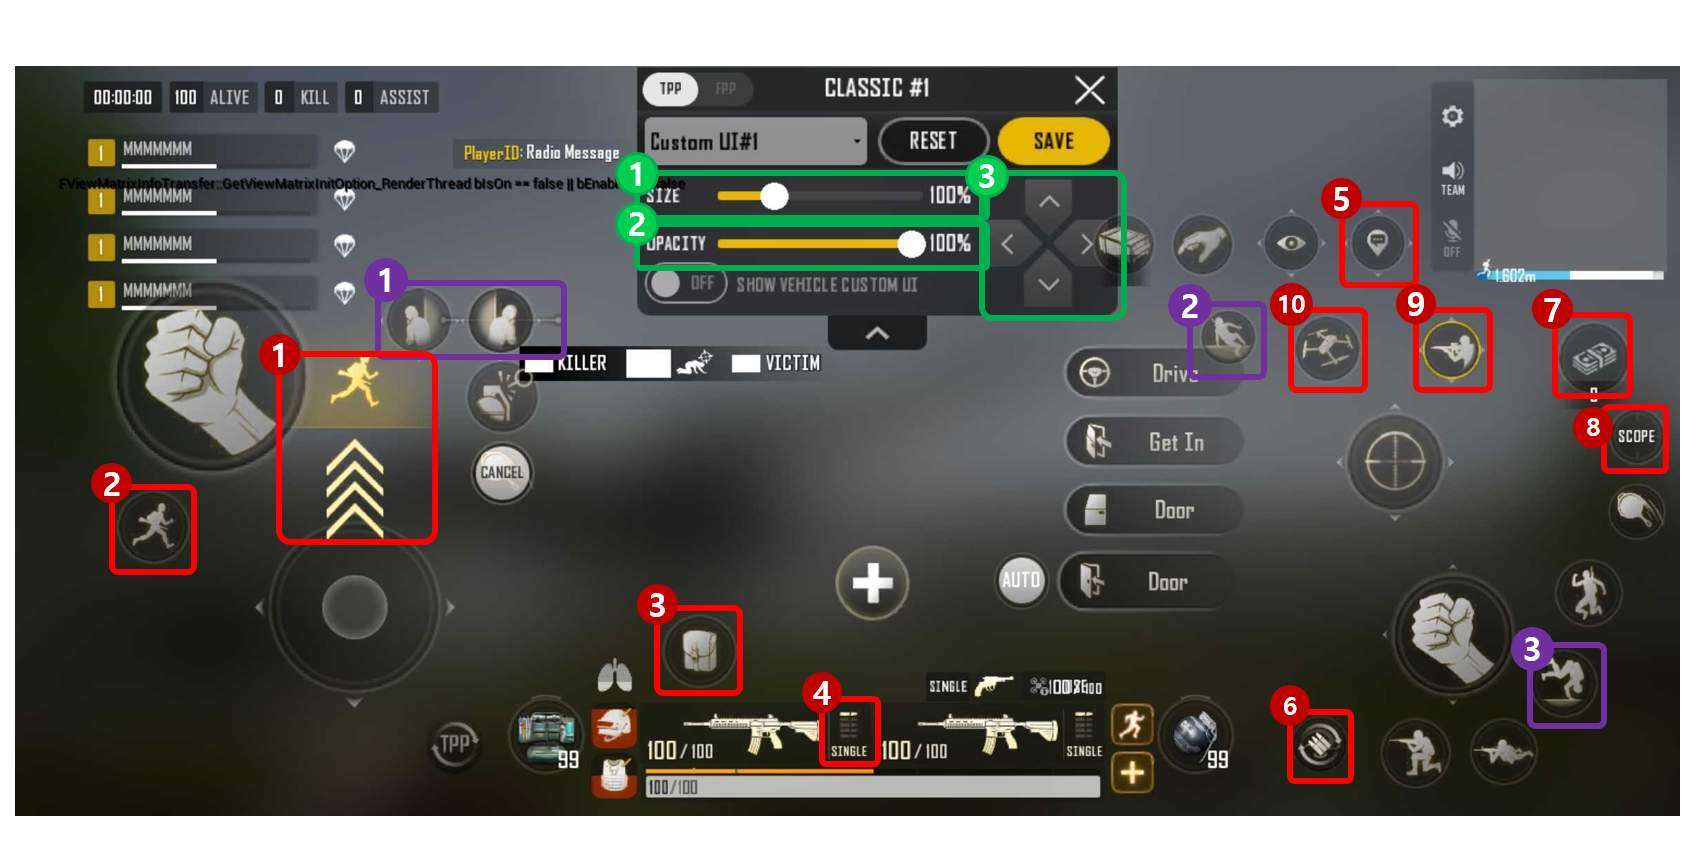
UI Adjustment
- Size: Adjust the size of the selected button.
- Opacity: Adjust the opacity of the selected button.
- You can move the selected button to the left/right/up/down with more precision.
Detailed Guide to Buttons
- Sprint range: Adjust the swipe range to trigger sprint.
- Sprint: Character starts sprinting in the direction they’re facing.
- Open Inventory.
- Change Firing Mode.
- Send out a Radio Message.
- When tapping/double tapping this icon, a marker will be placed where the crosshair is pointing.
- When tapping and holding, a wheel widget will be displayed, and you can select which message you want to broadcast.
- Reload.
- Drone Store: When tapped, the Drone Store window will appear.
- Scope change: Swap the scope of the weapon you are using without opening your inventory.
- Aim over the shoulder.
- Deploy a Search Drone.
Buttons You Can Set to Use
- Left/Right Peek: Choose between Swipe and Left/Right. You can’t use this feature until you set it in [CONTROL].
- Parkour: Go to [CONTROL] -> “Jump” and tap “Divide”. If you move with the button pressed, your character will automatically parkour when available.
- Roll: Go to [CONTROL] -> “Crouch” and select “Separate”. When “Roll” is disabled, double tapping the “Crouch” button triggers a combat roll in the direction your character is moving in.
Pick Up Settings
You can set up pick-up controls in [SETTINGS] -> [PICK UP].
In addition to , you can set up detailed options such as by weapon for each weapon category.
Sensitivity Settings
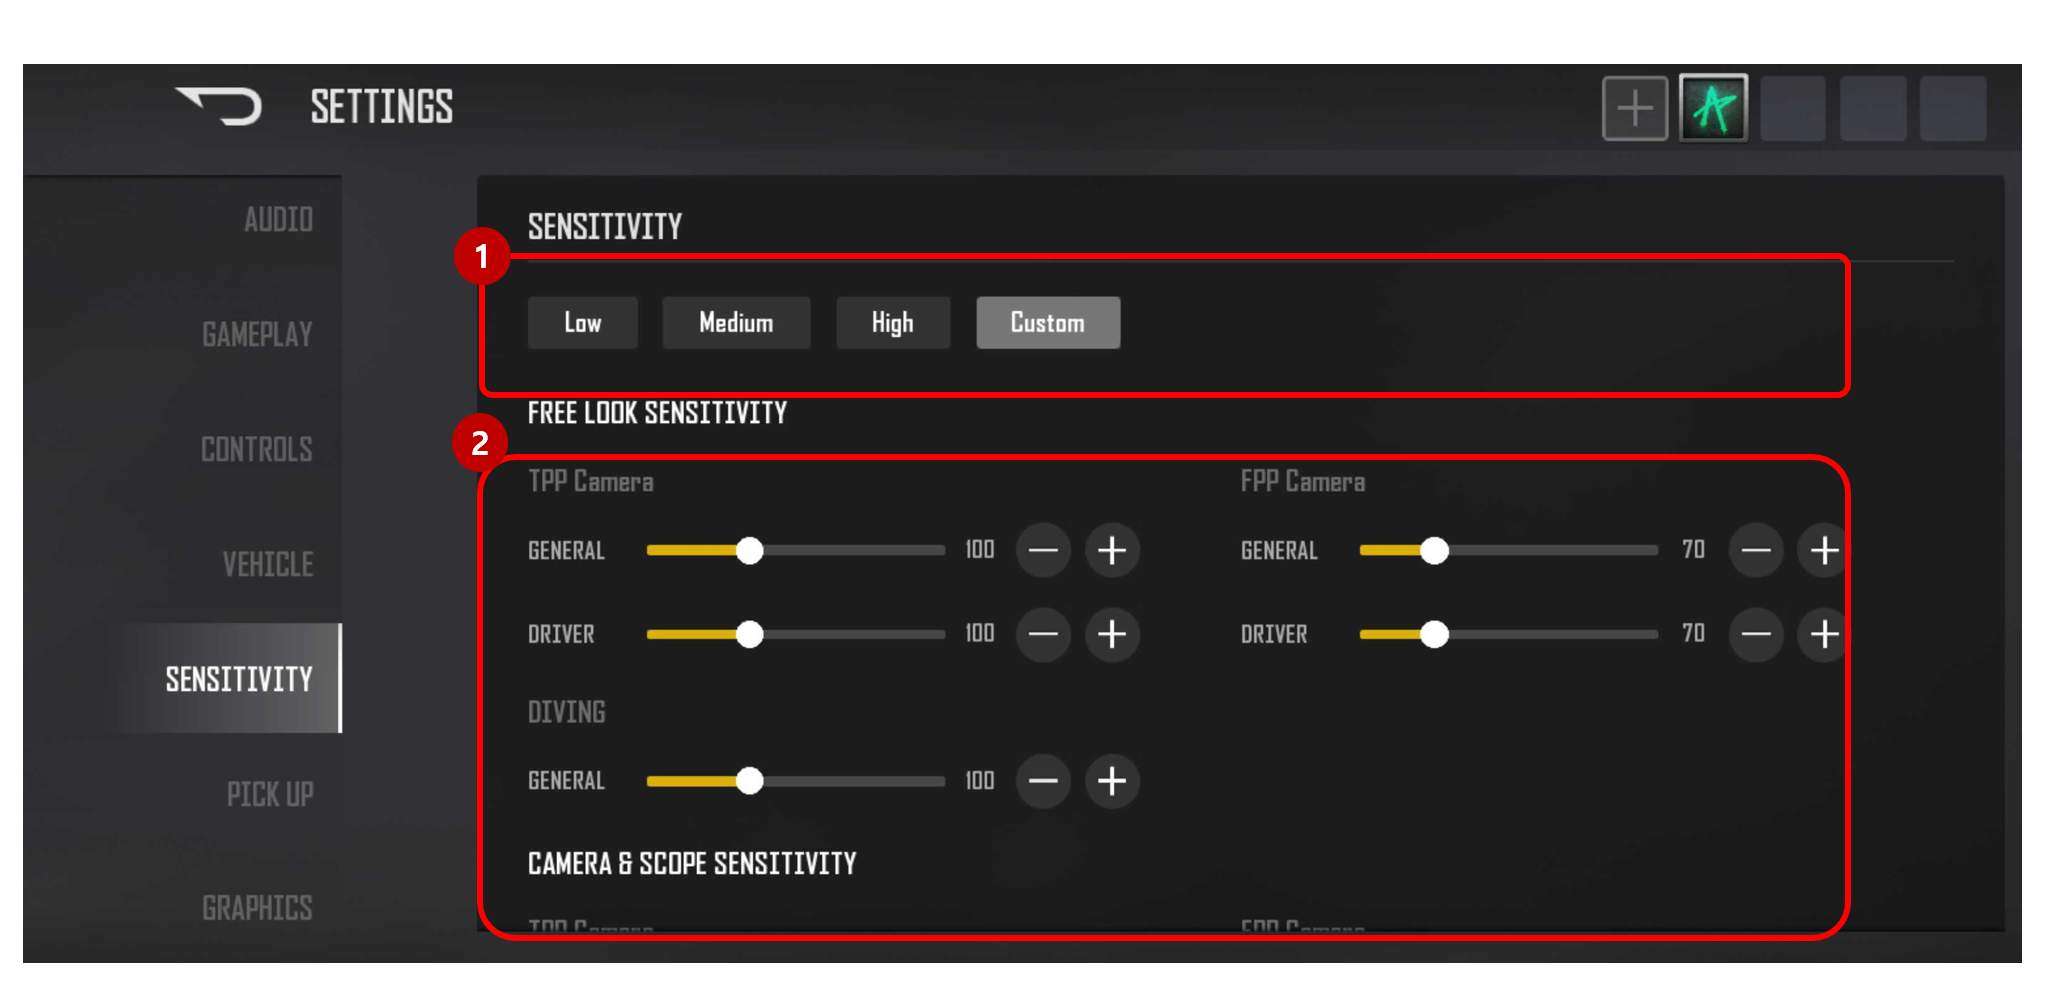
You can adjust your sensitivity in [SETTINGS] -> [SENSITIVITY].
- You can select between Low / Medium / High.
- You can adjust the sensitivity with more precision.


How does the floating fire control actually work?
I’d like an in depth concept of this control, I like this control so I’d like to know how this works thank you!