
Want to make using certain hotkeys such as accessing the RetroArch menu, saving and loading states, and swapping discs? Here’s how you can do that by configuring and enabling hotkeys onto a controller. Please note that this guide is primarily gear towards those who prefer using a controller with RetroArch.
Contents
Introduction
All credit goes to AmethystViper !
RetroArch is a free, open-source, and crossplatform frontend for emulating many classic video game consoles, arcade systems, computer systems, as well as clones and ports of game engines, all powered through the libretro API. It has helped me for years with emulating may older video game systems and relive past classics from yesteryear, discover games I’ve overlooked, or enjoy modded versions of said games through user-created ROM hacks. As someone who also got into setting up a RetroArch-driven emulation box with a RaspberryPi, I figured I show how you can configure and bind hotkeys to use with a controller to have easier access to useful functions when playing games on RetroArch with your favorite controller.
Some Important Things to Note
For General Use
If you plan to use hotkeys on your controller, please note that these configurations are going to be saved on your RetroArch’s configuration file. If you wish to make a back-up of your settings in case something goes wrong in the process, I recommend you create a back-up of your currently existing settings by going to Main Menu → Configuration File → and select Save New Configuration File, which will make duplicate of your current settings to a new file to \configs\RetroArch–.cfg, or manually copy and paste the retroarch.cfg from the RetroArch installation folder. If you need to restore your settings, simply delete the old retroarch.cfg and restore it from the new one. Furthermore, each controller can have buttons/axes in different places from others and this also applies whether or not Steam Input is enabled for RetroArch on Steam (see the next section for an example), so take this into consideration when setting hotkeys to RetroArch’s configuration settings.
For Steam Users
Often by default for the Steam version of RetroArch (or adding the standalone version as a non-Steam game), if Steam Controller support is enabled globally on the client then it will use the default wrapper settings to allow certain controllers to mimic an Xbox 360 controller as many PC games and some emulators commonly use XInput for controller support.
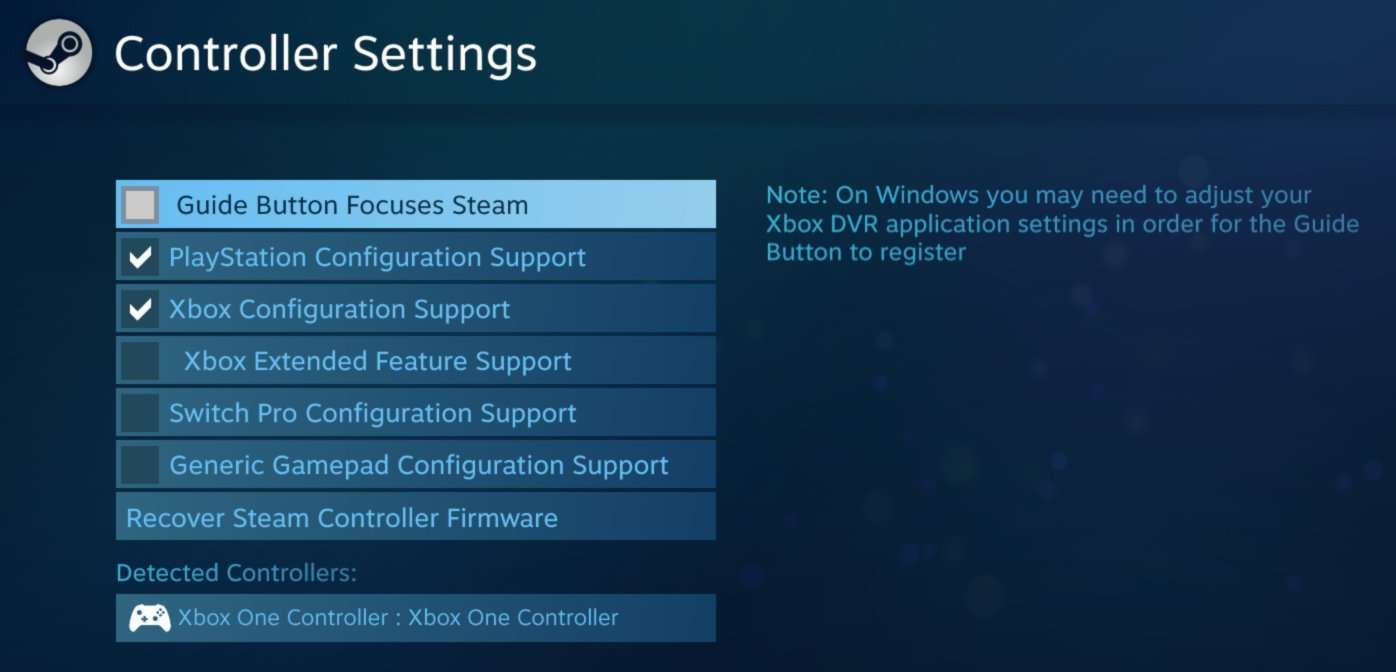
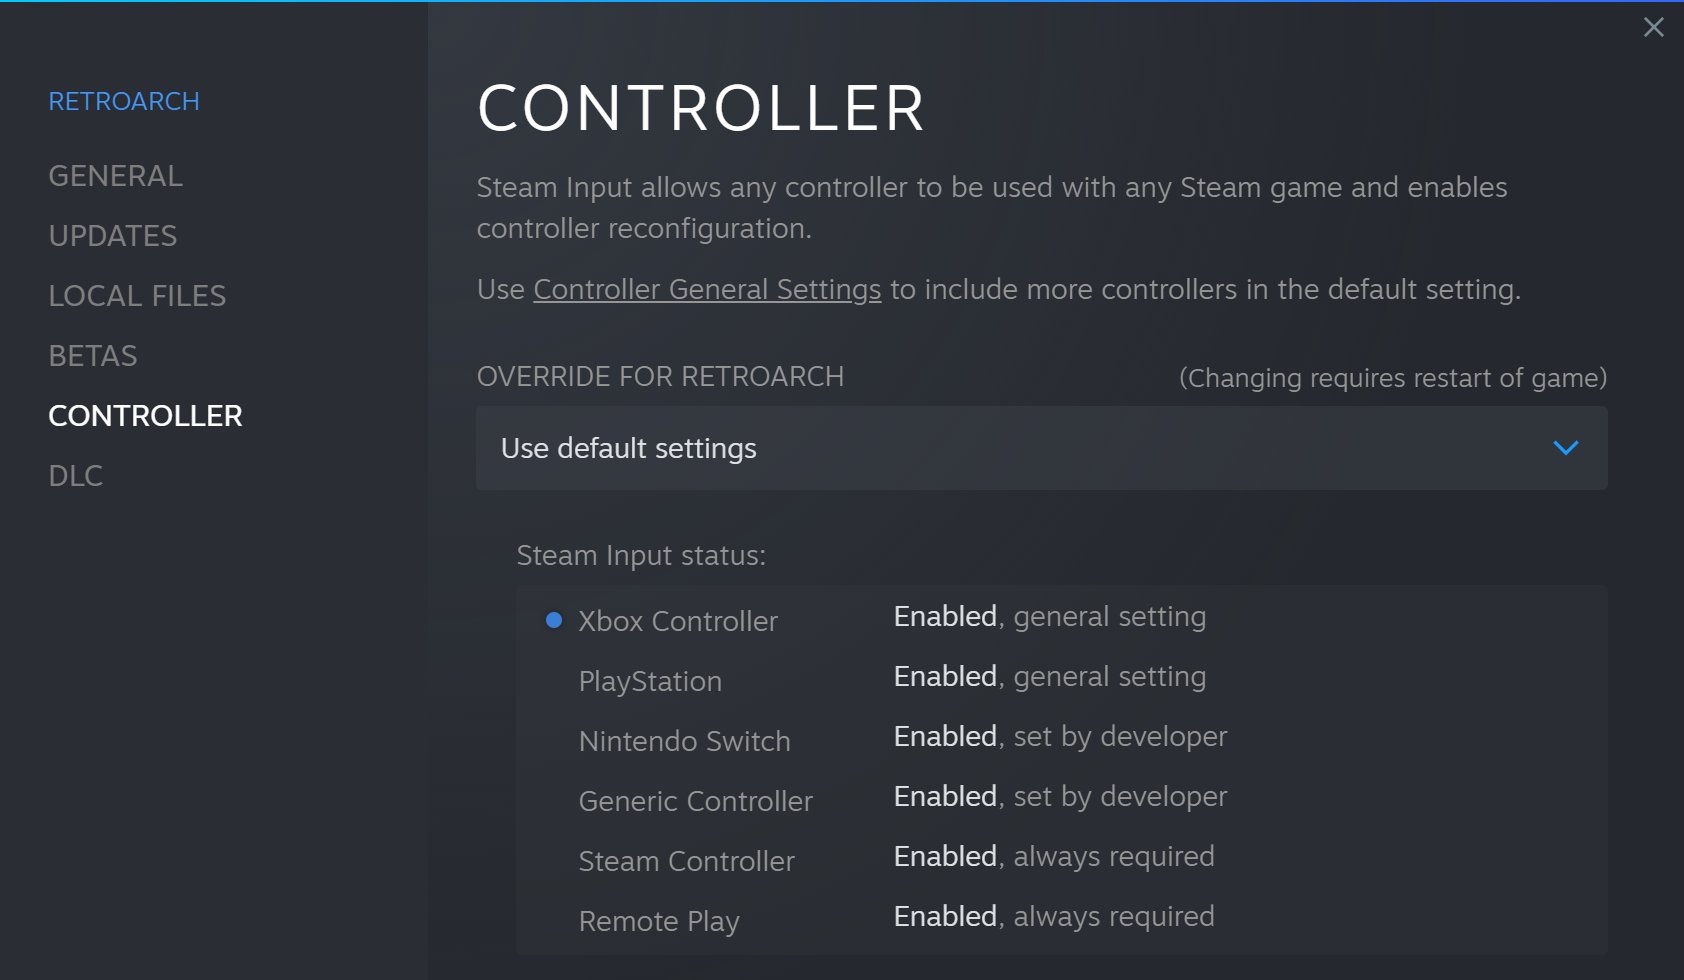
Before configuring your controller to use hotkeys, decide whether or not you wish to have this enabled globally on the client by going to the upper-left corner on the client and click Steam → Settings → Controller → General Controller Settings and toggle which controllers you want Steam Controller enabled, and then decide if you wish to have Steam Controller support enabled on RetroArch specifically by right-clicking the program on your Steam library → select Properties → navigate to Controller and toggle Steam Controller from the drop down menu as shown. You can check if Steam Controller support is active on RetroArch by going into its input settings by going into Settings → Input → Port # Controls → and look for the Device Index. See this example below.
Xbox One controller with Steam Input enabled:

Xbox One controller with Steam Input disabled:

If this input profile returns as “Xbox 360 Wireless Controller” on something that is different from what you’re using (e.g. Xbox One controller), then Steam Controller support is active for RetroArch.
For Keyboard Users
If you plan on using keyboard shortcuts, unfortunately you WILL have to use the button that is assigned to the Hotkey Enable if you want to use hotkey functions on keyboard. I wish the RetroArch developers didn’t make this where it affects both keyboard and controllers when only one of them have a Hotkey Enable button binding. Because of this, I would also recommend making an easily accessible key to act as the Hotkey Enable for keyboard. If this issue with RetroArch is an inconvenience, then do not follow the rest of this guide unless this problem does get resolved.
How to Enable Hotkeys
Before getting into setting up hotkeys on a controller, it’s a good idea to update your controller profiles whenever a new version of RetroArch releases. Here are a few ways how you can do this.
Updating Autoconfig Profiles
If you are using the standalone version of RetroArch, these are already included but you can also easily update the autoconfig profiles from within RetroArch by going to Main Menu → Online Updater → Update Controller Profiles and it will download and install the latest controller profiles.
If you are using the Steam version of RetroArch, you can transfer the controller profiles that you downloaded from the non-Steam version of RetroArch and import them into the Steam version. You can also download the latest controller profiles from Github here either by going to the Releases page and click the Source Code (zip) link for the stable release’s profiles or by clicking the green Code button and select Download ZIP from the drop-down menu on the front page:
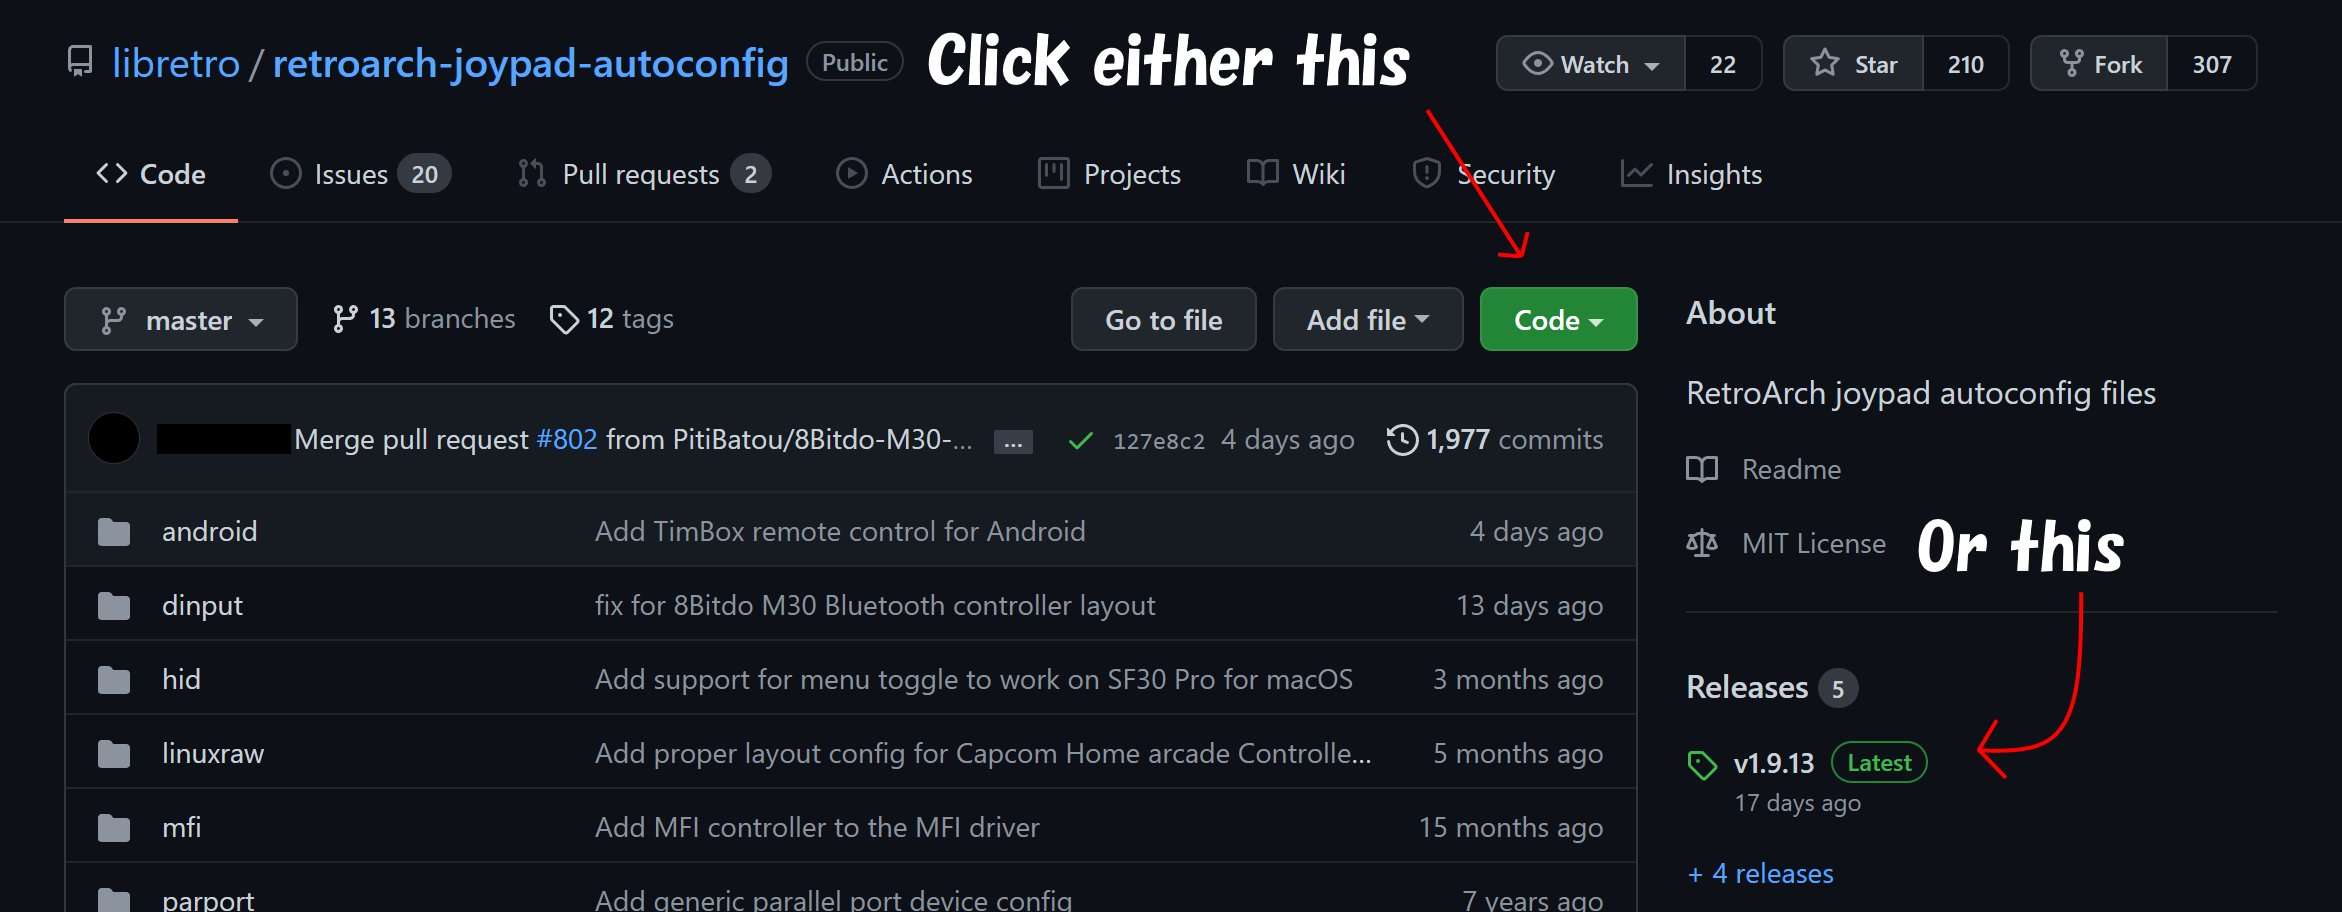
Once you have this file downloaded, extract the retroarch-joypad-autoconfig-master folder from the zip file that was downloaded with a program such as WinRAR or 7zip and extract the contents to a convenient location on the computer, then go inside this folder and copy all of these folders with a system name (e.g. android, dinput, xinput) into \autoconfig folder.
Setting Up the Hotkey Enable for Controllers
To set up the Hotkey Enable button for your controller, go to Settings → Input → Hotkeys, then highlight the Hotkey Enable setting. Press the Confirm button on your controller, and press the button you want to use. I would recommend using the Select (or equivalent) button as the dedicated Hotkey Enable button as RetroPie often uses this button for controllers.

Hotkeys Controller Layout
From here, now you can go through the various hotkey functions you wish to bind for each button on your controller. These are just some examples of hotkey configurations with a controller. Feel free to use your own layout for any PC compatible controller you use.
Xbox 360 Controller
- Back – Hotkey Enable
- Start – Close Content
- A – Reset
- Y – Menu (Toggle)
- LB – Load State
- RB – Save State
- D-pad Left – Save State Slot-
- D-pad Right – Save State Slot+
A very basic hotkey configuration based on RetroPie’s controller hotkey layout.
Xbox One Controller
- Back – Hotkey Enable
- Start – Reset
- A – Eject Disc Toggle
- B – Next Disc
- X – Previous Disc
- Y – Menu (Toggle)
- LB – Load State
- RB – Save State
- RT – Fast-Forward (Toggle)
- D-pad Left – Save State Slot-
- D-pad Right – Save State Slot+
- D-pad Up – Volume+
- D-pad Down – Volume-
An expanded version of RetroPie’s hotkey configuration, featuring rewinding and fast-forwarding functions, disc-swapping controls, and volume adjustments.
PlayStation DualShock 4
- Share/Touch Pad Button – Hotkey Enable
- Options Button – Reset
- X – Eject Disc Toggle
- Circle – Next Disc
- Square – Previous Disc
- Triangle – Menu (Toggle)
- L1 – Load State
- R1 – Save State
- R2 – Fast-Forward (Toggle)
- D-pad Left – Save State Slot-
- D-pad Right – Save State Slot+
- D-pad Up – Volume+
- D-pad Down – Volume-
Same as the above but for DualShock 4 controllers.


Be the first to comment