
Learn the fundamentals of traditional roguelike survival and any start can win.
Contents
Guide to Tactics
All credit goes to Patashu!
Preface
This is a tactics guide for Rogue Fable III, to help you cultivate a mentality for playing this and other traditional roguelikes using every trick in the book to turn unfair fights into fair fights. This is, notably, not a strategy guide or a build guide. It won’t tell you how you should play a specific race or class. That stuff is relatively self-explanatory, and in fact fun to figure out on your own – this guide focuses on the ‘invisible’ aspects of playing a roguelike – Ways to split enemies up or neuter their ability to pelt you with attacks that you might not have even thought of and that the game will never hint at.
It is commonly said that any seed can be won in Rogue Fable III, that there are no unwinnable situations except that you make for yourself – and while I don’t know who the best RF3 player is, I know that the best ever Nethack winstreak is 61 and the best ever Dungeon Crawl Stone Soup winstreak is 62. They are not cheating, just playing at the highest possible level of caution, risk aversion and turn-by-turn optimization. With even a fraction of this level of discipline, you can get a win of your own.
Your goals for this game should be first to win, then to win with every class, then to get a win streak of 3, then to get a daily challenge win streak of 3. After that, you can consider yourself an RF3 master, and you should consider taking what you’ve learned with you to other traditional roguelikes! Let’s begin.
Rule 0
Rule 0 of tactical roguelikes is as follows: ‘By default, it’s a mistake to walk towards an enemy’. Let’s explore various situations and tactics where this rule holds, and also the exceptions where it doesn’t.
- Take The First Hit: It’s minor, but new players to the genre may not think of it – if you step next to a melee enemy, it will get to hit you first. But if you hold still, the enemy will step next to you, and you get the first hit. By similar reasoning, try to get the first hit on ranged enemies as well.
- Corner Peeking: If you discover a ranged enemy several tiles away from you, then walking towards it will let it take several hits, but breaking line of sight (hereafter LoS) by stepping around a solid wall or line of fire (hereafter LoF) by stepping behind an obstruction will force it to come to you.
However, note that kiting enemies are smart enough to move to the furthest away tile that they can shoot you from, so not all corners work equally well.) (Also, be aware that some effects only require LoS, not LoF. LoS is asymmetrical, and the goblin storm mage could see me and summon an orb of storm here!

- LoS Edge Kiting: If you aggro an enemy at maximum range (requires it to have ‘???’ and not ‘?’ – try being exactly 7 tiles away orthogonally or a 6,3 diagonal) then start running away, it will start each turn not in your LoS and have to step towards you. This lets you kite even archers to favourable terrain – just make sure that the level layout lets you keep them away at all times, observe that diagonals take you ‘further’ away than orthogonal moves, and have a plan for getting in range with minimal damage taken when you’re done kiting. (Plus, many ranged units have less than 7.5 max range – by default elementals/statues have 7, archers have 5, and mages have 4! This lets you use even tiles in LoS to kite.)

- Diagonal Diving: Because LoS and ranges in RF3 are circles, you can approach/retreat from enemies faster if you take a diagonal path. In particular; approaching an enemy orthogonally puts it in LoS for 7 tiles and detection range for 7 tiles (or 6 if you start the approach 1 or 2 tiles higher); whereas a diagonal puts it in LoS for 5 tiles and detection range for a mere 4 tiles.
- Chokepoints: The more enemies you let have line of fire on you at once, the worse of a position you’re in. Rushing an enemy group is a good way to let them surround you and wail on you. Retreating to a corner or one tile corridor limits the surface area and lets you deal with them one at a time.

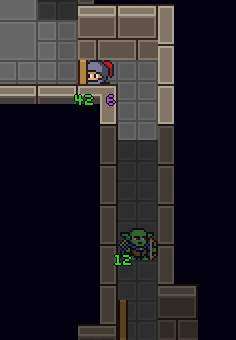
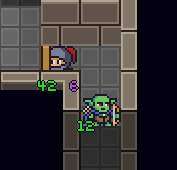
- Fear the Unknown: Until you know otherwise, you should assume every unexplored tile is full of enemies. If you’re retreating or luring enemies, pull them closer to the stairs or useful terrain – don’t run into unexplored territory and potentially bring more enemies into the fight. Also, be aware that while enemy shouts aggro other enemies within 6 tiles of the shouter, any enemy more than 10.5 tiles away from you can’t be aggroed this way, and shouts outside of your LoS are halved to 3 tiles. By aggroing this first goblin storm mage and moving it out of my LoS and towards me, its other goblin storm mage friend is barely 3 tiles away from its first shout and never noticed! This is Pack Splitting (Shout Dampening Variant).


- Pillar Dancing: If you need to run from an enemy and don’t want to run out of space, then you can use a single tile pillar or a closed loop. Since you and the enemy move at the same speed, the enemy will never catch up, and you can regenerate resources/cooldowns at your leisure. For example, a warrior should never hold still and melee a melee enemy, but instead retreat whenever Shields Up is on cooldown. If the enemy is ranged, though, you must use a single tile pillar. If the enemy is out of LoS the entire time, as a bonus, you can de-aggro the enemy on top of this. Also, be aware that if you go past the 50% mark of a closed loop, enemies will start following you the other way, so you might get flanked. (but you might use this on purpose…?)
- Stairdancing: When you take the stairs, one turn passes during which enemies can act, and after that turn, you transition between levels. Enemies that are now adjacent to you will follow (so take the stairs when they’re one tile away if possible); all enemies left behind will de-aggro and wait in place, no time having passed. They don’t even regenerate HP or wear off status effects/clouds! As such, there are three main modes of Stairdancing: ‘peeking’ where you go up the stairs to regenerate all resources then return and continue fighting; ‘pulling’ where you split up enemy packs by pulling them one or a few at the time to another level; ‘parking’ where you move a monster you don’t want to fight right now to a cleared level, juke it and de-aggro it somewhere where you can ignore it until later. (TODO: What does falling down a pit do? If it’s safe, you can use it as an alternative to stairs)
- Use Favourable Terrain: While luring enemies away from where you found them, consider luring them to beneficial terrain features: Unstable terrain makes physical attacks deal 1.5x damage and can be used repeatedly. Flammables can add AoE damage to a fire attack. Water and shock reeds do similarly for lightning (and don’t forget they’re unstable too!). Clouds can block LoS and prevent enemies from seeing you, but you can see them (and water can be used to make your own!). Fire shrooms and other destructibles will explode painfully. Fountains can give you mid-fight resources. Pits will instantly kill an enemy knocked in and give an escape route. Pillars, corners and loops can break LoS or give you retreating options. Enemies never take into account dangerous terrain when choosing moves!

- Chumpblocking: Enemies block each others’ LoF. So, a less scary enemy can block a more scary enemy from shooting you. You may even deliberately maneuver it or keep it alive. Keeping a melee enemy between you and a ranged enemy lets you kite the ranged enemy around indefinitely! Nothing’s stopping you from kiting a rat through the whole game as a chumpblocker, but that may be too silly. (Also, rats sometimes move randomly, so be careful.) Also, sometimes chumpblocked archers shoot the chumpblocker, but I don’t know how to trigger it.

- Pack Splitting (De-Aggro Cheese Variant): If you aggro an enemy at the maximum possible distance from you (7 tiles away orthogonally) , then keep it out of your LoS for 20 turns in a row, it will de-aggro (it will disappear from the map and minimap), as will all the other enemies its shout aggroed too. At this point, they will stop moving and hold still, and depending on how the pack spread out, they both are much further away from unexplored territory (can safely be fought knowing no more reinforcements will come) and less of the pack will be aggroed in the fight.
Exceptions to Rule 0
- I Can’t Get This Ranged Unit To Come Closer: If the terrain is simply not favourable or you’re already caught in a bad position, then you may be forced to approach it. Levels with wide open areas and lack of true walls may cause this. Especially if the unit is acting ‘smart’ and moving to the furthest way tile in your LoS, it has a minimum range of 3 – getting close to it, if there are no other enemies around, may render it harmless.
- Immobile Units: Spawners, statues and swimmers simply can’t be kited to the part of the level of your choice. If you would rather kill them then ignore them, then you may have to approach them. You may want to clear out surrounding parts of the level first to improve your options.
- Fast Enemies, Slow Players: If the enemy moves faster than you, then there’s only so much kiting you can do. Figure out what the most favourable position you can reach in time is. If you’re slower AND it’s a shooting enemy, then there may be no better play than to immediately engage. (Conversaely, whenever you’re faster than an enemy unit – if it’s a meleer, you can get infinite free moves without spending any resource!)
The Roguelike Mentality
The goal of playing a traditional roguelike is not to make the best strongest character ever, or to fulfill a playstyle fantasy, or to eventually win just by playing for long enough. The goal is to win, and to win as often as possible. There are no bonus points for getting into a dangerous situation and barely surviving – only the chance that you miscalculated and have to start over. There’s no pressure to think or play quickly – the game is turn based. There’s no reward for winning without using all your consumables or abstaining from certain strategies – save that for challenge runs if the game gets too easy. These principles lead to the following rules of thumb:
- Use Consumables Early: Some consumables are designed as panic buttons (like the potion of healing) – others may have greater use if employed before the tide of the battle turns against you. A potion of power boosts your DPS, but you can’t later decide you wanted to use it at the start of the fight. A well timed javelin or wand may kill a troublesome enemy before it can snowball out of control. A wand of blades zap may relieve pressure and give you several free turns when you can make them most count. And so on. As a result, the skill of risk assessment, determining how hard a fight will be before you begin it, is an important one to cultivate. But even more to the point, ‘this is the end of the game, I won’t ever have another chance to use them’, or ‘this is a boss fight, it’s going to be hard’ are also simple and useful pattern recognition heuristics.
- Use Consumables Often: Rogue Fable 3 is a short game – it can be beaten in 2 hours playing at a typical pace. There’s not that much game for you to save consumables for, and no consolation price for dying with a potion of healing still in your backpack. Use them or lose them.
- Risk Assessment: RF3 has a useful feature – you can mouse over each enemy and see the maximum possible damage they can deal. This lets you, for example, calculate the worst possible case scenario for a turn, as long as you also take into account surprises (hazardous terrain, damage shields, the 1.5x damage multiplier for being constricted, etc). How many turns you’ll die in if you sit still and do nothing is an important metric to always be aware of – if you’re going to die right now, you need to stop and think of what your highest probability out is. If you’re going to die in two turns, it’s now your job to play smartly and use consumables so you don’t fall into the previous category. Even dying in three or more turns is a situation to take seriously. And you should always play more conservatively than how much damage you can take implies; you may not instantly be able to bail yourself out, you may have missed an interaction or non-damage effect an enemy can do, and given that this is a game where a damageless run is possible, you should take any and all opportunities to minimize how much damage your run takes.
- Cool and Level Headed: You’re not in a hurry, this is a turn based game. More to the point, the emotional state you’re in might influence your decisions. Being mad, salty, sleepy or loopy are signs that you need to take a step back from the game before you take an ill-advised move that could end your run. The moments where you feel the strongest emotions are when you should try the hardest to remain analytical and objective – but you also have to play the rest of the game carefully too, so you don’t sleepwalk from an easy encounter into an unwinnable one. Figure out what mental strategies work best to maintain self-discipline, and always play to win.
- Learn and Remember: RF3, like other traditional roguelikes, is a game full of mechanics, interactions and threats. If you don’t know how something works, and it might mean the difference between life and death in a future run, endeavour to figure it out and write it down. If a fight went poorly, but you knew what you should have done better, write it down so you can do it next time. Your future self will thank you. Also don’t feel afraid to ask in the official Discord Server – we’re all here to learn from each other.
- Food is a Resource, but so is Hunger: You don’t have to eat foot when your hunger is at 3/20 or less – technically you can wait until you’re about to die from starvation damage, but I tend to wait until the starvation damage starts then eat it. On the other hand, you get more food than you need to beat RF3, and you can buy even more from the Merchant, so you don’t be stringy with it – the lower your hunger is, the more you should value food as a very useful consumable. It’s an instant half heal of HP, MP and SP, and if you end the game with food still in your inventory, then you could have used more. Plus, if you feel safer taking a full rest or retreating to use an earlier fountain you skipped than pushing on with depleted resource meters, that’s a choice you can make, and the better you are at avoiding HP loss, the more options you have on how to spend your hunger and food.
Speed is King
It’s a common refrain on the Discord server that the proper way to build most characters is to get 1 dex for your first SP, then enough stat for all of your talent unlocks, then dex for the rest of the game. But why would you not want to keep pumping str or int forever? There are valid reasons to do so (more DPS is great, more survivability is great) but dex offers a power unmatched by anything else in the game; free movement that regenerates very quickly. Let’s explore all of the things you can spend an SP to get.
- +1 Range: You can instantly move one tile closer to an enemy and shoot it or melee it. This effectively increases the range of all of your attacks and abilities by 1. (It doesn’t truly do so, since at the same time you’re moving into range of that enemy and any other enemies around. But if you’re ready to finish the fight after starting it, then it lets you skip one turn of enemy attacks.) Plus, moves with a ‘minimum’ range (like charge and fireball) can now be used from melee if you spend an SP first.
- -1 LoS: When retreating from a monster, either to stop it from attacking you or to get it to forget you entirely, spending an SP saves you from one turn’s worth of attacks, or makes it go from completely impossible to possible.
- Dodging Hazards: Several things an enemy do can be completely nullified by spending an SP or two – thrown bombs, ice bombs, smite, a melee enemy being uncomfortably close to you, et cetera. You’re effectively spending an SP to avoid tanking a lot of damage.
- Mistake Erasing: In a roguelike, spending a turn doing something unproductive or that you could have foreseen is one of the worst mistakes you can make. Whenever you’re on the wrong tile by accident (maybe you woke up a storm mage while standing in water, or you can’t quite get your perfect fireball lined up, or you REALLY REALLY need to be next to that fountain/on that stairs to use it) you can spend an SP to fix your mistake then go back to what you were really wanting to do, attack and use abilities.
- Monster Aggro Avoiding: Several forms. if you accidentally step into a ‘???’ monster’s detection radius and can’t leave it in one turn, you can spend SP to guarantee 100% it won’t wake up. If you DO wake it up ‘!!!’, then using all your SP before it is able to shout for the first time on its next turn can be used to very effectively split that monster from the rest of its group (since any monster more than 10.5 tiles from you stops being able to aggro from shouts, AND if it ends its move outside of your LoS its shouts only reach 3 tiles, not 6!). Finally, you might just run enough to move an aggro enemy out of your LoS. Kite it for 20 turns, and it’ll forget about you and you can try again in a more favourable position.
- SP Regen Surfing: You regenerate 1 SP every 10th turn (e.g. T in the bottom left corner = 10, 20, 30…) no matter your SP max. This is both why the first SP point is the most important, and means that if you have control over when you use your first SP in a fight, use it just before it regenerates, not jsut after.
The only question is, when to spend your SP? An argument could be made for spending at least your first SP very early (so it can regenerate), but beyond that, they should of course be spent whenever they reduce the expected amount of damage (or need to use consumables to avoid lethal damage) in the remainder of the fight, which is a matter purely of calculation and experience. Whether you use them to aggressively explode enemies, to kite enemies in a dance or save them for an emergency is a playstyle distinction and up to you to cultivate. The fact that it’s powerful like Haste or Swiftness in Dungeon Crawl Stone Soup but even more so since you can choose when it fires off and is a renewable resource is hardly a surprise.
Miscellaneous Noteworthy Mechanics
This section is specifically for things that are less fundamental, and more specific to the way RF3 works.
- Zigzagging: If you move one or more tiles before ending your turn (normal move, speed points move, I believe abilities work too) and an enemy tries to attack you with a basic projectile, there is a 20% chance that it will target the square that you were last on. This means that all other things being equal, you should move/spend SP at an angle towards, away from enemies or instead of passing a turn, to take 20% less damage on average.
- Smoke Bomb Abuse: First off, the clouds it makes block LoS – even if it’s only for 2 turns. Second, it aggros the enemy while putting it to sleep – so if you sleep bomb an enemy and walk 10.5 tiles away, it’ll aggro and follow you without any of its enemies being able to hear shouts and follow. Third, a deep sleep only ends upon taking damage or the duration ending – so you can take an enemy completely out of a fight by chain smoke bombing it. You can smoke bomb an enemy to get ‘free SP’ by reposition while it sleeps, you can smoke bomb and run away, you can smoke bomb an enemy to block a corridor, et cetera.
- Ally Tanking: Allies are traditionally OP in traditional roguelikes, but in RF3 they’re even better, because whether an enemy prefers to target an ally or you is deterministic! If the ally is closer, the ally takes priority; if you’re both equally close, then it depends on a directional priority. (In order around the enemy it’s W, N, S, E, NW, SW, NE, SE. There’s a pattern for range 2 and beyond if you want to find it yourself. Confused enemies use the same logic.) (A few known exceptions: If you or an ally zigzags then enemy or ally projectiles might accidentally hit you, you can incidentally be hit by AoEs and hazardous terrain still, and whip pulls always target you. (TODO: Some other abilities might still be buggy and always target you, too?)). Popping a flaming battle sphere or a wand of blades can give you an instant effective HP boost. As another tactic, you can summon an ally, then run away, and let the ally fight for you – due to the 10.5 tile aggro limit for shouts, this can be another way to split large fights into smaller ones.
- Cloud Abuse: Clouds can be made by using fire over water, using Smoke Bomb, and certain natural features create it too. Clouds can be moved and shot through, but cannot be seen through. While enemies are always aware of your location, they are not permitted to shoot you without LoS – but you CAN shoot THEM. By using clouds you can create a safe retreat or get a very large number of free turns. It also encourages kiting enemies to get closer to you if they can’t see any way to stand and shoot you from a distance.
- Shoutless: Because monsters only start shouting once they take turns while aggroed, and only have a 50% chance to shout when they die, if you kill a monster before it becomes aggro, you only have a 50% chance of alerting nearby enemies. Remember, attacks don’t make noise, only monsters do!
- Levitation Abuse: If you have levitation from Shroud of Wind 2 or the ring, then you can hover OVER hazardous terrain (pits, lava, water, bones…) and everyone who wants to approach you has to step on it and take the penalty. Or, even better, you can just fly PAST the pit and non-flying enemies can’t even pursue you! This can give you a huge advantage especially against melee enemies.
- Wandering Monsters: Monsters are normally generated stationary, but occasionally are generated asleep or wandering instead. Wandering monsters move in a straight line until they hit a wall (note that being obstructed by another enemy doesn’t count) or roll a 5% chance, then pick another straight line. You can’t tell if a monster is wandering or stationary until you see it move unaggroed.
- Kiting Flag: Ranged attacking monsters generally have the kiting flag. This makes them move into your LoS at the furthest away tile they can shoot you from, and sometimes (25%) back up when 3 or less tiles away from you. You can expect anything that can shoot an arrow or bomb or elemental attack or use priest spells to have it.
- Reflective: Enemies listed as ‘Reflective’ actually have 75% reflection. So, what’s actually reflected? It’s the actual projectile itself. Edge cases include: Lightning Bolt can’t be reflected since the entire thing is an AoE. Fireball and Smoke Bomb can be until they land, then they turn into AoE which can’t be. Anything smite targeted (LoF not required) can’t be reflected. And of course, melee works perfectly fine.
- Pits: Pits are powerful. Besides jumping down them on purpose to go down a floor, any non-flier knockbacked onto a pit will instantly die, give you full EXP, and if it dropped an item it teleports onto the nearest floor. And they’re useful for you, too. Jump in a pit (by clicking it) and without even spending a turn, you’ll change floors and de-aggro everything (like taking the stairs), landing somewhere random. You will lose half your current HP if not levitating, however, but if you are levitating it takes an extra turn to fall down (have to be above a pit and press >), which might be worse. And don’t take a pit at the bottom of a branch or you’ll instantly die!
- Constriction: Constriction is a very strong mechanic enemy golems (and some other monsters) can use. While constructed, you can’t move or use SP and you take 1.5x damage. You can knock the enemy away, kill it, teleport or blink, and if you can’t do one of those your run might be over, so be very careful. (Also, Shields Up doesn’t stop it.)
- Ice/Oil Infinite: Ice (made by a frost mage or naturally) or oil (made by a dying clockwork or naturally) is not just unstable terrain, but causes enemies meleed on it to be knocked back and lose their turn. This gives a free, resourceless way to infinite combo such enemies.
How Aggro Works
Becoming Aggroed
There are three main ways the enemy can gain aggro (assuming they aren’t created already aggro) – Being hit by an attack, detecting the player, or hearing a shout. The first one is trivial, so let’s clarify the other two.
Detecting the Player
Note: I tried source diving for this, but the actual behaviour I observed in-game seemed to be totally different. So I rewrote it with the rules I’ve observed, but may be missing some nuance.)
Every time an enemy gets its turn, it checks if the player is within detection radius. (It displays ‘???’ if yes, ‘?’ if no.)
Detection radius is calculated as follows: 1.5 tiles (8-way adjacency) for sleeping (‘ZZZ’) enemies, 0 tiles if the player has Vanish up, 0 tiles if the enemy is in a deep sleep (Smoke Bomb). If none of those exceptions apply, it’s 7 – the player’s stealth. (Note that LoS is 7.5 tiles – so not all tiles on the edge of LoS work. Notably, 7,0 and 6,3 do.) There is an additional rule: You had to be in LoS or in detection range on the previous turn. If that’s true and monster can detect you (‘???’), then it has a % chance to actually succeed and aggro (‘!!!’). Being closer to the monster makes it more likely, higher stealth makes it less likely, and higher level monsters are more observant, while sleeping monsters are very inobservant.
A monster that aggros via detecting you does not immediately get a turn, so this is often a preferrable way to aggro a monster. This is also why I often forego stealth mechanics in traditional roguelikes – not being able to wake up a monster at maximum range under my control and have it follow me around can be a disadvantage.
Here’s an example of the ‘player had to be in detection radius or LoS last turn’ mechanic. I walked to the NE and back 20 times in a row and this fire mage never woke up. But if I instead move N and back, the fire mage will have chances to wake up.

Another example: In this situation after moving east (and the enemy was not in my detection radius before) I got noticed in one turn. So being in LoS on the previous turn was sufficient.

Hearing a Shout
Enemies shout every turn they’re aggroed (as long as they moved or are currently visible), and also have a 50% chance to shout when they die.
Shouts aggro every enemy that is both within 6 tiles of the shout and also within 10.5 tiles of the player (As in, both conditions have to be true.).
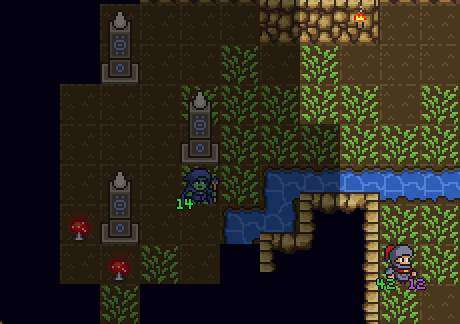
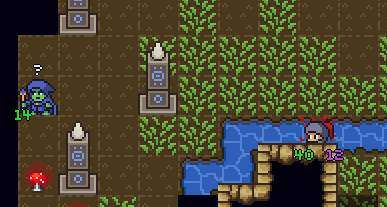
Asleep monsters only respond to shouts within 3 tiles (instead of 6). Deep sleep monsters (from Smoke Bomb) don’t respond to shouts at all. Shouts originating more than 7 tiles away from the player have their radius halved from 6 to 3 tiles. (The halvenings from asleep and outside 7 tiles stack.) (Note: It’s >7, not >7.5! So it’s not the same ‘as being in your LoS’. Shouts on the edge of your LoS that aren’t at 7,0 or 6,3 are halved. (Worked example: This sunflower is more than 7 tiles from me, so its shouts are halved to 3 and don’t reach the second enemy.)

Besides the normal kinds of shout enemies make, there are some other things that are technically a shout:
- Hidden enemies, when they aggro, perform an ‘ambush’ shout that only wake up other hidden enemies within their ambush distance of the player.
- Opening a glyph door performs a ‘strong’ shout that ignores the 10.5 tile limit and ‘radius halvening for being more than 7 tiles from the player’ (In practice I think neither fact matters though.).
Here’s a worked example. I would like to not wake up the unique. So, I should fight the other band of enemies (that definitely will notice me) without letting any of them move onto any of the red dots (where asleep monster would hear a shout within 3 tiles and wake up). If the unique was stationary rather than sleeping I’d have to keep monsters out of a much larger 6 tile radius, but I still could have gone for it.

Because enemies only shout 3 tiles if they’re out of LoS, aggroing an enemy and immediately running out of LoS might cause it to not wake up its friends. That 3 tile radius is very small! Plus, it has to be within 10.5 tiles of my new location, too.
Note that enemies only shout when they move to a new tile or if they’re visible (This mostly matters for immobile enemies, which as a result can’t shout if you can’t see them.).
Having and Losing Aggro
Monsters that you’ve aggroed have perfect knowledge of where you are… but the same is true for you! They’ll be visible on the map and minimap unti they deaggro. Even when not in line of sight, they can be shot/targeted (even though the enemy can’t do the same back to you) and the moment they deaggro you can notice this and act accordingly.
unagroTimer goes up by 1 every turn an enemy can’t see you, plus an additional 1 if the enemy is a stationary swimmer or immobile. When it hits 20 turns, the enemy de-aggros. If it can see you, unagroTimer becomes 0 again.
An enemy that deaggros goes back to its previous behaviour – sitting still or wandering.
Some special enemies can never lose aggro once they have it: Grax The Frost Shaman, The Frost Giant King, The Kraken and its Tentacles, Expanderis The Slime King, The Efreeti Lord, Lavosa The Eel Queen.
Advice for Specific Levels
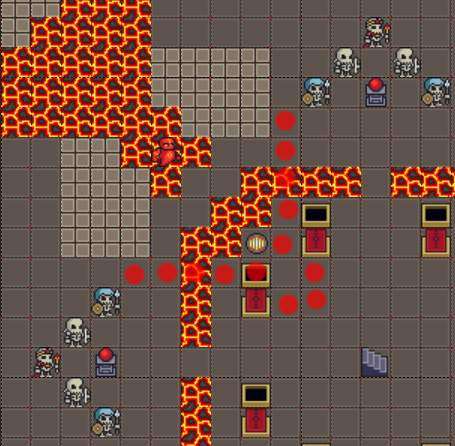
Vault of Yendor – ‘Lava Surround’
This is the floor that looks like this: This is the floor that’s most likely to kill you even with cautious play, because how it works is very spoilery. A common death on this floor looks like this: ‘walk to a side, see some skeletons, aggro both fire elementals in the corners, start to get overwhelmed, aggro the rest of the floor, try to take the stairs, die in one turn’. Instead, do the following, which relies on a precise understanding of how aggro works:

- Pick a north diagonal since the stairs are always north.
- Beeline to the diagonal fire elemental – don’t aggro it until you’re inside the cage (see image below) – then kill it. This’ll wake the surrounding two skeleton packs, but not any other fire elementals as long as you don’t step onto any of the red dots (because that’d put you 10.5 tiles or closer to that other fire elemental, and they’d hear an aggroed skeleton shout (radius 6) and aggro).
- Kill both skeleton packs. If you have levitation/lavaproof, hang out in the lava to make it easier. Or if you have speed points, move through 4 tiles of lava to get to the back. This is recommended over just hang out in the ‘cage’ and gun them down.
- Once you have a corner done, you can circle around or go straight to the north stairs and leave.
TODO: Random595 has an idea for an alternate strat where you go north, aggro the skeleton pack, SP retreat to a specific point, and you can pick off just the skeletons. But it needs testing before I add it.)
The Kraken
This boss appears at the end of The Sewers branch about 50% of the time. What makes it potentially very difficult is that if you have no ranged options besides fire magic, the fact that it’s wet basically makes it impossible to kill, and you took a one way teleporter to get here. Here are some options you can consider to make the fight easier (or possible):
- Keep your eyes open for a different ranged option. Lightning Bolt is the absolute best, but anything that’s not fire can be passable. Javelins are very good, don’t underrate them.
- If you have Cone of Cold/Wand of Cold and aim it such that all 8 surrounding tiles are frozen, the Kraken can’t move anymore. Then simply never thaw those tiles and you have an easy win.
- If you can’t burst down the head quickly but you can out-range and out-mobility the Kraken, killing the tentacles one by one can work instead. Grab the energy fountain for restoration, use the one-way portals to indefinitely kite, blink and use speed points as needed to retreat and drag things out as long as you can.
- Be aware the tentacles block line of sight for the Kraken’s tentacle attack, and that the tentacles can’t go further than 2 tiles from the Kraken.
- A power potion popped before you start dealing damage will improve your output a lot.
- You don’t have to fight the Kraken now. In fact, you don’t have to fight the Kraken ever. You can go get the other two runes to beat the game.
- If you have a source of blinking, you can blink past the gate and abstain from fighting the boss.


Be the first to comment