
A somewhat comprehensive guide on how to make 3-Part horns.
Contents
Guide to Make 3-Part Horns
All credit goes to Detroit_!
Note
I am by all means not a audio expert, and (no joke) I only figured this out by doing insane amounts of trial and error, however due to the amount of positive feedback I’ve been facing by those I present this information to, I feel the need to make a guide on this. Gotta get all the wisdom out there, y’know?
What You Need Beforehand
Before you can pursue the mission of making a awesome and nearly seamless 3-Part horn, one must have the stuff listed below:
- Clean audio
This really only works its fullest magic when the audio you are editing is the cleanest you can make/find, make sure there is little noise, and a clear start, middle, and end point in the sound. otherwise this can be come a lot more difficult to perfect. In my cases, I have searched YouTube, checked out sounds from model train DCC sound decoder files, and even asked my friends help by having them supply their own audio! - Decent knowledge in Audacity and audio editing in general
Since I have learned to do this in Audacity, this guide will refer to that program in particular, if you don’t have the program or experience, look it up! The program is free, and there is a user manual that explains what each of the things I do works and what it does. For the folks experienced in other programs, you might be able to “translate” the actions in Audacity to your preferred program - Patience
As the saying goes, “Rome wasn’t built in a day”. Especially for the first time people with audio editing, expect to face some tedious and/or difficult moments doing this, but as a person who managed to figure it out after doing the computer version of banging two rocks together, I can say it will all be worth it in the end.
If you think you have all of the above, you are ready to proceed and make some awesome audio!
A 3-Part Horn Overview
To really get to the solution, we must understand the “problem” at hand. In this case, that means understanding how Rolling Line works 3 Part Horns.
As the name suggests, the dynamic horns in RL (known within the respective audio modding section as “Multi-Step Horns”) are comprised of 3 parts: The Start, Middle (also known as Loop, Run, or Sustain), and End. The moment you press the horn key, the game fires the horn start, then the loop, and will hold the loop until you release the key. Once you release the key, the game waits for the loop part to end, then plays the end, bringing you locomotive’s ear blasting symphony to a end. However, If you are to press and release the horn key really quickly, the game will play the the start, and then play the end right afterwards, resulting in a quick toot of the horn.
So, what does this mean for us mod creators in making horns?
Well, to put it simply, the horn audio clips must do all of the following:
- The horn start must seamlessly transition into the horn loop.
- The horn loop must seamlessly transition into the horn end.
- The horn loop must seamlessly transition into itself.
- The horn start must seamlessly transition into the end.
Otherwise, the horn will sound funky or strange.
“Holy crap, that is a lot of requirements for 3-parts, this is going to be hard!”
Do not worry! There is a reason this guide exists! As you will see below, the method to make audio that meets the requirements I have outlined is somewhat straight forward. Without a further ado, lets get to it!
Editing The Audio
With a understanding of the problem in mind, lets get going to the audio editing!
Load up the audio into audacity
Make sure its one full clip of the entire horn. If not, try and see if you can stitch together the clips.

In this entire guide; as a example; I will use this killer hybrid Nathan Airchime K5HLA, recorded off NS 8101 by my friend, Pixel.
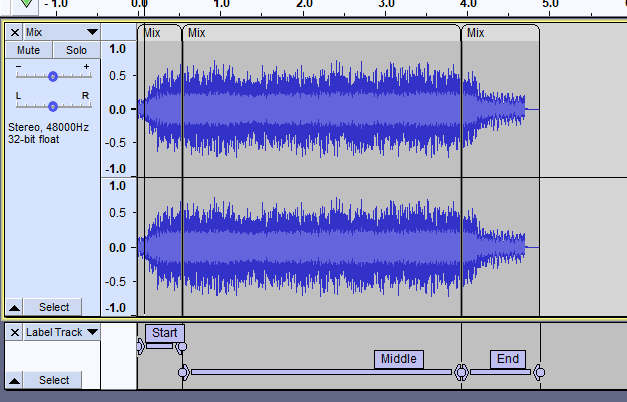
Mark the start, middle/loop, and end part of the sound
Get comfy to listening to the same sound file multiple times, because this and later steps will require it! Listen to the file and try and listen for the 3 key points in the sound. Once you think you have got it, mark the 3 points respectively.

Create 2 new tracks, and separate the middle section
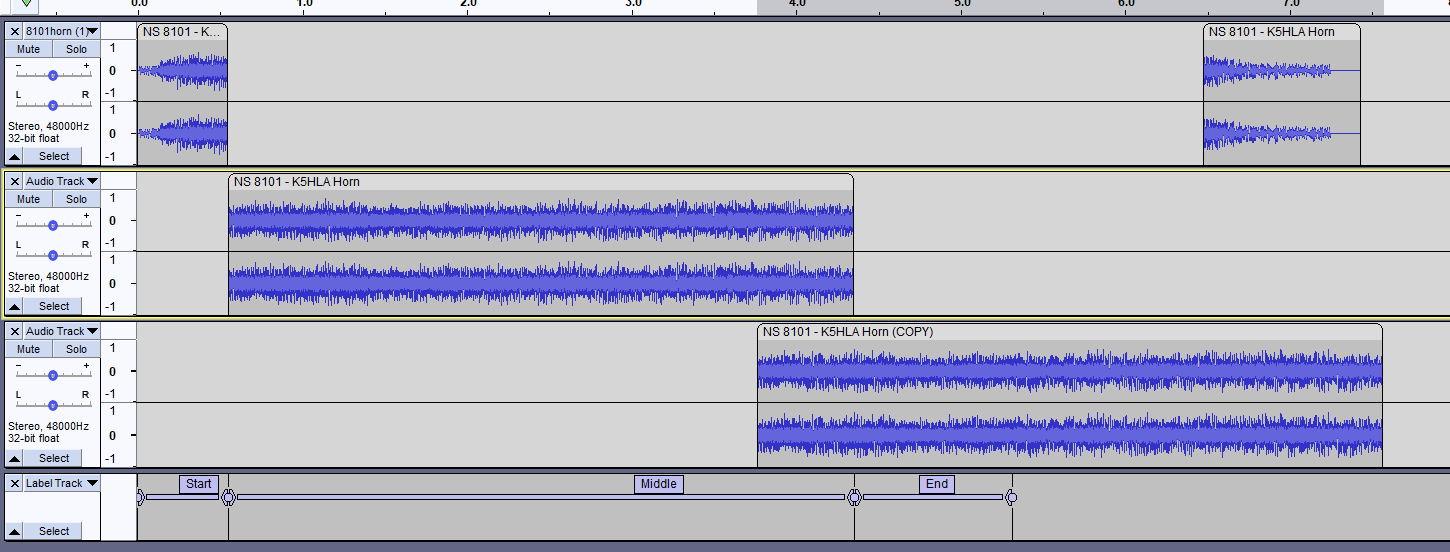
After you labeled your key points on the label track, create 2 new tracks, separate the middle portion of the horn, and move it to one of the twp new tracks.

Copy the middle horn and move it to the other new track
For now, you can move the start and/or middle part of the horn out of the way, but do not delete it! Copy the middle clip of the horn, and move it under to the new track such in a way where the end of the original middle part overlaps a good bit of the end of the new copy we have created.
Crossfade the two tracks, and note the Crossfade duration
You are nearly almost there! What you must do now is cross fade the tracks by selecting the region in which both overlap, going to Effects > Crossfade tracks (don’t use Crossfade clips, it wont work!). Now, one of the more important parts, note down the length of the Crossfade duration, you will see later how we use this to help us conquer one of the more difficult parts of 3-Part horns.
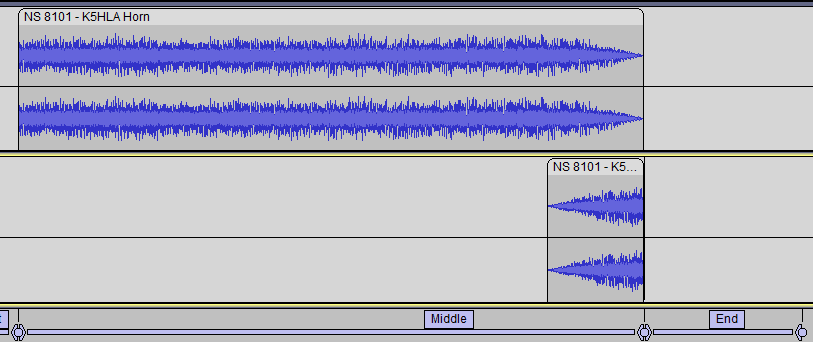
Remove excess audio after Crossfade
As the title reads, knock off the audio directly after the Crossfade on the duplicate track, the result should leave you with a tiny little nub of audio overlapping like in the example below.
Trim audio at the start of the middle section
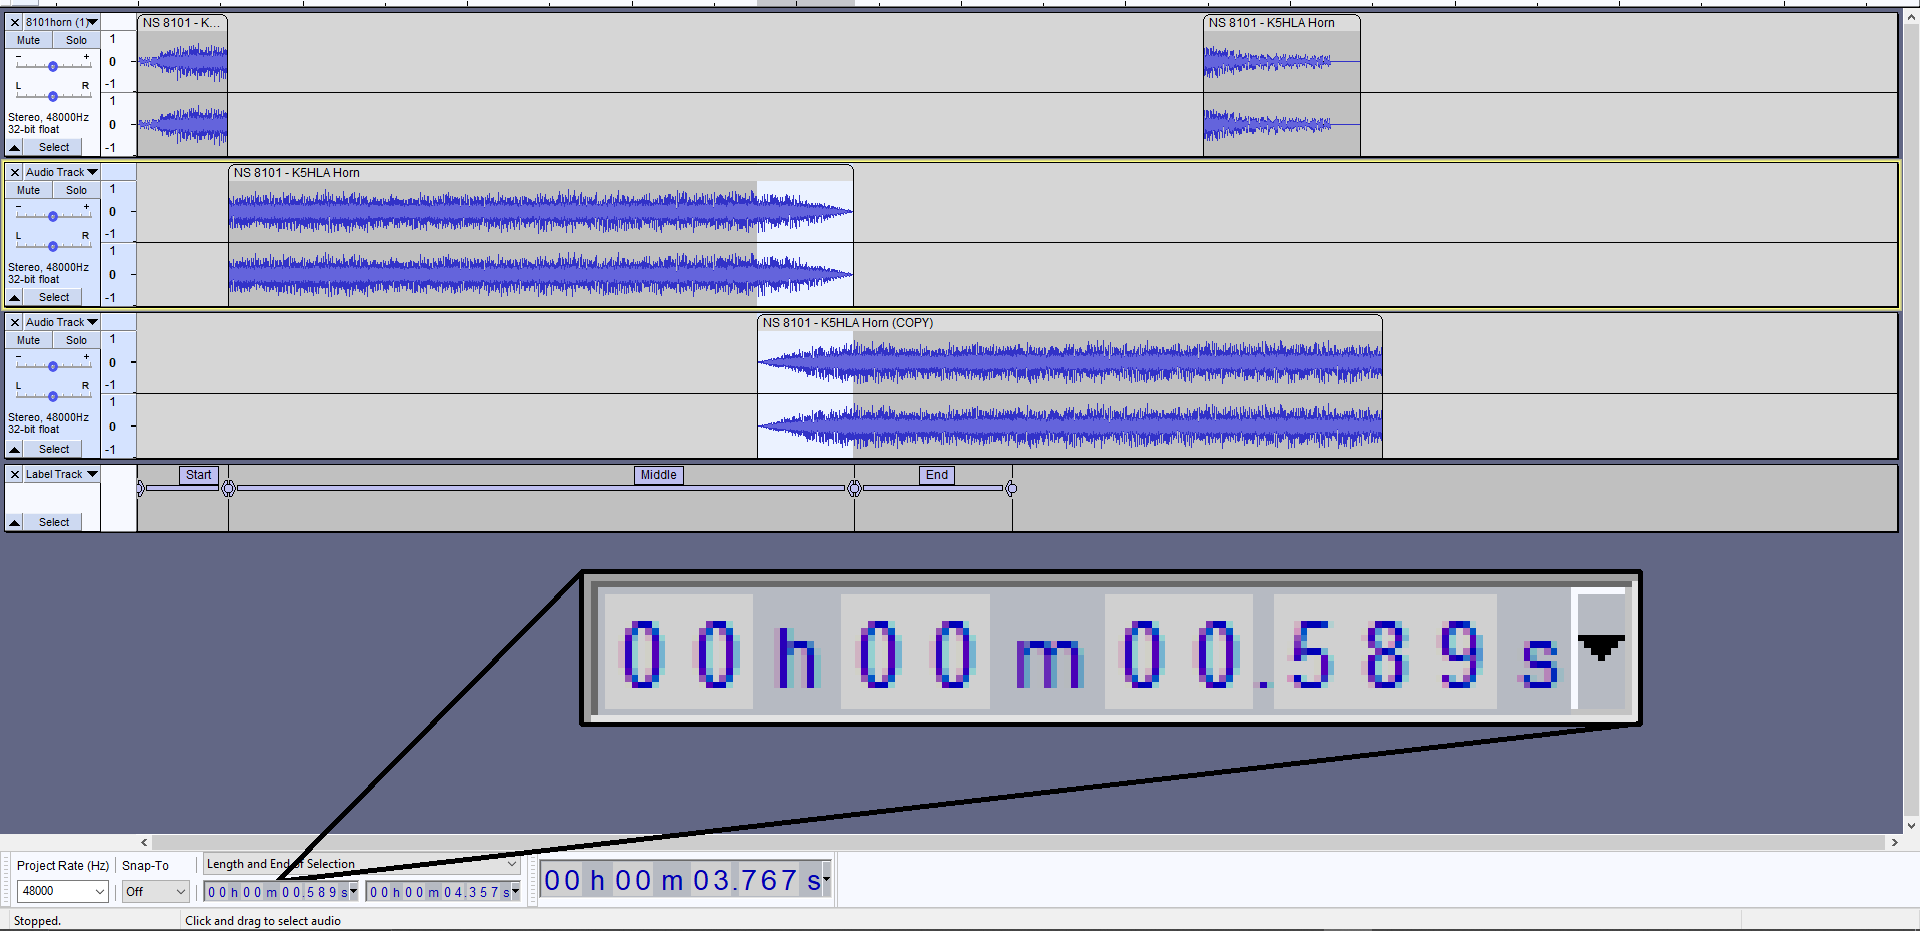
Remember the length/duration of the Crossfade we noted down not too long ago? Here is its use, what you will do now is cut the exact same amount of audio from the start of the clip, in my case, that is .589 seconds of audio I must cut off from the start of the middle. Then mix the 2 tracks containing the middle part and the Crossfaded clip, do Tracks > Mix > Mix and Render.
Good job! You just took up on one of the biggest challenges for 3-part horns, and successfully made a self-looping middle portion! The next portion of steps will show you how to take that middle portion and make it work with the start and end points, while also making the start flow perfectly into the end clip by itself!
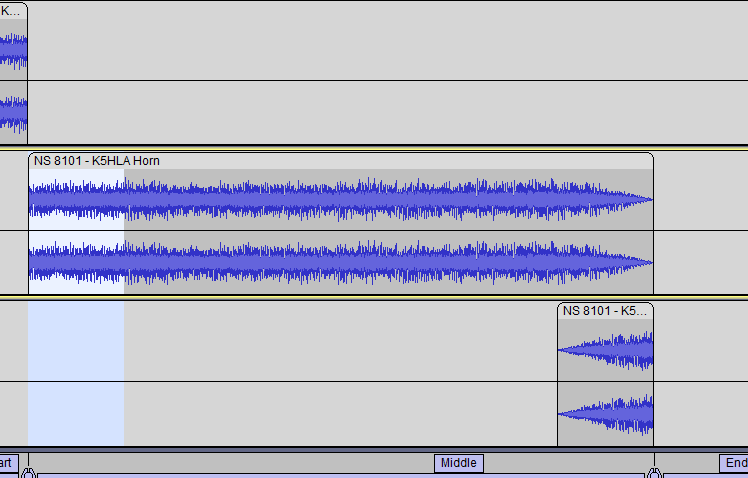
Crossfade the middle part with start and end
Like the first time around with the middle, adjust the middle portion to overlay the start and end like the picture below, and then Crossfade the overlapping regions on both ends. You may have to rearrange the labels as a result.

Mix middle and start/end tracks, and separate accordingly
Like the first time around, select the 2 tracks, and using Tracks > Mix > Mix and Render, mix the 2 tracks back down to one long clip. Before you panic, thinking you have to redo on the first step, fear not! Now you will see the magic of the label track we made earlier! Using the label track, cut separate the single long clip into 3 portions.
Congratulations! You have just fully made a 3-Part Horn!
Outstanding job fellow mod maker! You have done it! All that is needed is to export the audio, simply click on each portion, and navigate to File > Export > Export Selected Audio, and set the file format to .WAV
Conclusion and Side Notes
Good job! You just made a really seamless 3-Part Horn in its entirety! Now that you have faced on the most difficult challenge, lets give a rundown of what we did to make this work?
By Crossfading the middle/loop portion of the horn on the start of itself and removing the same audio from the start, you seamlessly transition the end right back into the start! Which knocks out the “Middle part must loop into itself” criteria I outlined earlier. And by Crossfading the start with the middle, and the middle with the end; Obviously it transitions the ends respectfully with the middle, but you also make it so the start transitions directly into the loop, which essentially knocks out all the other criteria we laid out! Meaning you have did what it takes to make a good 3-Part horn!
Side notes
While we have essentially got the winning formula to make 3-Part horns, its good to establish the variable we got:
Crossfade Duration
While short Crossfades work; The longer, better. However, not all clips are long enough to fit long Crossfades, so do not fret if you can’t get long Crossfades.
Start/Middle/End length
As with the first one, the duration isn’t too much of a factor, shorter clips for Start, Middle, and/or End clips can improve the horns responsiveness. However, as mentioned in the 3-Part Horn overview, the game skips the middle portion if the user tries to sound a short horn burst, meaning this isn’t too much of a worry.
Conclusion
So with all said and done, you have learned not only how to make high-quality 3-Part horns, but also how it works, and the variables at play that if fine-tuned, could improve your quality of already great horns! Thank you for reading my guide, and have fun with this new found knowledge!


Be the first to comment