
Extensive and detailed guide for creating new relics or modifying existing relics in The Hand of Merlin, written by its game designer Mat.
Guide to Modding Relics
All credit goes to Mibs!
Topics
- Introduction – What is a relic?
- Basic Setup – ID and basic information.
- Relic Properties – What does the relic do and how to set it up.
Introduction – Creating New Relics
Hello! I’m Mat, Game designer for The Hand of Merlin. Now that our editor is available to the wider public, I’d like to write up a few guides on how to create some content in our game for your modding purposes.
In this guide, We’ll talk about implementing Relics!
As an example, we’ll create Glass Arrow, a Common relic.

What Is a Relic?
A relic is an equippable item that grants the bearer with some sort of boost. It can be a passive attribute increase, the access to an ability, all sorts of things.
They are found in encounters as random or specific rewards, and can also be bought in Relic Shops, found in most cities in The Hand of Merlin.
To start the creation process, let’s use the Create Menu (Ctrl+N as a hotkey), and create a new Relic Parameter.

This should be the file you’re greeted with:

Then, make sure you save the new file in the Content\Merlin\Relics folder, to let the game know that your relic exists.
Basic Setup
Relic Identification
So, three things we’ll set up first. The Relic’s Name, Flavor, and Description.
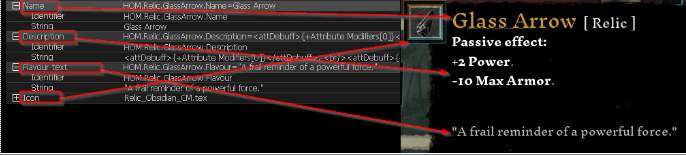
Name is just your relic’s name. Think of something fancy. We’ll go with Glass Arrow for ours.
Description is where you’ll describe what the relic does. You can use the tags we talked about in the Abilities guide, but here’s exactly what the text is for Glass Arrow, as an example:
{+Attribute Modifiers[0]}. {-Attribute Modifiers[1]}.The {Attribute Modifier[X]} stuff will be filled in in the future dynamically when we actually set attribute properties to the relic.
Because these are text properties, you have two fill in two fields: the Identifier and the String. This is to make it easier for translations. If you are making a big mod, you might want to have your own identifier naming conventions, but here’s mine: I use HOM.Relic[RelicName].[Category], where Category is Name, Description or Flavour.
Then, you can set up an icon. Remember that we use .tex files, that you can create from your own PNGs by using the Texture > Create menu (CTRL+SHIFT+T).
Relic Acquisition
A huge aspect of configuring a new Relic is how exactly are players supposed to acquire it.
Rarity is its category. This does very little on its own, but Common and Rare relics can be found in shops (2:1 in most cases), and can be randomly granted in some encounters, including the first one, Camelot. Unique we tend to leave to those associated with specific encounters, and Legendary is a category we leave for the Grail and the Horn, and its variations.
Gold Cost is the base price of this relic in shops, expressed in gold. Note that some encounters offer discounts to the shops.
Finally, none of that matters until you set your Spawn Random and Spawn Shop booleans – The first allows the relic to be granted at random in encounters, and the latter allows the relic to be found in shops.
Pretty simple stuff, I hope!
Relic Properties
Equipping a Relic allows the bearer to gain access to a series of modifiers, both active and passive.
Status Effects are passive effects granted by just having the relic equipped. They are granted at the beginning of a match, so if your effect has a decay rule (like Powerful or Vulnerable), they will be lost over the duration of the match, only to be replenished at the start of the next one.
Attribute Modifiers are far simpler. These are alterations to a unit’s base attributes, like Power or Max Armor. We’ll focus on this one for Glass Arrow. It’ll look like this:

This is what will be filled in the description, as we talked about in the previous section.
Ability describes the ability associated with this Relic. We call relics with this property “Action Relics”, and it’s great for versatility. These can be any ability really, but we usually make 0 AP ones for relics, so keep that in mind if you are looking for something to fit vanilla gameplay.
Spell is like Ability, but here you’ll browse a Spell Parameter, which has some UI information regarding the spell. Also note that adding a Spell to a relic allows anyone to use it, as spells are considered “outside” the unit.
Equippable determines if the item can be equipped, or it must stay on the stash. If your relic has a spell or a status effect and is non-equippable, the game assumes that it should apply that effect to everyone, so keep that in mind.
Grail, Upgrade and ID: these are some smaller properties that we use for some unique behavior.
A Grail relic will end the game if you lose it:
- A Upgrade path makes this relic be exchanged for the one listed if you are using the Virtue modifier in Hardmode+
- And an ID can be queried in encounters to see if the player has it. In Marca Hispanica, we check for the Horn ID to see if you carry any variant of Roland’s Horn.
Relics are a great simple addition to test your modding chops. Good luck!


Be the first to comment