
With how limited options are and how bad Unreal Engine 4’s idea of localization is, some may wonder… how in the hell do you change a language. This step-by-step guide will explain that.
Guide to Change the Language
All credit goes to Suicide Machine!
Intro
One of the trends I really hate in modern video games is to tie the language to a system and only go with English if there is no translation available. Steamworks has this cool thing, where you can poll Steam on which language to use and even prevent it from downloading unused languages’ files to reduce on game’s size. And yeah, it’s a small annoyance, when you can simply switch the language in options (albeit – most often – after a minute or two of splash screens, warnings, and gamma calibrations), but I will still use my chance to bash on – what I perceive – popularization of bad trends by Unreal Engine 4 and its developers (as if bad FOV scaling and a “safe” and movement that this family of engines has made a standard weren’t bad enough).
Anyway, problems grow to a different level, when despite implementing this trend, you then don’t even implement an option to change the language, which is what The Quiet Man in all its “glory” did.
And yeah, maybe it’s not a “big deal”, cause the game essentially has subtitles for the first few minutes and then you’re essentially watching a really bad movie with no voice acting, trying to figure out what the hell is going on… that is until you decide (hopefully not) to go for a non-deaf playthrough hoping this time you can understand what the hell is going on.
Well, here is how to change the language.
Editing the Config File
Before we start, you’ll need to start the game at least once to create appropriate config files. After you do, close the game and follow the instructions below.
- Press Super Key + R / Windows key + R – this will open the Run window.
- In the text field type in the following text (copy-paste it).
%LOCALAPPDATA%\Moon\Saved\Config\WindowsNoEditorNow open GameUserSettings.ini with a text editor (preferably with something like Notepad++).
Its content will look something like this:
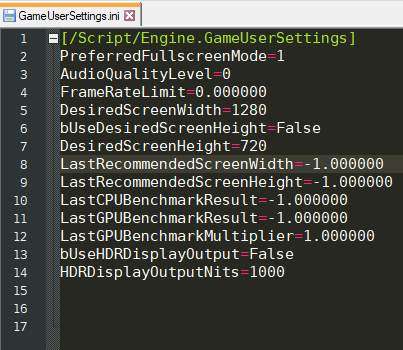
- Now add the following lines:
[Internationalization]
Culture=en- Change en in Culture=en to a language (or culture language) supported by the game using this table.
- In most cases the first 2 letters should be enough, but in some cases (e.g. “Portuguese” vs. ” Portuguese – Brazil”) a full name might need to be used to enforce a proper variant.
- Save the changes and start the game.
- The game should now work in your preferred language.
Be the first to comment