
Follow these steps to create you own dedicated V Rising server.
Contents
How to Host Your Own Server (Rental Service Provider)
All credit goes to HumanGenome !
You can host a server at game server hosting provider:
Note: Every gaming server goes online immediately! A welcome email including your connection information (guide) will be sent to you when your gaming server is created.
Server Requirements
- Windows 10 or Server 2016+ & 64-Bit
- Quad Core processor (requires up to 2 full cores)
- Up to 16GB memory (currently uses around 4GB memory minimum)
- 5GB disk space (install folder)
- A copy of the V Rising early access game from Steam
How to Create
- Create a folder C:\VRisingServer
- Download SteamCMD for Windows.
- Extract the contents of the zip to the folder
- Create a file called FetchServerFiles.bat and place the following code in there:
@echo off
start "" steamcmd.exe +login USER PASS +force_install_dir "C:\VRisingServer" +app_update 1829350 validate +quit- Fetch server files from Steam by running the FetchServerFiles.bat
Starting the Server
To start the server, create a batch file called StartServer.bat with the following
- start “” VRisingServer.exe -log
Run StartServer.bat and let it load (takes 10 minutes the first time)
Your local save files are located within this area on your computer:
- %USERPROFILE%\AppData\LocalLow\Stunlock Studios\VRisingServer\Saves
However, just like with the settings, this can be overridden with the -persistentDataPath parameter.
Configuring Your Server
Now comes the fun part, setting up your V Rising game server to your liking.
To modify game server settings you can create two files
- ServerHostSettings.json
- ServerGameSettings.json
You can create these files in your VRisingServer\Settings folder
You can modify settings in here (in addition to the launch line) – these settings overwrite your launch line settings:
- ServerHostSettings.json
{
	"Name" : "My V Rising Server",
	"Description" : "This is a role playing server",
	"Port" : 27015,
	"QueryPort" : 27016,
	"MaxConnectedUsers" : 10,
	"MaxConnectedAdmins" : 4,
	"SaveName" : "world1",
	"Password" : "SuperSecret",
	"ListOnMasterServer" : true,
	"AutoSaveCount" : 40,
	"AutoSaveInterval" : 120,
	"GameSettingsPreset" : "StandardPvP"
}- More info can be found here.
If you want others to connect to your server, make sure you allow the program through the firewall. You might also need to forward ports on your router. To do this, please follow your manufacturer’s instructions for your particular router. If you want your server to show up on the server list you need to make sure that both the specified queryPort and gamePort is open in your firewall and forwarded on your router, otherwise just opening/forwarding the gamePort will be enough.
To become an administrator in the game you will first need to modify the adminlist.txt file under VRisingServer_Data/StreamingAssets/Settings/ with your steamId (one steamId per line). This can be done without restarting your server. To become an administrator in the game you need to enable the console in the options menu, bring it down with ~ and authenticate using the adminauth console command. Once an administrator you can use a number of administrative commands like banuser, bancharacter, banned, unban and kick.
If you ban users through the in-game console the server will automatically modify the banlist.txt located under VRisingServer_Data/StreamingAssets/Settings/ but you can also modify this manually (one steamId per line).
How to Join a Server
To join your V Rising server follow the below guide.
- Once you launch the game up click the Play button
- Click into Online Play
- Click the Find Servers option at the bottom
- Select the Display all Servers & Settings option at the top of the page
- Search by the server name you setup

You can also join using your IP/Port that was setup in the first setup phase.
- Once you launch the game up click the Play button
- Click into Online Play
- Click the Find Servers option at the bottom
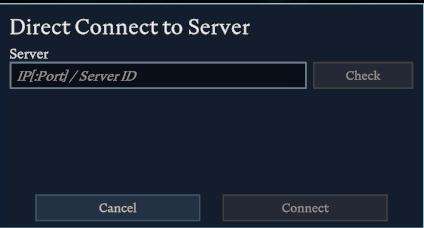
- Click Direct Connect at the bottom.
- Enter your IP:Port or Server ID to connect
Backups
It is highly recommended to backup the save files often and before patching or before starting the server after having patched.
The current auto save settings allows you to set save interval and save count. So with the same amount of disk space you either save often but maybe not have that many save files (not so far back in time), or save less often (longer rollback in-case of crash) and have more save files, or high number of on both and consume more disk space. So, again, regularly backing up you save files is highly recommended in case your game state becomes corrupted.


I have the game installed and have successfully followed all steps up until running the StartServer.bat file, I receive the error that “Windows cannot find Vrisingserver.exe”
i have the same problem, tryc to use the tool in your library “Vrising dedicated server” 🙂
If you have an issue running the dedicated server from the Steam installation, 2 things. You must run the exe inside the dedicated server files, not from Steam, and not from the bat files. Secondly, in the steam_appid.txt, remove the existing ID and the null value, and write in 1604030. From there you can run the exe to boot the server. Settings can be changed in Appdata/LocalLow
I got it working to the point where I can connect to it from another computer on my network VIA the local IP, but if I change the host settings to the recommended ports (27015 and 016) I can no longer connect. Also, in either case i cant connect over the internet.
You probably need to go to your router firewall settings and open those ports
I would try to set “SaveName” in your ServerHostSettings.json file to your private session save name
To the people asking about time I’m pretty sure alot of the base mechanics were inspired by rust.
I would assume time never pauses on dedicated servers because essence is pretty easy to come by.
It does on private game for obvious reasons.