
Getting Started Guide
Basics
Create and customize your character
Simple enough. Make your character look the way you want.
Putting on clothing
Before you join a server you need to equip your clothing by going into your wardrobe. You do this by going to customize character then selecting the wardrobe tab, choose your clothing and click Save.
Joining a server
Click play and choose your region, then select a server, just a suggestion if you’re new you might want to start out on a low population server just to get used to the game a bit first.
Starting your wipe/building section
After creating your character and joining a server, you might wonder what to do next. You have many options: you can visit a town to collect weapons, ammunition, and crafting materials; participate in an event to fight AI enemies; or begin setting up your base.
Whatever you decide, you’ll probably want to start by finding small trees to gather branches, sticks, and plant fiber. These materials will help you craft basic tools like a hatchet and pickaxe.
Important note: You’ll need a hammer to upgrade your base from wood to stone, and from stone to metal. The hammer is also used to add code locks to your items (which is highly recommended for security) and to pick up or demolish structures.
Before building your base, you must place a Land Claim first. This will highlight the area where you can construct your base. If you’re playing with a group, remember that the person who placed the Land Claim must be online for other group members to build. If that person isn’t available, someone else in your group who is online will need to place a new Land Claim. You can remove a Land Claim using a hammer.
Basic key functions
Tab key to open your inventory, craft menu, Campaign missions, and finally your stats. Now your Campaign missions are your bread and butter. They teach you the basic mechanics of the game and how to play plus rewards you with in game cash and experience to gain levels.
Settlements
Settlements are a safe haven in the game where you can store anything in your global stash and transfer it to other servers. It also has a vendor where you can buy multiple different things like weapons, ammo, food, water ect, and that changes every 20 minutes or so.
There is also a public helicopter that can transport you from settlement to settlement for a fee of $500 in game currency. You can also sell your junk and stuff to the vendor like Gold and silver bars are very nice and get you a pretty chunk of cash.
Side note: Your Hunger and Thirst will go up slowly while in the settlement while your RADS will go down.
Farming Resources
The tools in the game all farm the same amount of resources, it’s usually +1 per hit.
Side note: When you place your ores in the furnace you need to put in wood logs to start it.
Turrets
There are 3 different Tiers of turrets and only 1 of each can be placed per person so a total of 3 all together per person.
Side note: They only shoot AI as of right now, not players.
Raiding
C4 has a base damage of 150 Damage per. So an example would be 1 C4 per wooden Box, 4 C4 for wood wall, 8 C4 for stone, 12 C4 for metal.
Grenades do a base damage of 25 per. So an example would be 6 grenades for 1 box.
Events
Events trigger periodically around the map which rewards random resources, weapons, ammo, cash and xp. You can see all the events that are happening on your map by pressing M.
Groups
Everybody likes playing survival games with their friends who doesn’t, and to do that you simply just press and hold P on your keyboard and find the players name in the list and invite them to your group.
Side note: You will have to make a party and invite each other every time you log in the server.
Upgraded Backpacks
Yes every backpack in the game you can upgrade VIA the crafting bar and that makes it hold more weight.
Civilian Bunker Security Data
As far as I know the only places to get this is from Campaign missions, Downed helicopter events, and from the Civilian Bunker event itself.
Types of AI
There are 3 types: the red ones (XOID) which are basic, the blue ones (Stalker XOID) which are a little stronger and faster, and finally the green ones (Heavy XOID) which are even faster and super strong.
Note: Beware of the green ones, try to run around obstacles and jump up on boxes while killing it. Do not stand still.
Red and Blue XOIDs you can just Melee and stun lock them pretty much, the electric pipe or knuckles are very useful against them, but definitely shoot the green one (Heavy XOID).
PVP
Now the best tips i can give to you for PVP is only stuff that i personally use and like, and i mainly stick with 3rd person because i find it a lot easier to see my surroundings and to see around corners which is a huge advantage.
Against people that are playing in first person, and always try to stay behind or near cover and use it to your advantage, And most importantly and i mean it Always and i mean always keep extra water and meds on you.
Dehydration comes quickly and you might need those meds to keep yourself alive until you find water.
Side note: Grenades are your friends, always try to have one or two on you if you’re going for a roam.
The Map
The map includes regular cities, military bases, and event locations. Since the map is very large, finding a car is necessary throughout the game.
When starting, it’s important to find a good building location. Look for a city that has at least two car spawn points, is near a settlement, and is close to valuable event locations like compound events or helicopter crash sites.
The XOID’s
There are 3 types of XOID’s, normal XOID’s (red), Stalker XOID’s (blue) and heavy XOID’s
The red XOID’s are pretty simple to deal with, you can melee them or shot them 6 to 10 times and they will die, you can also stun look them with weapons like the pickaxe, they will deal around 8 – 10 damage per swing and you can outrun them.
The blue XOID’s or the “stalker’s” are the upgraded version of the red one’s, the are as fast as you. You cant stun lock them, you cant run them over with a car, they have about double the health of a normal XOID and they deal about 16 – 20 damage per swing, you need to watch out for those and avoid using melee against them
The green XOID’s or the “heavy” is the hardest of them all, he has about 10x the health or a normal XOID and armor protecting his body, hes much faster then you so you cant outrun him and he deals a crazy 30 – 40 damage per swing.
How to Deal with XOID’s
Having a car is a must when trying to take down XOID’s, when you are driving you can run the red XOID’s over when you are over 30km and when u need to kill the blue XOID’s and the green one’s you can stand inside of the car and jump to shot them without them being able to attack you back!
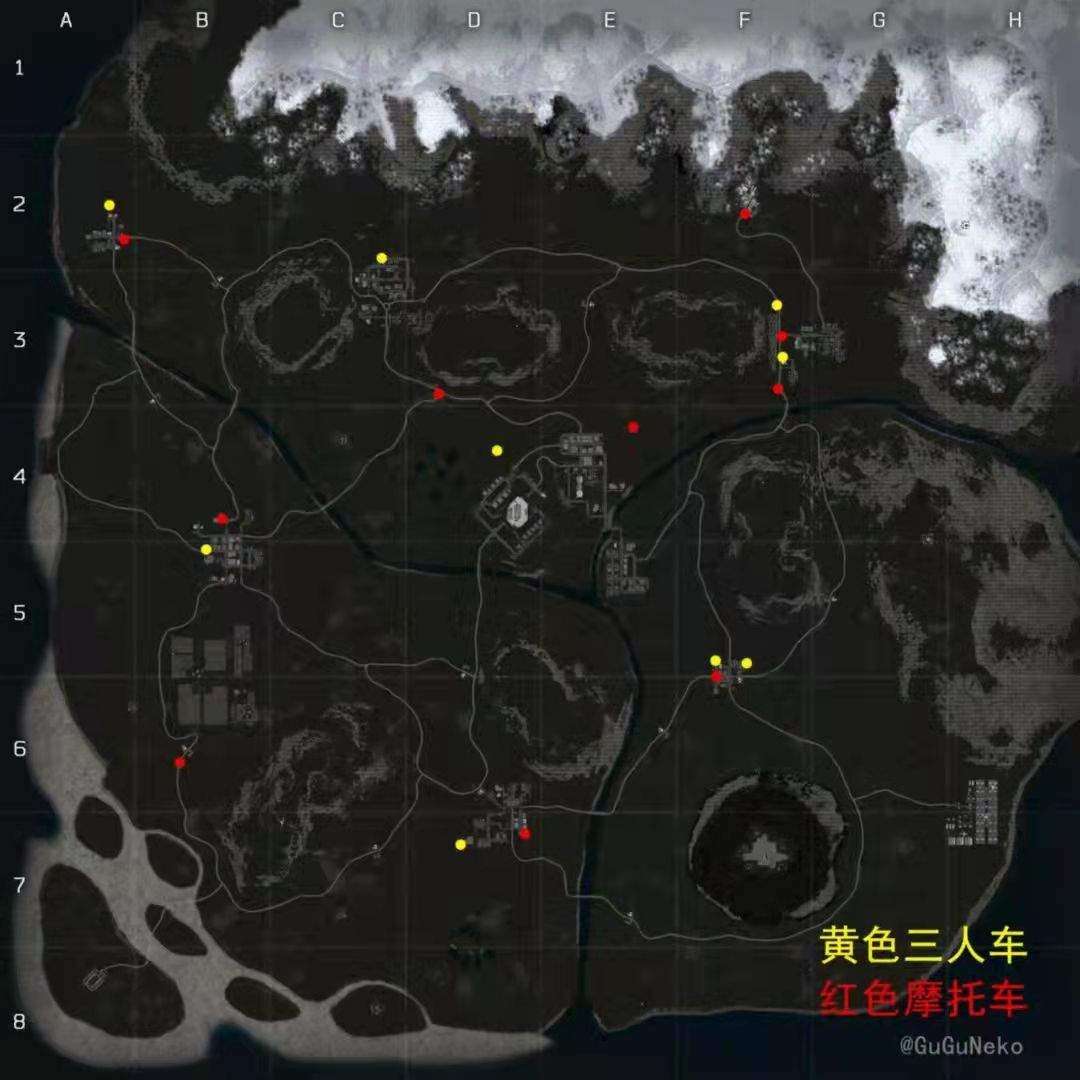
Vehicle
There are 2 types of vehicle, the ATV which is a 1 person car and the buggy which can carry 3 people. Vehicle spawn in different parts of the map and its important to build your base near at least 2 car spawns.
Here is a car spawn map for season 5 (not mine):
- Red = Buggy
- Yelloy = ATV
Compound Event
In the compound event you will have to kill 30 XOID’s (the robots) there will be around 25 normal XOID’s (red), 4 Stalker XOID’s (blue) and 1 heavy XOID (green). To proper u will need a car, a crowbar (to fix the car) enough gas, about 120 rounds and about 40 health worth of heals.
When you get the the event you would want the stop the car in front of the compound, get out of the car and run around collecting at much XOID’s as you can, once you have more then 5 on your back run back to the car (when you are in the car XOID’s cant hurt you) and just run them over, when the green XOID’s or the blue one comes after you just stand inside the car and jump to shoot while they cant hurt you. After the compound is done you will be able to loot a bunch of military creates and 3 airdrops!
Heli Crash
The helicopter will crash once every about an hour and a half and will give high tier loot, it will have 1 green bot protecting the loot so make sure to bring a car and some ammo and be ready for a fight!
Radio Towers
These events are kinda useless, it will give you about 400$ and some XP and spawn an airdrop in a random location of the map
Air Drops
Air drops will land every time someone fixed a radio tower in a random location of the map, the will contain armor heals a weapon and some ammo
How to Get Scrap Metal and Nails
The fastest way to obtain nails and scrap metal is to prioritize building a furnace. Once you have a furnace, you can smelt metal ore into metal bars, with each bar giving you 3 metal scraps when crafted. If you need materials for your first furnace, you can dismantle crowbars and metal pipes to get the necessary metal scraps.
Pepa, in inactive reactor events
the radiation icon on the map is this event??
Gll, Hit it
how to use the crowbar to fix the car?