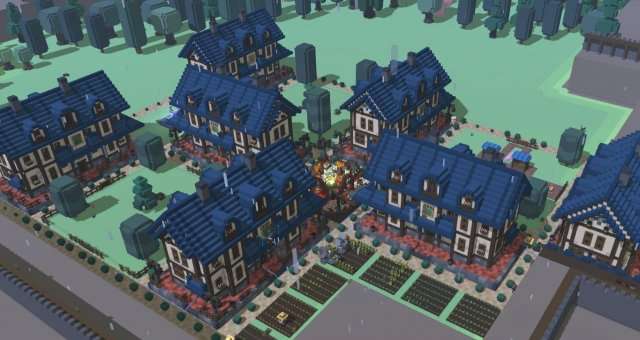
Do the building tools baffle you? Is doing anything beyond dropping down a template terrifying? Are you just used to the alpha interface and have no clue what to do with 1.0? Do your buildings just have weird bits that look funny? Strap on your hard hat, we’re going to take some of the mystery out of this for you!
Your Toolbelt – The Main Interface
Definitions
- Project – If I call something a “project” I mean the actual instance of the thing you are currently making on the screen that will turn into a finished building (or whatever) once you tell your hearthlings to get to it.
- Template – A “template” generally means “the building you picked out of the drop down menu. Not the one you plopped somewhere on the ground but the one that presumably lives in a little text file on your hard drive somewhere.”
- Component – A component is anything that the game sees as an individual thing.If it gets its own Blue arrow cross then it’s safe to say it’s a component.
- Object – objects are the physical items that hearthlings create and can actually be removed from a project after it is finished (or even while it’s still building!) Decorations, furniture, doors, and windows are all objects. All objects are components, not all components are objects.
Now, to the meat, shall we?
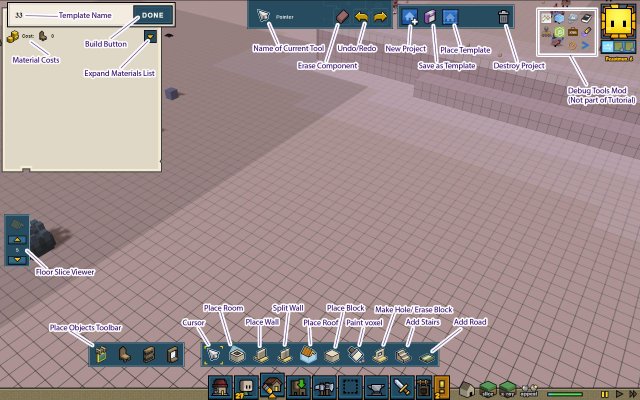
Boy that’s a lot of stuff isn’t it? Don’t panic! I’m here to help. Let’s start at the left and generally work our way over.
Major Interface Buttons
- Template Name – This is where you’ll find the name of the template you’re editing. It’s also the name of the project you’re making. They are one and the same thing. (More about this in saving and loading templates.) If the template is new to this game it will have a number here, because you haven’t named it yet. It’s generally only worth naming important things like an actual building instead of a flat little planter for a flower box you stuffed in a corner somewhere.
- Build Button – This will say “Done” or “Build or “Pause.”:
Done means there’s nothing to construct, either because you haven’t drawn anything, or the project you’re looking at is finished.
Build means “This project is final. Start building guys!” If you press this you can NOT change anything unless you save it as a template, trash the project, and place the template you just saved. Be SURE.
Pause means “Hearthlings stop working on this.” There can be a lot of reasons to do this. Attacks by goblins, crafter backup, too many projects running at once, etc. Too many building projects running at the same time is a leading cause of hearthling ADD and player frustration. Two at the most. Three if one is tiny, like the previously mentioned flower box. - Material Costs – This is a short at-a-glance summary of the major raw materials you’ll need to build this project.
- Expand Materials List – is a button that will open up the large white parchment and lists in detail all the crafted items and raw materials the job needs. If your project isn’t building this is the first place you should check. If there are any items in red that means you don’t have them. Either mine more resources or go check your crafter to see what the hold up is.
- Name of Current Tool – This just tells you what tool you’re using.
- Erase Component – This is your eraser. It will remove any component on the field. (That you placed. It won’t erase “real” things that are already in the hearthling’s world. They have to go harvest those tumbleweeds themselves.)
- Undo and Redo – These will step you through every action and every change that you’ve made to this project. I have yet to find a limit, and I don’t think there is one.
- New Project – Make a new project. Any other project you were working on greys out and you can start placing new things. Be aware when you’re building to make sure you do this whenever you switch from one building to decorating another or building a road or something. Your town will become quite the headache later if you blow up a road only to lose your carpenter across town. If you work with more advanced painting programs, think of each project as its own layer.
- Save as template. This saves the current project in whatever state it is presently in as a template that you can plop somewhere else, or even in a different save. The part where it gets a little hinky is if you save a template that hasn’t been “Built” and then make edits to the original project. The original project may still be tied to that template. (I’m not 100% certain of this, or under what circumstances this is the case, but it happened to me at least once.) Hitting “build” will lock the template for certain, and destroying the project will also de-link a saved template without hurting it. (If this is even an issue and I’m not insane.)
- Place template – This will place a template as a new project. You cannot combine two templates into the same build. You can build a new project directly on top of an old project, however, so piecemeal templates are still theoretically possible.
- Destroy Project – This will destroy the currently selected project and will leave a few random materials to recover. If you are going to destroy something, it’s best to undeploy any placed objects before you do to avoid losing any.
- Floor slice viewer – This lets you step up and down through the different levels of a multi-story building. You don’t define what is or is not a floor slice. That’s entirely up to the pathing software in the game. This just lets you see each level so that you can decorate, check positioning, or even just make sure your hearthlings actually have a path to all the areas you want them to reach.
- Place Objects Toolbar – This is pretty self explanatory. You can add doors, windows, furniture, or decor. placing is very similar to how it works in normal gameplay.
- Pointer/Cursor – It’s your mouse tooltip. This is how you interact with an already placed component.
- Place Room – You can place a room. See the section on rooms for more.
- Place Wall – Ditto.
- Split Wall – See the wall section.
- Place Roof – There’s a roof section too.
- Place Block – There could be a disseration on this tool. It has its own section too.
- Paint Voxel – See the painting section.
- Hole Tool – See the section on erasing.
- Stairs Tool – See the section on infrastructure.
- Road Tool – Ditto.
Yeah, that was a lot. But a few of those things I will never talk about again because that was all that needed to be said. But wait, there’s more!
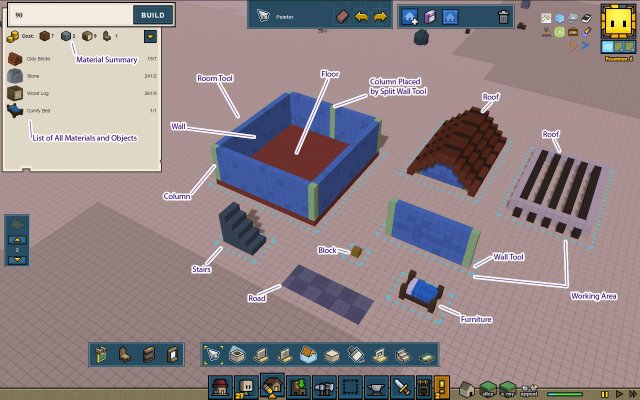
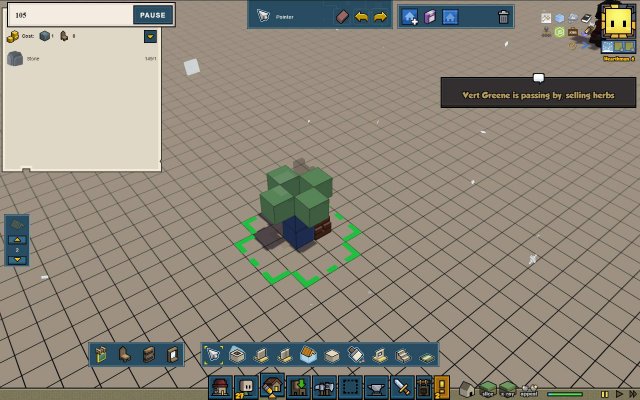
Here you can see all the basic construction types, and what the materials summary looks like now that there’s something on the ground. Most of this is self explanatory, but there are a few things to point out:
Working Area – This is the cyan dashed line on the ground around each component. Every project you build will have one of these. It will turn yellow when you commit to build the project. If a hearthling can reach each and every one of those squares on the ground there’s a good chance they can build the project without your intervention. If the game thinks everything is good to go the dashed line will turn green. Visually check to make sure they can reach them all. Build ladders if they can’t. If it is impossible for them to reach a spot, don’t build there. If the line won’t turn green, check the troubleshooting section.
The stairs and the road default to the selected “block” and “floor” textures, respectively. Here they have been given different colors to distinguish them better.
Throughout this guide walls will be blue, columns green, and floors red. Blocks will be yellowish. (Most of the time.)
Your Toolbelt – Control Arrows
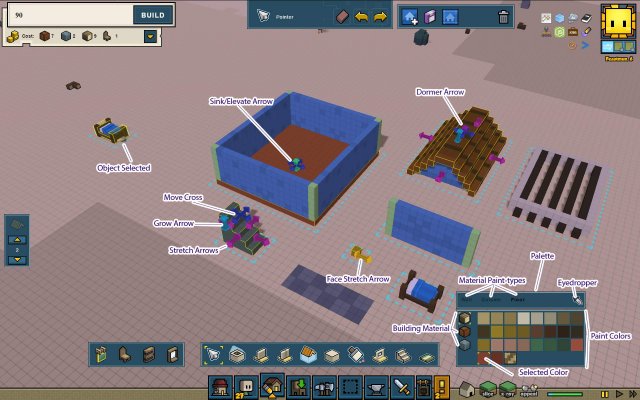
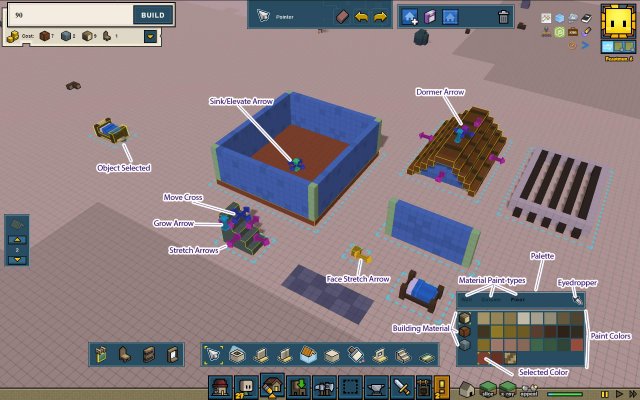
Here you see an object (comfy bed) selected so you can position it. There is also a breakdown of the palette and its important features. (More about that in the painting section.)
Most importantly this lists all of the control arrows you will regularly see. Time for another list!
- Move Cross – Royal Blue – Clicking and dragging on this blue arrow will let you move the component in the XZ plane.
- Sink/Elevate Arrow – Light Green – Lifts the component up or down along the Y axis without changing its shape. (Often shortened to the Sink Arrow)
- Grow Arrow – Aqua – Stretches the component vertically along the Y axis. On a peaked roof this controls how pointy the roof is.
- Stretch Arrow – Magenta – Stretches the component horizontally along the X or Z axes.
- Dormer Arrow – Purple – This is the grow arrow, but it controls the Drop Walls on a peaked roof.
- Face Stretch Arrow – Yellow – Also called the extruder. Allows you to drag a block face out along any cardinal axis to create more blocks.
- Normal Arrow – Bright Green (not shown) This arrow only shows up (rarely) in conjunction with the block tool. It is not controled directly. See the Block Tool section for more information.
(Should you care, I generally consider the NW to SE diagonal to be X, the SW to NE diagonal is Z and the vertical axis is Y. It’s not critical to this guide.)
Experiment: Set up a new project in a blank area of the map and play around with the movement arrows of different components until you really get a feel for how they work. It costs you nothing to play around with a building project.
Blueprints 101 – Adding Rooms
Building Tip #1: Don’t forget to pause your game while laying out a building. Slapping down a template is one thing, but actually designing a building can take a while. If the game is still running your hearthlings will be uing up supplies and food… or getting into trouble while you work. You’ll also have to deal with the visual changes of day and night and passing clouds. You don’t have to pause the game, but be aware of the fact that at some point you will get interrupted.
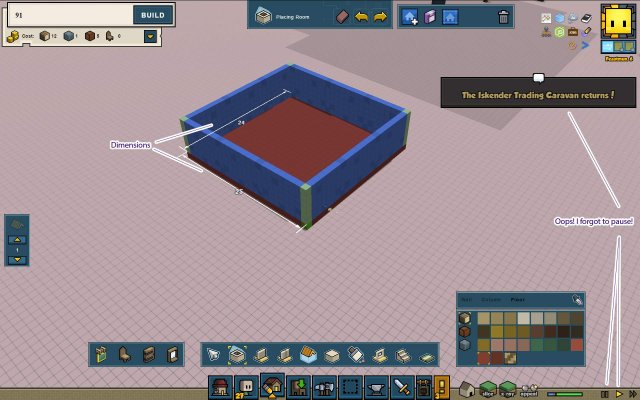
The room tool isn’t the most basic in the game, in fact the structure it drops down is one of the more complicated, but it is the first thing you’ll likely grab when making an actual building.
Using it is simple. Just click and drag until you have a box of the desired size. The game will show you the dimensions so if you’re trying to be precise you don’t have to laboriously count blocks.
A room consists of a floor, and (at least initially) four walls. Each wall ends in a column.
Building Tip #2: Columns are not structural supports. They are mostly decorative. We’ll cover them more later, but for now, just know that you don’t have to worry about “having enough” columns to keep your building upright or anything like that.
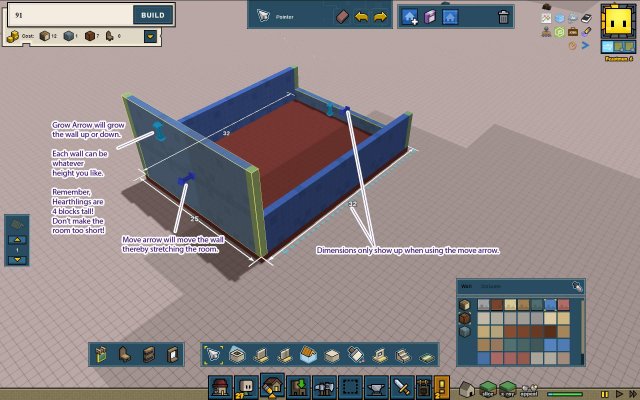
Clicking on each wall or the floor will give you different arrows you can grab to fine tune the shape of your room.
Each wall has a grow arrow that will let you make it taller or shorter. Each also has a move arrow. Unlike most of the royal blue move arrows in the game, these arrows actually change the shape of the room. You’re moving the wall, not the entire room component, and the game adapts the rest of the room in response. Walls can be grown independently of eachother.
Building Tip #3: Hearthlings are three blocks tall and they can dig two blocks up. The game defaults to a wall height of 6 and a tunnel height of 4. Low ceilings make hearthlings feel cramped and unhappy. Adding an extra row or two of blocks doesn’t cost much in the way of material. Especially on small buildings.
Clicking on the floor will give you a different set of move arrows. The royal blue Movement cross will become a familiar sight as pretty much every component has it.
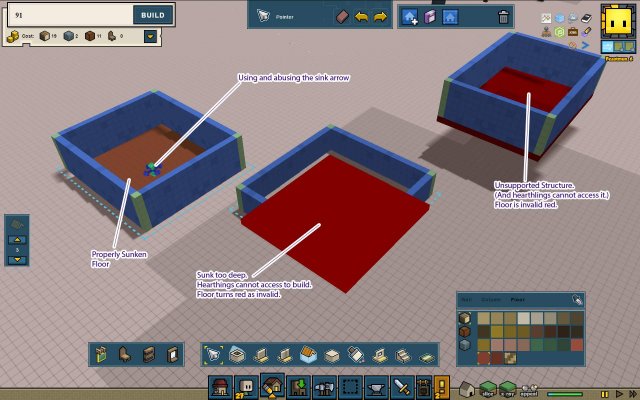
The pale green sink arrow is a little more unusual. It physically lifts the entire room or sinks it under the ground. Depending on the lighting and terrain conditions this can be hard to see. Try drawing a room hanging over the edge of a cliff and then using the sink arrow to see how it interacts with the terrain.
While you’re playing with the sink arrow you may notice the floor turns bright red. This tells you that there’s definitely something wrong with the placement of the component and it needs to be corrected. If you lifted it off the ground it will be floating unsupported. Either drop it back down, or put something under it to hold it up.
Building Tip #4: Everything needs to be connected to the ground when first placed somehow, even if it’s only by a single block.
If you sink the floor too deeply into the ground the hearthlings cannot reach it to build it. You can safely sink it one block deep and the floor will be level with the ground. If you don’t like the appearance of the floor from the outside of the building, or you don’t want your hearthlings to step up to get inside this is a good option.
Building Tip #5: It’s possible to build basements, but they can take careful planning and excavation. Consider making basements separate projects from above ground buildings for ease of future placement.
Note that should you decide to use the eraser on a room only the floor will shade red indicating the component to be erased. Clicking on one of the walls will still work to erase the entire room. It’s still safest to target the floor. Walls can be shared between rooms and you won’t ever be certain which room will vanish if you try to erase a shared wall.
Building Tip #6: Always erase a room by clicking the floor, not a wall.
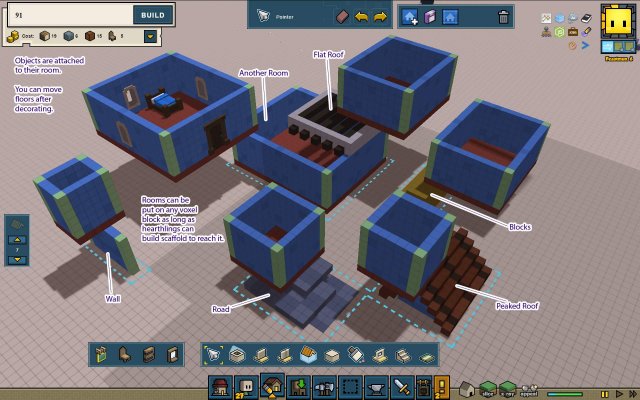
Now that you have a hang for how rooms can be moved, let’s look at where you can put them and what happens when you move a decorated room.
You can put a room on pretty much any other building component you can think of. If it can’t be picked up and moved by a hearthling (ie: it’s a voxel not furniture) then it should be valid to build on.
Moving a decorated room is one of the great features in the game. You can build a floor, move it somewhere else so you can see and decorate it as you like, then move it right back into place.
Building Tip #7: Move a room temporarily out of position to decorate it before putting it back.
Anything you put on top of a room that touches it will “stick” and move with the room. If you have a multi story building and you move the second floor to get at the first, the roof will move too, or the third floor and the roof. You get the idea.
Anything you hang off the side, like blocks, doors, windows, lamps will also move with the room. (Unless the wall is shared. More about shared walls in the eraser section.) And I do mean HANG. If a block (or cluster of blocks) is touching both the ground outside of a room and the room’s wall the blocks will stick to the ground rather than the wall. Blocks will only move with the outside of a room if they have nothing supporting them from below.
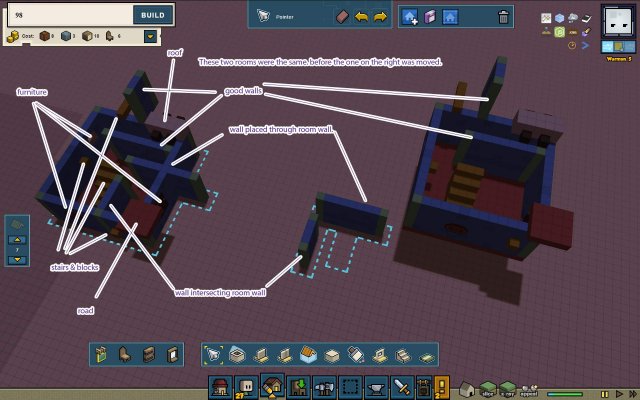
Interior walls are the tricky bit. A wall that is fully contained within a room will move with the room. The bottom of the wall must rest precisely on the floor. The columns of the wall cannot intersect with the walls of the room at all. If you get all of that right, the wall will move with the room. Otherwise it will stay behind.
So what happens when rooms intersect, not just walls? Let’s take a look.
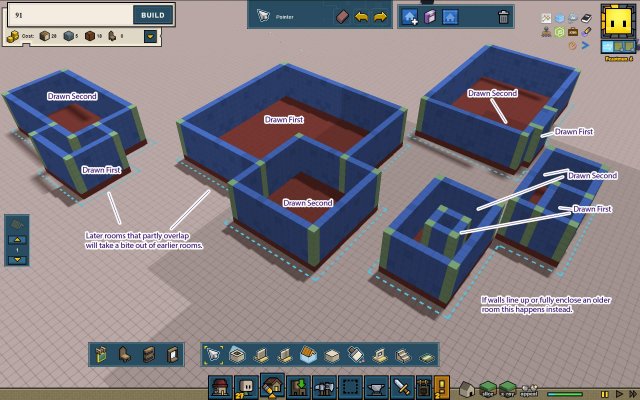
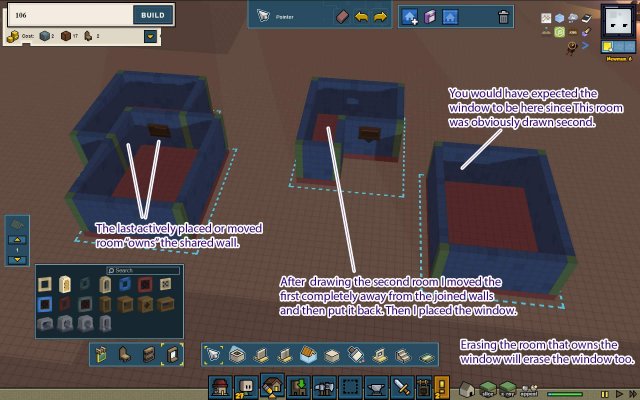
If rooms intersect on the edges you’ll get two boxes with a shared wall between them. Shared walls can cause odd behaviors if you move one room and not the other (it won’t cause odd behavior once it’s built. But one room just might steal some of another room’s stuff!) So if you have two decorated rooms sharing a wall and need to move one; make a point of holding shift and selecting the second room before you move it. If the rooms aren’t decorated you don’t need to worry at all.
If one room completely surrounds another They won’t show any particular interaction. moving the interior room will not leave behind a hole in the exterior room.
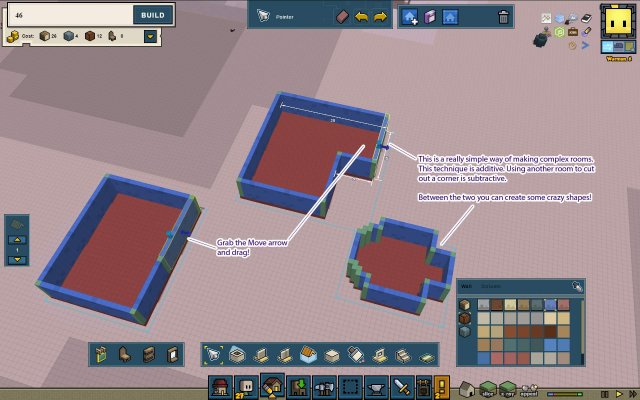
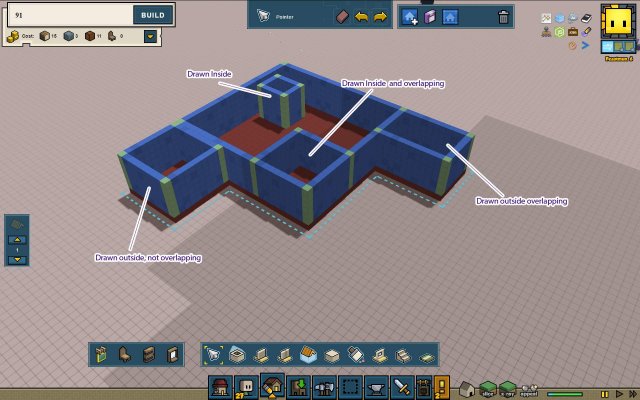
Where it gets interesting is if two rooms partly overlap. The room that is being drawn or moved will take a “bite” out of the room that is sitting still. This is one of two major ways to make rooms that aren’t rectangular.
Building Tip #8: Drawing one room partly overlapping the other is the subtractive technique for room design. Use small rooms to take chunks out of a larger one to make the shape you want.
Experiment: Make a donut shaped building out of four overlapping rooms. Now make another one out of a small room inside a larger room. What do you notice that’s different between these two buildings?
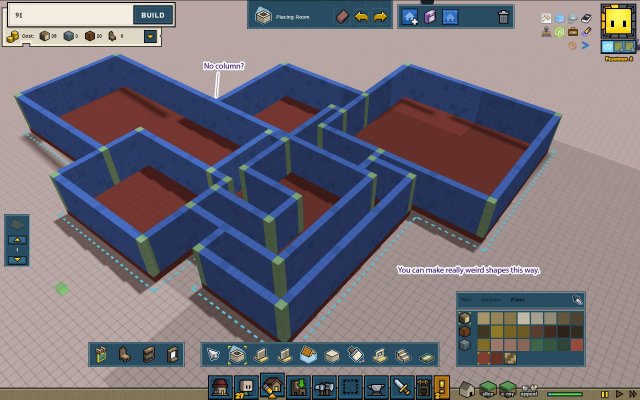
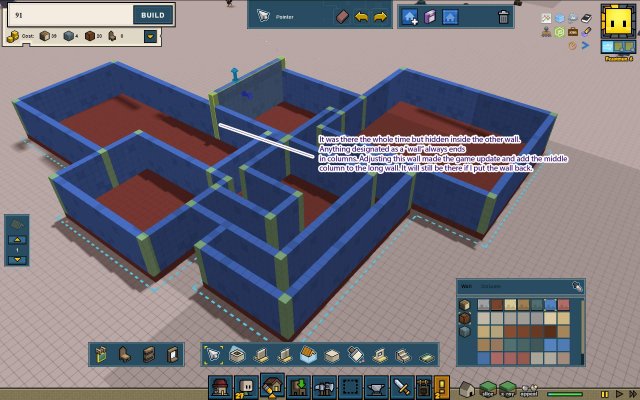
Make a crazy mess with the room tool and then play around with the resulting pieces. Get a good feel for how rooms behave and change as they interact with eachother. You can make some pretty strange stuff this way. Hey, isn’t that column missing in the picture? Probably about time we start talking about walls and columns, isn’t it?
Structural Integrity – Walls and Columns
Walls
The first thing you need to know about structural integrity in Stonehearth is that there isn’t any! Or at least, not much. As long as a component isn’t floating when you hit build, you’re fine. So, what’s the point of having a separate wall or column tool anyway?
Convenience and flexibility, mostly. Let’s start with what a wall is, first of all.
Walls are a one block wide component that can be as long or tall as you like. Each end of a wall is always capped with a column, which is a special 1x1xn component that is always attached to a wall, either made by the wall tool or by the room tool. This guide usually shows walls as blue and columns as green.
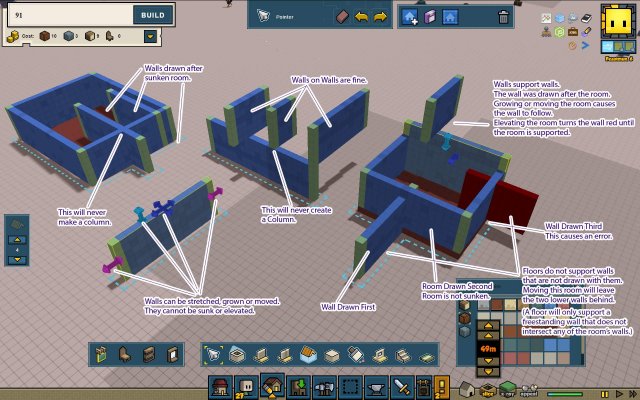
Freestanding walls can be moved, grown or stretched. They cannot be elevated or sunken unless they are attached to something below them that will move them up and down. The top edge of a wall is “sticky” in the same way that the top of a room will grab anything attached to it and move them with it.
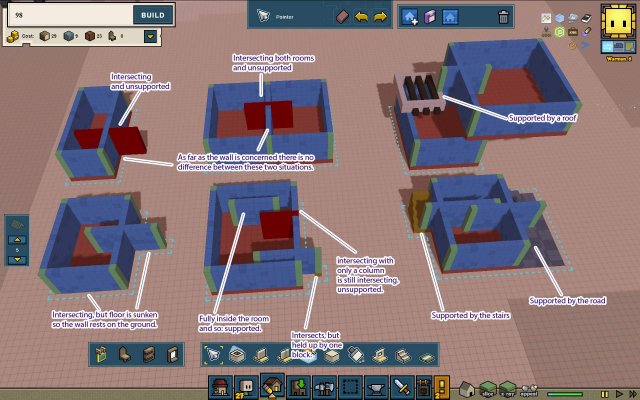
One place you may have problems is in the interaction of the wall tool and the room tool. A room doesn’t like having a freestanding wall intersecting its walls. It can be done only if the freestanding wall is supported on the other end by the ground or some other stable platform.
Building Tip #9: Walls must have a stable structure to live on. If they intersect a Room wall they will be considered unsupported unless there is something other than the floor of the room keeping them up.
Experiment: Put down a room and draw a freestanding wall starting inside it and going outside of it. Now try putting down a room, a single block (with the block tool) inside it on the floor, and then drawing a wall from the top of the block to somewhere outside the room. What does this tell you about drawing walls inside rooms?
Columns
A column is a part of a wall that has been defined as a corner or end point of the wall. It’s the Stonehearth building version of a vertex. Walls can be thought of as lines, and Rooms can be thought of as rectangles. When two rectangles overlap the game automatically calculates new columns at the intersections. Remember this?
The game does all those checks and decisions itself. That one point where the column was missing was probably because I had added too many rooms too quickly. (That entire shape was made in about five seconds of mad clicking.) On working with the wall, the game noticed a column should have been there and instantly put one in.
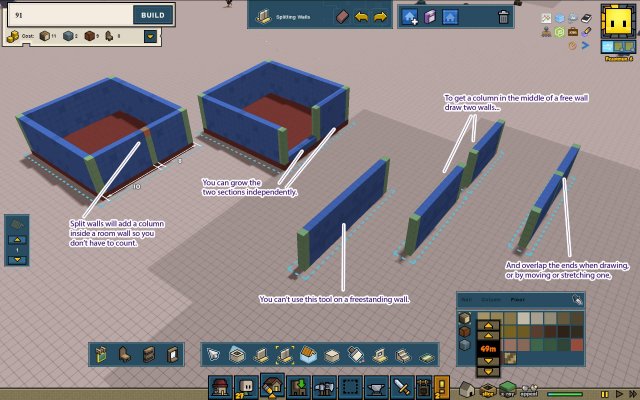
The split wall tool adds what looks like a single column to the middle of a room wall. It doesn’t work on freestanding walls. If you want a column in the middle of a freestanding wall you can overlap two of them, but it gets you no real benefits. It’s simpler just to paint it on.
Yay. Exciting. So it’s just a measuring tool?
Nope. It doesn’t add one column. It actually adds two. When you grab one of the walls and pull…you can start making some serious shapes. This is the additive technique of room design.
Building Tip #10: Splitting walls lets you add (or remove) additional space to (or from) a room by moving the resulting pieces.
Experiment: Try using the split wall tool to turn a square room into one with a central hole in it. Can you manage it? If not, how close can you get?
If for some reason you want a column for aesthetic purposes (like holding up a porch roof) you have a number of options. If you want a pair you can make a wall and use the hole tool (see erasers) You can also place a 1×1 wall or a 2×2 room for a thick column on the floor.
Experiment: Try making a 2×2 column out of the room tool. Now use the blue movement arrows. Select one column in the pillar and use the rotate keys. What happens? Now make a 1×1 column using the wall tool and try the same things. What if you draw a wall going in the opposite direction of the current stretch arrows and squash it down to a single column?
Environmental Protection – Roofing
Unlike columns, roofs are actually important, verging on critical in the game, depending on the kingdom you play. Leaving your animals out during winter in the Northern Alliance is a brilliant way to slowly torture them to death…and your hearthlings too. Roofs also protect Rayya’s Children from horrible sandstorms. So you want them.
Builder’s Tip #11: Roofs protect from the environment! Put a roof on your pastures if you get bad weather!
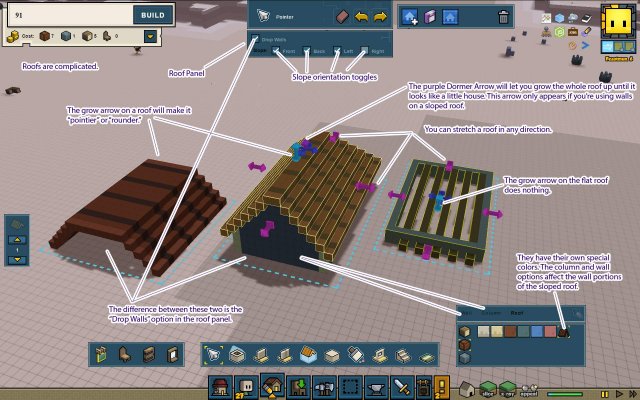
Before you go slapping down a roof, take a look at the Roof Panel and the special Roof section in the palette. You can click on the checkboxes all you like but they won’t visibly change until there’s already a roof on the building. Don’t worry if you don’t care for the color options in the palette. You can paint anything you dislike later.
Once you place a roof (Pick a shingled one for now.) Go ahead and select it with the pointer. You’ll see some familiar arrows that will let you stretch the roof into position. The grow arrow will do something a little unexpected. It will adjust yoour roof’s slope to be flatter (and rounder) or pointier.
The “Drop Walls” option will fill in under your roof with your set wall and column colors. The purple Dormer arrow will let you lengthen the dropped walls: perfect for making dormers! If your current roof isn’t arranged to allow for dropped walls the arrow won’t be there.
Experiment: Make a large peaked roof and use the hole tool to put two holes in it. Make a dormer using a small room and another peaked roof. Now make a second dormer using just a peaked roof with the “drop walls” option and the dormer arrow. Use the different viewing modes to compare the two dormers. What’s different about them?
If you grabbed the wrong style of roof, just pick a different “paint” option from the palette. You won’t have to redraw it.
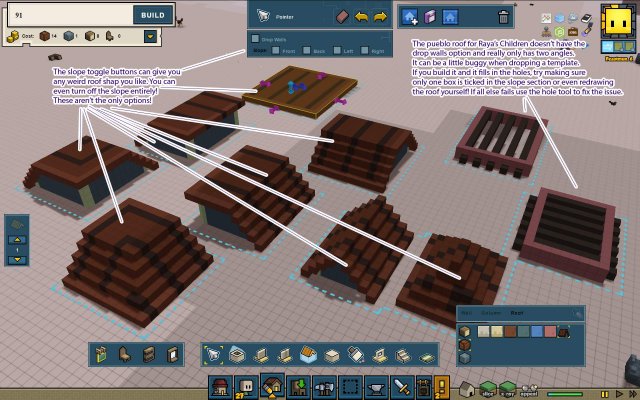
Now for the meat of the roof. Those four unresponsive checkboxes will now respond to you as long as the roof is selected. Check or uncheck them in any combination you like. This gives you a ridiculous number of styling options for the appearance of your roof. Likewise, if you rotate the roof (comma and period in a standard qwerty setup) you’ll see that the checks change depending on the orientation of the roof.
Experiment: Draw two rectangular peaked roofs that are the same dimensions as eachother. Rotate one of them 90 degrees and put them together in an “L” shape. Can you change their slopes so they connect together properly?
For the flat Rayya roof note that it can be a little buggy sometimes and might fill itself in. This especially seems to happen with roofs loaded from templates. Making sure a Rayya roof has only one box checked before you build might help avoid this. If it doesn’t, then either redraw the roof or take the hole tool to it.
Builder’s Tip #12: Check a roof’s settings after you’ve placed it to be sure they’re correct!
Infrastructure – Stairs and Roads
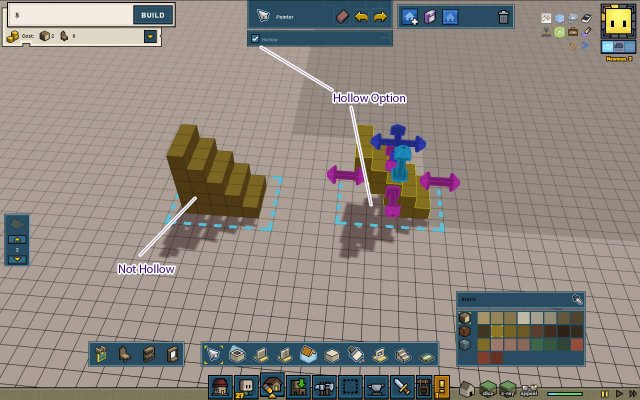
Stairs are possibly the single simplest tool in the game after the wall tool. You can stretch them in all dimensions, grow them taller, and move them around. Stairs only have one toggle option: whether or not to hollow out the underside of the stairs. You cannot use the hole tool on a staircase.
Builder’s Tip #14: As of 1.0 hotfix 2 stairs have a paint category of their own in the palette, but you cannot change the color of a staircase once placed unless you paint it by hand. Stairs when placed might take on the color of your set choice for the block tool instead of the stair tool. This bug has been reported. As a work around: reselect the color of your staircases when picking up the stair tool to use it.
Roads
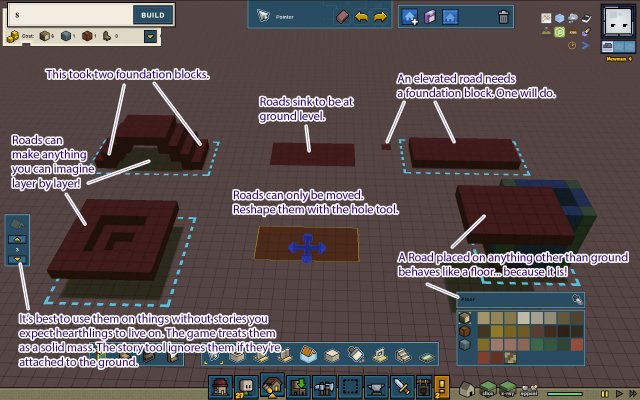
Roads are basically floors with some restrictions and quirks. They even share the floor color selections.
When first placing a road on the ground it will sink in a block so that the road is at ground level. If you begin constructing on any other surface the road will act as if it were a floor and sit on top of it. To draw a road above ground level you must first give it a foundation block to sit on. This can be as small as a single block.
You can build anything you like by stacking roads, but it’s best to avoid using them to build up walls for structures your hearthlings will live in because the Floor Slice Viewer will treat them as a single object, and the view mode won’t treat them like proper building parts either so it will be hard to see inside! Floors make excellent sculptures though!
Builder’s Tip #15: Don’t use floors to create walls. It will ultimately make it hard to see into your buildings.
If you place a road on top of a wall or room, however, the game (And the floor slice viewer) will treat it exactly as a floor. But note that it will be a floor and NOT a roof in the view mode.
Builder’s Tip #16: Don’t use roads to create roofs. If you want a flat roof either use a given flat roof or remove all the slopes from a peaked roof. Only use a road as a “roof” if you intend it to be living space, like an open air terrace.
There are a few other “gotchas” when it comes to dealing with roads.
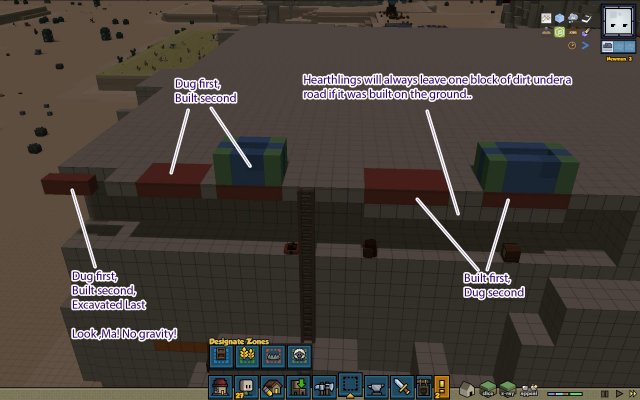
Hearthlings will not dig out a ground block directly under a road. They will, however, put a road in a 1 block thick patch of ground. (You want a floating city? You can totally do it.)
Builder’s Tip #17: Dig out underneath first, then put in roads. The same applies to a room’s floor.
Experiment: Try to build a floating building.
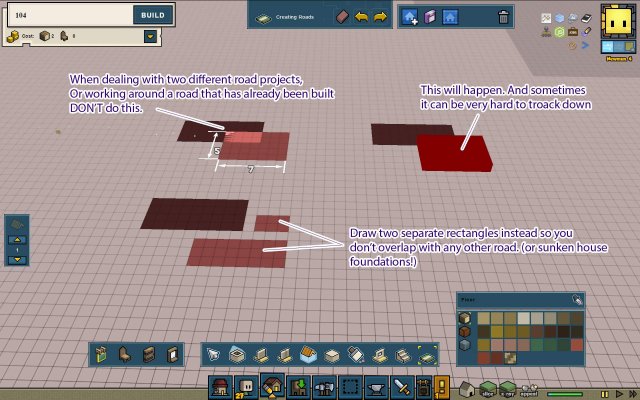
Because roads have the unusual property of naturally sinking into the ground, unlike every other tool in the game, it’s very easy to create a road that overlaps another road by a few voxels, either in a different project if you’re building multiple projects at once, or over a road that’s already built. If you make your road projects very large instead of breaking them into chunks it can be hard to find the error that’s holding up the whole job.
Builder’s Tip #18: Get into the habit of never drawing one road rectangle over another. Draw multiple smaller rectangles to surround a corner instead of overlapping it. And never draw a road underneath a clay floor tile or carpet.
Materials & Decor – Painting and Furniture
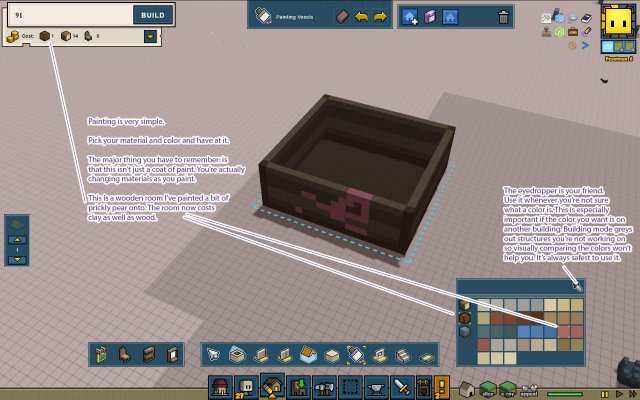
Painting is fairly simple. Pick your color and drag away. There is no fill tool, you can only color one block at a time, so try to avoid having to paint large areas by selecting colors before you place a component, or selecting a component, picking the appropriate material paint-type and picking a new color.
Builder’s Tip #19: Reserve the paintbrush for detail work. Recolor the component first using the palette.
If you work while the game is running as opposed to pausing it, making sure your colors are consistent is a bit of a nightmare. Use the eyedropper to be certain your color choices are consistent if the color you want to use is already out in the world. Actually, use it even if the game is paused. The hilight on your current component will make it look quite different from finished buildings which are greyed out a little, or even other parts of the working building.
Builder’s Tip #20: The eyedropper is your friend. Use it or regret it.
The most important thing to know about painting is that the color you pick will have an impact on the building material your hearthlings use to construct things. If you’re horribly short on a resource don’t use those colors to build your building.
Builder’s Tip #21: You’re not painting with paint. You’re painting with colored wood, clay, and stone. The color you pick affects your costs.
Experiment: Draw a room made entirely of wood. Pick a paint color of stone or clay and paint part of the room. See how that affects the materials used in the upper left.
Furniture / Objects
This should be the one part of building that’s painless to you, because you’ve already mastered placing items in the world and it’s basically the same thing. You have mastered it, right?
Builder’s Tip #22: The default rotation keys are comma and period. You should know this long before now. Every object, rooms, roofs and stairs can all be rotated even though there aren’t move arrows.
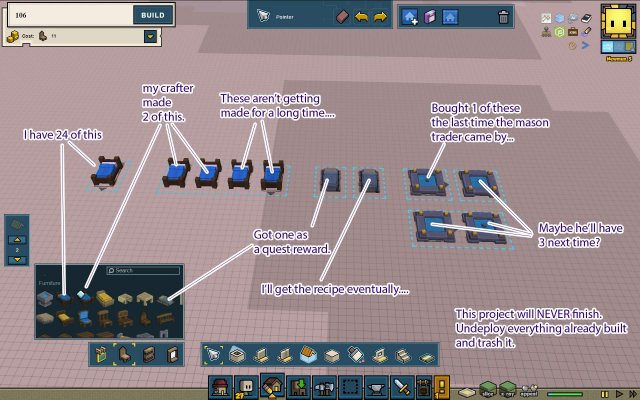
The menu will not show you everything you have in inventory. It will show you every recipe your hearthings currently know how to craft, along with an icon of every other item you own and can actually place. Once you click build every opbject you can create (whether or not you already have it in inventory) will be placed into your crafter queues to be made.
If you try to place items you can’t make and you don’t have enough of, your hearthlings will wait until kingdom come to finish your building… unless you obtain the items somehow. The game won’t warn you you don’t have enough. It will just assume you plan to obtain them eventually.
Likewise, if you have an item of exceptional quality (blue, purple, or gold gem icons in the corner) it won’t tell you how many you have in inventory. It will just assume you only want the high quality versions used and will ignore lesser quality items.
There’s no way to tell if you placed an exceptional piece of furniture or a normal piece in the build menu or anywhere else until the piece is actually placed.
Builder’s Tip #23: Avoid placing exceptional quality items or items you can’t craft with the building tool unless you’re certain you have enough. Place them manually instead. Never use exceptional quality objects in a template you plan to share.
Demolition – The Hole Tool and the Eraser
Everyone likes breaking things, right? There are a few ways to do it in this game.
The Hole Tool
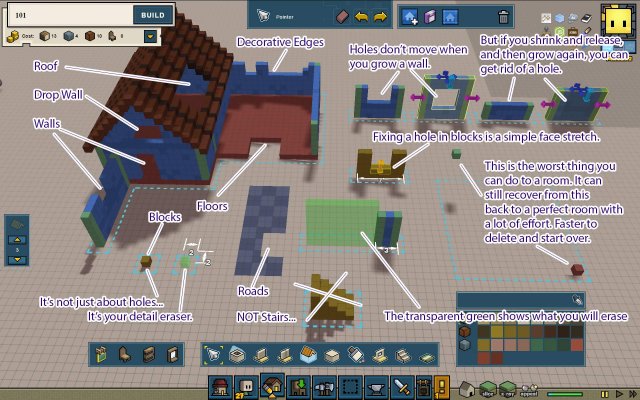
Right, the hole tool is for detail work. It’s your scissors and your saw. It also might be the best tool in the whole builder. Holes, half walls, corrugations, scalops, crenelations… All these things are possible without the hole tool. But they’d be an utter nightmare to make.
Want a giant panoramic window or an open doorway? Hole tool. Latticework trellis? Hole tool. Dormers are impossible without the hole tool. Do you need that wall gone but you still want it to be an actual room? Let me introduce you to your sledgehammer: the hole tool. Does that boring straight wall offend you? Not anymore!
But it’s not just got making holes. Got your block tool one cube too long? do you need a single cube hole in a wall so that your stair tread can fit juuuust so? The hole tool is your all purpose detail eraser.
The Hole tool has no equal! Nothing can stand befo– What? Oh alright fine. –Nothing but the stairs can stand before it!
You can erase a single block by clicking. Lines or planes can be erased with a click and drag. You’ll get a green hilight showing you exactly what you’ll be getting rid of.
Holes stay exactly where you put them on a component. The move and sink tools will take the hole along with the component. If you grow or stretch a wall larger the hole won’t move.
What if you make a mistake? How do you get rid of a hole?
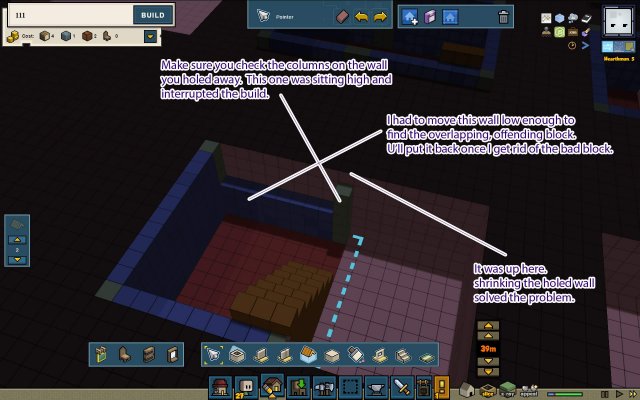
You can use the undo function if it was a recent mistake. That’s often your best choice. Otherwise you’ll have to use your stretch and grow arrows. Grab an edge of the holed component and squish or shrink until you can’t see the hole anymore. LET GO. (If you don’t let go the hole won’t update and realize it shouldn’t exist anymore.) Now grab that same edge and pull things back to how they were. Your hole should be gone!
If it’s really, REALLY borked then just use the eraser and start over. Sometimes it’s just faster to start over.
Builder’s Tip #24: Holes stay where you put them on a component. Grow and stretch won’t move them, but they will get rid of the hole if you resize the component small enough. Toggle the drop walls checkbox off and on if you put a hole in the wall of a peaked roof.
Experiment: Take the hole tool to a room until you only have one floor cube and one column cube on opposite corners of the room (See the picture above to see how it looks.) Use your move and grow arrows to restore the room without any holes.
The Eraser is your tool of mass destruction. It removes entire components.
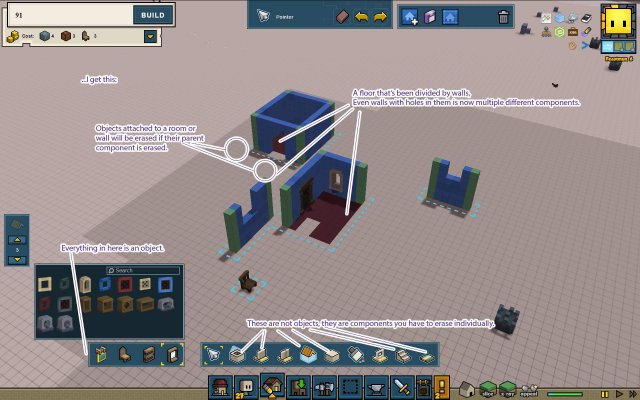
Objects that are loose will have to be erased one at a time, but taking out a room will erase any objects attached to that room. Pay attention to any shared walls when erasing!
When dealing with two rooms (or freestanding walls, or the drop walls on a roof) that share a length of wall, either because you’re erasing or moving a component, it’s important to know how objects attached to that wall will behave.
Think of components existing in a “stack” of importance. The very last component you grabbed gets moved to the top of the stack. If you grab something in the middle of the pile it gets taken out and moved to the top and everything above where it was drops down one. If two rooms share a wall and you put a door on that shared wall, the game goes down the stack until it finds one of the rooms. Then it assigns the door to that room. Once the door is attached nothing can steal it, unless you move the door and then the game runs down the stack all over again.
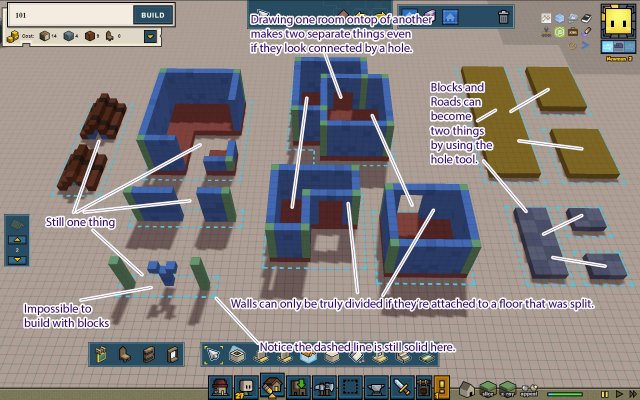
Builder’s Tip #25: Overlapping rooms drawn by the room tool split into separate rooms. You’ll have to erase them separately. Objects in a room are erased with the room. Shared walls may loose objects if they were assigned to the room you moved or erased!
Experiment: Draw at least five rooms and freestanding walls that all overlap so you have a lot of interesting shapes. Use the erase tool and movement arrows to see how the game handles overlapping rooms. Add objects to different walls at different times to see what happens when you move or erase a component.
Contiguity
Contiguity basically means “uninterruptedness.” A thing made of one whole touching part is contiguous. A thing made of two disconnected parts is not contiguous.
Stonehearth has some… interesting rules on how contiguity works and it pays to know them so you don’t try to do something invalid. The hole tool and the room tool are the two major places where you can change the contiguity of a component.
The first thing to understand is that when you make a hole in a wall, a room, or a roof, that block isn’t really gone. It’s just been turned invisible and intangible. You don’t see it, and your hearthings can put things in the empty space…but the game still knows “something” is there.
Making holes has a different effect on blocks and roads. If you erase some voxels in a road or a cluster of blocks that voxel is gone. Completely and utterly gone. If that was the last voxel connecting two clusters of voxels, then those two clusters become two completely separate objects that will move independently.
Experiment: Use the hole tool on a freestanding wall to make a checkerboard patterned chain link fence for your hearthlings. Now use the block tool to make a wall and make the same pattern. Do you understand why some of the blocks in the second fence are invalid? Can you make another structure with the wall and hole tools that you can’t make with the block tool?
The Sum of All Things – The Block
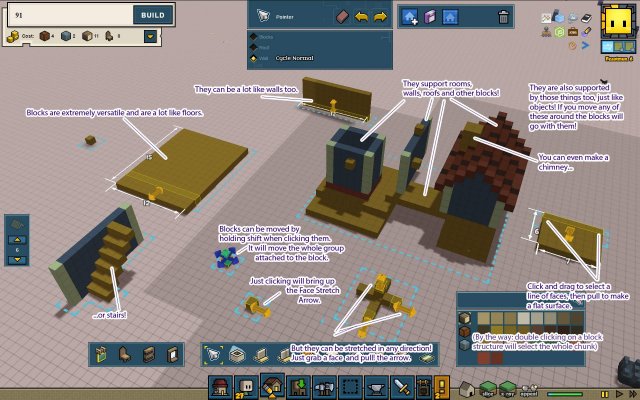
The Block tool makes a single voxel object and places it in the world. Blocks are “sticky” and will attach to walls, floors, roofs or the ground…basically anything really. The do have a preference for the ground over anything else though.
This is by far both the simplest tool for a new player to use for detail work, and an experienced user to make a masterpiece with; it’s also the easiest tool for anyone to abuse.
In theory the block tool is the only construction tool you will ever need. Everything else is just convenient. (This isn’t quite true, there are still a few glitchy behaviors, but it’s pretty close.)
Blocks are the only building tool that is face dependent. What happens to a block and how you’re allowed to interact with it is dependent on which of the Voxel’s six faces you grab.
You can click and drag to select specific blocks to manipulate, or double click and the game will try to intelligently select the group of blocks you wanted. Double clicking in the middle of a plane of blocks will select the chosen plane. If you don’t get the selection you want, try clicking a different face or using a click and drag.
The yellow Face Stretch arrows are unique to blocks made with the block tool. Pulling on one won’t move the block you selected, it will instead cause the game to extrude your selection in the direction of your pull, creating blocks as it goes.
Builder’s Tip #26: Grab different block faces to stretch a block in different directions. Holding shift while clicking on any block face will bring up the move cross and sink arrows. Blocks can be repositioned but not rotated. If a block is stuck to something else that does rotate it will be left behind.
That’s the beginner’s understanding of blocks. Slap them down, drag them around, and go. You’ll have a building that only looks good in roof on mode, and will look a mess in roof down or wall-less mode, but it’s easy.
Advanced: Block Flags
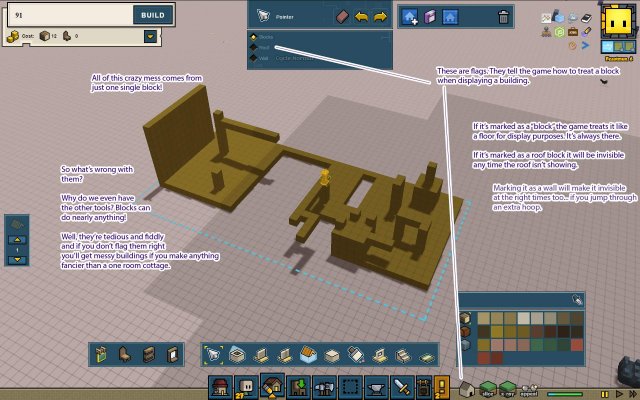
Every single block has a “flag” that can be set to one of three states. Which flag a block is waving tells the game how and when to display it. (Supposedly. As of 1.0 Hotfix 2, there are some display issues in some cases with some modes. Those bugs have been reported and I’ll try to give you workarounds where possible.)
The three flag options are “Normal” “Roof” and “Wall.” Wall has four sub-options that can be accessed by repeatedly clicking “Cycle Normal.” We’ll get to that.
Normal is, well, Normal. Every block defaults to this and will be displayed all the time in every view mode. This is often a bad thing for having a well constructed usable building. You’ll see what I mean in a minute.
Roof is just the opposite of Normal. The game will treat the block like a roof block, which means any view mode that turns off the roof will also make these blocks invisible.
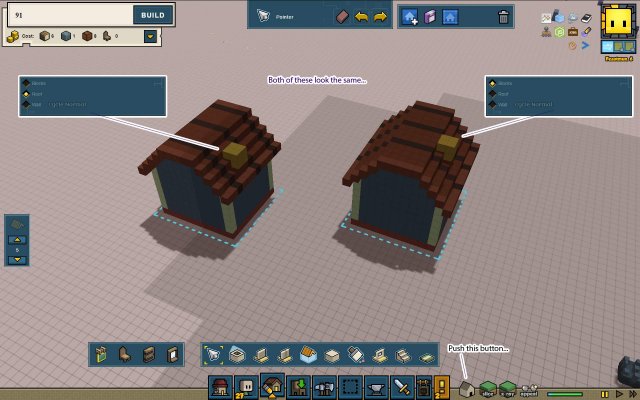
Take a look at the chimneys in this picture:
Visually they’re identical. But as you can see, their flags are set differently.
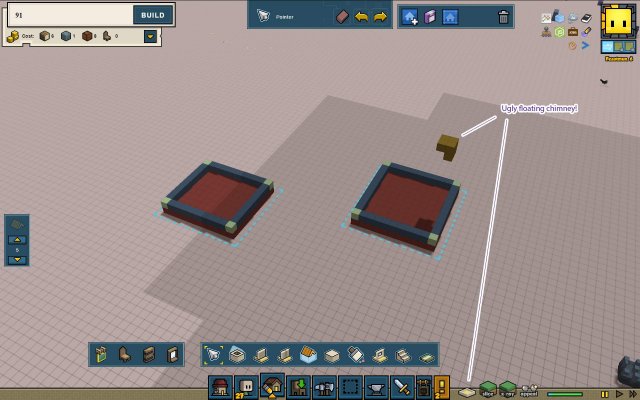
Changing the view mode gives us this. We now have a chimney floating in the middle of space. Now, this may not appear to be a very big deal, and in this instance it isn’t very polished but it isn’t a large problem. Now imagine making one wall of your house out of blocks, or a few inside blocks that never go away, ever. That starts to cause a serious display problem and can cause issues when placing decorations. Also, having little blocks pointlessly floating in mid-air is distracting and off-putting. What if you want a curled lip on the edges of your roof like in some Chinese architecture? You’d almost have to make it out of blocks and then you’ll have a giant permanent ring floating above your building.
Setting the flags on a block is equivalent to crossing your T’s and dotting your I’s. It makes things behave well and looks sharp. It’s especially important in the case of roof blocks because those are the blocks that are almost guaranteed to get in the way at some point.
Builder’s Tip #27: If a block properly belongs to the roof, flag it as a roof block.
The wall flag is similar in principle. Unfortunately it’s a bit bugged as of 1.0 Hotfix 2. Fortunately you can still see how it ought to behave in every case, you just have to jump through a hoop or two. That will be covered.
First though, if somehow you’ve managed to get this far and not familiarize yourself with the building view toggle, go do that. It looks like the little gray house near the pause and slice controls. Go look at a building and then toggle it a few times.
It has three modes. “Roof On,” “Back Walls Up” and “Walls Down”. “Back Walls Up” sometimes only displays blocks with a wall flag properly in build mode. If your wall blocks are 1 block thick by however many blocks tall and wide the game is much more likely to display them correctly, but it’s still a very iffy and inconsistent thing. “Walls Down” only displays wall flagged blocks properly during normal gameplay.
So in the ideal universe where everything works correctly: what’s a normal and why does your wall need it?
The term Normal comes from geometry. Some mathmaticians probably shouldn’t be allowed to name things. Normals are invisible arrows that tell the game where the outside face of the wall is. The game needs to know this so that it can turn off front facing walls and leave back facing walls on when you’re in the “Back Walls Up” viewing mode. It gives you access to the interior walls of your houses easily.
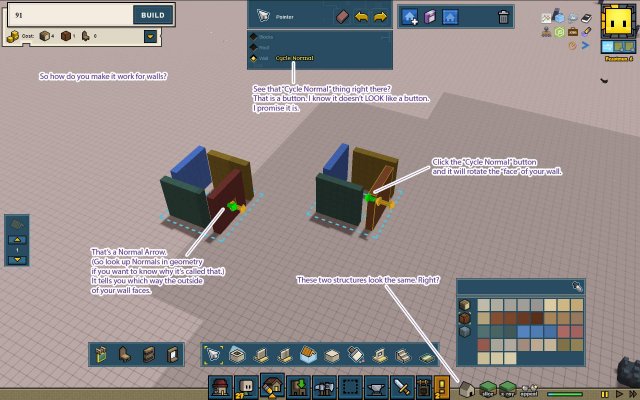
Experiment: Set your view mode to “Roof On.” Draw a wall of blocks and select them. Set them to wall. Cycle Normal will no longer be gray. Click it repeatedly and watch your wall. A small bright green arrow will appear for about a second. Every click will rotate it around your wall 90 degrees. Set your view mode to “Back Walls Up” while in build mode and rotate around your wall to see it flicker in and out of view.
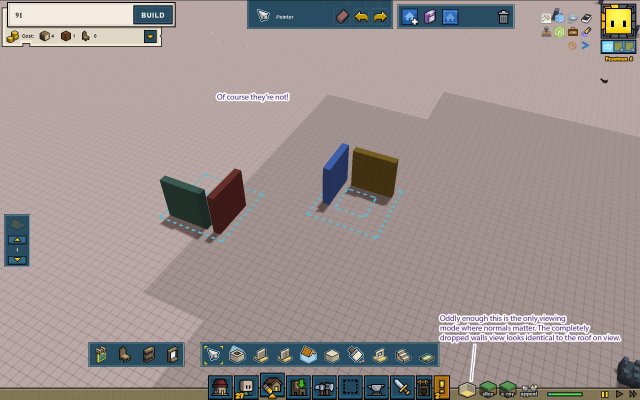
The above walls look identical, but their normals are reversed from eachother.
This is what it looks like in the “Back Walls Up” view mode.
Experiment: Design a small house with two floors and a staircase entirely out of blocks. Set your block flags appropriately and check to see that your normals work while still in build mode.
Builder’s Tip #28: While you can set a normal on a wall made of blocks, you can’t set the normal on a freestanding wall. The game will try to guess what sort of normal it should have by its proximity to other things. Sometimes the game will get it wrong. If your freestanding wall is displaying at the wrong times replacing it with a block wall that has the proper normal might help.
But displaying block walls is broken! what should I do if I’m making templates for other people?
The bug is much less prominent when the blocks you define as walls are actually shaped like walls. So make sure that any block wall is only one block wide, and isn’t touching any other blocks that it might take along for the ride. Hopefully that will ameliorate the problem enough that it still works enough when actually built. If that doesn’t work try making sure that the top is also flat.
If neither of those steps work, you’ll probably need to make a call based on how much the wall blocks views. If it’s a low wall you can probably get away with leaving it always visible. If it’s a large wall causing extreme issues you may need to set it to display as a roof. That said…
Builder’s Tip #29: When in doubt, roof it.
Building it Right – How to Kill the Sarlacc
So now you know about all the tools, and you can use them all! Let’s wrap it up by going over a little organizational philosophy. For the purposes of visualization Stonehearth buildings are built of floors, walls and roofs. Any voxel placed will be treated as one of those things.
Stonehearth’s builder is extremely powerful, but the tradeoff is that it doesn’t forbid you from doing things that will display badly.
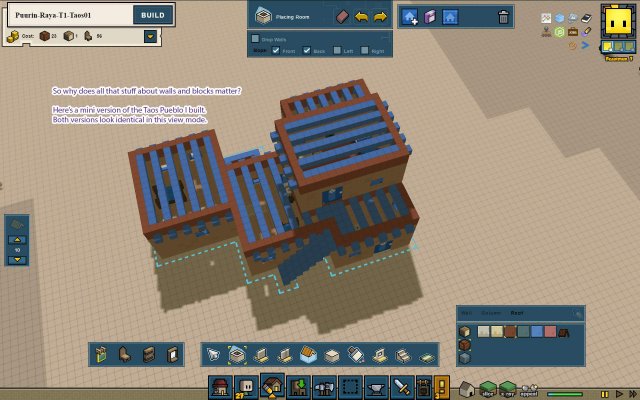
This is a miniature version of Taos Pueblo I built for my hearthlings. I hadn’t really started digging into the editor yet so I was just slapping down boxes and I had a few ideas about what you can and can’t do that turned out to be wrong.
With the roof on it’s a cute little building. Looks pretty solid.
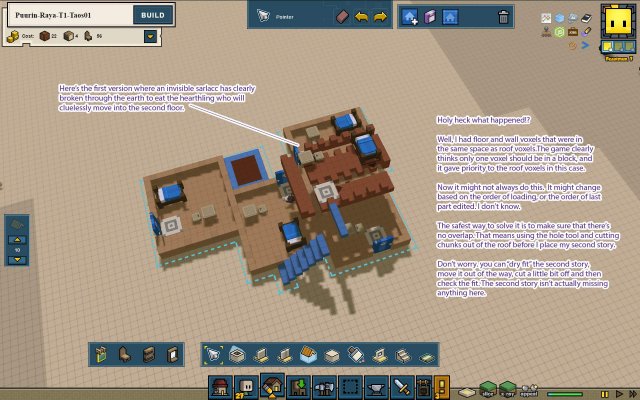
This is what version 1 looked like with the roof off. It’s a fantastic mess. Right now there are roof voxels living in the same place as floor voxels and wall voxels. The builder lets me theoretically say “There are three voxels living in the same spot” with no problems. But a displayed voxel can only hold one flag in its hands when the renderer says “should I draw you or not?” In this case the roofs had priority over the floors.
There’s no way of arranging the priority stack beyond going through every component in a building and shifting it out of position and then back in in the order you want things to stack. And that’s kind of an insane thing to do. Which is why the game doesn’t even try to give us a tool to prioritize stack order.
And that’s why there’s an invisible sarlacc trying to eat my hearthlings. Clearly something had to be done.
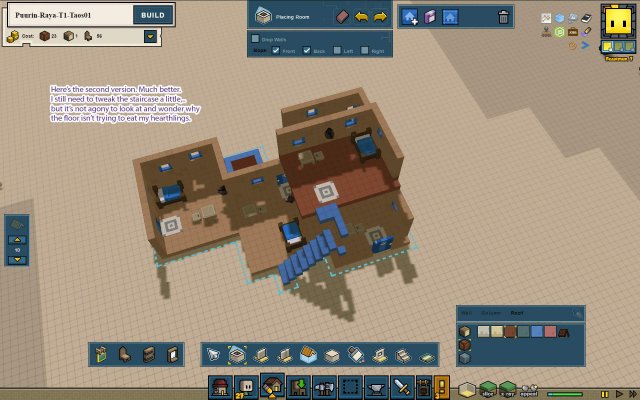
This is my second try. It’s leaps and bounds better. The sarlacc is dead, and there’s only a little weirdness with the stairs that should be simple enough to fix later.
Fixing the issue took me all of five minutes and once you get into the habit of working in a clean manner creating crazy awesome designs that display well in every mode won’t even be that hard.
Builder’s Rule A: When you place a component of your design know in your mind whether the piece will display as a roof, a wall or a floor, or in the case of placing a block what you want it to display as.
Builder’s Rule B: If two components overlap and have conflicting flags don’t let the game flip a coin. Decide how that voxel should display and then make it happen by knocking some holes.
Builder’s Rule C: Check your design in every view mode. Rotate all around it. Can you reach everything important in at least one of the view modes? Can you reach everything you need to to decorate after the building is built? If No: fix it somehow.
Builder’s Rule D: Does anything look out of place in any view mode? Does anything display in a broken or fractured form which looks unpleasant? If yes, knock holes or change some flags.
Builder’s Rule E: Does it look awesome? If yes, share it with the world.
Troubleshooting: Workers On Strike!
There are a number of different reasons a building either won’t build, or stops building.
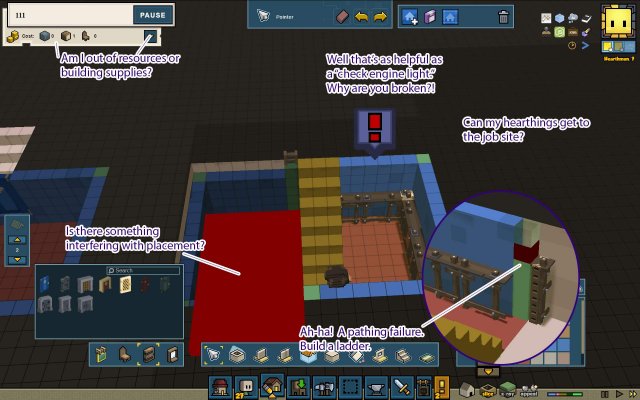
The three primary issues are pathing failures, components placed in invalid positions (Like inside the ground, a cliff, or an already built building), and lack of materials.
Most of the time if a component is placed in an invalid spot then something will turn bright solid red while you’re doing the placing. Occasionally, it won’t, or at least you won’t see it, and when you press the build button the working area will turn yellow instead of green and you’ll get a popup warning you there’s a problem with an object. Once corrected you can try to build again.
Very rarely does this error occur once construction has already started, but if you have more than one building project running at a time and they’re near eachother it can happen. It’s quite easy to do this with roads in particular.The game will give you the opportunity to correct the offending object, but in a worst case scenario, correcting it will involve demolishing the offending project.
Troubleshooting Tip #1: Never have multiple road projects in construction at the same time. Do not design a new road project while a road is being built. Wait until one finishes before starting the next.
The second most common issue, and one that regularly crops up during building is running out of some material or object needed. Check your crafting queues and move the needed item to the top of the queue. Clay bricks should be first, followed by doors and windows.
Crafters aren’t smart. They will only queue the final product needed. if you queue a blown glass vase, the crafter won’t queue the preliminary unfired vase for example. They also queue up every item they can build for a building, whether or not you already have those items in storage. If you have a lot of premade materials and are building a lot of projects in a row your crafters might get behind and buried under a lot of useless items you don’t need at the moment.
Troubleshooting Tip #2: Don’t be afraid to clear queues of items you don’t need now or add in items that are missing.
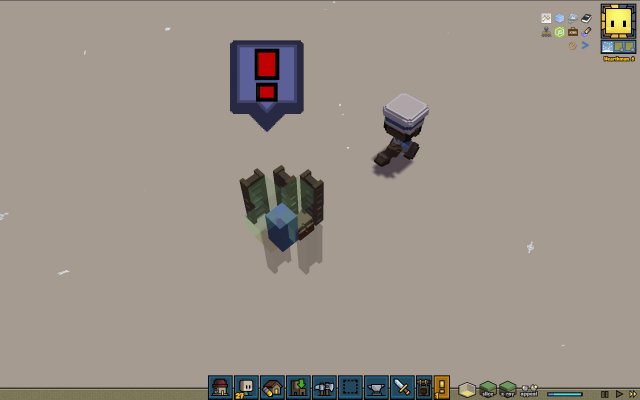
The last problem is the most insidious and the hardest to diagnose because there’s no real warning that a hearthling can’t path to the working area. Sometimes a block will glow and flash red, but not always. if you’re running stairs up into an opening you need three blocks of open space extending out past that first riser or hearthlings can’t use it.
Troubleshooting Tip #3: If you see a glowing red block, run ladders up to it until there’s a path your hearthlings can use to get to it. The exclamation point may not go away immediately. Let it run a little. If you can’t find the problem block run ladders everywhere you think looks reasonable. Or even unreasonable.
There are other bugs that can cause construction failure, these are usually Lua script errors and can often be solved by pausing all but one construction job, saving and exiting stonehearth completely.
Troubleshooting Tip #4: If your hearthings are acting strangely and not crafting items you need for construction try pausing all but one construction job, saving, and exiting stonehearth completely. Possibly power cycle your machine too.
If all else fails and the little prima donnas still turn up their noses, save your template, undeploy everything that’s been placed, (doors, windows, etc,) destroy the project, and place the building again. Sometimes the hearthlings botch it themselves by double placing a ladder or something.
Troubleshooting Tip #5: When all else fails, template and destroy the project and then place a new copy. Only if it fails to build 3-4 times at the same point in construction should you consider that there’s an error in the template itself.
Advanced: Dwarfing It
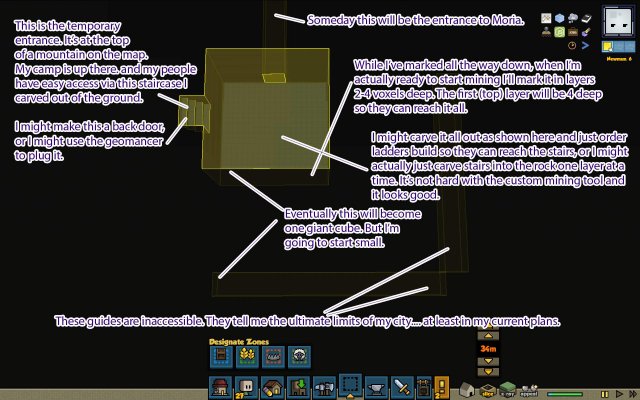
So you want to build a basement/sunken building/or just burrow into the side of a mountain and play dwarf? Cool. Let’s get subterrainian.
To even have a chance at building underground, first you’re going to need to mine. The game has two mining tools and one of them has a few quirks.
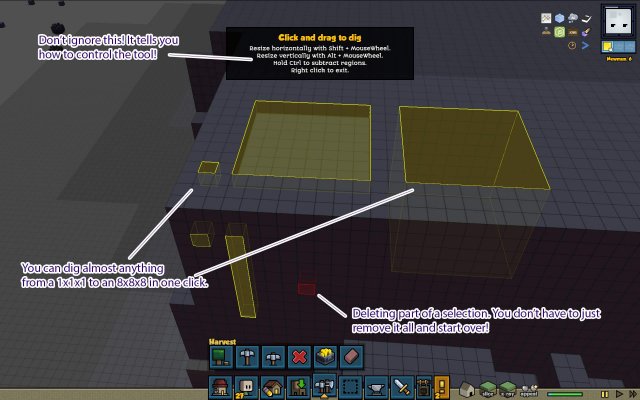
In its most basic form this tool marks out a single voxel for digging. You can also click and drag to remove single lines or a single horizontal plane of dirt.
But you CAN increase or decrease its size and shape up to 8x8x8. When dragged it will pull out a volume equal to multiples of that number. So you can drag out an 8 block tall digging zone that’s 64×64, 8×16, any multiple of 8 you like…. or any multiple of 6 or 7 if you set your tool to thise numbers too. It’s an infinitely variable tool.
Miner’s Tip #1: pause the game, find yourself a cliff and start playing around with sizes and shapes of the tool until you’re comfortable with how it works. Once you’re done, cancel any mining zones you don’t want.
Miner’s Tip #2: Setting the mining tip to 4x3x3 is ideal for cutting normal doorway sizes in the ground.
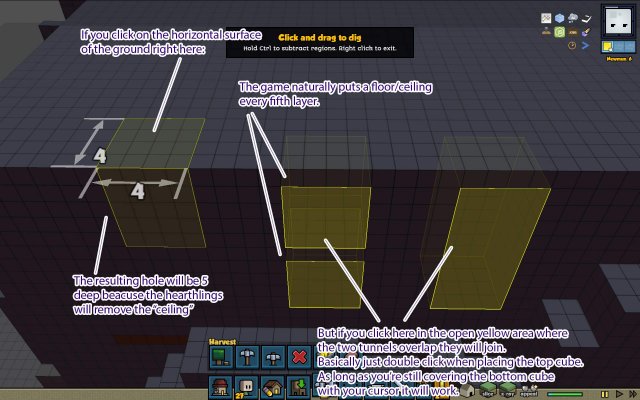
The tunnel mining tool is less flexible but quite a bit simpler to use. That said, it can be confusing if you don’t understand the premise it works under. The tunnel miner exists within an invisible universal grid on the map. Each grid is 5 blocks tall and 4×4 on the XZ plane. The tunnel miner if given it’s druthers will mine out a 4x4x4 cube and leave a nice single layer of ceiling above it.
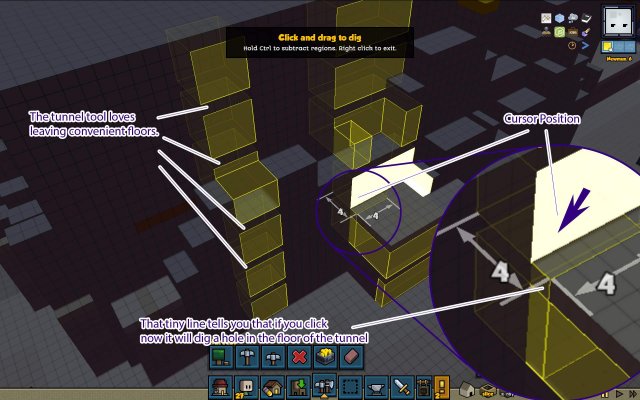
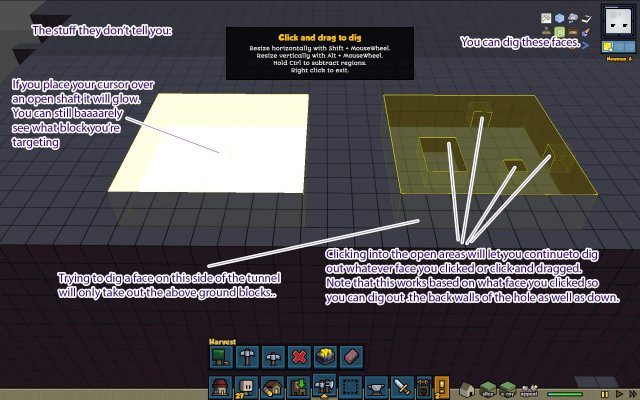
In a shocking coincidence these 4×4 layers of minable material line up perfectly with the Ground Slice Viewer’s 5 layer jumps and ground level. Turn on the slice viewer, drop the slices down until ground level has just gone away, and you’ll find that the tunnel miner is perfectly happy to mark out its ideal 4x4x4 cubes. (It’s almost like someone planned it!) If you then turn slice view off you’ll find a single thin ground layer above it. Click on the ground and the tool, realizing you want to actually break through the ceiling (you heathen, I imagine it cries) will begrudingly knock you a square hole.
Miner’s Tip #3: A 4×4 hole in the side of a cliff or at the bottom of stairs can be filled by Tunnel doors. It’s why they were added to the game in the first place!
Both mining tools behave as though anything marked for mining has already been dug out. If you face a cliff square on, aim the tunnel miner directly down the center and start clicking away in the same spot you’ll get a marked out tunnel for as many 4x cubes deep as you clicked. (As long as you lined it up right.) Click three times and you’ll have a 4x12x4 tunnel.
This technique will only work on the faces of voxels you can actually see from your current point of view if you imagine that the marked cubes have already been dug out. It’s much less confusing once you know it can happen and see it working yourself. It’s easiest to get benefits out of this with the custom miner, mostly because the yellow glow is so bright over the marked cubes it can be hard to see where you’re actually going at first.
The best tactic when you’re still learning this technique is to visually note where you want to click while your cursor is off of the yellow hilight. Keep your eyes on your goal as you move the cursor in place. Click once, then move the cursor away to evaluate the result.
Experiment: Make a 1x3x1 custom miner cursor (a horizontal one.) Find a small cliff edge somewhere and use the cursor to designate a 4 tread staircase without dragging. Try to do it without changing the angle too much or using the slice viewer to help you.
The Slice Viewer
One more Tool to cover before we get into building underground. The slice viewer is next to the building view toggle. It says slice and if you click it it will pop up a set of four arrows and a number in Meters.
If you want to build underground you have to be completely comfortable with this viewing mode. It’s not hard. Familiarize yourself with this viewer. Stand next to a cliff and click the 5m down button until things start changing. Use the up buttons too. Go back and forth, counting blocks or writing down numbers if you have to until you understand exactly how this works. (There isn’t much I can do to visually show this to you. The screenshots would be dull at best.)
Once you’re comfortable with moving up and down your slices, try going under ground level so everything is black, marking out some tunnels and moving up and down to get familiar with how to orient yourself underground. If you’re not comfortable this far below ground, I suggest you not try for a subterrainian city just yet. Stick with basements. Maybe make a tunnel or two between some buildings once you’re feeling a little more confident.
Doing the Mole Thing In Comfort
Hearthlings don’t like low ceilings or small spaces unless you take the appropriate perk when it’s offered in the questlines. As such, while the tunnel tool is convenient and fairly simple to use it’s best reserved for it’s intended purpose: actually mining in an actual mine because you need ore.
It’s not intended for living space.
Miner’s Tip #4: When digging living space and not mining for ore set your custom mining tool to dig out at least 6x6x6… but 8x8x8 is better.
When building on the surface you can be flexible and not do a lot of planning. Mining is time consuming though. Always have a plan before you start digging.
Miner’s Tip #5: To prevent over-eager hearthlings from hogging out material in an area you’re still marking out, consider changing your settings so that mining zones start paused.
While your entrance point to your underground wonderland is going to vary based on your purpose, what won’t vary is the best ways to go about laying things out and then digging them out.
Plan from the bottom up, dig from the top down. When you start marking out yellow mining zones it’s easy to see ones below you so you can line things up. It’s really hard to deal with ones above you. This is especially the case with stairs where you can step up one slice at a time and just draw a slightly longer rectangle than the last one. If you don’t want that top hole in moria at all, then dig yourself a small vertical shaft with a ladder up to the top and have them dig down from the top.
Miner’s Tip #6: Plan bottom up; dig top down.
This doesn’t mean you have to dig moria out all at once. Pace yourself. Keep your mason and potter on top of the resources you’re digging up by having them make the things you’ll need once you actually start building. Gargoyles. Think of the epic gargoyles lining your halls. That much stone will make a ton of gargoyles.
Funny enough, once you actually have your giant cave-of-epic building underground isn’t all that different from building outside (Unless you’re mad enough to carve your homes from the living rock. You are? Ambitious. I’m not holding your hand for that. You can work out the logistics yourself.)
So that’s Moria. Let’s talk about something a little smaller.
Advanced: Basements
Carving Out a Root Cellar
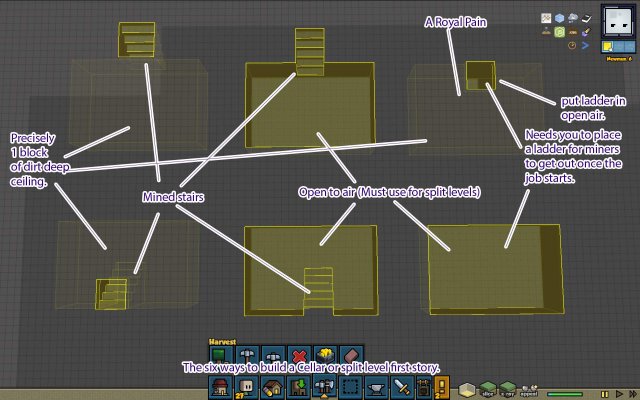
There are six basic kinds of basement. Well, seven really but one is just a hole in the ground with a staircase leading to a hole in a house. There are six basements with walls and floors.
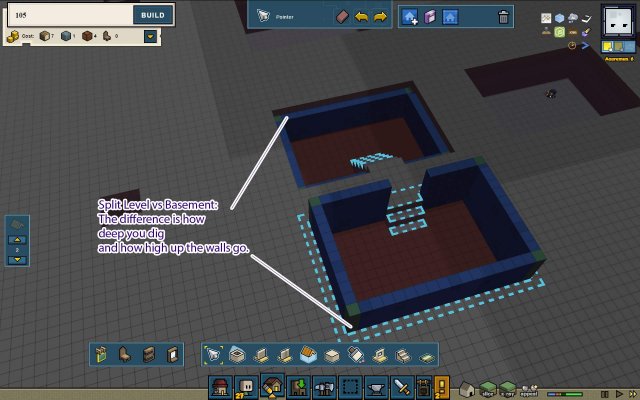
There are open air and enclosed basements. Basements with an exterior entrance, interior entrance, or ones dug using ladders. Any constructed basement will be some combination of these features. Open air basements include partly sunken split level rooms.
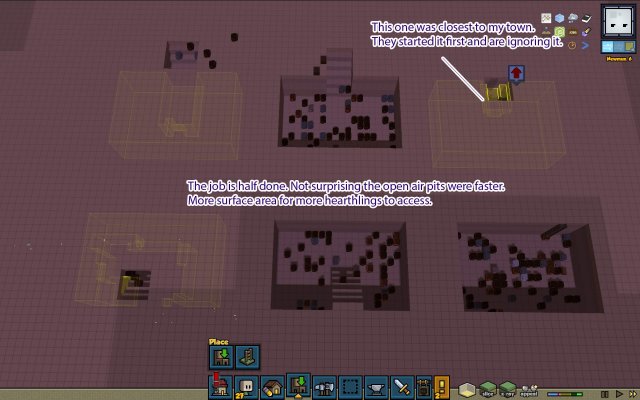
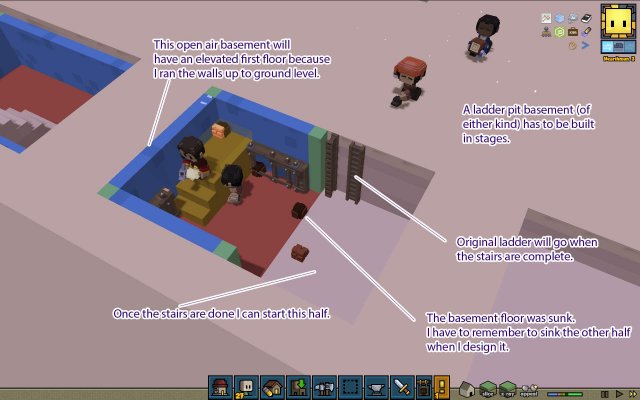
Hearthlings dig open air basements faster than closed basements because it’s easier to reach the digging surfaces. They have fewer problems getting to the nooks and crannies. The downside of an open air basement is that it’s exposed. Whatever house you put on top of it must completely cover the open hole. If you want a split level building, you’ll have to use an open air basement to sink that first room into. Only dig half as deep as you normally would.
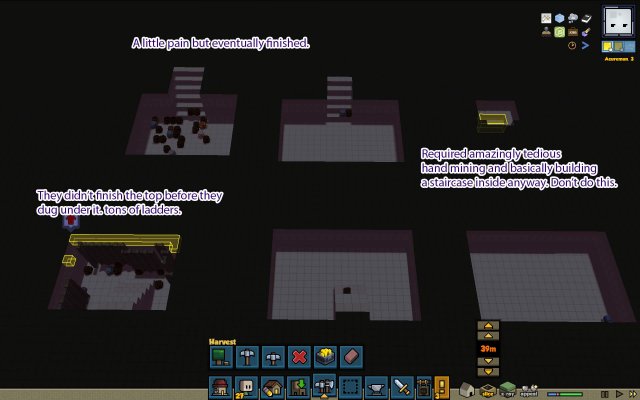
Enclosed basements only have a small entrance hole to the outside world. Their ceiling is a single layer of ground blocks that you will replace by sinking a room onto. An enclosed basement allows more flexibility in house layout. They are much more fiddly. A ladder entrance to digging out this basement is a non-starter. You’ll have to order your hearthlings to dig it out, sometimes block by block. Carve out a dirt staircase. Order them to dig out only four layers. Once they’ve finished you can start ordering the next few layers in chunks of four until your basement is sufficently deep.
Let’s talk entrances. You can either dig out a staircase or use a ladder. Only use a ladder on an open basement. it’s not worth the pain to deal with an enclosed basement and a ladder. Eventually you’ll likely replace the ladder with built stairs. Make the stairs one block taller than the top of the basement walls so it can reach the floor of the house proper. (Don’t forget to cut a hole in the house floor!)
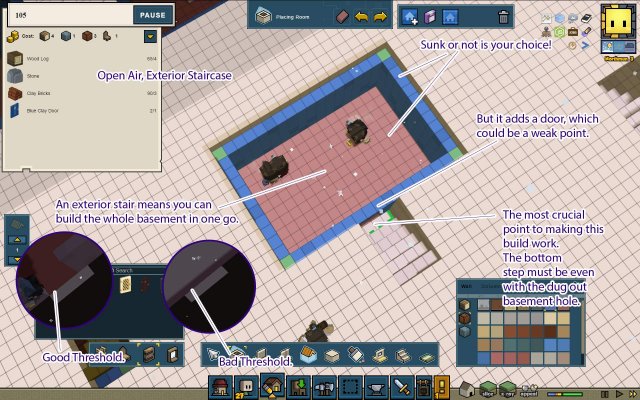
Otherwise we’re talking dirt staircases, either from the top down, or sunken outside the basement with a little door to the outside world. The exterior stairs are less defensible, but free up space inside the basement. A dirt staircase can always be dug out later and replaced by a built staircase.
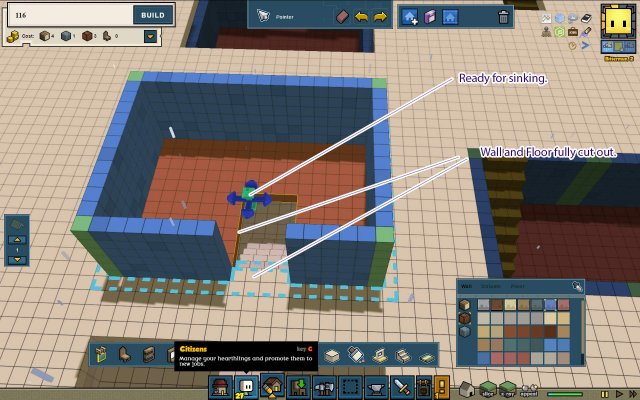
The biggest problem with dirt staircases is cutting out the chunks of room that conflict with them. You’ll do a lot of elevating, moving, counting, and switching between slice and Xray view modes to get rid of every conflicting block. Exterior entrance basements don’t have this issue as badly, if at all.
The biggest thing you have to be aware of is where your ground-level floor will live, if you’ll be sinking that or not, and that your basement walls need to stop just UNDER the floor and not intersect with it. Staircases should usually be one block higher than the basement walls so that the top stair is flush with the floor. You can make it even with the basement walls if you’re tight on space.
Actually building a basement from the inside out isn’t terrible. Hearthlings only need access to one face of a block to place it so you don’t need to worry about running the walls right up against the edges of the hole. The good news is that sinking a basement is just as do-able as sinking a normal room into the ground. You may initially get an exclamation point, but that will go away once the floor is dug out and put in.
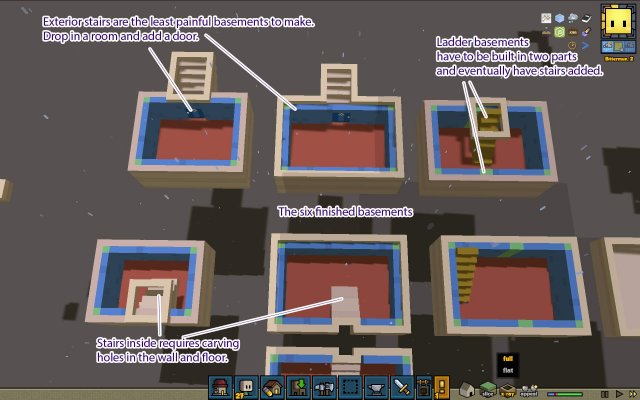
I went ahead and actually built all six styles. Here are some comments about each variable:
First, enclosed vs open: Enclosed is more flexible but somewhere between a pain and a horrible nightmare to dig out. Expect it to take three times as long. Open is faster and you have to use it for split-level builds, but you give up some flexibility in the size of the house you put above it because you have to cover the hole somehow. Every enclosed basement gave me some degree of trouble.
Enclosed basements can and should have their walls run right up to the dirt ceiling. Make sure you adjust your wall height before punching any holes so that you don’t have hidden columns poking up and causing problems.
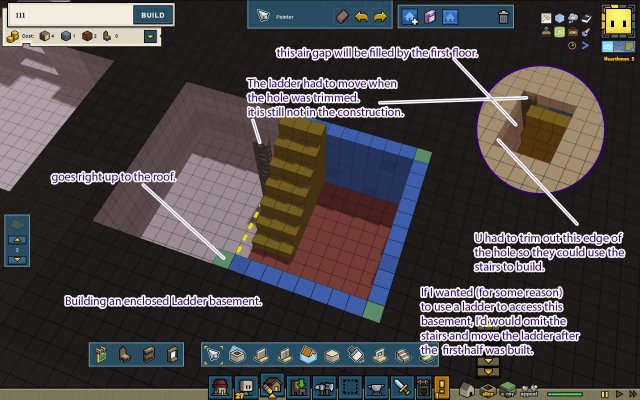
Ladder basements are a special kind of misery. Digging them out can be anything from an annoyance to a full blown micro-managing nightmare. The pain doesn’t stop once you’ve dug one out.
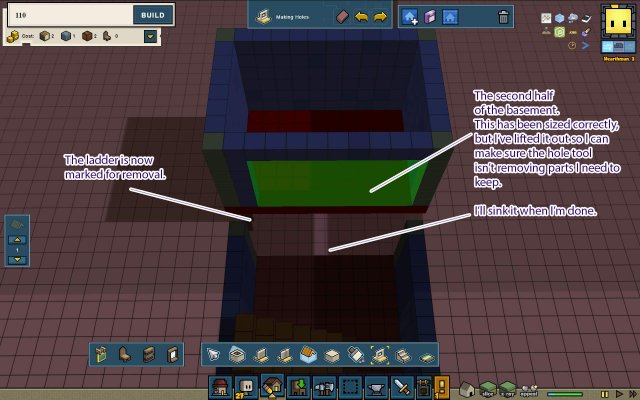
You’ll have to build it in two parts because the ladder gets in the way.
Every enclosed basement gave me some trouble, but the ladder enclosed basement was by far the worst. It was the only basement I had to blow up and start over. It can be done, but why would you want to?
Interior earth staircase basements are the compromise between ease of building and defensibility. You only have to build one room, but you’ll have to carve a chunk out of the walls and floor to place it without errors. This is actually the most technically challenging of the basements, due to that fact.
Exterior earth staircases are the easiest basements to build. Dig the hole, drop in a room with a door and you’re done. Aesthetically they might not be for everyone, and they do add a second point of entry, which could be good or bad. If you’re new to building underground try exterior staircase basements to start with.
Experiment: Try building all six kinds of basements. Which did you like best? What problems did you encounter? Could repositioning any staircases give you better options?
Just For Fun: Impossible Sculpting
This technique breaks all the rules. All the rules about good design, and pretty functional templates, out the window.
Then why am I showing it to you?
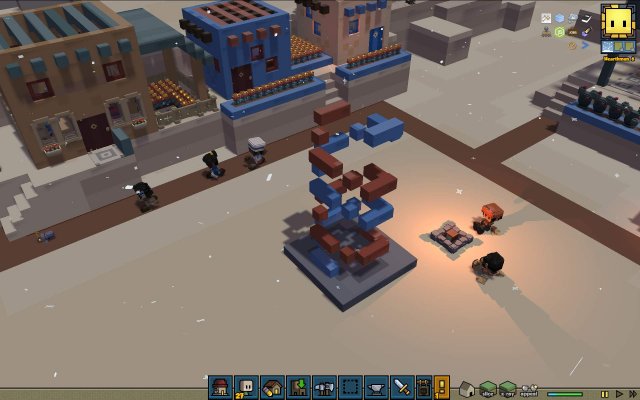
Because you can make seriously awesome things with it. Impossible, light airy structures that float on nothing. Single cubes that float in space with nothing holding them up and care not about gravity.
But it does break all the rules about nice, consistent pretty looking structures in every view mode. …actually this one still looks pretty cool, but I’m sure they all won’t.
But this is sculpture! Not buildings! Modern art can be weird.
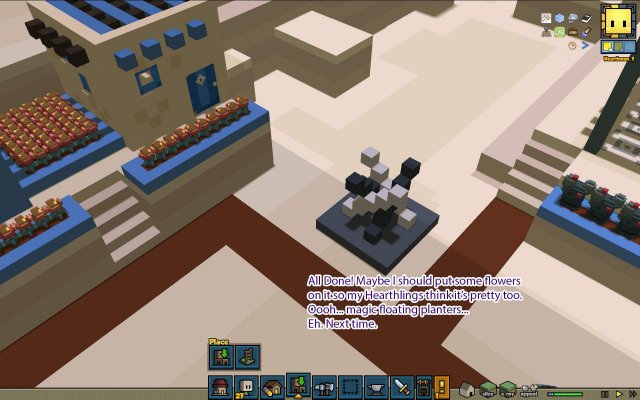
None of this uses cheats. That twisty double helix didn’t use console commands. My hearthings built it one block at a time.
Have you figured out how it works yet? I bet you have if you read the whole guide.
Aren’t those colors familiar? Yep! I’m using walls! That particular impossible flower has already been set to build (as per the green dashed lines) and my hearthlings have already designated a ladder and started delivering materials.
They hit a holdup because of access. Giving them a few ladders helps move them along. That’s a technique you’ll have to plan to use if you try this out, because you can make blocks float in the middle of nowhere.
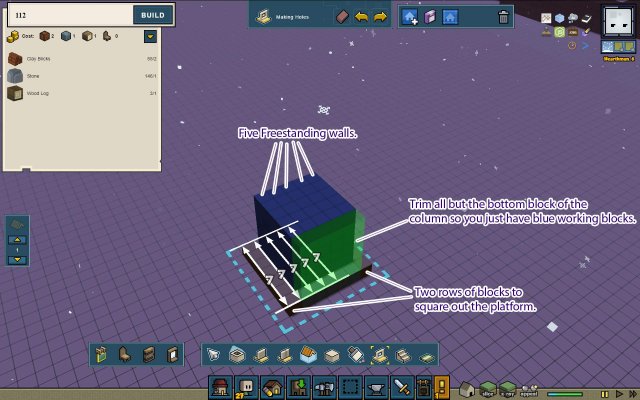
So, how do you do this? Let’s start by preparing our working surface. The idea is to start with a block of “marble” on a “platform” and then carve away using the hole tool. (You don’t really need the platform ultimately, but most sculptures have some sort of a base to stand on.)
Lay out any number of freestanding walls of the same length all sandwiched against each other. (Rooms really don’t work well for this. I’m sure it can be done, but I prefer freestanding walls.) Carve away all but the bottom block of column. (Eventually we can get rid of those if we don’t want a platform for the sculpture to stand on, but it helps while working to keep all the walls the same length.) I add two rows of blocks to the bottom to square off the platform.
Now get a design in mind. You can hack away mindlessly if you like, but undoing mistakes is a pain. We’re going to carve from the top down, mostly. I’m going to do some rising diagonal lines. it’s simple but still impossible. If I were trying to make something possible I’d have stuck with blocks!
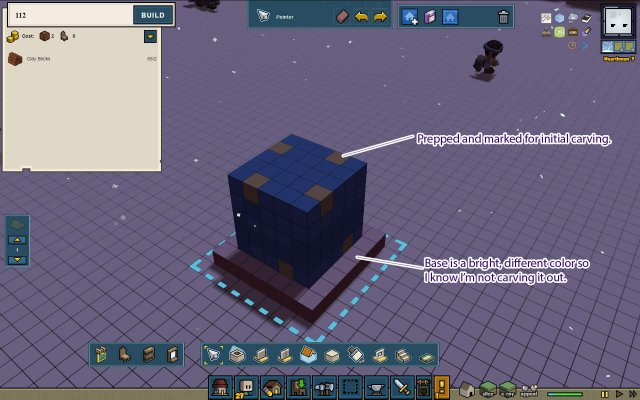
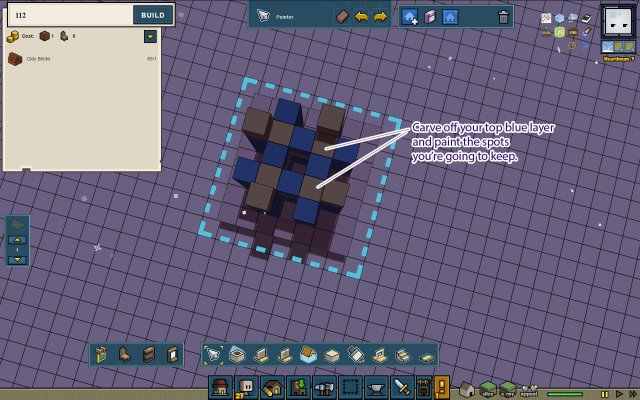
If you have any blocks in your design that are on the outer surface of the cube, paint them now. Also: turn on the “Walls Down” view mode and paint your platform a bright visible color.
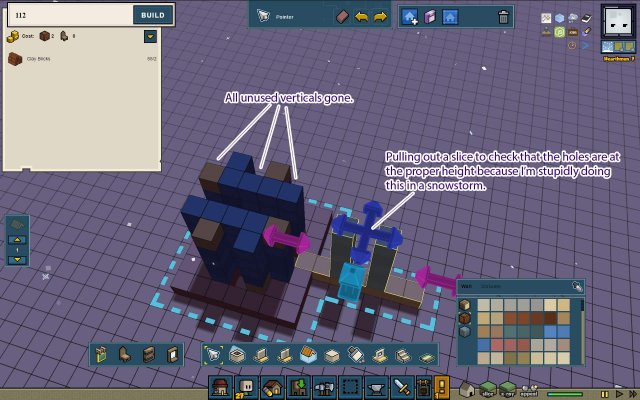
Envision your design. Are there any vertical rows (columns really, but not columns as the game defines them) that will never have a block in them? If so, cut them out with the hole tool. If you’re not sure you got all of a central hole, pull walls out individually to check them, then slide them back in.
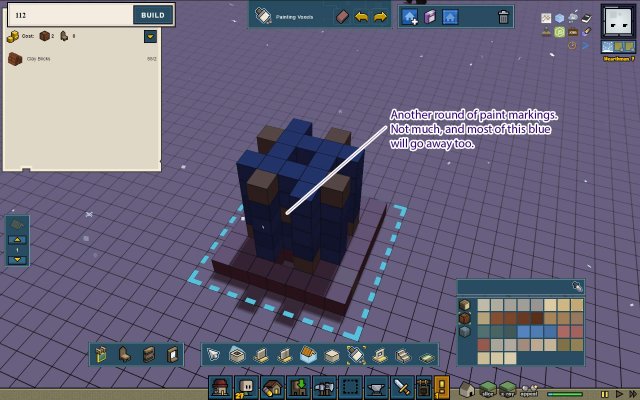
Take a look at your exterior one more time. Paint any more spots that you’re going to keep.
Now, Everything on your top layer you want to keep should be painted. So carve away all the blue in the top layer.
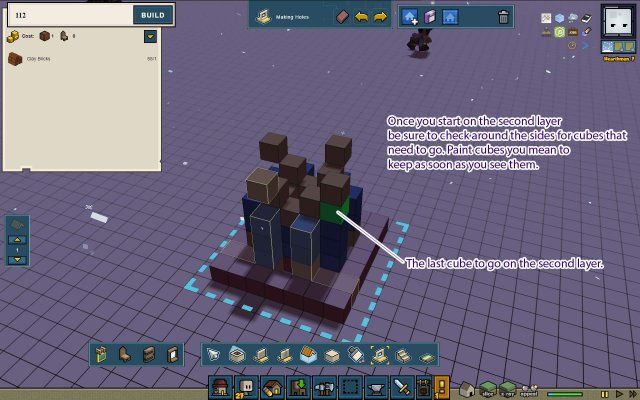
After painting anything you want to keep carve away the blue on the second layer.
Once you start getting overhang in your sculpture be sure to check your scuplture regularly for stray blocks you don’t want, and to paint blocks you do want.
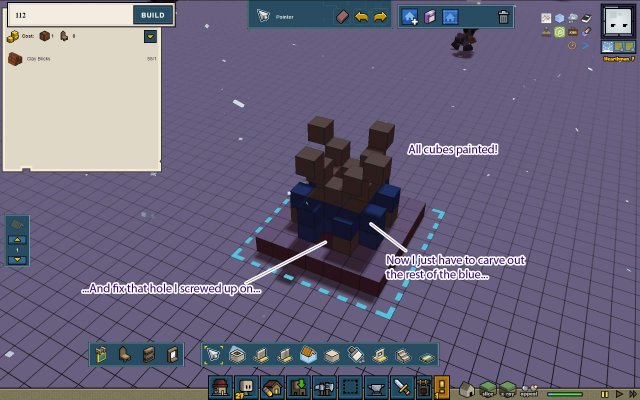
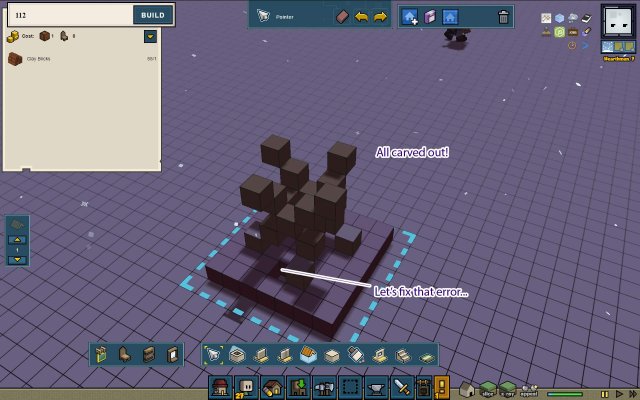
Eventually you’ll have painted everything you want to keep. Carve out all the rest of the waste.
Now you have your basic sculpture. Let’s look at fixing mistakes, and then we’ll finish up!
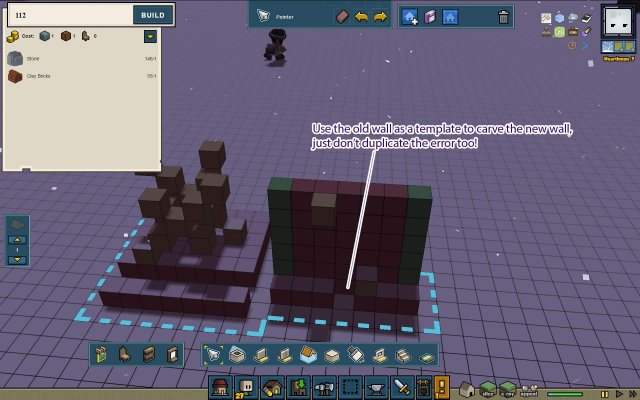
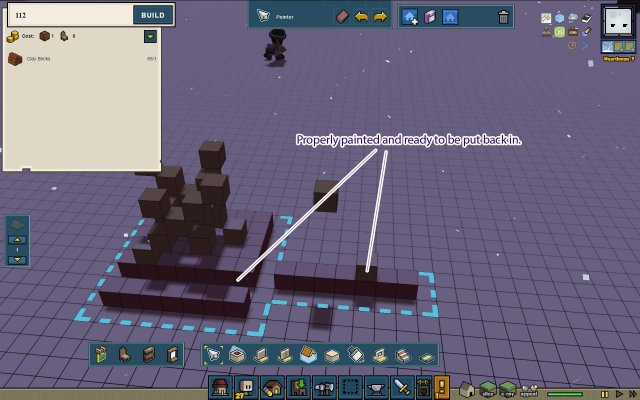
Grab the wall that has a missing cube. Draw a new wall just behind it.
Hole the new wall to be a duplicate of the old wall, but correcting the errors on the way. Paint it to match the rest of the sculpture.
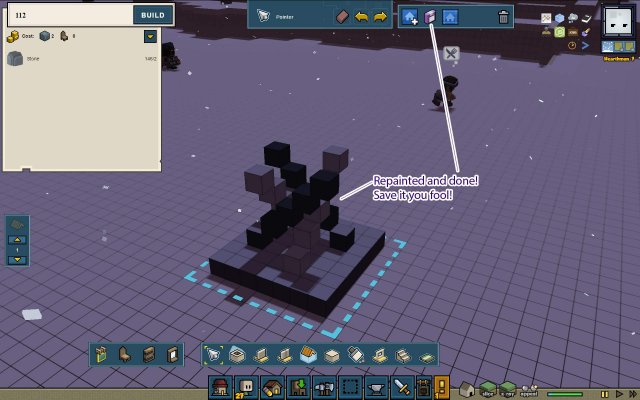
Give everything a final paint job so you’re happy with it and save it.
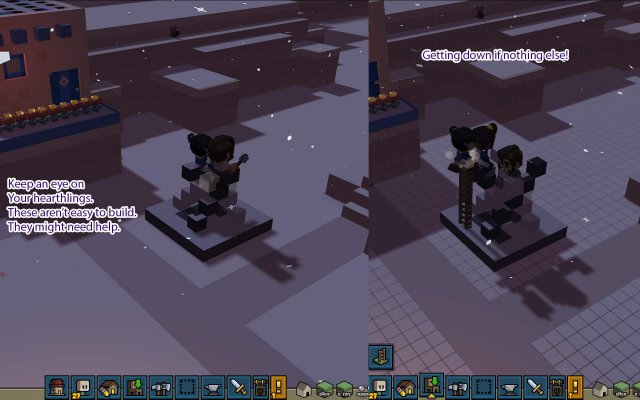
Place the template where you actually want the statue to live and build it. Keep an eye on your Hearthlings. It’s really easy for them to get trapped on these odd shapes.
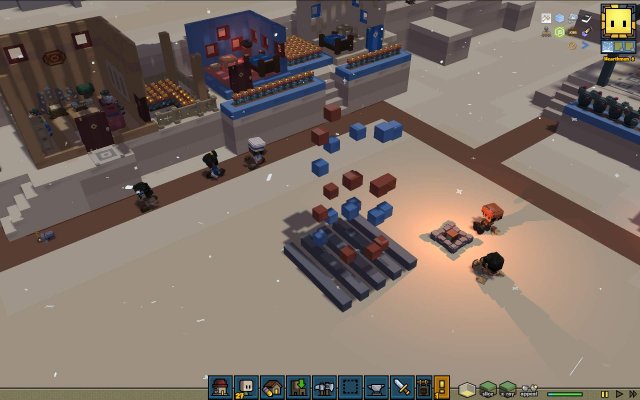
Enjoy! Note: As nifty as this one is? it’s not nearly as cool as the helix in “Back Walls Up” mode. It’s either visible or invisible.




Be the first to comment