
A guide on how to succeed in the foraging mission minigame
Introduction
Like many other players, I had some trouble with my first attempts to win the foraging minigame and was even mildly shocked when I received a painfully high reputation penalty after failing to gather enough supplies in time. I’ve noticed that quite a few new players are struggling with this part of the game at the moment. Because of this, I’ve decided to write this guide.
Unless you play through the entire game without receiving a single promotion, you won’t be able to avoid the foraging minigame. In A Legionary’s Life, every officer (tesserarius, optio, centurion) will sometimes be put in charge of a foraging party. Because of this, every player needs to learn the necessary strategies to succeed in this event reliably.
If you currently think that the foraging missions are impossible to beat, let me start by telling you this: With the strategies I am going to present to you in the following chapters, I now practically never fail the foraging missions.
This is the structure of this guide:
- Chapter 2 will focus on planning your route in a foraging mission, which is always the first thing you need to do. It will also explain the structure of the randomly generated maps.
- Chapter 3 will list all the different sources of supplies you can encounter in a foraging mission.
- Chapter 4 will give you some more tips on avoiding ambushes and on time management.
Analyzing the Map and Planning your Route
The goal of a foraging mission is to fill the supply bar and return to your starting location (which is marked on the map) before time runs out. Whenever you move, pick up supplies or perform an action, you will consume a certain amount time. Because of this, planning your route is the first and most important step to avoid failing the mission.
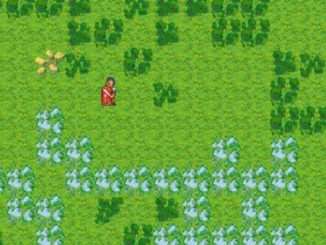
But before we talk about planning, let’s first take a look at the structure of the foraging mission maps. The map is always randomly generated and consists of plain tiles, forest tiles, mountain tiles, several villages (usually located in the upper part of the map) and a marker indicating the position of your starting location (at the bottom of the map).
It is important to understand the differences between plain, forest and mountain tiles. Plain tiles provide the perfect ground to move quickly – they should be your preferred route. Walking through a forest takes twice as long as walking through a plain tile. Crossing a mountain even takes four times as long. Another important thing to be aware of is that each time you enter a forest tile, there will be a 4% chance to be ambushed. Statistically speaking, you will encounter an ambush after walking through 20 forest tiles, but of course, you can get unlucky or lucky. One thing is certain, though: Unless you are confident in your legionary’s combat skills (or even looking for a fight), you want to avoid ambushes like the plague.
There are several ways to find supplies (see next chapter), but the only thing you know at the start is that the villages are bound to have supplies you can loot. So your primary goal is to make your way to the villages as quickly as possible (and ideally without getting ambushed).
Now you need to plan your route. Hold down the left or right mouse key and move your mouse around to take a careful look at the map. Pay attention to the location and number of the villages. Decide which village you want to visit first. Then try to find the best possible route to reach it.
This route should be as short as possible and contain only as many forest and mountain tiles as absolutely necessary. Sometimes you may want to take a slightly longer route to avoid forests because of the ambush chance. It may also be a good idea to start with the village which is furthest to the left or right because then you can work your way through the other villages without having to walk back and forth all the time.
When you have planned your route, start moving!
Finding Supplies
The supplies in foraging missions are represented with a grain sack icon, which will be visible in the top right corner whenever you find supplies. Sometimes you will only see a small part of the grain sack, indicating a small amount of supplies. Henceforth, I will refer to these grain sacks as “stacks” of supplies. In order to completely fill your supply bar, you roughly need 5 full stacks of supplies.
Every village contains one full stack of supplies. Sometimes you can just pick it up without any incident when your party is standing on the village tile. However, it will not always be that easy. Upon trying to pick it up, you may trigger a random event (or even an ambush) which – depending on your choices and your character’s abilities – can lead to an outcome in which your party will only get a smaller amount of supplies, or no supplies at all.
Fortunately, there are also a few other ways to find supplies: fishing, hunting and tracking down hidden supply stacks.
While walking across plain tiles, your foraging party will sometimes come across fishing spots. When this happens, there will be a special fishing option in the top right corner. Just click on it. Fishing is an action that consumes some time (just like picking up supplies) but it is never a bad idea. It will trigger an awareness/quickness check. If you pass it, you will get a lot of supplies (about one full stack). However, even if you fail it, you will still get a moderate amount (maybe about half a stack). It’s always worth it.
Hunting works in a similar way. You will sometimes find hunting spots in forests, which will give you a special hunting option, and just like fishing, it’s always worth it. This time the game will check your javelin skill, quickness, coordination and awareness. Even if you fail, you will get some supplies.
There is one more way to find supplies, and it’s a bit more complicated. Sometimes there are supplies scattered around plain tiles outside of the villages. You will notice this when you walk across plain tiles and a tiny or small amount of supplies is shown in the top right corner. Speaking of this, I have one important tip for you:
Do not pick up the small stacks of supplies! You will only waste too much time for very little benefit!
However, these small stacks can help you in a different way: They are basically bread crumbs surrounding a full stack of supplies. This full stack can be found on a nearby plain tile. Try to track it down by scouting around and pick it up if possible. The bigger the small stacks become, the closer you are to the full stack.
Let me try to visualize this:
- Tiny stack — tiny stack — tiny stack — tiny stack — tiny stack
- Tiny stack — small stack — small stack — small stack — tiny stack
- Small stack — medium stack — medium stack — medium stack — small stack
- Small stack — medium stack — full stack — medium stack — small stack
- Small stack — medium stack — medium stack — medium stack — small stack
- Tiny stack — small stack — small stack — small stack — tiny stack
- Tiny stack — tiny stack — tiny stack — tiny stack — tiny stack
I admit this doesn’t look particularly beautiful, but it should give you a rough idea on what to watch out for. However, the supplies will not always be distributed in such a symmetrical way.
Of course, if your supply bar is almost full, you can fill it up by picking up one or several of the smaller stacks. Just keep in mind that you consume a significant amount of time whenever you do this. Generally speaking, it’s not a good idea.
Ambushes and Time Management
I would like to conclude this guide with a few more remarks on ambushes and time management.
Keep in mind that you can not only be ambushed in forests, but also in the villages. If you want to stay out of a fight, try to avoid visiting a village if you can see another way to find enough supplies (for example a hidden stack). The fewer villages you visit, the less likely it is that you will be forced to fight.
That being said, sooner rather than later you will get into an ambush. When this happens and you feel the enemy is too strong, fight defensively until some of your fellow legionaries join the fight to help you out (which can take between 20 and 30 turns).
When visiting a village, you may also get into a situation involving an optional fight. The optional fights in this game are the most dangerous, so unless you are very confident in your legionary’s combat abilities you may want to back off or choose a less dangerous option.
Concerning time management, sometimes it’s better to walk through a few forest and/or mountain tiles instead of taking a long way around. If there is only a single mountain surrounded by plain tiles, it’s always better to walk around, though (crossing the mountain and walking on the plain tile behind it takes 5 “time units”; walking around it only takes 4). With respect to forests, you sometimes have to choose between risking an ambush or wasting some time by walking around them.
Be the first to comment