Quick Guide to Combat
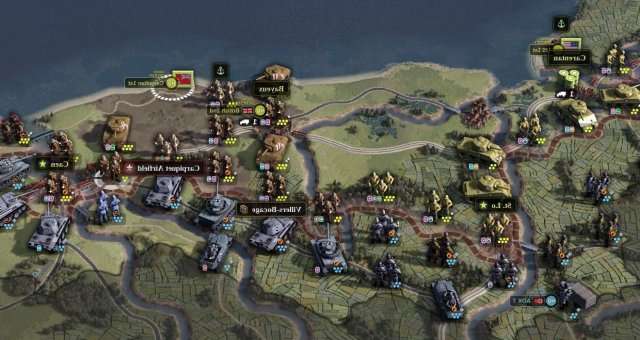
Units can fight only if they are next to each other. To attack, pick your unit, move your mouse over the enemy unit next to you, and click. An attack requires an action point (AP). Attacking uses up the AP, except if the attack results in an overrun.
In addition to regular combat described above, Unity of Command II defines three special attacks which can be activated with the help of a unit’s parent HQ (see HQs): feint attack, suppressive fire, and set piece attack. Special attacks are activated from the HQ bar, or by using the mouse wheel while hovering over the target unit.
On top of all that, combat can also occur during a paradrop, a naval landing, or an HQ-assisted river crossing. This section of the manual will deal with regular combat only, all other combat situations will be discussed separately.
Combat Odds
An attacker’s combat value is the unit attack value times the number of steps. If the unit has one or more specialist steps, their attack values are added too. The defender’s combat value is that unit’s defense value times the number of steps, plus the defense value of any specialist steps present. Only active steps are used in both calculations.
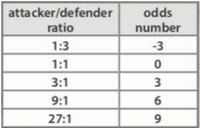
The ratio of attacker and defender combat values is fed into a formula (see table) to produce an “odds number”. These odds are then further modified by “shifts” that account for influences of terrain, weather, experience etc. Positive shifts favor the attacker (left side of the combat sheet, in green) while negative (right side, red) favor the defender.
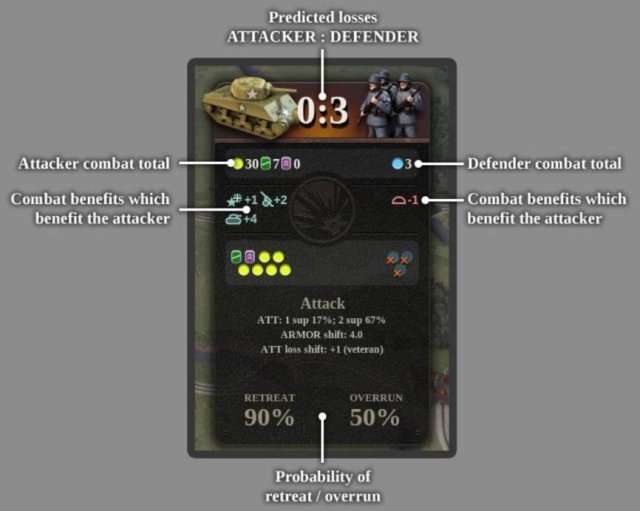
Armor Shift
Armored units can produce a significant shock effect when attacking in suitable terrain. In game terms, this is represented with the armor shift. This is a value that is attack-only by definition: if the defender happens to have stronger armor, the armor shift is zero.
In unsuitable terrain, there is no armor shift: when attacking across rivers or into cities, ruins, mountains, forests or swamps (excluding frozen swamps).
Armor shift amounts to the difference between attacker and defender armor totals (armor value times number of steps), divided by 10. When the defender is is entrenched or fortified, its defensive armor total is boosted by 50% or 100% respectively.
Specialist steps contribute armor to both attacker and defender armor totals. Armor added by specialist is expressed as a whole shift, e.g. a +2 armor shift (in other words, its value does not get divided by 10).
Limitations:
- Towed AT steps contribute to armor shift only in defense. Non-towed AT steps can contribute in attack, but only to offset defender armor if present.
- Infantry units with defensive armor (AT icon on unit sheet instead of a tank icon) contribute to the armor total only in defense.
- Armor shift is capped (has a maximum value) at 5 in any combat.
Armor Penalty: when armored units attack into cities, mountains or forest, they receive no armor shift. On top of this, they incur an additional -1/-2 penalty shift for mechanized and armored units, respectively.
Note that the list of terrain types for the armor penalty is not the same as the one for negating the armor shift. This is easily overlooked, but it’s intentional, and important.
Artillery Shift
Artillery shift simulates extensive artillery preparation prior to an attack. Units themselves cannot contribute to this value, it is reserved for certain specialist steps that provide an artillery shift. Artillery shift is always zero when attacking into mountains or ruins, and when attacking a defender entrenched in a city, forest or swamp (excluding frozen swamps).
The artillery shift is capped (has a maximum value) at 5 in any combat.
Other Combat Shifts
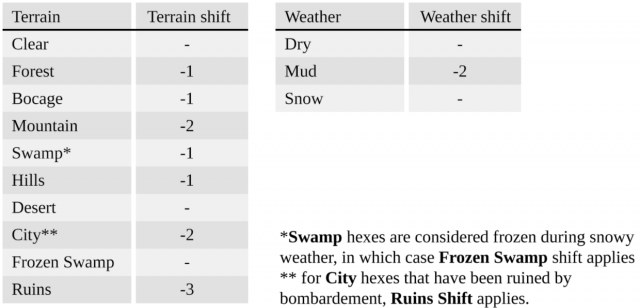
Terrain and weather provide benefits to the defender (negative shifts) as shown in the table.
River: if the attack is over a minor river, this provides a -2 shift to the defender. However, if the attacker has active engineer steps, this shift is 0.
Entrenchment: provides a -1/-2 shift to defender, if the defender is entrenched or fortified, respectively. If the attacker has active engineer steps, each engineer counters this shift by +1 (but never above 0).
Experience: this shift favors more experienced units. It is calculated as the difference between the attacker’s and defender’s respective experience level (green is 0, regular 1 etc.) and it can go either way.
Combat Losses
Attacker and defender losses are looked up in the combat results table using the final odds number. Note that the odds number is randomized when combat actually happens (as opposed to when predicting combat results), to simulate the inherent uncertainty of real-life operations.
Technical note: in this context, “randomized” describes taking a random value generated from a normal (Gaussian) distribution centered at the odds number, with a standard deviation (sigma) of 1, and then rounding it. This means that “randomized” odds will almost always be within +/-2 of the starting value — but every once in a while outlier results will occur, leading to very unexpected combat results. Sometimes this will help you, and sometimes it will really hurt!
Attacker Losses: attacker KIA losses are looked up from the attacker losses table, using a randomized odds number. If the attacker suffers no KIA losses, it rolls again to receive “high-odds” suppression, in the following manner:
- If the attack resulted in an overrun: 66% 1 SUP, 33% 2 SUP
- If no overrun: 33% 0 SUP, 66% 1 SUP
Defender Losses: inexperienced, green defenders succumb to “panzer fright” when attacked by armor, reflected in a positive shift equal to the armor shift applied to their losses (the shift is positive as it favors the attacker, and results in greater defender losses). Defending units under “no retreat” orders step suffer greater losses as a result of holding on to their positions (+1 shift).
To calculate the defender KIA losses, the odds number is modified by the above, defense-specific shifts and randomized. Defender KIA losses are then looked up from the defender losses table.
If the defender suffered no KIA losses, and hasn’t retreated, it may suffer suppressed steps. These SUP losses are looked up from the defender suppression table, using just the odds number (not randomized, no defense-specific shifts).

Stragglers
In combat, taking a step loss means that a step is either KIA, or gets converted into stragglers. The odds for conversion into stragglers are 66% (Allies), 50% (Axis) or 33% (Soviet).
Stragglers are game elements that are 1-3 steps strong and represent disorganized remnants of defeated units that remain present on the battlefield.
- Only one stragglers entity per hex (1-3 steps)
- Can only exist in a friendly hex
- Can be in a hex with a friendly unit
- Can not be in a hex with an HQ or a Supply Hub
- Can not be moved by the player

1- and 2-step stragglers have no effect on gameplay, except being taken as prisoners when an enemy unit enters their hex. 3-step stragglers raise the movement cost for the hex to “min-3” MPs.
Stragglers move automatically, at the start of each turn, towards the nearest HQ or Supply Hub. Once they reach the HQ, they get reorganized automatically, spending that HQ’s CPs in the process. Stragglers reaching a Supply Hub get reorg’d in the same way, except they incur an extra +1 turn delay.
- Stragglers tend to stick to roads, therefore clustering together (up to 3 steps).
- Stragglers can not move into mountains or be created there.
- Stragglers prevent front line sweeping.
Retreat and Overrun
A defending unit may retreat as a result of combat. The probability of this happening is defined in the retreat tables. A retreating unit will remove itself to the nearest empty hex within its own territory, and will be marked as weak for the remainder of the turn.
Retreat Probability: Defending units under “no retreat” orders receive a -2 retreat shift at this point (less likely to retreat). Units that took either KIA or SUP losses earlier in the turn become more likely to retreat: each loss taken in the same turn becomes a cumulative +1 retreat shift.
To calculate the retreat probability, the odds number is modified by the above, retreat-specific shifts and again randomized. The retreat probability is then looked up from the retreat table and a retreat roll is taken.

Retreat restrictions: units expend MPs when retreating and may spend no more than their normal move points in one retreat. Units may not retreat across a river, but may retreat over a bridge.
Cornered units: if a unit is forced to retreat, but there is no location it can move to according to retreat restrictions, all of its steps are suppressed immediately.
Overrun: if the defender retreats, the attacker has a chance to keep its AP. This is called an overrun. The probability of an overrun is looked up from the overrun table using the odds number (not randomized, no retreat-specific shifts).
Special Defensive Orders
Defending units can be given special defensive orders by their parent HQs: no retreat, rearguard, and counterattack. When you place one of your units under such orders, it shows a blue/green special defense marker.
The attacker is generally not aware of such special orders before the unit is attacked. It is possible however, to acquire this knowledge with sufficiently upgraded HQ intel (see HQs).
No Retreat:
- -2 retreat shift (lower chance of retreat)
- ignores the cumulative retreat shift for as long as it has the marker (lower chance of retreat)
- +1 loss shift (higher losses)
- after the attack, if the unit retreated, it loses its no retreat marker
Rearguard:
- enemy attack on the unit resolves as if it was a feint attack (see special attacks)
- after the attack, unit retreats with full MPs towards its own HQ (straggler move routing), and becomes weak just like with any other retreat
- after the attack, the unit loses its rearguard marker
- exception: enemy “suppressive fire”, resolves as suppressive fire, after which the unit retreats as above
- exception: if the unit has no retreat route, all attacks resolve normally
Counterattack:
Decision to counterattack (enemy turn)
- if the unit is attacked (normal attack, assault crossing) it can decide to counterattack
- counterattack happens in the same hex, but with swapped attacker/defender roles
- decision is taken so as to minimize projected own losses for the unit (KIA + SUP)
Effect of the counterattack
- counter attacker gets a +2 surprise shift
- counter attacker is exempt from “attacker suppression” rule
- if the original attack was across a river, the counter attacker gets a river shift in its favor (-2/-4 for minor/major river)
- retreat results (for the other unit) are ignored
After the combat, if the defender is still alive but either weak or retreated, it loses its counterattack marker.
Combat Side Effects
City turned into ruins: if attacking a city with artillery, each artillery shift adds 2% to the probability that a city will be turned into ruins. Note that if the defender is entrenched, the artillery shift will be zero, but this effect still applies – you can turn a city into ruins with ineffective bombardment too.
Defender entrenchment reduced: if the defender loses 2 or more steps (KIA/stragglers) its entrenchment is reduced by 1. If the attacker has engineers, then any loss (including suppressed steps) is enough to reduce the entrenchment. If the attacker has 2 engineer steps, the entrenchment is reduced by 2.
Attacker gains experience: xp is gained for each defender step lost (either SUP or KIA, incl. stragglers). 20/10/5/1 xp is gained for green, regular, veteran and elite attackers respectively. Green units: earn xp in both attack and defense. Additionally, they earn +20 xp for every combat in which they do not retreat.



Why is this game so difficult to play?
Love it.