
How to Obtain All Achievements
Prison Princess is a short visual novel. It uses point and click controls and has five different endings. There are also twenty-one achievements that players can unlock. A guide showing how to get all of them is available.
- Make sure to and within the first try, unless stated otherwise.
- Follow the guide thoroughly to avoid any issues.
- Estimated Completion Time: 50 minutes.
Chapter 1
Start a New Game
- Investigate the broken wall.
- Click on the table and then on the chair.
- Click on the door.
- Head to the left side of the room.
- Click on the horse and on the nightstand.
- Use magic (bottom right corner of the screen) and wait.
- Click on the Horse to start a puzzle.
- Solve the puzzle by clicking on the buttons in the following order:
- Red
- Blue
- Yellow
- White
- Green
If you completed the puzzle quickly, you’ll get:
Zena’s Trust
- Get Zena off the statue, stat!
- Click on the chair.
- Click on the stone revealed behind the broken wall.
- Click the buttons at the bottom in the following order:
- Left
- Middle
- Middle
- Right
- Left
Zena’s Escape
- Escape Zena’s Dungeon.
Chapter 2
- Click on the bucket [Thin Key].
- Click on the chair [Book].
- Head to the right side of the room.
- Click on the bed [Book].
- Click on the Frog Statue at the bottom right corner of the screen.
- Solve the puzzle:
- Red
- Green
- Yellow
- Blue
- Orange
If you solved it quickly, you’ll get:
Aria’s Praise
- Get Aria out of the statue, post-haste!
- Click on Item at the bottom left corner of the screen to open your Inventory.
- Choose the [Long, Thin Key] and use it to open the bookshelf.
- Click on the middle book on the second arrow [Slip of Paper].
- Equip the [Books] from your inventory and use them on the top shelf.
- Rearrange the books as follows:
- Glory
- Defeat
- Oblivion
- Earn
- Nice
- Learning
- Click on the red lever that just revealed to the right of the books.
- Solve the puzzle:
G – D – O – E – N – L
Aria’s Escape
- Escape Aria’s Dungeon.
Chapter 3
- Click on the door on the left to open it, then click again to go through.
- Might need to click at the top to go through and avoid speaking to the girls.
- Inspect the rug.
- Click on 4:00 to solve the puzzle.
- You’ll get [Staff].
- Open you inventory and choose the [Staff].
- Click on the right sofa twice while holding the staff.
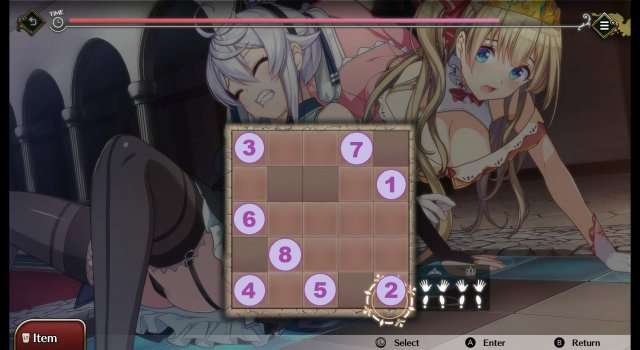
- Start the lights-out puzzle by clicking at the Middle Goblin.
- Press the buttons in the following order to solve it:
- 1 – 5 – 8 – 7 – 3 – 5 – 6
If you finished the puzzle quickly, you’ll get:
Tactician
- Escape the sofa trap in a flash.
- You’ll receive [Large Key].
- Examine the barrels at the top left corner.
- Click on the lantern on the left wall.
- Head to the right side of the room and use the [Staff] from inventory on the blue cabinet.
- Pick up the [Quill of Papers], the [Book], and the grail [Round Piece of Metal].
- Click on the Hex Board to start a mini-game:
- Click on the buttons at the bottom of the screen in the following order to solve the puzzle:
- 3 – 2 – 1

- Click on the Set of Vases above the previous puzzle to start another mini-game.
- Rearrange the vases on the following order:
- Red
- Blue
- Green
- Purple
- Gold
- Receive [Silver Fragment].
- Open your inventory and use the grail [Round Piece of Metal] on the door and go through it.
- Click on the glowing stone monument on the left side to get a [Pattern].
- Use the [Large Key] on the right door to open, then click again to go through it.
- After the scene, leave the guest room and head to the right side of the grand chamber.
- Re-enter the bathing room and click on the bucket [Piece of Tub].
- Examine the fountain [Necklace].
- Click on Change Rooms (top left corner of the screen) and head to Zena’s Dungeon.
- Click on the table to zoom in.
- Pick up the [Bread] and the [Note].
- Back out (by pressing RMB) and head to the left side of the room.
- Click on the cell’s window to attract a bird, then use the [Bread] from inventory to receive a [Small Key].
- Click on the nightstand, open the bottom drawer, and take the [Chess Board].
- Equip the [Very Small Key] from inventory.
- Use it to open the middle drawer [Even Smaller Key].
- Open the top drawer and interact with the Box to start a mini-game.
- Rearrange the icons as follows:
◆ – ♥ – ♠ – ♥
- Receive [Chess Pieces].
- Open your inventory and place the [Chess Board] on the nightstand.
- Use the [Chess Pieces] on the Board to start another mini-game.
- Place the pieces in the following positions:
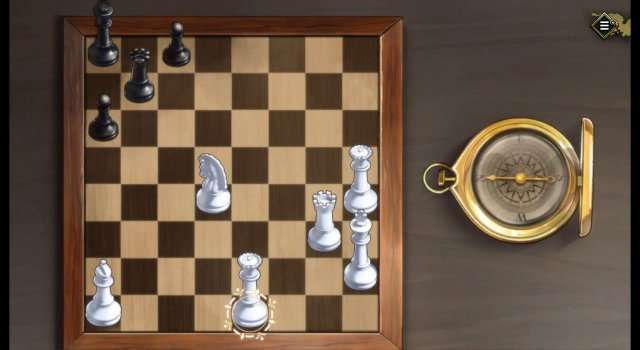
- Click on the bed.
- Choose:
- Take it.
Naughty Book
- Obtain a very Naughty Book.
- Head to the right side of the room and click on the Stone behind the broken wall.
- Press the buttons in the following order:
- Yellow
- Blue
- Red
- Yellow
- Red
Pick up the [Shackles] from the floor.
- Take it
- Click on the hatch on the door [Base of Dagger].
- Examine the torch.
- Click on the broken chair [Leg of the Chair].
- Use the [Leg of the Chair] on the torch to light it up.
- Head back to the left side of the room.
- Save your game (Save 1).
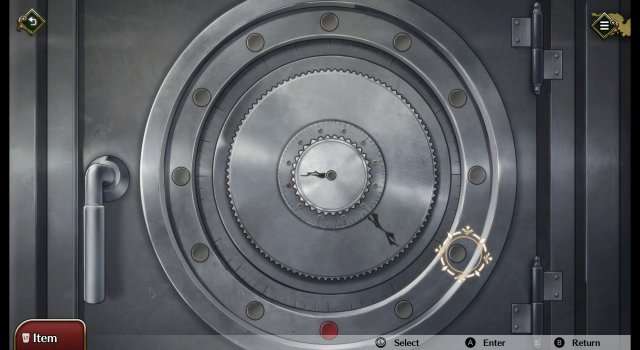
- Interact with the Horse to start yet another mini-game.
- Press the buttons in the following order:
- Green
- Yellow
- Blue
- White
- Red
If you solved it quickly you’ll get:
I Know The Password
- Race to get Zena off the statue again.
Chapter 3
- Click on Change Rooms at the top left corner of the screen and choose Aria’s Dungeon.
- Pick up the [Bucket].
- Click on the large jar [Blue Gem].
- Click on the chair [Green Gem].
- Head to the right side of the room.
- Click on the bed [White Gem].
- Click on the cell’s window [Red Gem].
- Inspect the nightstand and open the top drawer to find [Brown Gem].
- Open the bottom drawer to get [Mysterious Pedestal].
- If you collected all five gems, your [Mysterious Pedestal] will turn into a [Bracelet].
- Open the middle drawer and click on the board.
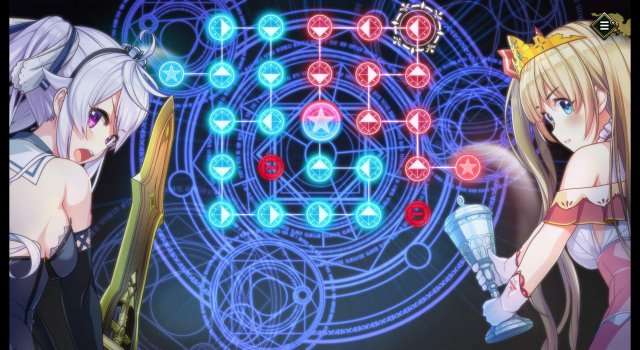
- Click on the Board on top of the nightstand to start a mini-game:
- Place the gems as follows:
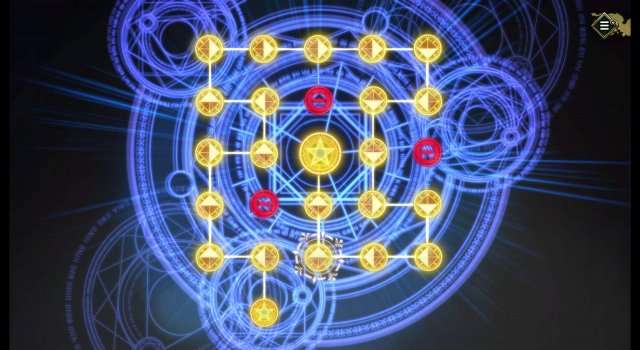
- Examine the bookshelf and click on the Red Lever to start another puzzle.
- Click the spots in the following order:
- G – O – L – D – E – N
- Examine the bookshelf one more time.
- Use the [Even Smaller Key] from inventory on the lock [Mixing Book].
- Save your game (Save 2).
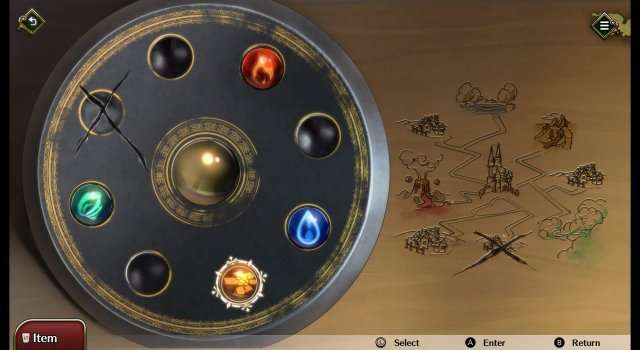
- Back out and examine the Blue Frog at the bottom of the screen to start another puzzle.
- Solve it quickly:
- Blue
- Blue
- Blue
- Yellow
- Orange
- Red
- Red
How Resourceful!
- Quickly get Aria out of the statue again.
Click on the bed.
- Take it
Essay on Beauty
- Obtain the Essay on Beauty.
- Click on the hatch at the door [Candy].
- Head to the left side of the room and pick up the [Shackles] from the floor.
- Take it
Special hobby
- Obtain both of their shackles.
- Click on Change Rooms at the top left corner and head to Guest Room.
- Go to the left side of the room and use the bucket on the barrels.
- Solve the puzzle quickly.
Note: Wait until the animation is over before clicking on the next valve.
- Blue
- Green
- Red
- Green
- Red
Mixologist
- Obtain the Shining Liquid in a jiffy.
- Open your inventory and select the [Torch Flame].
- Use it on the lantern on the wall to light it up.
- Click on Change Rooms and head to Aria’s Dungeon.
- Use the [Bucket] from inventory on the big jar [Sage’s Book].
- Click on Change Rooms and go to Bathing Room.
- Click on the wall with carvings.
- Open your inventory and use the [Bracelet] on the wall.
- Place the cogs as follows:
- Red
- Green
- Blue
- Light Blue
- Yellow
- Purple
- Click on the big red button.
- Enter the now open door on the left.
- Click on the left and right chests to open them up.
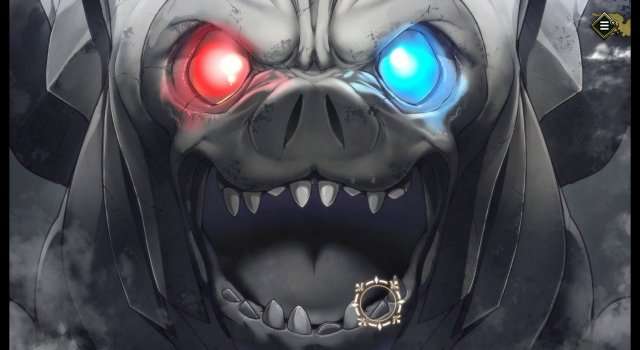
- Inspect the gargoyle at the middle of the room.
- Then, click on its teeth so it ends like the screenshot below:

- Leave the room.
- Inspect the gargoyle near the fountain.
- Solve the puzzle quickly:
- Blue
- Green
- Blue
- Red
- Green
Onsen Master
- Nimbly get out of the bathtub.
- Head inside the sauna again [Small Toy Casket].
- Leave.
- Click on Change Rooms and go to the Guest Room.
- Examine the cabinet and pick up the [Coins].
- Back out and use the [Coins] on the left table.
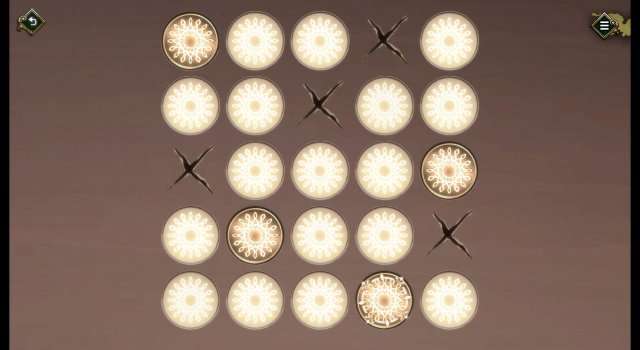
- Click on the table again to start a puzzle.
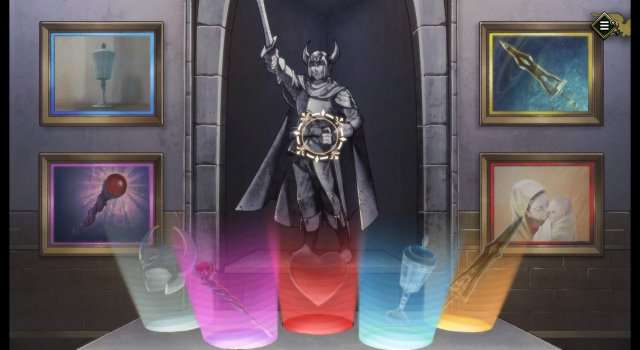
- Place the coins in the following order:

- Click on the blue flame behind the painting.
- Click on Change Rooms and head to the Grand Chamber.
- Interact with the Dragons and choose:
- Use all the items that interest you.
- This action will destroy both dragons.
- Interact with the four glowing monuments [Pattern].
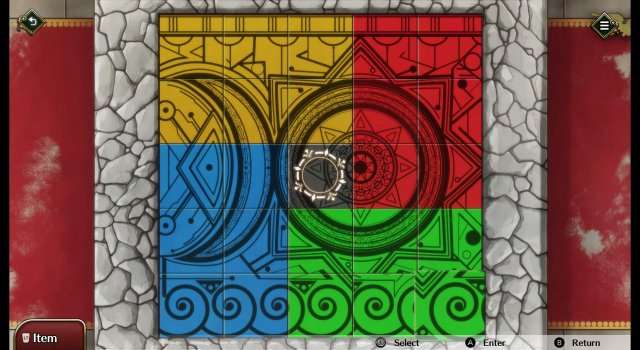
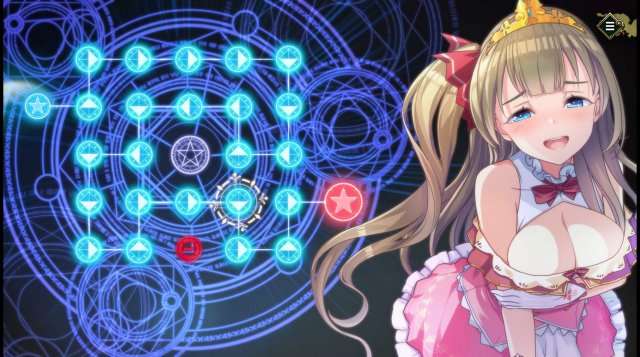
- Click on the tiles at the center of the room to start another puzzle.
- Solve the jigsaw puzzle:
Note: Swap the two tiles at the bottom right corner to win.
- Approach the altar in the background.
- Solve the puzzle:
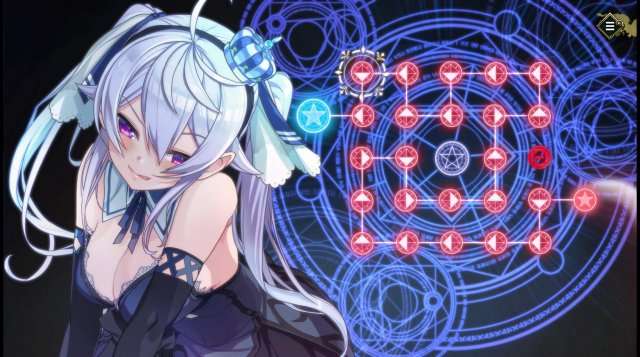
- Interact with the tiles at the center of the room to start yet another mini-game.
- Click on the floor and solve the puzzle quickly:
Dance Master
- Speedily solve the pedestal puzzle.
Ending 1
- Save your game (Save 3).
- Click on the staircase and choose:
- Escape the castle.
- Solve the puzzle:
The Pair’s Determination
- Ending 1/5: Complete the normal route.
Note: Force close the game (Alt+F4) to skip the credits.
Ending 4
- Load Save 3.
- Click on Change Rooms and head to Zena’s Dungeon.
- Interact with the table and use the [Blue Flame] on the symbol.
Relic of Power
- Obtain the Sacred Sword.
- Back out and head to Aria’s Dungeon.
- Interact with the table and use the [Blue Flame] on the symbol.
Relic of Wisdom
- Obtain the Sacred Goblet.
- Back out and go to Bathing Room.
- Go to the right side of the room and interact with the windows.
- Save your game (Save 4).
- Take it
Forbidden Book of Poetry
- Obtain the Forbidden Book of Poetry.
- Load Save 4.
- Leave it behind.
- Return to the Grand Chamber and escape through the staircase.
- Escape the castle.
Solve the puzzle:
- Save your game (Save 5).
- Need More Strength.
The Two Heroes
- Ending 4/5: Complete the Demon King route.
Note: Force close the game (Alt+F4) to skip the credits.
Ending 5
- Load Save 5.
- Don’t Need Anything.
On A New Journey
- Ending 5/5: Complete the true ending.
Note: Force close the game (Alt+F4) to skip the credits.
Ending 2
- Examine the Blue Frog at the bottom of the screen to start another puzzle.
- Quit the mini-game by clicking on the top left arrow.
- Start it again and solve the puzzle:
- Blue
- Blue
- Blue
- Yellow
- Orange
- Red
- Red
Click on the bed.
- Take it
- Click on the hatch at the door [Candy].
- Click on Change Rooms at the top left corner and head to Guest Room.
- Go to the left side of the room and use the bucket on the barrels.
- Solve the puzzle quickly:
Note: Wait until the animation is over before clicking on the next valve.
- Blue
- Green
- Red
- Green
- Red
- Open your inventory and select the [Torch Flame].
- Use it on the lantern on the wall to light it up.
- Click on Change Rooms and head to Aria’s Dungeon.
- Use the [Bucket] from inventory on the big jar [Sage’s Book].
- Click on Change Rooms and go to Bathing Room.
- Click on the wall with carvings.
- Open your inventory and use the [Bracelet] on the wall.
- Place the cogs as follows:
- Red
- Green
- Blue
- Light Blue
- Yellow
- Purple
- Click on the big red button.
- Enter the now open door on the left.
- Click on the left and right chests to open them up.
- Inspect the gargoyle at the middle of the room.
- Click on its teeth so it ends like the screenshot below:
- Leave the room.
- Inspect the gargoyle near the fountain.
- Solve the puzzle quickly:
- Blue
- Green
- Blue
- Red
- Green
- Head inside the sauna again [Small Toy Casket].
- Leave.
- Click on Change Rooms and go to the Guest Room.
- Examine the cabinet and pick up the [Coins].
- Back out and use the [Coins] on the left table.
- Click on the table again to start a puzzle.
- Place the coins in the following order:

- Click on the blue flame behind the painting.
- Click on Change Rooms and head to the Grande Chamber.
- Interact with the dragons and choose:
Use all the items that interest you.
- Interact with the four glowing monuments [Pattern].
- Click on the tiles at the center of the room to start another puzzle.
- Solve the jigsaw puzzle:
Note: Swap the two tiles at the bottom right corner to win.

- Approach the altar in the background.
- Solve the puzzle:

- Interact with the tiles at the center of the room to start yet another mini-game.
- Click on the floor and solve the puzzle quickly:

- Click on Change Rooms and head to Zena’s Dungeon.
- Interact with the table and use the [Blue Flame] on the symbol.
- Back out and head to Aria’s Dungeon.
- Interact with the table and use the [Blue Flame] on the symbol.
- Return to the Grand Chamber and escape through the staircase.
- Escape the castle
Solve the puzzle:
Escape With Zena
- Ending 2/5: Complete Zena’s route.
Note: Force close the game (Alt+F4) to skip the credits.
Ending 3
- Load Save 3.
- Interact with the Horse to start yet another mini-game.
- Quit the mini-game by clicking on the top left arrow.
- Start it again and solve the puzzle:
- Green
- Yellow
- Blue
- White
- Red
- Click on Change Rooms at the top left corner of the screen and choose Aria’s Dungeon.
- Pick up the [Bucket].
- Click on the large jar [Blue Gem].
- Click on the chair [Green Gem].
- Head to the right side of the room.
- Click on the bed [White Gem].
- Click on the cell’s window [Red Gem].
- Inspect the nightstand and open the top drawer to find [Brown Gem].
- Open the bottom drawer to get [Mysterious Pedestal].
- If you collected all five gems, your [Mysterious Pedestal] will turn into a [Bracelet].
- Open the middle drawer and click on the board.
- Click on the board on top of the nightstand to start a mini-game:
- Place the gems as follows:

- Examine the bookshelf and click on the Red Lever to start another puzzle.
- Click the spots in the following order:
- G-O-L-D-E-N
- Examine the bookshelf one more time.
- Use the [Even Smaller Key] from inventory on the lock [Mixing Book].
- Back out and examine the Blue Frog at the bottom of the screen to start another puzzle.
- Solve it quickly:
- Blue
- Blue
- Blue
- Yellow
- Orange
- Red
- Red
- Click on the bed.
- Take it.
- Click on the hatch at the door [Candy].
- Click on Change Rooms at the top left corner and head to Guest Room.
- Go to the left side of the room and use the bucket on the barrels.
- Solve the puzzle quickly:
Note: Wait until the animation is over before clicking on the next valve.
- Blue
- Green
- Red
- Green
- Red
- Open your inventory and select the [Torch Flame].
- Use it on the lantern on the wall to light it up.
- Click on Change Rooms and head to Aria’s Dungeon.
- Use the [Bucket] from inventory on the big jar [Sage’s Book].
- Click on Change Rooms and go to Bathing Room.
- Click on the wall with carvings.
- Open your inventory and use the [Bracelet] on the wall.
- Place the cogs as follows:
- Red
- Green
- Blue
- Light Blue
- Yellow
- Purple
- Click on the big red button.
- Enter the now open door on the left.
- Click on the left and right chests to open them up.
- Inspect the gargoyle at the middle of the room.
- Click on its teeth so it ends like the screenshot below:

- Leave the room.
- Inspect the gargoyle near the fountain.
- Solve the puzzle quickly:
- Blue
- Green
- Blue
- Red
- Green
- Head inside the sauna again [Small Toy Casket].
- Leave.
- Click on Change Rooms and go to the Guest Room.
- Examine the cabinet and pick up the [Coins].
- Back out and use the [Coins] on the left table.
- Click on the table again to start a puzzle.
- Place the coins in the following order:
- Click on the blue flame behind the painting.
- Click on Change Rooms and head to the Grand Chamber.
- Interact with the dragons and choose: Use all the items that interest you.
- Interact with the four glowing monuments [Pattern].
- Click on the tiles at the center of the room to start another puzzle.
- Solve the jigsaw puzzle:
Note: Swap the two tiles at the bottom right corner to win.

- Approach the altar in the background.
- Solve the puzzle:

- Interact with the tiles at the center of the room to start yet another mini-game.
- Click on the floor and solve the puzzle quickly:

- Click on Change Rooms and head to Zena’s Dungeon.
- Interact with the table and use the [Blue Flame] on the symbol.
- Back out and head to Aria’s Dungeon.
- Interact with the table and use the [Blue Flame] on the symbol.
- Return to the Grand Chamber and escape through the staircase.
- Escape the castle.
- Solve the puzzle:
Escape With Aria
- Ending 3/5: Complete Aria’s route.
Note: Force close the game (Alt+F4) to skip the credits.
Can press [Enter] to skip end credits. No need to close & restart the game.
your guide ir wrong, how can i make endings 2 and 3? load what saves? man, revise your guide
The guide it’s ok, it just messed the saves a bit, to get the ending 3 start from save 2, and to get ending 2 start from save 3