
Guide to Late Game
Introduction
This is a guide for progressing endlessly in Heroes of Hammerwatch. Instead of giving detailed builds and strategies, this guide aims to explain the reasoning and methodology for how to continuously scale with rising NG levels. If you’re a “new” player struggling with how to advance once the shop upgrades have run out, this guide explains your options for moving forward.
This advice is targeted towards players with the Pyramid of Prophecy and Witch Hunter DLC. If you don’t have those DLC’s, there’s a section at the end which briefly discusses how things change without them.
The late game in Heroes of Hammerwatch starts roughly after NG 2. At this point, many of the mechanics the player has grown used to lose relevance and are replaced by new mechanics to master. These mechanics depend on some nuances which are important to understand. Those nuances aren’t always made clear in game, so we’ll start by breaking them down and then move on to explaining how best to use those mechanics to your advantage.
Quite a bit of math is involved in analyzing the late game in Heroes of Hammerwatch. This guide will avoid going through (most of) the details to keep it accessible to everyone.
Damage Formula
The single most important piece of information for progressing through the late game is the general formula used to calculate damage:
- Base Damage * Attack Power or Skill Power Buff * DMG % Buff * Other Multipliers * DMG Reduction
Because base damage, attack or skill power, and damage % increase are multiplied together instead of added, upgrading them all equally is more effective than upgrading just one of them. Also keep in mind that attack power scales primary damage, while skill power scales everything else.
The formula for damage determines which statue combinations are best, which class titles are most impactful, and, ultimately, what kinds of builds are most viable.
Damage Reduction
The main sources of damage reduction are armor and resist. Armor reduces physical damage taken, while resist reduces magical damage taken.
Every point of armor or resist above 0 reduces damage taken. The first few points increase the reduction by 1% with diminishing returns for higher amounts. Every point of armor or resist below 0 increases damage taken by 2%.
After the game calculates the percentage, armor and resist work the same way as other damage reduction effects. Each effect is multiplied together to get the final damage (Typically, the order isn’t important, but one instance where it does matter is for Priest builds using Divine Protection and the Ring of Transmutation).
With each NG level, the armor and resist penalty increases. It’s difficult to balance the penalty completely, but minimizing it is important to prevent reaching such a high negative armor and resist that you get one-shot by everything in the dungeon.
Scaling
The key to progressing in the late game is scaling damage and damage reduction with the NG level. There are a few mechanics which do this. Some are more important than others, but it’s best to take advantage of all of them. Here’s a quick summary:
- Class titles
- Statues
- Sword tokens
- Leveling
- Blood Rites
Some of these mechanics scale damage, some scale damage reduction, and some do both. Let’s look at them one-by-one.
Class Titles
Class titles provide a little of everything. They’re upgraded from clearing the Forsaken Tower on higher NG’s. For damage reduction, the Paladin class title scales armor and the Warlock class title scales resists. For damage, Ranger scales attack power, Wizard scales skill power, Gladiator scales primary crit damage and Witch hunter scales skill crit damage.
Statues
The statues are arguably the most important means of scaling, but are almost exclusively designed to scale damage. There’s a lot to talk about, so we’ll cover them in their own section.
Sword Tokens
These function as stand-ins for continuous upgrades from the shops. While they can be used to scale damage, it’s better to use them to scale damage reduction. Sword tokens should first be used to reduce NG armor and resist penalties, and eventually to increase either armor or resist depending on whether you are using the Cedric or Calis statue.
Leveling
Leveling up does two important things. It increases your health, mana, regen, armor and resist stats, and it gives stars to spend on attunements. The armor and resist gains are relatively small, though, and there’s a practical limit to the effect of attunements.
Blood Rites
A Blood Rite gives a random buff to either health regen, mana regen, attack power, skill power, armor or resist at the cost of a multiplicative 10% reduction in max hp per Blood Rite. The buff is significant and scales with NG level. All blood rites are lost on death. Unfortunately, the only way to get strategic use out of blood rites is by duplicating profiles to force a specific buff. This is…probably cheating, so decide for yourself if you’re comfortable with it. Fortunately, Blood Rites are non-essential.
Attunements, Drinks, Blessings, Combo, DLC Dungeons
Let’s touch on mechanics which aren’t endlessly scalable, but are still important in the late game. These mechanics sometimes provide a bump in power to push through the first few NG’s, but other times they become hallmarks of certain builds.
Item Attuning
Attuning certain items, such as the Lucky Hat or Ring of Transmutation, is important for some builds. Many item attunements, though, only have a significant benefit in the short term.
Monster Attuning
Attuning a monster gives a DMG % buff against it and damage reduction from it. Monsters can be attuned multiple times, but the cost grows exponentially. This puts a practical limit on how many times a monster can be attuned. In the long-term, the damage reduction is what’s important.
Alas, no skill attuning.
Drinks
Certain rare and uncommon drinks are essential to some builds. Drinks also provide damage buffs which take a long time for statue upgrades to overtake. The two most important drinks are probably Frenetic Eruption and Evil Infusion. Frenetic Eruption might be the best way to enable combo builds, while Evil Infusion gives skill builds lifesteal.
Blessings
Many blessings aren’t very influential in the late game. Armor and resist ignore become useful eventually, but the only other blessings which really matter outside of niche strategies are the lifesteal and divine blessings for primary builds.
Combo
Combo can be used as a source of damage, but usually it’s the extra mobility it provides which is important. For example, it allows the Paladin and Priest to move unhindered while using their primary, and it allows the Wizard to cast spells while still moving.
DLC Dungeons
Neither of the DLC dungeons matter very much for progression. They each come with a perk, but it’s rather minor. The Pyramid of Prophecy is a bit more useful than the Moon Temple because each NG rewards 10 stars. Still, that’s only a fifth of the 50 stars earned from leveling up to the new level cap.
Statues
Statues are the basis of late game builds. The nine statues can be separated into three categories based on which part of the damage formula they affect.
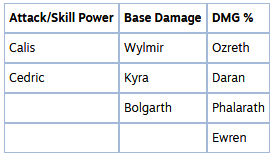
Calis and Cedric are both foundational statues. Calis gives a percentage of armor back as attack power, while Cedric gives a percentage of resist back as skill power. By level 20, a point in either armor or resist also becomes a point in either attack or skill power.
Wylmir, Kyra and Bolgarth are the options for increasing base damage. Unfortunately, none of them scale primary damage. This single-handedly makes primary builds suboptimal compared to skill builds.
The last category are DMG % buff statues. These statues give a DMG % increase against enemies afflicted with a certain status condition. Ozreth provides the largest % increase and is overall the easiest to enable. Ozreth and Daran have the advantage of being enabled by status conditions most (all?) bosses are vulnerable to, while Daran and Phalarath have a base effect which scales in power with the enemy’s health. Which DMG % statue is best depends somewhat on the class being played.
Bolgarth and Ewren are the worst of the statues. Bolgarth starts powerful but his damage doesn’t scale, and Ewren has by far the most conditional damage buff.
Class Builds
There are three main types of builds which are viable in the late game: true primary builds, skill primary builds and skill mastery builds.
The core difference between these builds is what statues they use. True primary builds exploit Calis to make their primary as powerful as possible. Skill primary builds use Kyra to effectively transform their primary into a skill. Skill mastery builds use Wylmir to increase the base damage of their castable skills.
Here’s a summary of the statues and class titles important to each build.
- True primary: Calis, Paladin, Ranger, Gladiator.
- Skill primary: Cedric, Kyra, Warlock, Wizard, Witch Hunter.
- Skill mastery: Cedric, Wylmir, Warlock, Wizard, Witch Hunter, Sorcerer.
True primary builds care about attack power, so Calis is essential. The attack power increases from the Paladin (because of Calis) and Ranger class titles are important to. The Gladiator gives extra damage on primary critical hits.
Skill primary and skill master builds both care about skill power. The difference is whether the main source of damage comes from Kyra’s arrows or class skills. Cedric is essential either way. The Warlock and Wizard both provide skill power increases and the Witch Hunter gives extra critical damage to skills. Skill primary builds will want to supplement the arrows with items like Earthsplitter. Skill mastery builds will also want a relatively high Sorcerer class title to keep their skills fueled.
As mentioned before, skill builds scale better than primary builds. However, that doesn’t mean true primary builds aren’t viable. They still scale quickly enough to keep up with the rising health and damage resist of mobs. In the beginning of the late-game, true primary builds are actually better for single-target damage, mostly because of the Incendiary Demise drink. It should be noted, though, that skill builds get to take advantage of skills and item effects, making them more flexible overall.
- Skill build insight from Sinistralis’ Pestilience Paladin Guide.
It’s possible to use any of these three types of builds for each class, but typically one will be more effective than the others. Giving specific advice on how to build each class isn’t the goal of this guide.
Farming
Seeing as statues and sword tokens aren’t free, it’s worth the time to go over the most efficient ways to farm in the late game. Many of these strategies are summaries of things shown on YouTube.
Statue Blueprint Farming
The fastest way to farm statue blueprints is by rerolling for old map in the shop, playing paladin, and dashing through the Desert on the highest NG available. This is also a great way to farm for item blueprints, drinks and dyes, though you might not find that necessary.
This video explains how to do this:
And now for the most controversial part of the guide. The fact is that the game is designed to make grinding more and more time-consuming as the game progresses. The rate at which regular gold and ore gain increases is lower than the rate at which the cost for sword tokens and statue upgrades increases. Magnifying this issue is the cap on tax reduction.
The only legitimate way to counter this is by imp farming. The gold and ore given from the imp grows much faster than the gold and ore picked up from the floor. The fastest way to imp farm is to run through Act 1 of the Forsaken Tower on the highest NG available and with the Plentiful Gifts modifier turned on. Of course, gold will still be taxed, so it’s only a “success” when an imp gives you ore.
Here’s a video going through this approach:
Unfortunately, even though imp ore gain grows faster than sword token or statue costs, the ore gain from the imp starts further behind. The ore from one imp will equal the cost of one statue upgrade at around NG 70000.
There’s a much better way to imp farm if you’re comfortable exploiting the game a bit. A floor is generated after entering it, and imps decide what to give you after talking to them. By duplicating profiles, it’s possible to force an imp to spawn on every floor and to control what it gives every time. Using this method, the best approach is to get gold from an imp on floors 1 & 2 of Act 1, and then send your gold to town with an imp on floor 3.
Video shows this method in more detail:
But there’s an even better way. A way which will give all the gold and ore you desire and remove the need to ever farm again, for the small price of your soul and all your grinder’s grit.
The catch is it requires multiplayer. Have a friend make a modded profile and activate at least one mod. Tell them to use cheat commands from the console to set their NG level to 10000. Now, have them turn off their mods and set up a lobby so you can join them. Enter NG 10000 with them and proceed to wreak havoc on enemies who have had their health reduced to 1 (?) due to integer overflow. Manipulate one imp into giving you ore and then find an elevator shaft to send the ore to town. Spend the rest of your days finding a way to spend your 40,000,000 ore.
Cheating to other NG levels will work as well, but may require some experimentation. In the Far Realm of the ultra-late NG’s, the game mechanics can’t be trusted to work quite as expected.
Playing Without DLC
Some of the conclusions above change without the Pyramid of Prophecy and Witch Hunter DLC. Without statues, primary and skill builds scale at the same rate, and without the Witch Hunter class title, there’s no way to scale skill crit damage. The absence of sword tokens and blood rites also makes it much more difficult to keep up with NG armor and resist penalties. Farming efficiency isn’t really affected, though. Instead of farming item blueprints, drinks and dyes in the Desert, do it Act 1 of the Forsaken Tower.
Be the first to comment