Treasure Locations
By TenOunceCan
This list is incomplete. These are my notes while working on the World Map. The map has everything, this list does not.
- Catuga 1 – Pirate Bandana (West Chest)
- Catuga 2 – Coins (East Chest)
- Catuga 3 – Coins (North Chest)
- Catuga – Star Rune (Boss Kill)
- Catuga – Ship Key (Boss Kill)
- Catuga – Float (On Ship)
- Island Above Catuga 1 – Purccaneer Cutlass
- Furst Cave 1 – Coins
- Furst Cave 2 – Warriors Braid
- Booty Cave 1 – Coins
- Booty Cave 2 – Coins
- Booty Cave – Patchy’s Claws (from Patchy, not chest)
- Booty Cave 3 – Patchy’s Coat
- Booty Cave 4 – Coins
- Booty Cave 5 – Patchy’s Hood
Spicy Squid Cave
- Squid Cave 1 – Coins
- Squid Cave 2 – Spicy Bandana
- Squid Cave 3 – Squiderpuss
- Lovepurr’s Cave 1 – Coins
- Lovepurr’s Cave 2 – Ice Mage Hat
- Lovepurr’s Cave – Lovepurr Chronicles
- Furrlorn Cave 1 – Coins
- Furrlorn Cave 2 – Gunner Eyepatch
- Furrlorn Cave 3 – Knight Shield
- Furrlorn Cave – Lovepurr Chronicles
- Heartpurreak Cave 1 – Ice Mage Hat
- Heartpurreak Cave 2 – Firing Rate ++
- Heartpurreak Cave – Lovepurr Chronicles
Lovepurr Castle – Healpaw
- Lovepurr Castle 1 – Clawford’s Vest (Book One)
- Lovepurr Castle 2 – Clawford’s Vest (Book Two)
- Lovepurr Castle 3 – Clawford’s Hat (Book Three)
- Lovepurr Castle 4 – Heartbreaker (Boss Kill)
- Lovepurr Castle 5 – Heartmender
- Straits Island 1 – Coins (South Chest Hidden Under Barrels)
- Straits Island 2 – Magical Glove (Blue Stones)
- Straits Island 3 – Fishercat Hat (Blue Catfish)
- Straits Island 4 – Lousy Gloves (Watchcat Second Chest)
- Fire Pi-Rat Hideout 1 – Fire Wand (First Floor)
- Fire Pi-Rat Hideout – Ice Wand (Second Floor)
- Fire Pi-Rat Hideout 2 – Coins (Storage)
- Fire Pi-Rat Hideout 3 – Coins (Storage)
- Fire Pi-Rat Hideout 4 – Fire Mage Vest (Storage)
- Fire Pi-Rat Hideout – Firepurrism (Boss Kill)
- Fire Pi-Rat Hideout 5 – Fire Wand (First Floor)
- Fire Pi-Rat Hideout 6 – Fire Mage Hat (First Floor)
Maze Island
- Lower Left – Coins
- Starfish – Purrivateer Vest
- Blue Stones – Cannon Reload ++
- Middle Left – Coins
Outside Tavern
- Bush – Furlintlock
- Left Of Bush – Coins
- Shell Phone Above Bush – Purrmaid Vest
- Between Shops – Coins
- Ice Pi-Rat Hideout – Coins
- Ice Pi-Rat Hideout – Ice Mage Hat (hidden in Storage to the left)
- Ice Pi-Rat Hideout – Ice Mage Vest (Side Room)
- Ice Pi-Rat Hideout – Ice Wand (Captain’s Quarters)
- Ice Pi-Rat Hideout – Coins (hidden right of Ice Wand)
- Freezepaw Spell (Defeat Boss)
Watchcat
- 1 – Lousy Boot
- 2 – Lousy Gloves
- 3 – Knight Hat
- Boar King – Magma Cannonpaw
- Meowtallika Ship – Electric Cannonpaw
- Ruined Castle – Cannon Reload+ (hidden left of entrance)
- Ruined Castle – Coins (Second Floor)
- Ruined Castle – Meowchine Gun (Treasure Room)
- Orion Ruins 1 – Coins (First Floor)
- Orion Ruins 2 – Meowtallika Shirt (Second Floor Wood Chest)
- Orion Ruins 3 – Firing Rate+ (Third Floor Lower Left)
- Orion Ruins 4 – Meowtallika Helm (Third Floor Center)
- Orion Ruins 5 – Coins (Third Floor Upper)
- Orion Ruins – Lightwisker, Key Of Orion (Fourth Floor Boss)
- Orion Ruins 6 – Orion’s Cavalier (Fourth Floor)
- Orion Ruins 7 – Blade Of Orion (Second Floor Metal Chest)
- Twin Castle Right – Left Twin Main Entrance Key (Main Hall)
- Twin Castle Left 1 – Coins (Main Hall)
- Twin Castle Left 2 – Purrivateer Hat (Ladder Room Hidden On Left)
- Twin Castle Left 3 – Purrivateer Vest (Dining Hall)
- Twin Castle Left – Right Twin Dining Hall Key (Main Hall)
- Twin Castle Right 1 – Arcane Mage Vest (Dining Hall)
- Twin Castle Right 2 – Mana Crystals (Ladder Room Hidden On Right)
- Twin Castle Right – Left Twin Master Room Key (Main Hall)
- Twin Castle Left – Right Twin Boss Room Key (Master Room)
- Twin Castle Left 4 – Knight Hat (Master Room)
- Twin Castle Right 3 – Arcane Mage Hat (Dining Hall)
- Twin Castle Right – Necropawmicon (Master Room Boss)
- Twin Castle Right 4 – Arcane Wand (Master Room)
- The Magic Bone – Lightnyan
- The Magic Bone – Icepaw (For Voodoo Doll)
- The Magic Bone – Mana Crystals
- The Magic Bone – Pawer Up (For Necropawmicon)
- The Magic Bone – Meowgus Note – Stone Pillar Map
- Kidd Cat’s Smithy – Knight Armor (For Smithy Hammer)
- Kidd Cat’s Smithy – The Dragonbone (For Dragon Bone)
- The Milky Barrel – Knight Shield (For Jug Of Milk)
- The Milky Barrel – Pawer Milk (For Killing Cathulu)
- Wanted 1 Boar King – Pawer Milk
- Wanted 2 Ice Pi-Rat King – Magic Milk
- Wanted 3 Oinker Chief – Pawer Milk
- Wanted 4 Clawford – Hearty Milk
- Wanted 5 Fire Pi-Rat Captain – Magic Milk
- Wanted 6 Dratcula – Hearty Milk
- Wanted 7 Necromouser – Magic Milk
- Wanted 8 Captain Meowtallika – Magic Milk
- Wanted 9 Captain Takomeowki – Hearty Milk
- Wanted 10 Pi-Rat King – Pawer Milk
- Wanted 11 Duck Of Doom – Pawer Milk
- Boarb The Gentleboar – Nothing! (after returning all 3 lost items)
- Mermaid – Shell Phone
- Mermaid – Ammo Capacity (in chest)
- Mermaid Shell Phone Pool – Tri-Claws
- Purvanna Shell Phone Pool (east of Polaris Ruins) – Tri-Claws
- Furggy Island Shell Phone Pool – Purrmaid Helm
- Twin Island Shell Phone Pond – Purrmaid Vest
- Furtigua Island Shell Phone Pool – Purrmaid Helm
- Catuga Island Shell Phone Pool – Purrmaid Vest
- Blue Catfish – Fishercat Hat
- Lover Catfish – Fishercat Hat
- Rock Catfish – Fishercat Attire
- Ghost Catfish – Fishercat Hat
- Sunset Catfish – Fishercat Attire
- Fishercat – The Son’s Rod
- Monster Researcher (east of Polaris Ruins) – Chimeowra Claw
- Starfish Near Monster Researcher – Purccaneer Bandana
- Chest left of Meowtallica’s tower – Purccaneer Shirt
- Antares Ruins 1 – Fire Wand (First Floor)
- Antares Ruins 2 – Coins (Second Floor)
- Antares Ruins 3 – Ship Hull ++ (Second Floor)
- Antares Ruins – Mewteors, Key Of Antares (Boss Kill)
- Antares Ruins 4 – Antares Cavalier (Boss Kill)
- Antares Ruins 5 – Stave Of Antares (Third Floor)
- Centauri Ruins 1 – Oinker Shield (Middle Of Stairs)
- Centauri Ruins 2 – Oinker Headdress (Centauri’s Chambers)
- Centauri Ruins – Key Of Centauri
- Centauri Ruins 3 – Cannon Power ++ (First Floor)
- Polaris Ruins 1 – Mana Crystals (First Floor)
- Polaris Ruins 2 – Mana Crystals (Second Floor)
- Polaris Ruins 3 – Coins (Third Floor)
- Polaris Ruins 4 – Orion’s Armor (Third Floor)
- Polaris Ruins – Meowtallika Concert Ticket (First Floor)
- Polaris Ruins 5 – Antares Armor (First Floor)
- Polaris Ruins – Infinity Key (First Floor)
Postmutt Deliveries
- Mail 1 – Mr Blue Starfish – Nothing!
- Mail 2 – Ms Pink Starfish – Nothing!
- Mail 3 – Boarb The Gentleboar – Boar Tusk
- Mail 4 – Rat Who Floats – Nothing!
- Mail 5 – Oinker Chief – Nothing!
- Mail 6 – Charon – Nothing!
- Mail 7 – Bonehead – Nothing!
- Mail 8 – Boarb The Gentleboar – Nothing!
- Mail 9 – Postmutt – The Furst Mail
- Eight Bit Dungeon 1 – Bloodsucker (Final Sixth Floor)
- Eight Bit Dungeon 2 – Dratcula’s Topper (Fourth Floor)
- Eight Bit Dungeon 3 – Dratcula’s Coat (Fourth Floor Cat Painting)
- Golden Tower 1 – Golden Armor (Second Floor)
- Golden Tower 2 – Golden Helm (Third Floor)
- Golden Tower 3 – Golden Armor (Fourth Floor)
- Golden Tower 4 – Golden Helm (Fifth Floor)
- Golden Tower 5 – Golden Shield (Sixth Floor)
- Meowtallika Concert – The Rocker
- Meowtallika Concert – Meowtallika’s Tricorne
- Meowtallika Concert – Jacket
- Meowtallika Concert – Pick (From Chest)
- Pi-Rat King Hideout – Pi-Rat King’s Bicorne
- Pi-Rat King Hideout – Pi-Rat King’s Coat
- Pi-Rat King Hideout – Dragon Bone
- Pi-Rat King Hideout – Death’s Hook (Chest Outside After Boss Kill)
- Cathulhu – Fang Of Cathulhu
- Cathulhu – Fires Of Cathulhu (In Chest)
- Volcano Mountain – Takomeowki’s Bicorne (Boss Kill)
- Volcano Mountain – Takomeowki’s Coat (Boss Kill)
- Volcano Mountain 1 – Tsurai (Chest)
- Zero Dimension 1 – Knight Armor (East)
- Zero Dimension 2 – Purrivateer Vest (West)
- Zero Dimension 3 – Purrivateer Hat (Northwest)
- Infinity Tower 1 – North Star Essence
- Infinity Tower 2 – Weird Mushroom
Maps
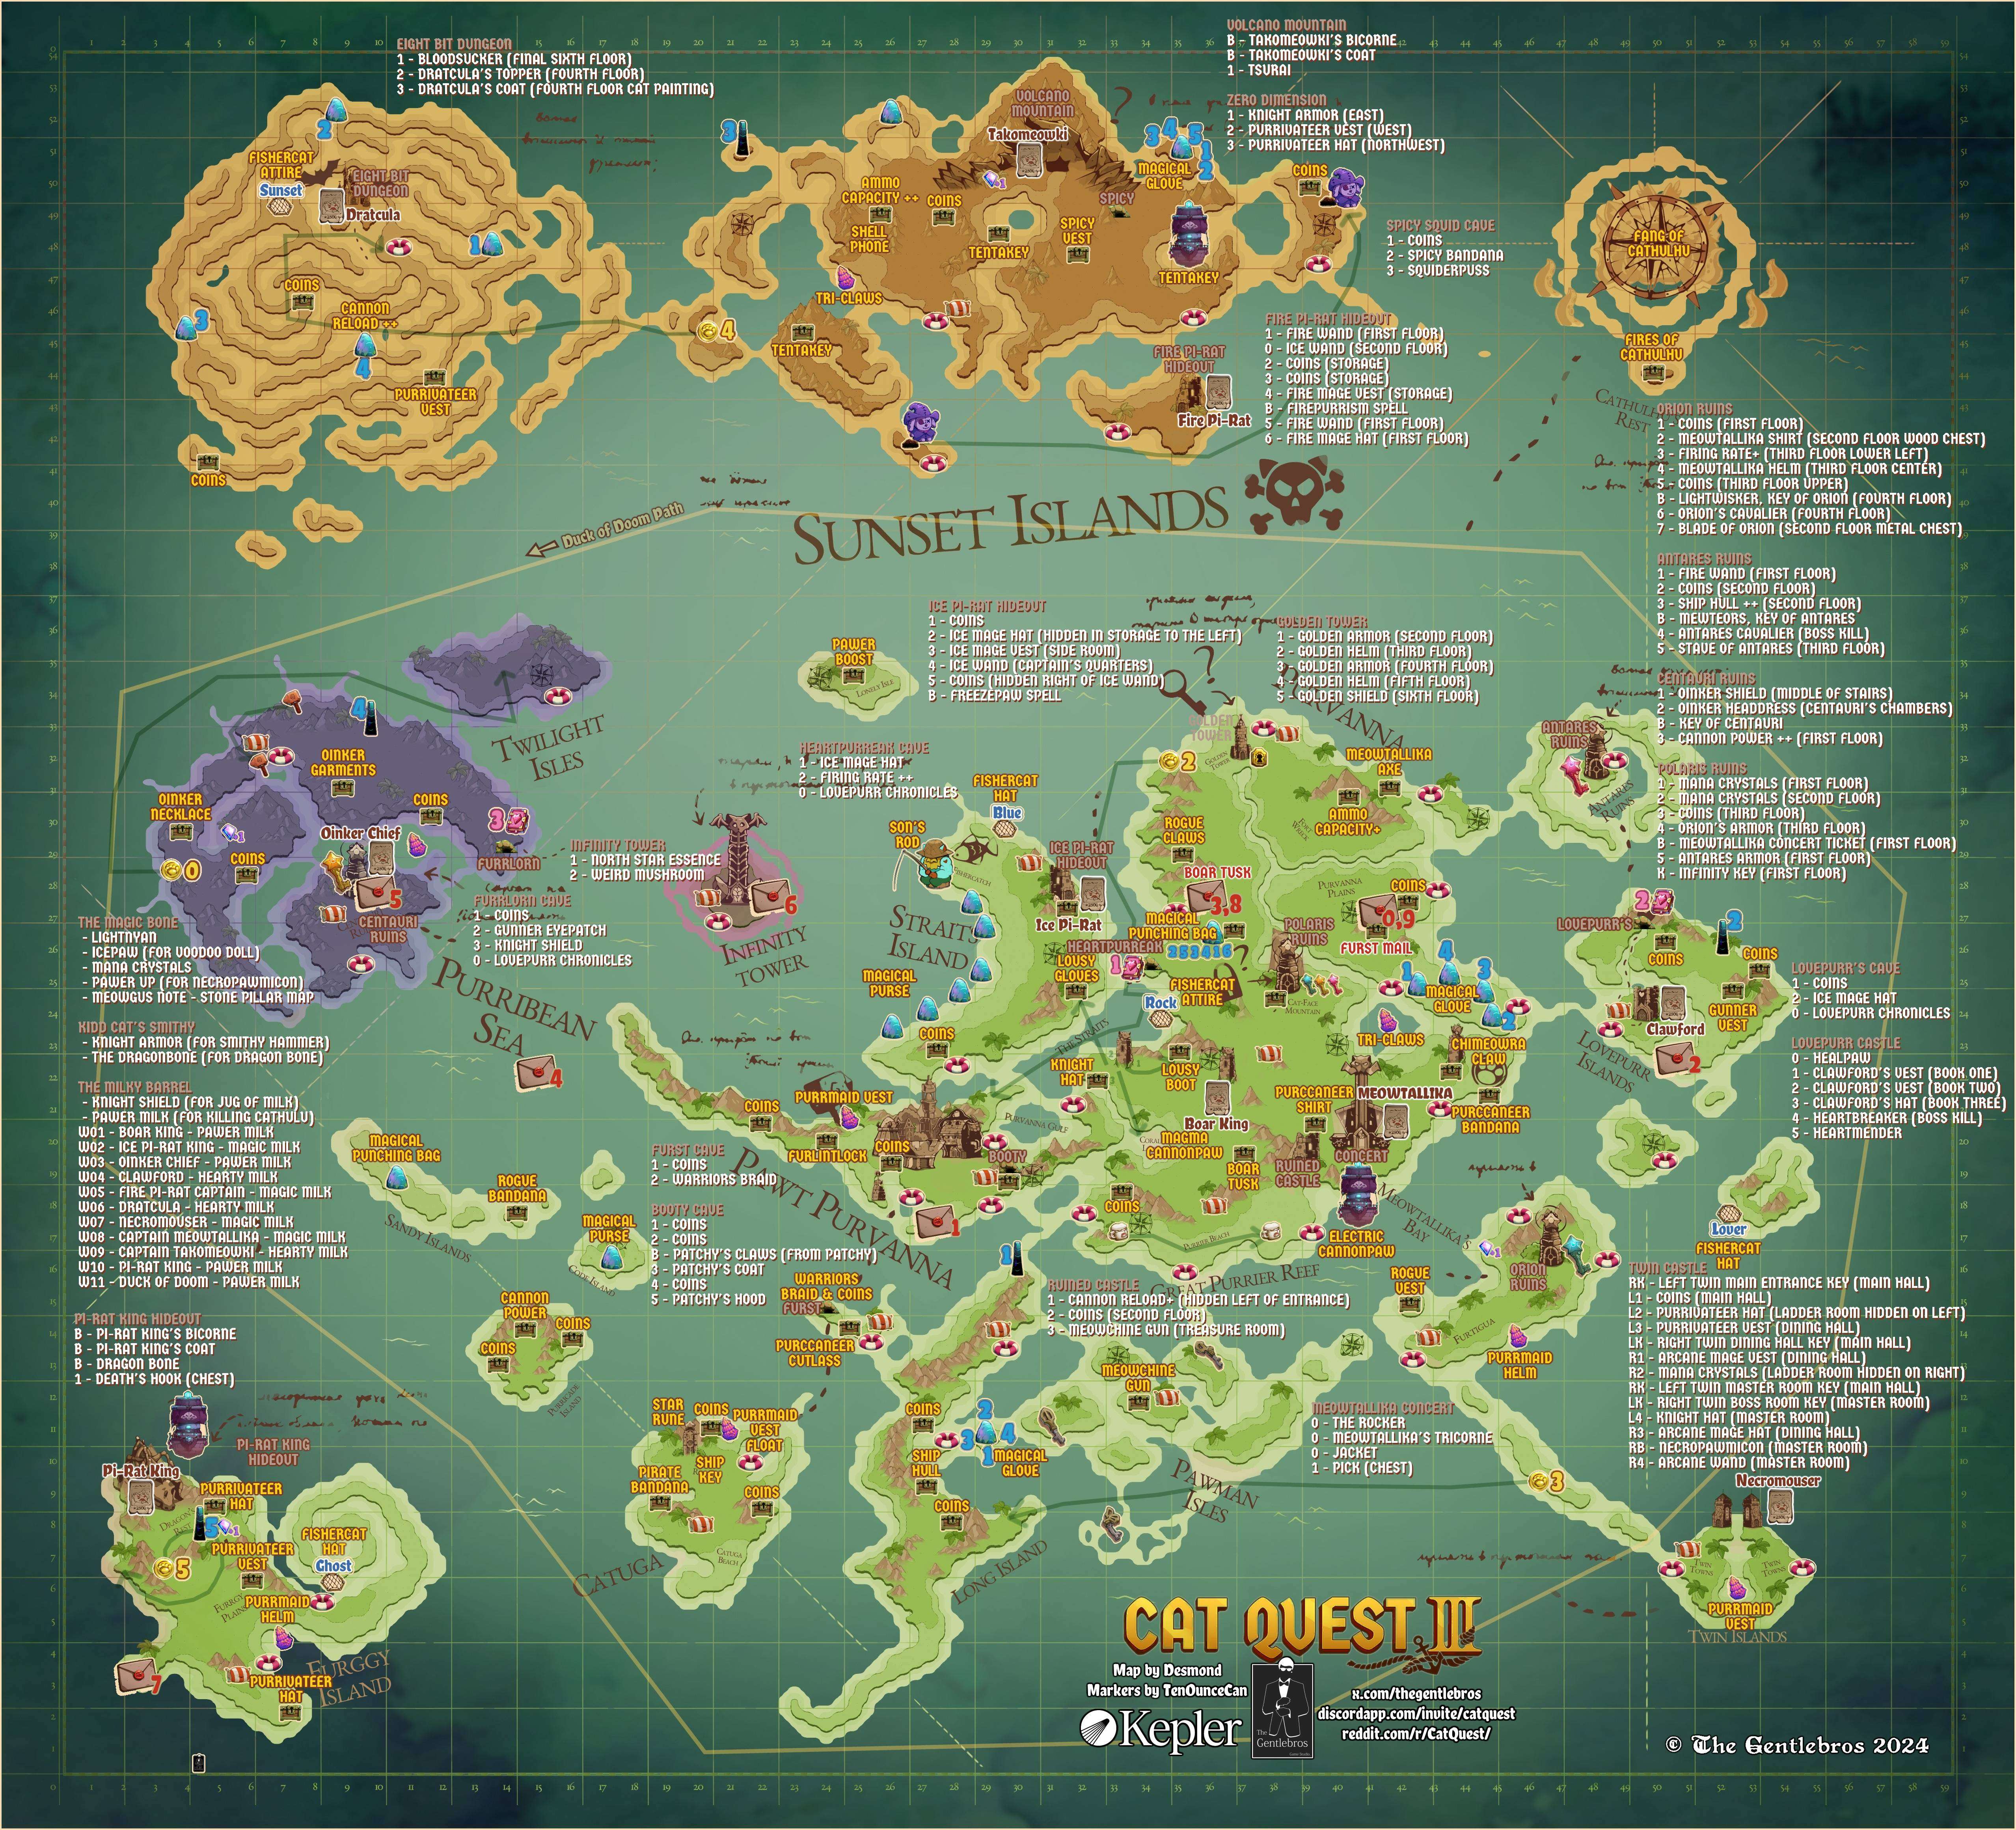
World Map – Highly Detailed
Click to enlarge…
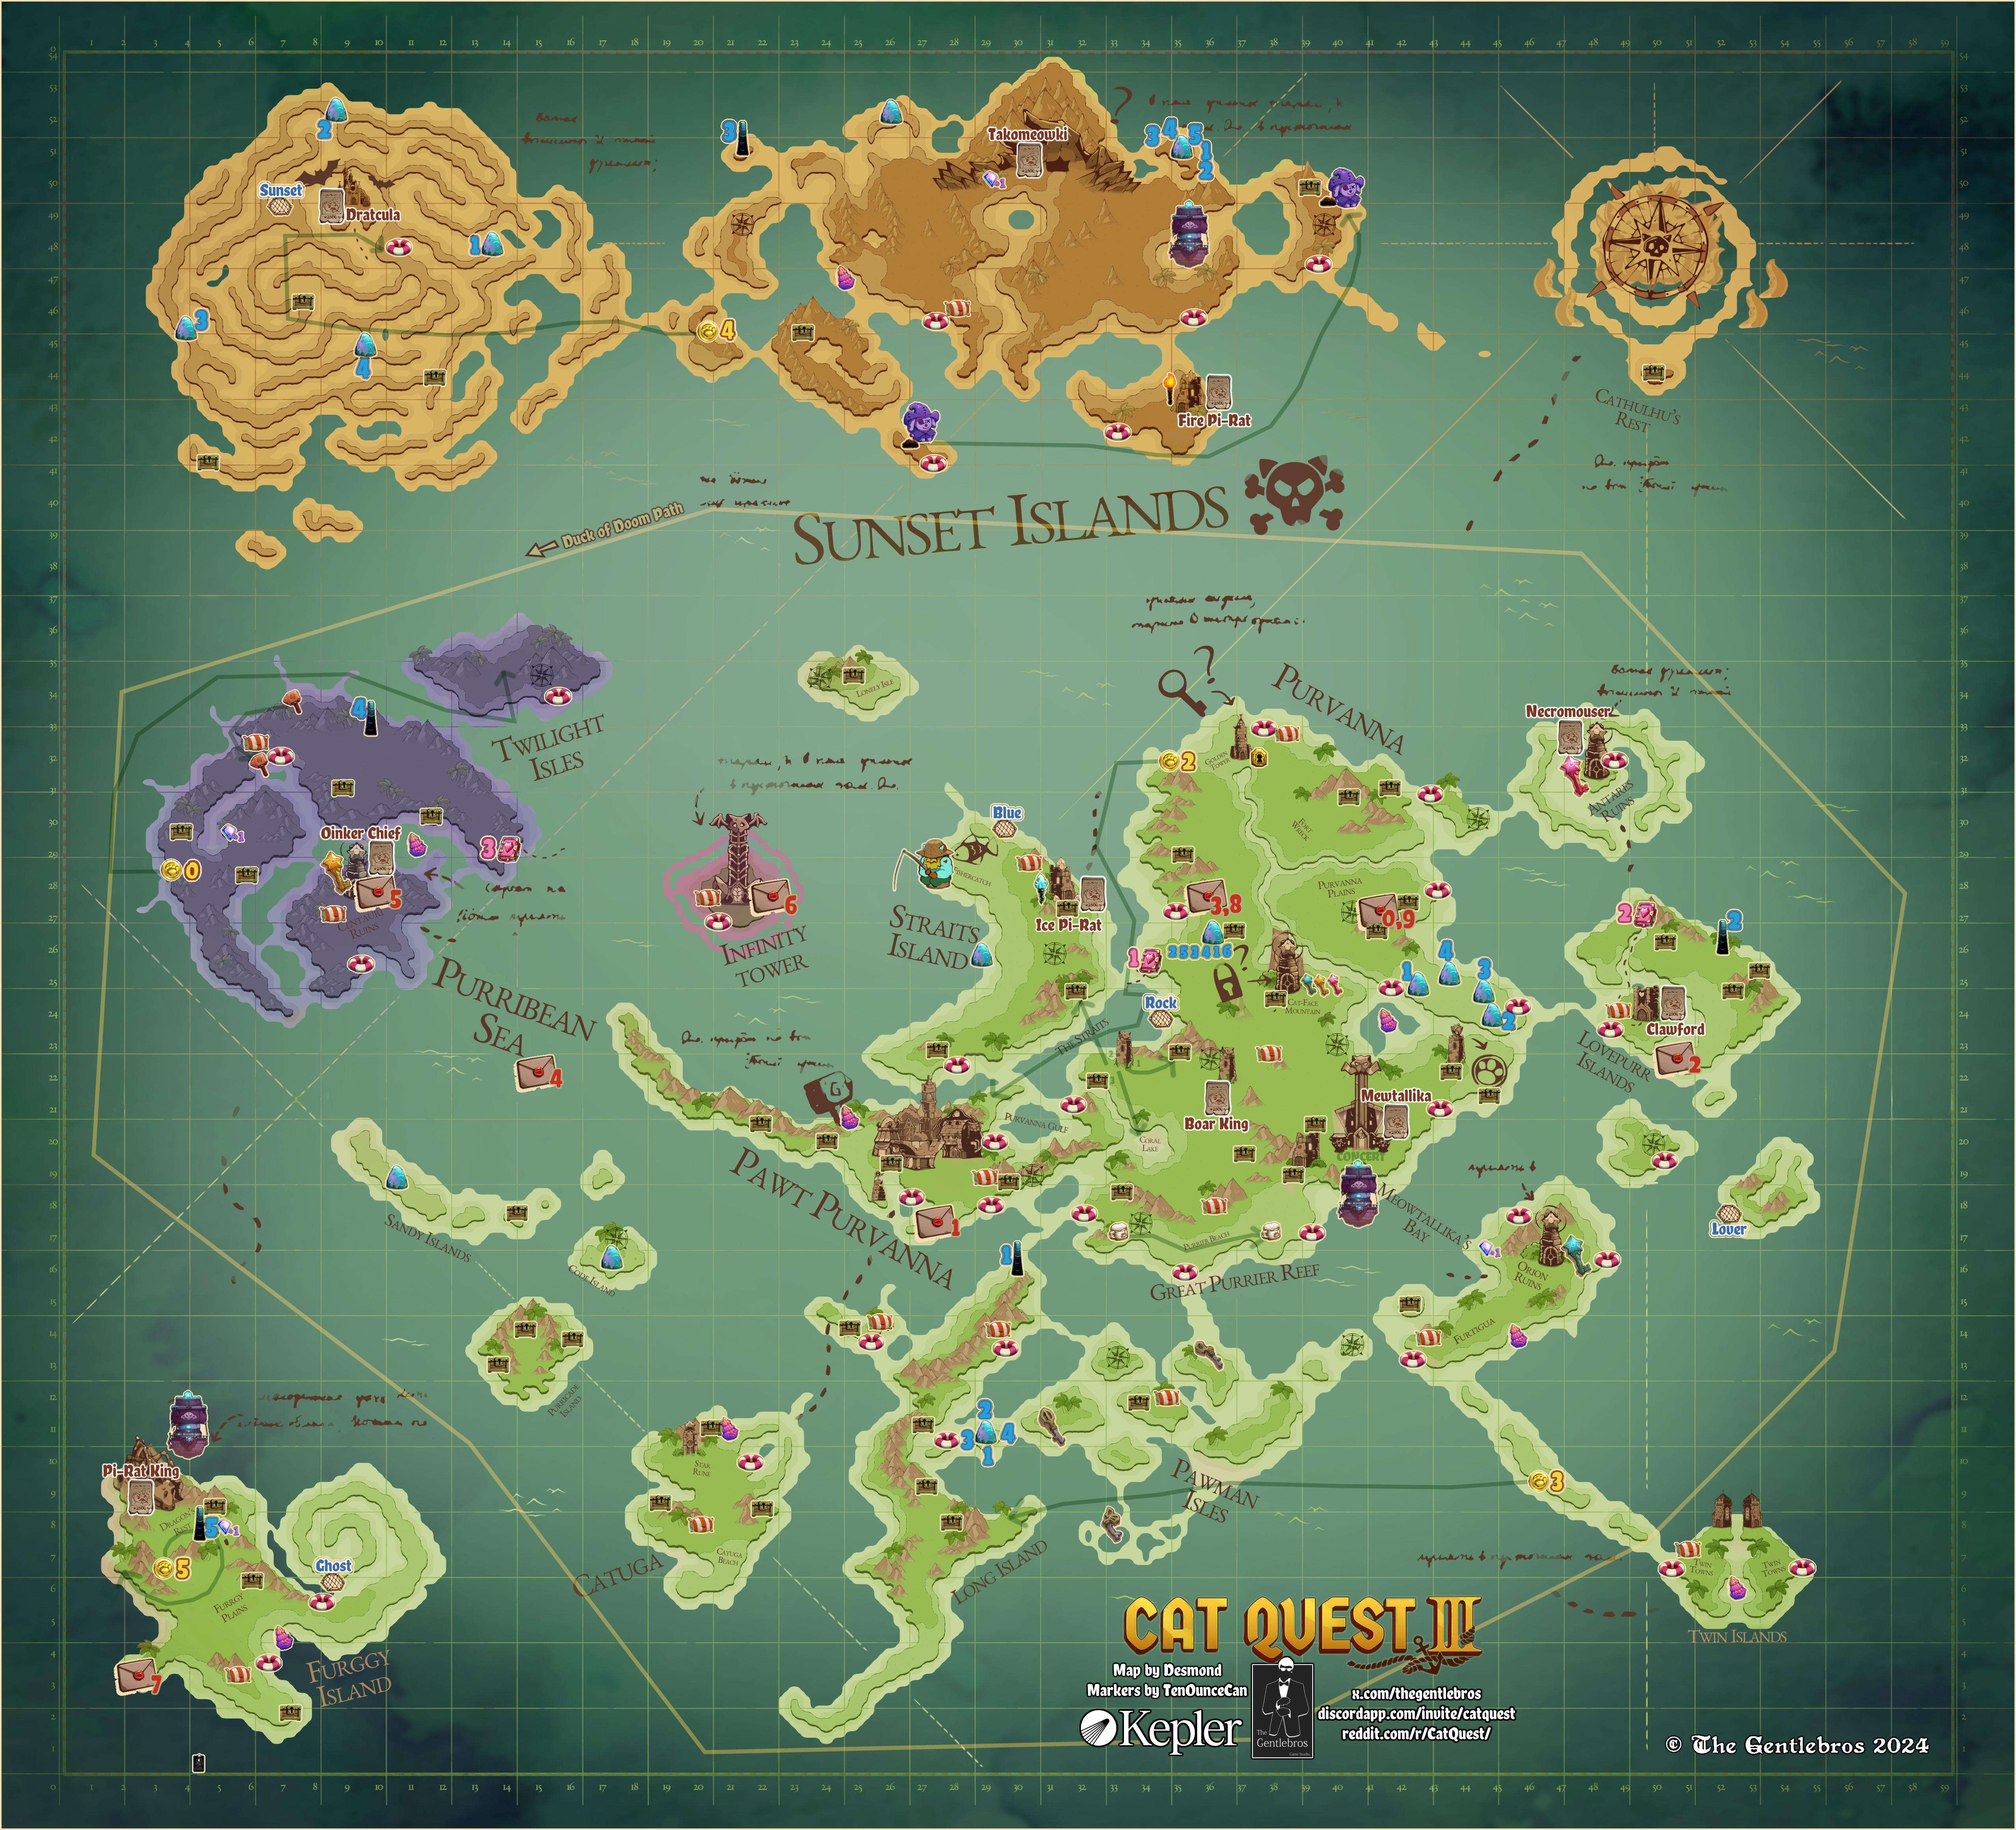
World Map – Detailed
Click to enlarge…
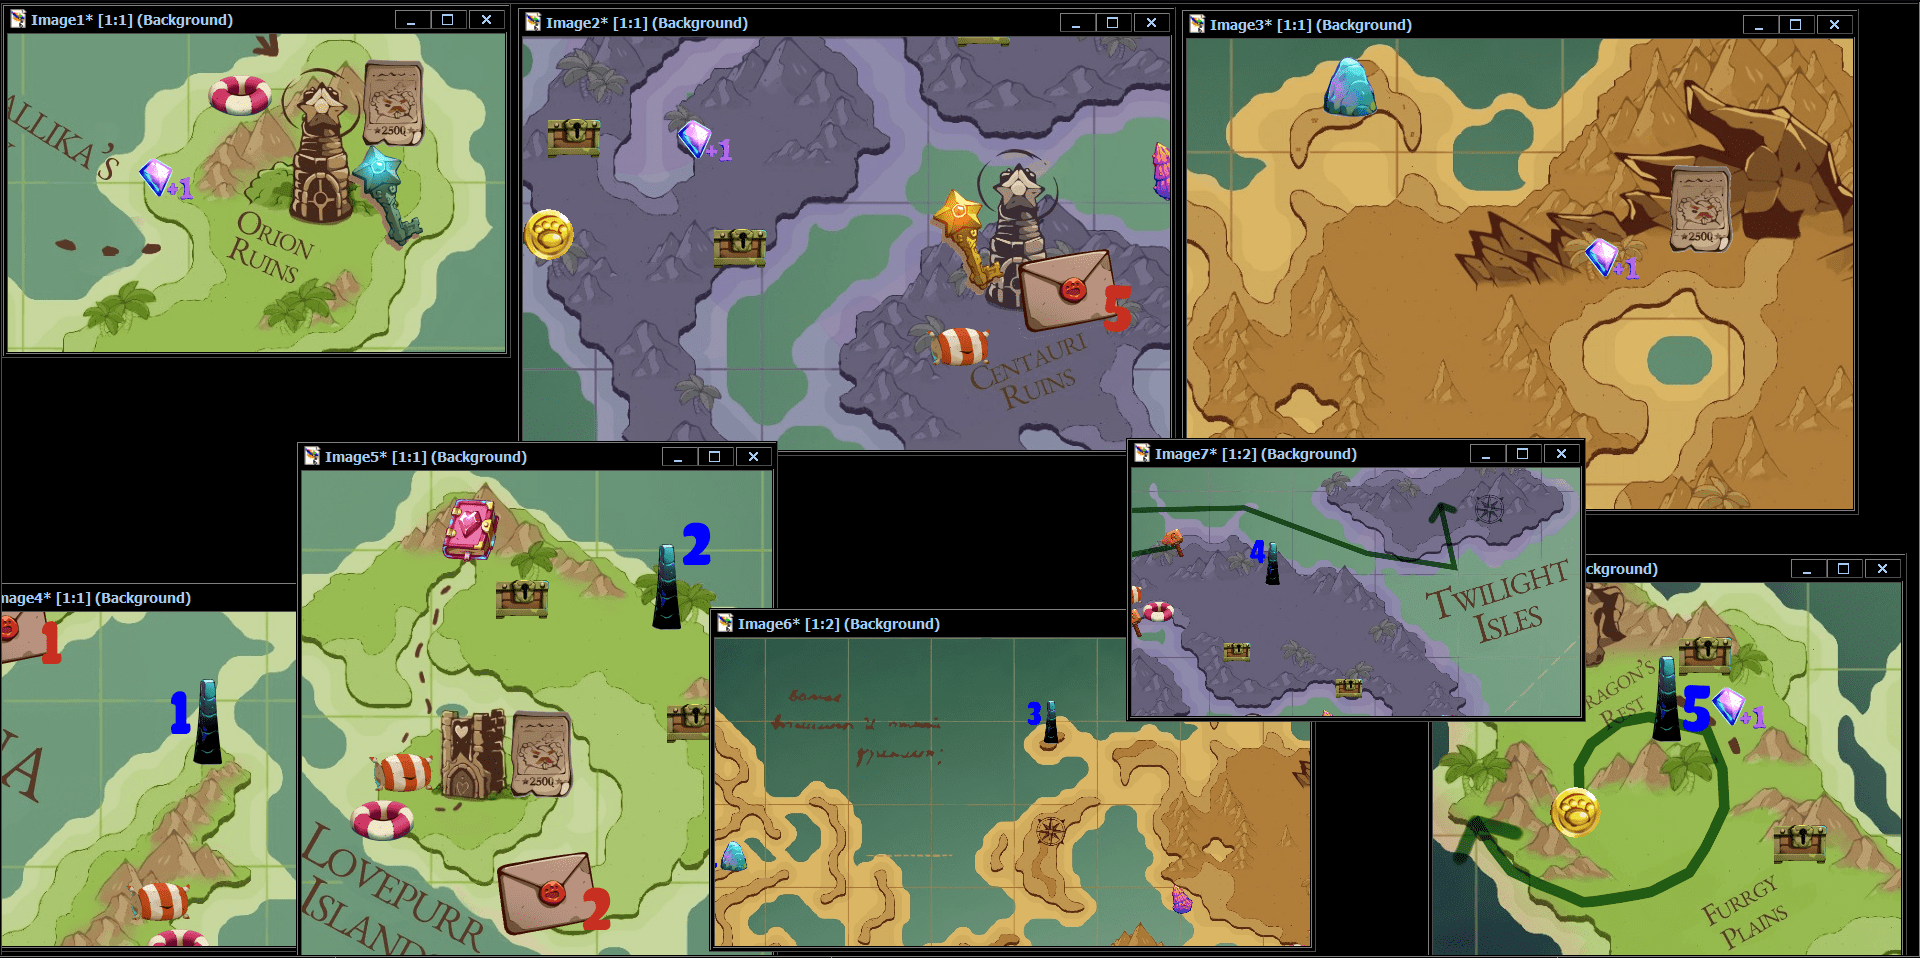
Aelius Mana Upgrade Crystal Locations
Click to enlarge…
Useful Info and Tips
How to Avoid Arcane Purrisms
- When you’re in the Fire Pi-Rat Hideout, you’re informed that you can dash while holding an Ice wand to move through Fireballs without damage.
- I was just fighting Seeker Antares and he shoots those Arcane Purrisms from his Stave and I always have to run away from them and try to get them to crash into walls so they disappear. Well, this time I held the Stave of Antares and I was able to dash through his Arcane Purrisms like they were nothing.
- Makes me wonder what The Architect lets you dash through without taking damage…
How does the damage scale with gold
- 1-9 gold > 5%
- 10-99 gold > 10%
- 100-999 gold > 15%
- 1.000-9.999 gold > 20%
- 10.000-99.999 gold > 25%
- 100.000-999.999 gold > 30%
- +1.000.000 > 30%


Be the first to comment