
Tips and Tricks
- The difficulty really only changes how stamina works and how aggressive Kaiko is- it does not affect save slots and auto-saving.
- Red Talismans are save points. They can also protect you if you’re in a pinch
- Any time you pick up a key item, the game auto-saves.
- The flashlight doesn’t need batteries, however it does make you easier to spot. When entering a hiding spot, the flashlight does not automatically turn off.
- Walking is your best friend when you aren’t in chase. Part of Kaiko’s AI is sound based, so the less noise you make, the better.
- The binaural audio is your best friend when hiding. While it’s best to wait until you can’t hear Kaiko anymore, if you’re in a rush, wait until she is walking in the opposite direction of where you want to go. I recommend crouching and leaning to see how far away she is before you start walking to your destination.
Kaiko
Note: To avoid spoilers, I will be referring to the monster pursuing you as Kaiko.
Kaiko’s AI is a little funny (and reminds me of the AI from Corpse Party 2: Dead Patient, if any of you have also played that game.)
Kaiko is like Mr. X from RE2, she is always looking for you and is constantly roaming around. I have never seen her standing in one spot for too long.
Her detection seems to be somewhat wonky. If she spots you, but doesn’t perform her screaming animation, she hasn’t really “spotted” you- if you can leave her line of sight in time she’ll forget she ever saw you.
If she is actively pursuing you in chase, run for a hiding spot. As long as she isn’t right behind you, she somehow loses you. She’ll linger around for a second then return to roaming around. If you’re worried about her lingering around if you’ve been hiding for 5 minutes in one spot, don’t be. It hasn’t happened to me (yet), and I’ve spent the better part of 10 minutes in a closet. If you’re unsure of where Kaiko is, i recommend jumping in a hiding spot and waiting for her to pass by.
If you can manage it, run by a red talisman while in chase with Kaiko, this temporarily disables her. Each talisman only has a certain amount of charges (which varies by difficulty) so try to remember which ones you’ve used.
Prelude: Ichinose
After the cutscene ends, you want to make your way around to Grandma Kinu’s house.
There are some coins littered around, as well as a ufo coin game, but not much else. The houses are closed off (which is a bummer. let me explore the abandoned buildings), and Minato will say something if you try going the wrong way.
The only thing you can check out is the Miyama Family Grave, which is a little before the house. There is a stone staircase in front of it.
To progress the story, simply enter Grandma Kinu’s house.
A fun little easter egg i found early on: after examining the Miyama Family Grave, if you quickly turn around and zoom in on the torii gate, you can see Kaiko looking across the way! i found this to be a neat little detail.
New Game +: When walking up to Kinu’s house, a bright pink note can be found posted to the building on the corner before Kinu’s house – on it reads 9679, this number doesnt change. After entering the house, go to the phone and dial the number. A child answers. She says her name is Mary and tells you where she is. This new event is based off of a urban legend in Japan called Mary-san or Mary’s Phone Call, in which a girl receives a phone call from a doll she abandoned. You can see Mary sitting in the trash pile at the beginning of the game, shes slumped over and looking at the ground.
Section 1: Grandma Kinu’s House
Approach the front door and use the Entrance Key to unlock the door. You might have noticed Grandma’s Key in your inventory, that key is used later in the game- so don’t worry about it too much.
Explore the house! I recommend opening all of the doors for later.
Notable things to find before resting:
- To the right of the entrance, through the wooden door, there is a telephone.
- To the right of the telephone there is a sitting room. grab that note about numbers and Grandma’s painkillers. (the note is important for later)
- There is a flashlight on the chair in the hallway outside the sitting room (why Minato doesn’t pick it up beforehand idk.)
- There is a save room just past the living room on the left. the door has no windows.
- In the kitchen, on the blackboard, Grandma mentions she lost a key in the bathroom. you can also have a drink of water while you’re in there
- Outside in the backyard, there is a chicken coop. grabbing the egg inside and eating it slightly boosts your defense stat.
- Going down the side of the house, there is a gate that has a plank of wood blocking it from being opened. go ahead and remove that and open the gate.
- There is a door with a dial lock on the far east side of the house, past Grandma Kinu’s room and the toilets. keep it in mind for later
New Game +: The majority of Mary’s phone call is going back and forth between the phone, and different locations outside. At any point, you can progress the main game after answering the phone (excluding the one in which she says she is behind you) however, doing so cuts Mary off short, as you can no longer leave Kinu’s house once you have decided to rest until nighttime. Seeing Mary’s phone call all the way through grants you a game over (and a creepy game over screen.)
To progress the story, enter the Living Room and chose to rest until night.
- Walk out towards the Entrance for an event to trigger.
- Open the front door to find a chicken’s head on the ground.
- The phone starts to ring, go and answer it. (and laugh when he says he’ll be okay for the night.)
- Minato says he’s thirsty, so head to the kitchen and interact with the faucet.
- After the cutscene, head out to the backyard.
Meet Kaiko! From now on, she is active.
There are only two hiding spots in the house: one in Grandma Kinu’s room and one in Grandpa Saichi’s office (the room above the sitting room)
First order of business is to grab that flashlight from earlier. Kaiko will enter through the front door (what a respectable monster!), so be ready to hide if you’re spotted.
After grabbing the flashlight, go to the telephone and dial 119 – Japan’s emergency service number. if you try calling 119 in a new game (before resting until night) the rep will tell you off for prank calling the line.what stand-up citizens we are.
Kaiko choke-slams you during the cutscene, and you regain control right after Minato stands back up. Book it to the closet in Grandpa Saichi’s office. As long as she isn’t right behind you, you’ll manage to successfully hide from her.
From now on, there are no more scripted interactions with Kaiko while you are in Kinu’s house, until the very end where you go to a new area.
Now what hell do you do?
Remember that note about the key in the drain- we need to get something to fish it out.
Head outside and go behind the chicken coop. Next to the baseball plinko machine there is a Poker used to stir firewood. Grab it.
(If Kaiko goes outside while you are outside, crouch in the grass. Wait until she is closer to the house before running back in through the side door by the kitchen.)
Go to the bathroom and use the Poker to fish out the Dresser Key Grandma Kinu lost.
Go to Grandma Kinu’s room and use the Dresser Key to open the drawer and get the Pencil. (all of that for a stupid pencil.)
At the beginning of the section, remember that note about keeping numbers in the cabinet under the phone? Head back around to the telephone and inspect that area.
You can use the Pencil on the notepad on the ground to reveal a 4 digit code. I don’t know if the code changes each time, but the code I found was 9474.
Head down the long hallway, past the toilets, to the door with the padlock. Enter the code you found.
Kaiko finds you in the hallway and you manage to fight her off, but block off access to the rest of the house…
Section 2: Storage Shed
You survived hell, now what?
You start in what appears to be Grandpa Saichi’s study.
New Game +: If you didn’t complete Mary’s phone call all the way through, she will appear in the crack of the doorway after the cutscene ends.
Grab the collectibles (if you’re into that), and head outside. Grandma’s been hiding a giant storage shed!
Approach the shed and open the door. Use Grandma’s Key to gain access to the shed.
Currently, Kaiko is not active. You don’t have to worry about running and hiding from her.
Take a look around, and put that flashlight to good use! Moonlight is scarce from here on out, so your main light source is your handy-dandy flashlight.
Towards the back left corner of the shed, grab the Garden Scroll that’s under the shelves. There is a small door to the right, but it doesn’t budge.
Head upstairs.
Look in the red chest to your right, open it and grab the Hawk Scroll.
When you make your way around, you can see a scroll on the wall. It’s fine to leave that one where it is.
Go towards the closet on the opposite wall, in front of the staircase. Open it and grab the Lion Scroll.
Read the red book on the desk, The Legend of Princess Mayu – this is the key to solving the scroll puzzle.
In case word puzzles aren’t your jam, here’s the answer:
- Spring: Lion Scroll , Summer: Hawk Scroll , Autumn: Boat Scroll , Winter: Garden Scroll
Head back downstairs to that small door- its open now! Go in and descend the staircase.
Upon discovering the cage, you can continue following the path around. (There’s only a file and 10 yen coin in the cage, nothing else of importance.)
In the Storage Room, there’s a red talisman. Inspect the wall opposite of where you came in. (secret tunnel! secret tunnel!). You can proceed as soon as you inspect it- there’s really nothing else of note.
The new room you enter has another talisman and a few files, nothing too important (unless if you care for lore, but this walkthrough is to help you get through the game).
Head out and around, down the staircase and into the room on the right. Kaiko is looming outside, don’t worry, she doesn’t bust through it to attack you- you can safely walk past her.
Go through the first room into the room with the lit lantern. Grab the Flint and the Map off of the table. Finally, a use for the Map tab!
Opening the map reveals that you’re in the Miyama Family Mansion- who knew Mom’s family was loaded?
Section 3: Miyama Family Mansion
I am still making my way through this section of the game. This is also the biggest section of the game by far, so apologies in advance if this is confusing.
The map is your best friend here. Thankfully there is an indicator as to where you are on the map, however Minato does not mark off what sections of the map are accessible or not- you have to remember what ways you can go. I will be using the room labels on the map a lot in this section, so be sure to study it!
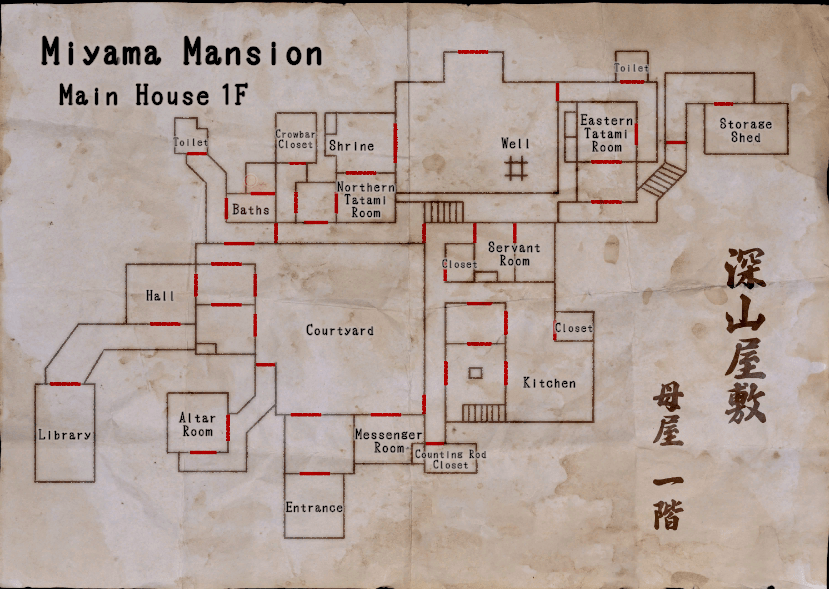
This section introduces Chests you can hide in. They are large, red chests with the Miyama Family Crest on them. These provide better sight than closets in terms of peeking out to see where Kaiko is, a vertical opening vs a horizontal opening, however you’re more likely to get caught and pulled out of them if you jump in during a chase.
You start off in the Eastern Tatami room, head out and around (past the toilets) to go to the backyard.
Guess who’s back! Run from Kaiko into the Tatami room and hide in the closet. You don’t have to wait for long for her to leave. She’s gone for a little bit after this, so take a deep breath.
Go out and inspect the well in the yard. There’s something in there, but you need something to fish it out. Inspecting the big wooden doors reveals they’re locked and need a key.
Passing through the Shrine room, there is a closet to hide in. The shrine is above you, so you need a stepladder or something similar to interact with it.
The area above the Northern Tatami room connects to the hallway (western door) and a short hallway to the Crowbar Closet- this door is locked and needs a key.
Out in the main hallway, there’s a sliding door that’s currently jammed to the right, and stairs to the left. Next to the stairwell there’s another jammed door.
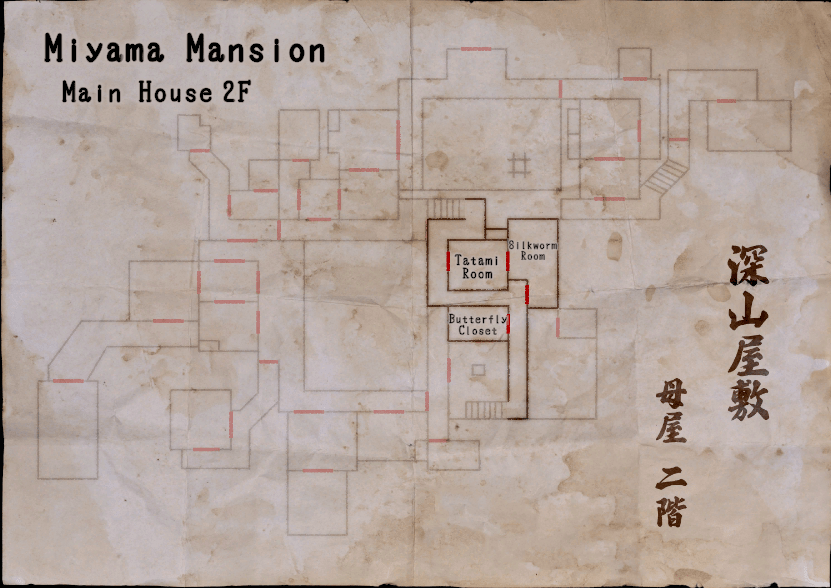
Head upstairs. Make your way around to the door. Its jammed (whos surprised?). Go around the corner and pick up the Old Wooden Board. Return to the door and use it to pry the door open.
omg another tatami room! There’s a closet you can hide in right by the door to the Silkworm Room.
In the aforementioned Silkworm Room, there’s a sketchy patch job over a hole in the floor. Inspecting the planks reveals that the nails can be pried up. Keep that in mind.
Passing through the room leads to the rest of the upstairs hallway that was blocked off, as well as the door to the Butterfly Closet (to the shock and awe of no one, this door is locked.)
Heading downstairs puts you right outside the kitchen. Be wary, Kaiko is in the room right next to you. She can be heard mumbling “Kinu-chan…” to herself.
There’s a hanging pot in the middle of the room, inspect it. There’s something stuck inside solidified grease (or something similar). Trying to use the Flint by itself is useless, you’re gonna need something to burn.
Once you start exploring the area, Kaiko will begin patrolling once more. If you happen to get spotted in this area, i recommend running back to the upstairs tatami room and hiding in that closet.
Go to the Kitchen, in the Closet grab the Firewood, also make note of the water pump in the back that’s rusted. Use the Firewood and the Flint to get the Crowbar Key out of the pot.
Look around the room Kaiko was in when you first went downstairs. There’s one of the chests I mentioned earlier, as well as a note from a servant stating they lost their Key in one of the toilets. (G-R-O-S-S.)
Going through the doors in front of the stairs leads to a hallway. To the left is the Counting Rod Closet and a door with a Peony Lock on it. To the right is a closet with a Red Talisman, the Servants Room (which is blocked) and the door next to the stairwell from earlier. Remove the plank that’s blocking the door. This opens up the first floor more so you don’t have to keep going upstairs.
Head through the now-unblocked door and go to the Crowbar Closet. Use the Crowbar Key to get in.
Pick up the letter that’s to the right when you enter the closet. It mentions a plate that changes is cold, clear water. Keep this in mind for later. Open the drawer in the back to find the Crowbar.
Remember that sketchy patch job from earlier? Go back to it. (If you don’t remember, its in the Silkworm Room on the second floor.)
Use the Crowbar on the nails. Minato moves the planks out of the way. Jump down into the hole. Before interacting with the items on the desk, remove the plank that’s blocking the door that leads out to the hallway. Pick up the Peony Key on the desk. Boo! Kaiko’s here! Run out and either find a hiding spot or run until she loses sight of you. The closest hiding spot to you in this instance is the closet in the Shrine Room. There is a closet in the Servant Room, but Kaiko is right on you, so hiding there is a no-go.
Head back to the door with the Peony Lock (its next to the Counting Rod Closet) and use the Peony Key. This opens up the Courtyard and the other half of the house.
The Courtyard, as you may expect, is a large open area, Kaiko can easily spot you even if you can’t see her. Line of sight blockers and using the “hide in the grass” technique from the first section are vital while moving in this area. There’s plenty of light, so its best to turn your flashlight off while out here.
The room to the left, the Messenger Room, has a closet in it.
Heading further down that path leads to the Entryway. Take the Spade that’s resting on the cart. Before you ask, no the Entryway doors don’t open. You can’t get out that easily.
In the Courtyard itself, in the middle there’s a Well Bucket. Pick it up, we’ll venture back around to that part of the house in a minute. We’ve got wilderness to explore first.
Turn around and head to the Altar Room. Pick up the note thats on the floor- its about a Crest that’s been hidden on the property. We’ll look for those later. There’s also a strange puzzle in the wall, we’ll come back to that too.
Continuing down the path, there are two rooms side by side, the one on the right leads to the Hall, head in there and pick up the Plate.
West of the Hall is a hallway that leads to the Library. The Library is currently locked. Pick up Kyubei’s journal that’s on the table to read about one of the possible endings.
Cut back through the Hall and the adjacent room to enter the bath area. There’s a toilet all the way north and baths to the right, as well as a door that connects to the rest of the house. Unblock the door so you can make your way to the Shrine Room if you need to hide. Go up to the Toilet and stick your hand in there, you’ll get the Counting Rods Key. In the Bath Room, there’s a Red Talisman and an Oilcan on the edge of the tub.
Make your way back to the other part of the house and go to the Counting Rods Closet. Use the Counting Rods Key to get in. Grab the Stepladder
Head back to the Shrine Room. You can either use the Stepladder to get the Red Medallion first, or use the Well Bucket at the well to get the Left Silkworm Key- doesn’t matter which one you do first.
Head to the Courtyard and find the indicator for the dirt patch. Use the Spade to dig up the Blue Medallion.
Make your way to the kitchen and use the Oilcan on the water pump from earlier. Then use the Plate, it reveals a pattern similar to the Medallions that you’ve collected- write the pattern down or take a screenshot of it. I’m not sure if the pattern is the same each playthrough.
Go to the Altar Room and put the Medallions in the contraption on the wall.
Remember that pattern from the plate? Recreate it on the wall – heres the pattern I got: North: green, East: blue, South: red, West: black.
Grab the Library Key from the drawer, and try to make your way there.
After using the Library Key on the door, head in and grab the Right Silkworm Key from the table drawer.
There were large double doors out by the well when you first gain access to the mansion. You want to make your way back there, thats where the keys go. When you approach the door, use the Left Silkworm Key and Right Silkworm Key and proceed through the doors.
Section 4: Miyama Mansion Outhouse
There is a map right in front of you, go ahead and pick it up. Welcome to the Outhouse!
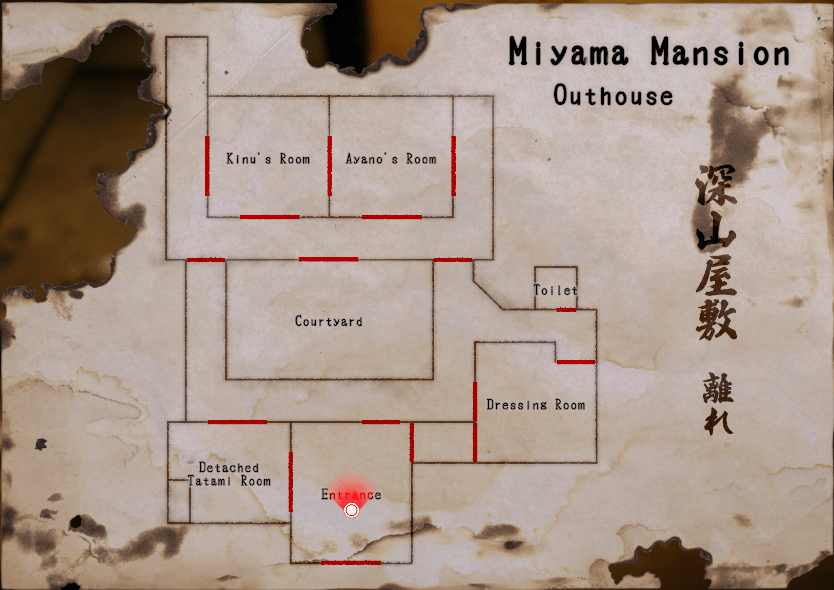
Kaiko’s not here, so chill.
Left of the Entrance, there’s a Tatami Room with a locked red box.
Right of the Entrance, find a Red Talisman and a Dressing Room. There’s a checkerboard that says “Old Man”.
No sticking hands in the toilet this time, but there’s a UFO coin game in there.
Ayano’s and Kinu’s rooms have vanities. Ayano’s has a Peony symbol; Kinu’s has Mountain Grapes.
Grab the Mountain Grape Mirror from the Courtyard, go to Kinu’s Room, and place it on the stand to find a Puzzle Box and part of Kinu’s journal. A note on how to solve the Puzzle Box is behind the vanity.
Take the Puzzle Box to the Dressing Room. Solve it like this:
- Old man, boat, princess, disease, silkworm, cocoon – down, right, down, right, down.
You’ll get a Small Key. Use the Small Key on the Tatami room’s red box to get the Peony Mirror.
Put the Peony Mirror in Ayano’s room and grab her journal to find the Crane Key underneath.
In the hallway near Kinu’s room, there’s a talisman on the wall hiding a passageway.
Section 5: Underground Passage
Kaiko was here, watch out for talismans.
There’s a Red Talisman at the stairs’ end. Use the Crane Key on a locked door further down.
Save at the Talisman near Kaiko’s cell. It’s creepy, with ropes and a noose.
To face the “Boss Fight”, read Kinu’s Will. You’ll get locked in with Kaiko.
Win by undoing bolts and using the noose when Kaiko lunges at you. She gets crushed.
End choice: Kill Kaiko or Spare her?
All Endings
Killing Kaiko – You get the “Human” achievement. You choose to kill Ayano, she turns into a cocoon with silkworms around. Minato keeps quiet about everything to his dad, and the dam construction is still on.
Sparing Kaiko – You score the “Descendant of a Xenomorph” achievement. Minato becomes Ayano’s new caretaker, quits college, and cuts off his dad. The dam project’s stopped. Ayano can’t stop crying over missing Kinu.
UFO ending – Bags you the “UFO” achievement. Buy and wear the Tin Foil Hat, go to the Detached Tatami Room’s closet, turn around, walk into a crop circle, and interact with a UFO. This gives Ayano a Tin Foil Hat accessory.
Butterfly ending – Earns the “Mayuhime” achievement. Buy the Butterfly Closet Key, open it, read Kyubei’s journal, and grab the Cocoon. Play normally, and after the final boss, feed Ayano the Cocoon.
Mary’s Phone Call – You get the ‘Mary’s Phone Call’ achievement by completing the urban legend challenge.
Be the first to comment