
How to Solve Puzzles
Ву Qwerty, Professional Complicator.
Test Level #001
- Hint 1: Try actually playing.
- Hint 2: Don’t hit the skeleton immediately.
Don’t Die
- Hint 1: Do not use the cleric’s shield until you have taken damage from a wound and survived because of the fountain of vitality.
- Hint 2: Thick skin is not necessary throughout this puzzle.
- Hint 3: You can hit props without a weapon and deal no damage to them, but time will still pass if you do so.
The Prison
- Hint 1: You can reposition yourself while still doing the same action; this can cause monster pathing to change.
- Hint 2: There is an x-barrel behind the cell door, which is how you are supposed to kill the skeleton.
Mom, There’s an Orc [in the Basement]!
- Hint 1: Destroy the rusty chest before the orc.
- Hint 2: Kill the first orc with 2 x-barrel explosions and a knife hit, then kill the skeleton with 2 other x-barrel explosions.
Not really a hint, but still kinda spoilery: You can beat this level without using the rusty sword.
The Prison 2
- Hint 1: Unlock the paywall as soon as possible.
Behind Closed Doors
- Hint 1: Destroying any pillars with a weapon will cause you to lose.
- Hint 2: You need the rusty sword first in order to kill the skeleton.
Behind Closed Doors 2
- Hint 1: Unlike its prequel, the order in which you teleport is forced. Try to find the specific sequence in which you have the sword and unlock the left cell door.
- Hint 2: You do not need to grab the old knife immediately.
The Old Jewellery
- Hint 1: Using the paywall at the start will lead to a solution (you will need to collect 4 emeralds and then the first skeleton takes damage).
- Hint 2: Following the first hint, once you deal damage to the first skeleton, use the rightmost emerald and then the paywall.
- Hint 3: You will need to stall the skeleton once in order to get the monster to move to a square that an old pillar explodes on on the turn that it explodes.
The Apothecary Shop
- Hint 1: You will need to hit an old pillar once.
- Hint 2: Use the herotrap to gain money and use the healing potions to deal damage to the skeletons.
Achillean Puzzle
- Hint 1: If you stall the orc immediately, you must then pick up the rusty sword that is not adjacent to a flipped archer.
- Hint 2: You must use the illusory wall before using incinerate.
The Three Factions
- Hint 1: Do not pick up the knife while holding another weapon; the knife will not be used fully.
Archer’s Ravine
- Hint 1: To reach an old knife, you must first kill all visible archers that can shoot you if you picked up that knife right then.
- Hint 2: You must kill the archer that starts directly adjacent to the barrel before killing the flipped archer next to 2 flipped archers and 1 non-flipped archer.
Timer for Spells
- Hint 1: Use the revelation shrine as soon as possible.
- Hint 2: You need to draw the ring of fire in a place that you can hit the archers with.
Bombs of Self Destruction
- Hint 1: Don’t whip o-barrels. They explode in your face. Quite literally.
- Hint 2: Don’t whip x-barrels in a spot where you’re going to explode yourself with a different barrel.
Ample Weaponry
- Hint 1: First take/use all the hero cards that give 2 weapons.
- Hint 2: You need to use sleep dagger to stop the wizard from casting the spell.
Balance of Two
- Hint 1: To break through the spikes, you need reactive armor + morningstar and nothing else.
- Hint 2: Use the armor that gives the most armor first, then the next armor, then so on, though not necessarily all in one go (I mean in absolute not considering godo’s hammer).
Sin Tutorial (No Text)
- Hint 1: You will need to equip geldkatze later than heavy hand.
- Hint 2: Gluttony will draw sloth, and auras work even if the hero is asleep.
- Hint 3: You do not have the time to pick up the emeralds after killing the skeleton.
An Eye for an Emerald
- Hint 1: Kill the rat conjurer before it adds a pack rat to the deck.
Pay the Price to Leave
- Hint 1: Shurikens are ranged weapons, and quick dagger just so happens to deal exactly the amount of damage needed to kill the skeleton.
Shocking Payment
- Hint 1: When teleporting, try to stay next to the emeralds so that you continue to deal damage to the monsters.
- Hint 2: Paywalls are great for stalling while standing still.
The Crumbling Castle
- Hint 1: Stall until the old pillar gets a timer of 1, then move to avoid getting hit by the old pillar.
- Hint 2: Reveal the leftmost monster ASAP, then the rightmost monster ASAP.
Pillar
- Hint 1: You want the uppermost skeletons to end up next to 2 old pillars when they explode and the other skeleton to take 6 damage at the same time.
- Hint 2: You can start by hitting a pillar adjacent to where you start, but you’ll need to move after that.
Vanity Kills
- Hint 1: Only lose hp after equipping bristle ring; if you don’t use the rightmost envy, make sure to keep enough hp to use another envy.
Vanity Kills 2
Sidenote, but the vanity kills is from the age where majestic armor created vanity and vanity was essentially envy so that’s why it’s called vanity kills, it’s not because we’re dumb.
- Hint 1: Use the majestic armor after using both fountains of vitality.
- Hint 2: Vanity and gauntlet are there for a reason.
Samson’s Sword
- Hint 1: Heavy hand should be used on Samson’s sword.
- Hint 2: The old knife should be used to kill the skeletons.
Samson’s Sword 2
- Hint 1: Once you kill both skeletons, use the geldkatze immediately.
- Hint 2: Hit the medjay with the weird rod.
Barred Doors
- Hint 1: Reveal both doors, one after the other; block one with a pillar and one with the rusty chest.
Barred Doors ([With] Paywall)
- Hint 1: Use the rusty chest to block both skeletons from advancing too far; paywall is good for stall.
The Archer
There are definitely multiple solutions; this is just hints for the most efficient one (that doesn’t require all the bows and gives 20 emeralds).
- Hint 1: Hit a side of the pillar to redirect the grunt’s movements, so an o-barrel can get triggered by the old pillar.
- Hint 2: Use a pushing bow to push the grunt into the emeralds to push off the wall.
The Poisoner
- Hint 1: Apply poison to all as soon as possible.
- Hint 2: Hit the stalker with the poisoned dagger.
- Hint 3: You will need to disable both auras for stalling purposes.
The Poisoner 2
- Hint 1: Apply poison to all as soon as possible.
- Hint 2: Hit the stalker with the poisoned dagger.
- Hint 3: The pack rat and skeleton will die if you use the poisoned dagger at the right time, so plan ahead knowing that they could die mid-turn.
- Hint 4: Stall with the paywall.
The Poisoner 3
- Hint 1: Equip all the shurikens before using them to attack, but after casting and getting 10 emeralds.
- Hint 2: Both poisoned daggers will be needed to hit the stalkers with.
- Hint 3: Paywall is your best friend.
The Archer’s Return
- Hint 1: Look at the hints for The Archer.
- Hint 2: Make sure the skeleton dies from an o-barrel.
Props and Stuff
- Hint 1: Whip the barrel below you first, then whip all the rest.
- Hint 2: All the o-barrels should hit at least the brute.
Ring Around the Paywall
- Hint 1: Don’t make the ghoul stop when you hit it with your shurikens.
Rogue Mechaniks
- Hint 1: Use the farthest poison cloud first, then the closer one to stall the pack rat.
- Hint 2: After hint 1, hit the archer and pick up medusa’s ring.
- Hint 3: You want the pack rat to die one square right of the center of the board.
- Hint 4: Hit the ghoul with all the x-barrels.
Mjolnir
- Hint 1: You will need to stall for 3 turns at the least to start.
- Hint 2: You want the pack rat to die one left of center.
- Hint 3: You will need to stall for two consecutive turns to get the zombie where you want it.
Rogue Puzzle #25
- Hint 1: You will need to stall for a turn before picking up the whip.
- Hint 2: Unlock the upper paywall first, and make sure that when you whip the x-barrel, the other orc gets hit by it too.
Back to the Drawing Board
- Hint 1: There is a sarcophagus, so pick up the mana vial belt first.
- Hint 2: Place the cards in such a way so that you can kill both heka priests while drawing.
- Hint 3: Use meticulous study to deal 11 damage to the zealot.
Exert Tutorial (Easy)
- Hint 1: The second time you use incinerator wand, don’t stand where the x-barrel can hit you.
Exert Tutorial (Medium)
- Hint 1: You need to hit a grunt with the wand of rehearsal as soon as possible, with that grunt moving next to you afterwards.
- Hint 2: Use tax collector’s boots with lightning robe to create mass destruction.
- Hint 3: Make sure to have one grunt take two hits to die from wand of rehearsal and two grunts taking one hit by using matick’s wand.
Let it Rain
- Hint 1: After picking up both mana vial belts (maybe you have to hit the paywall in between pickups [you didn’t hear it from me]), hit the medusa, then the paywall.
- Hint 2: Spells are not considered weapons and will therefore not be dropped by the void priest.
- Hint 3: Resource shrine will draw a mana potion.
- Hint 4: Once you use all the mana potions, Let It Rain.
Gavbins
Sidenote, it’s my friend’s pseudonym, don’t judge.
- Hint 1: Pick up the vainglory first, then the spear of longinus.
- Hint 2: After you reveal both monsters, then equip bagoas belt.
Crashring
- Hint 1: Don’t kill the boss.
- Hint 2: Try to deactivate graceful exit.
Good Luck
- Hint 1: 2: the leftmost one you can access.
- Hint 2: 3: the leftmost one you can access.
- Hint 3: 4: the leftmost one you can access.
- Hint 4: 5: the leftmost one you can access.
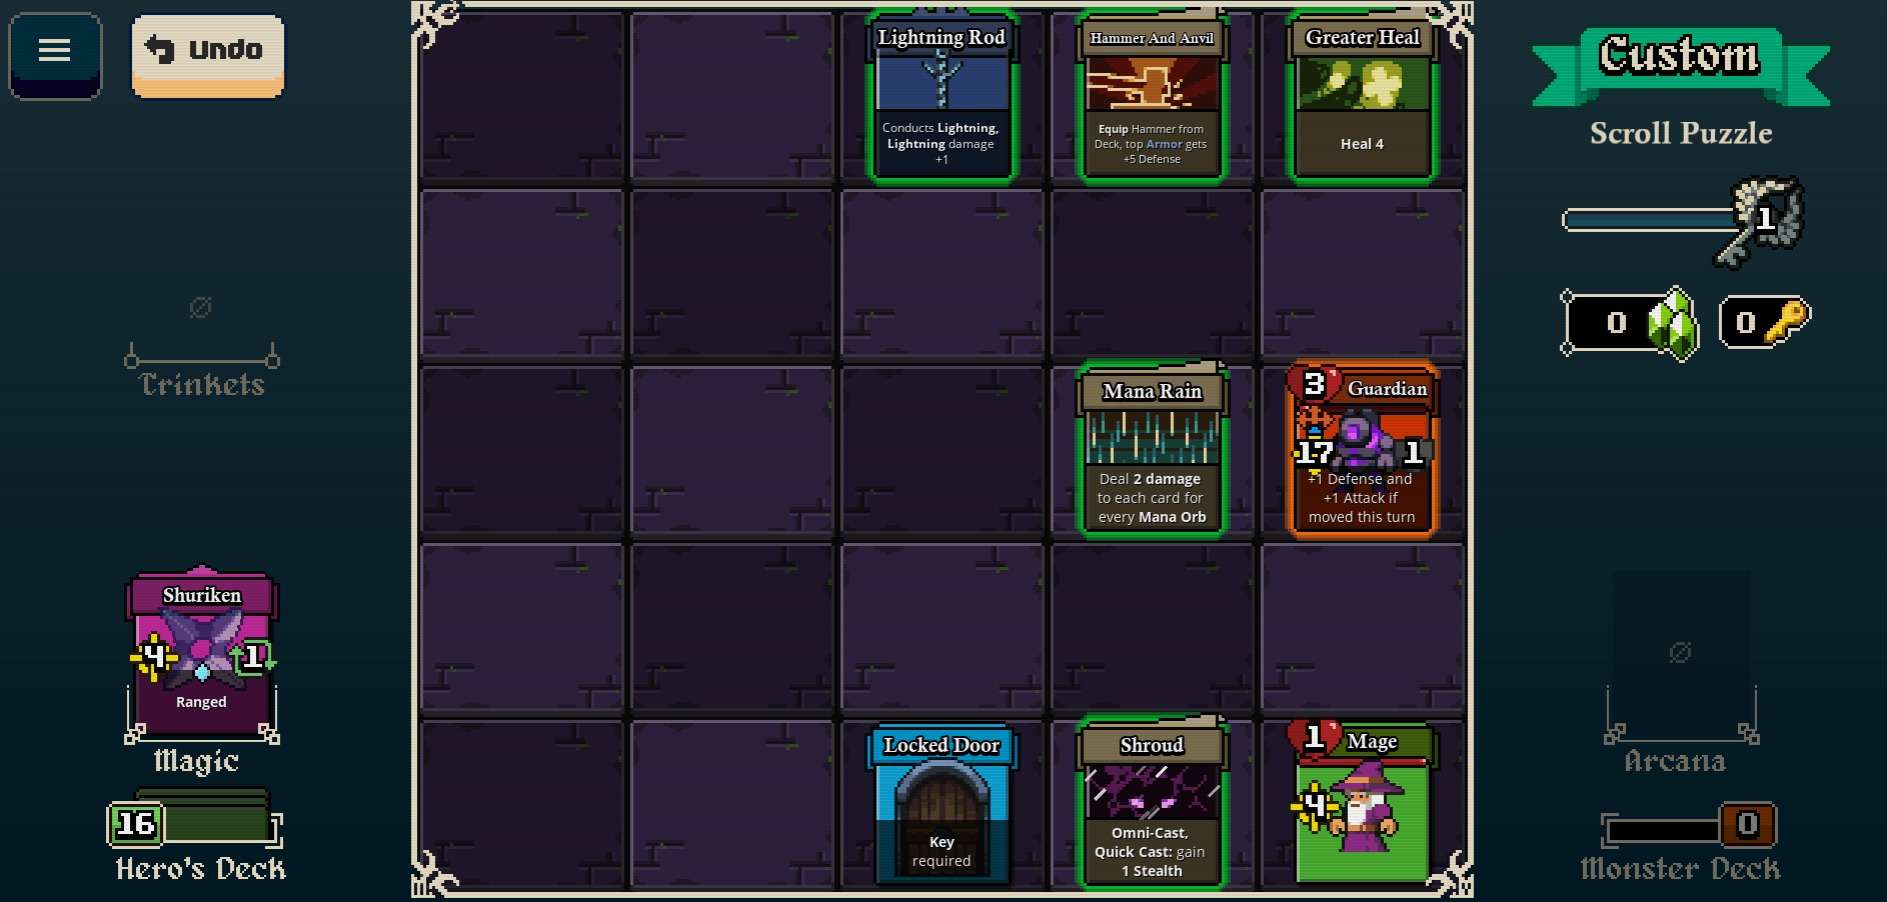
Scroll Puzzle
- Hint 1: Shroud has omnicast and quick, so it can be used at any time.
- Hint 2: Some of the scrolls, like atonement or greater heal, will never have any effect, so they are essentially illusory walls. Other scrolls, like shield slam or hammer and anvil, can be used without any effect, so choose wisely when using (or not using) them.
- Hint 3: You will not be able to use exert with ice shield, so do not try to. (It doesn’t reduce the block of the ice shield, in case you were wondering).
- Hint 4: Try to make the guardian stop as much as possible.
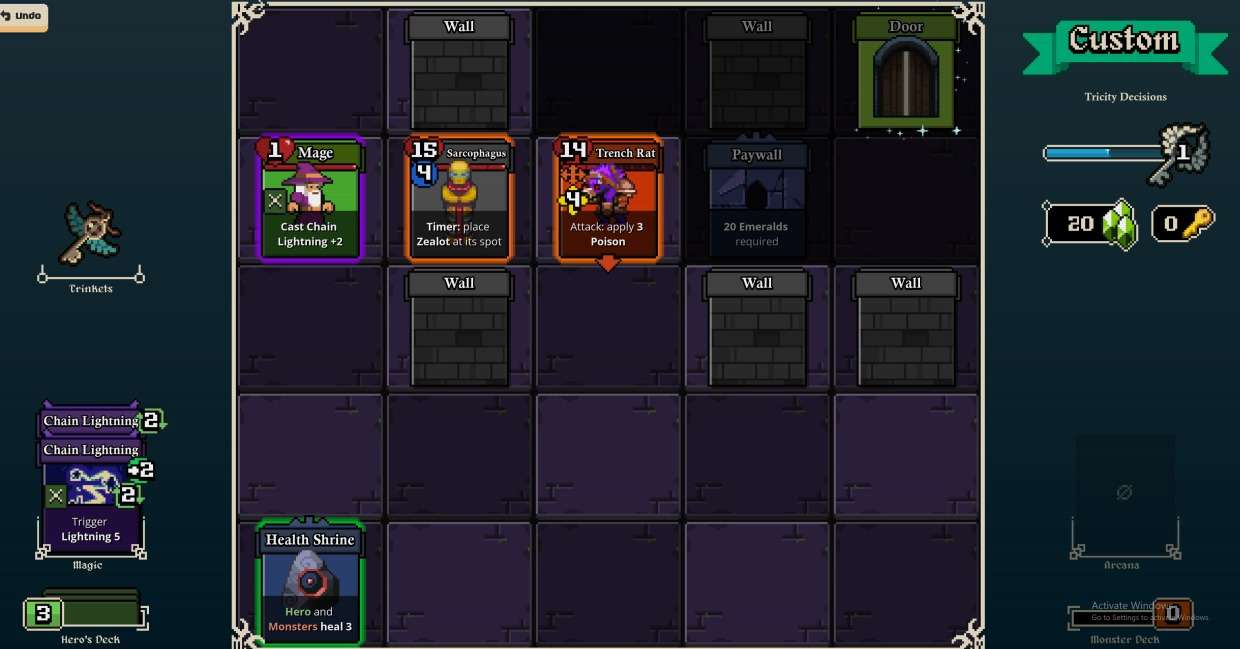
Tricity Decisions
- Hint 1: You will need to keep the bloody chest alive until the end to win, maybe find a way to not kill it instantly.
- Hint 2: Open the barred door.
- Hint 3: Don’t destroy the sarcophagus, and don’t hurt it either, but do hurt the zealot though you will need to survive one hit.
- Hint 4: Foresight is replaceable.
Forbidden Fruit
- Hint 1: The bottom right enemy should be revealed first and take 1 damage from the hidden dagger, 6 damage from the normal dagger, and the rest in poison.
- Hint 2: The top left enemy should be in a place where it cannot block movement or see the powder keg bow or the fencing rapier.
- Hint 3: The top right enemy doesn’t need to be hit until you equip the fencing rapier.
- Hint 4: The bottom left enemy should die to the powder keg bow and only the powder keg bow.
Not really a hint, but playing this level perfectly efficiently allows you to not use the normal rapier and the kunai, I think.
Forbidden Fruit 2:
- Hint 1: Equip the whip before the plague doctor’s cape, because bandits can jump through cards.
- Hint 2: You will need to use 4 hidden dagger usages on the top left bandit, 1 on the bottom right, and 1 on the top right.
- Hint 3: The quick dagger can kill the bottom right enemy.
- Hint 4: The normal rapier will be used to kill the top right enemy.
Be the first to comment