
Valby Guide
By Reeto.
Valby is a great beginner descendant to pick up as she can crowd control (CC) mobs and deal dot (damage over-time) that stacks on enemies when chaining her skills with ease. Overall, very fun playstyle and excels in every aspect of PvE in this game if built properly.
Supply Moisture
Before we go over our builds I want to preface that these builds need a Descendant module in order for her to do optimal DPS on her skills and weapons. That module being Supply Moisture.
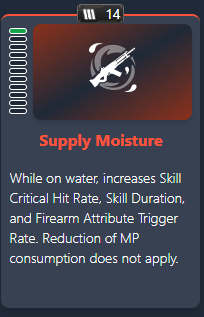
This is vital to her since on description, you’re thinking it only applies skill base Critical Rate but it also boosts your weapons base Critical Rate.
It gives your weapons and skills a +20% base critical rate while you’re in your puddles of water you’re stacking. How you’ll know this buff is applied is when your Supply Moisture icon next to your skills on the right hand side is lit up in a blue swirling color.
This makes running critical rate/damage on MLGS and SMGs more viable. As this also makes running skill critical rate/damage on Valby worthwhile since without Supply Moisture, Valby’s skill base Critical Rate is at 5% which isn’t that great.
Where to Farm for Supply Moisture?
The best option on farming this module is going to the Void Fusion Reactor – Fortress Frozen Valley that’s in the Frozen Valley on normal difficulty since It costs 12 Polymer and 3 Organic shards. On hard difficulty it costs 37 Polymer and 8 Organic shards.
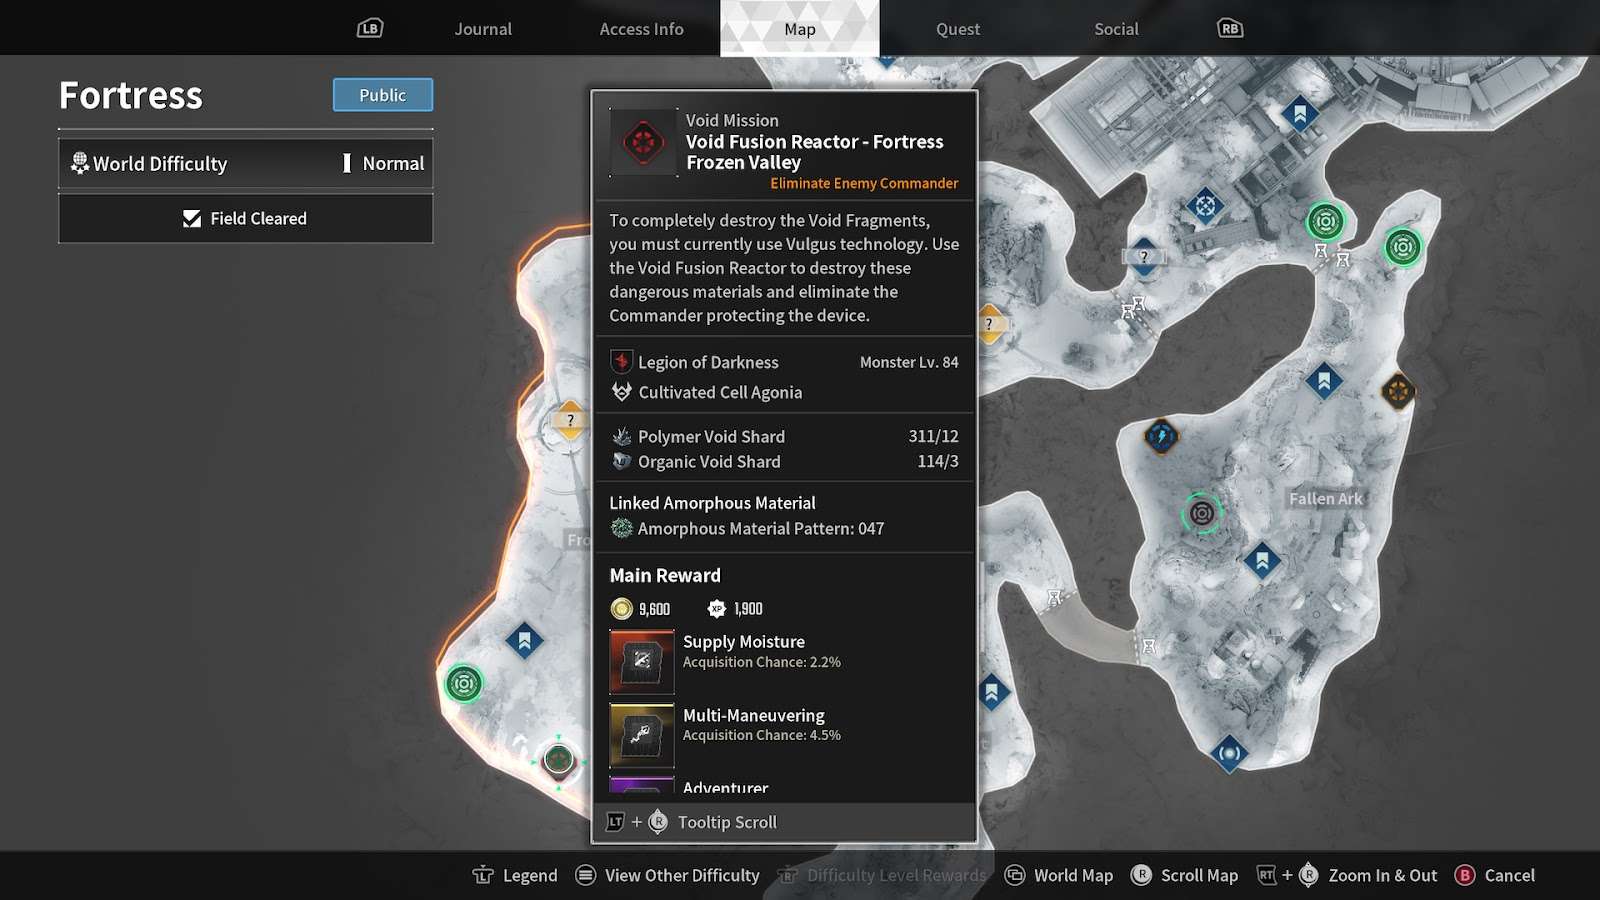
It’s a main reward with a 2.3% chance on normal vs a 2.5% chance on hard. It’s more efficient to stick to farming this on normal difficulty since you’ll get more runs by consuming less materials and kill the boss much quicker. The added .2% isn’t worth running it on hard.
For the materials, you’ll need Polymer and Organic shards from Void fragment missions. You want to go to hard difficulty for this since it’ll drop more quantity of shards at the end of the mission. It’s best to do this with Viessa since there’s a chill void fragment in the Frozen Valley that rewards you with 19 Polymer and 4 Organic shards.

Energy Activator, Catalysts & Weapons
For Energy activators, you’ll need one for the weapon and for Valby.
As for Crystallization Catalysts, you won’t need any in her Desdecent modules but you will need 6 on the Thunder Cage (my primary weapon of choice).
The ideal weapon for mobbing, hard dungeons and Intercept bosses is going to be Thunder Cage. In my opinion, this is her best gun in any situation since it compliments her Laundry de-buff perfectly. The de-buff gives a –20% non-attribute and electric resistance when enemies are in your puddles of water. Thundercage at a level 1 passive gives a 70% chance to proc a AOE shockbolt upon defeating an enemy. Your other weapons aren’t as important since you’ll be using them when you run out of ammo. I’d suggest going for Nazesitra’s Devotion, an impact weapon and Piercing Light for your heavy weapon.
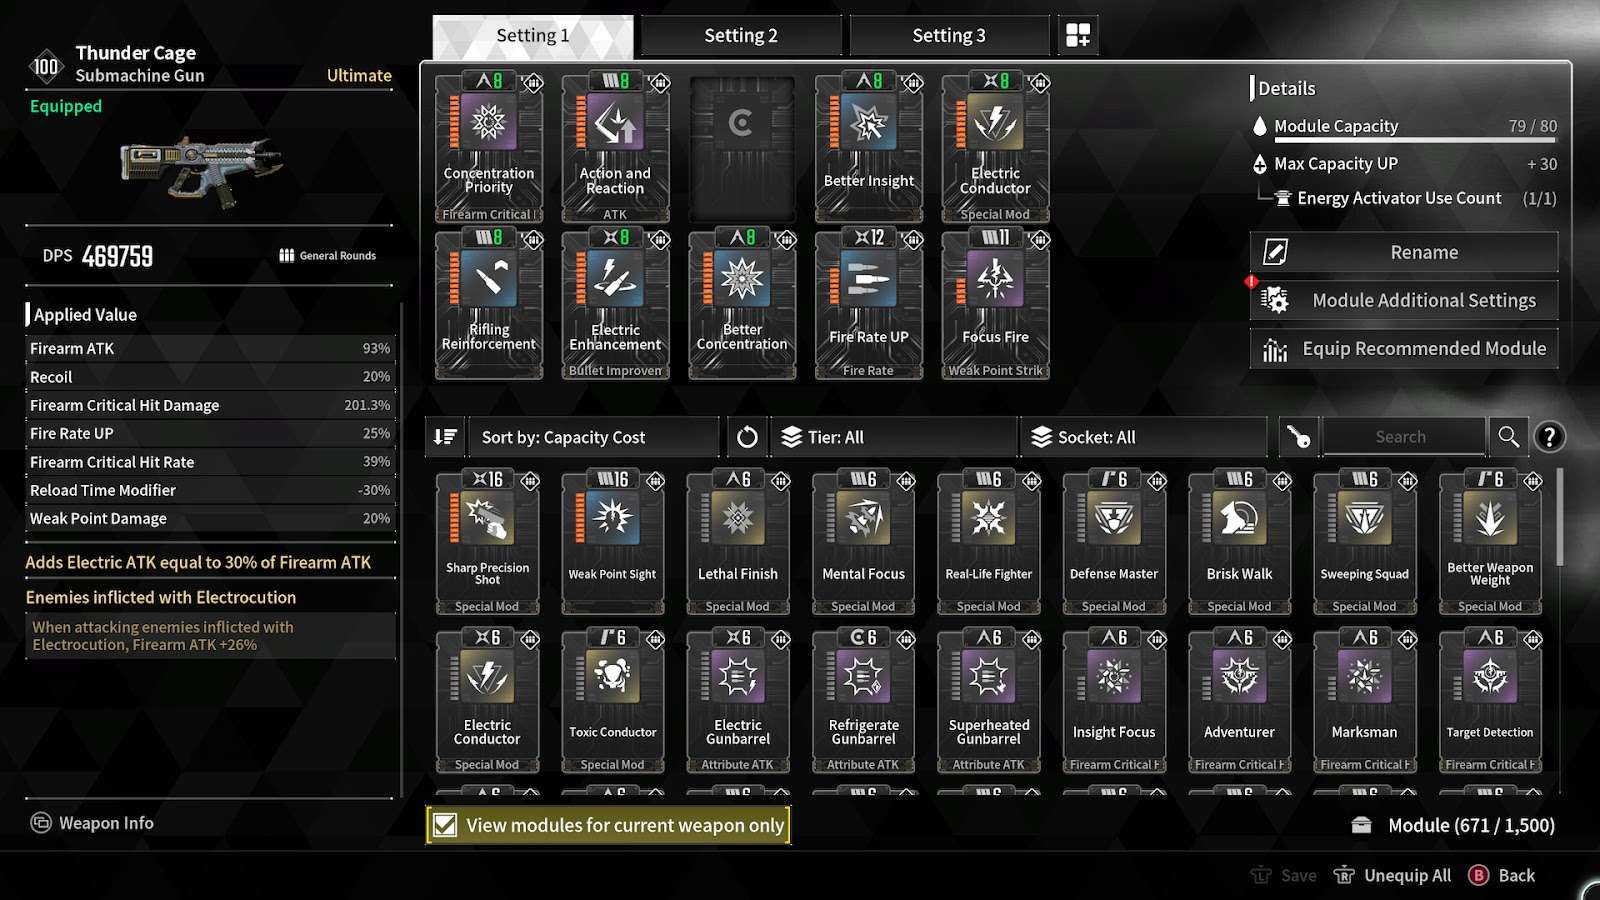
Thunder Cage comes with 2 Module Socket types, Cerulean and Malachite. You will need to use 6 Crystallization Catalysts as I mentioned before to have it the way I do. Focus on adding module socket types to the ones that take 16-15 capacity slots.
- Concentration Priority – Firearm Critical Hit Damage +120%, Reload Timer Modifier -30%
- Action and Reaction – Firearm ATK +61%, Recoil +20%
- Better Insight – Firearm Critical Rate +39%
- Electric Conductor – When attacking enemies inflicted with Electrocution, Firearm ATK +26%
- Rifling Reinforcement – Firearm ATK 32%
- Electric Enhancement – Add Electric ATK equal to 30% Firearm ATK
- Better Concentration – Firearm Critical Hit Damage +74.8%
- Fire Rate UP – Fire Rate +25%
- Focus Fire – Weak Point Damage +20%, Firearm Critical Hit Damage +6.5%
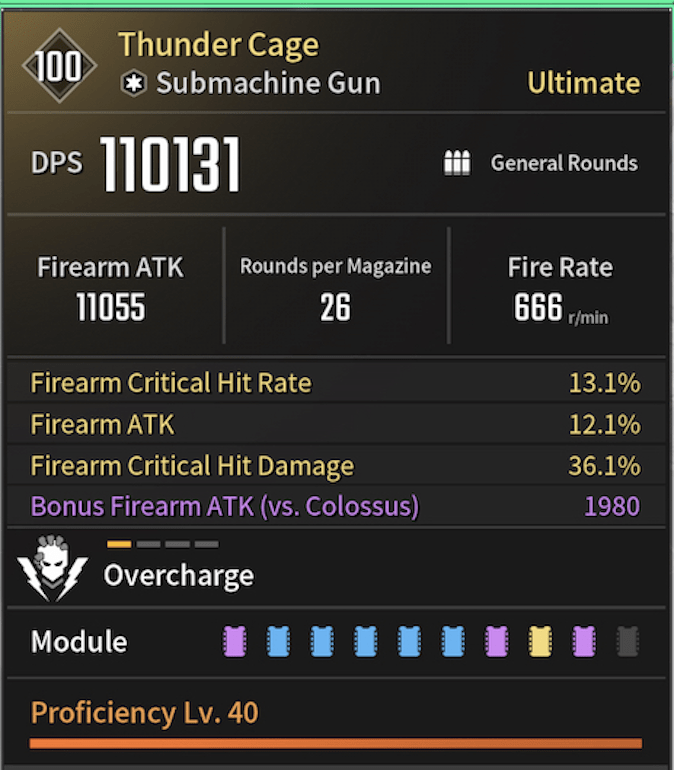
As for the sub-stats, you want to prioritize as followed.
Firearm ATK > Firearm Critical Rate > Firearm Critical Damage
For your fourth slot, it can be a mix of 3 things:
- Electric ATK – will compliment the Thunder Cage build by having more electric ATK. This will let you run the Electric Priority module to boost the stat even more.
- Bonus Firearm ATK (vs. Colossus) – If you plan to run Intercept bosses more often then this is a solid choice for extra DPS.
- Weak point damage – this is okay but Thundercage already has a low base weak point damage multiplier (1.1%) so it’s not adding as much value and the build I have, we aren’t heavily prioritizing weak point damage.
Reactors and External Components
For your Reactor, go for an Ultimate reactor that focuses on the Thunder Cage. If not then settle for a rare reactor that gives skill power when equipping a SMG. As for the type of reactor, Materialized Phase if you use your 2 and 3 more or Materialized Mixture if you use your 1 and 4 more. With Ultimate Valby around the corner, it’s best to get both in case.
The most important sub-stat is Non-Attribute Skill Power Boost Ratio. You want that in purple or gold. As for your second sub-stat, it can be either Skill Cooldown/Range/Cost or more Power Boost Ratio to either Fusion or Dimensional.
Skill Critical Damage/Rate – Is the best second sub-stat for the Skill Critical build I’ll go over in Builds.

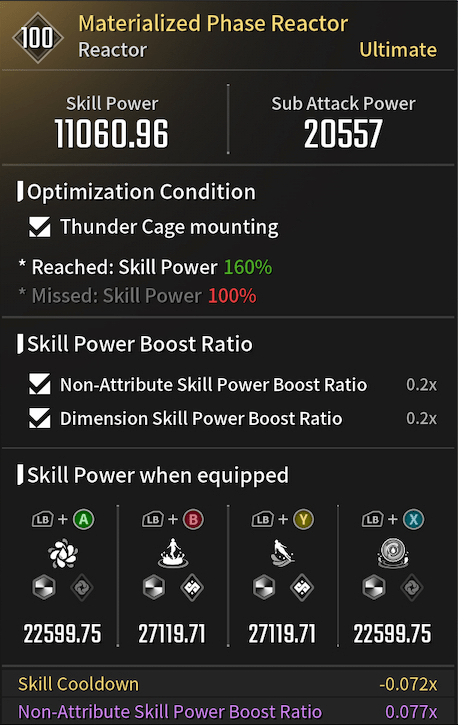
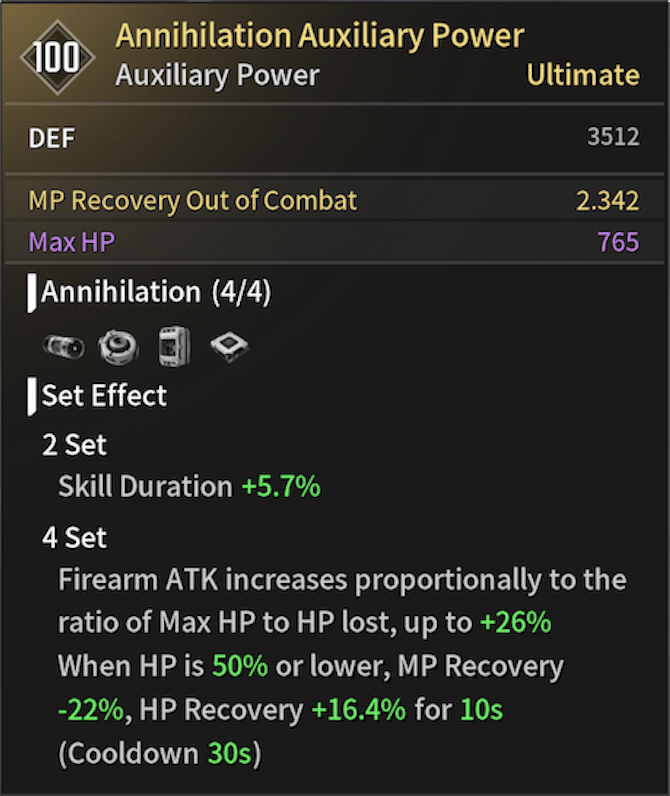
As for your external components, go for the Devour set which can be obtained by farming him on hard difficulty. It’s the best one for Valby since it gives Skill duration +5.7% on a 2 set and Firearm ATK on a 4 set.
As for the sub-stats, the ones that matter most are on the Auxiliary power and Memory component.
On the Memory:
- DEF – gold or purple (priority)
- MP recovery
On the Auxiliary Power:
- Max HP – gold or purple (priority)
- MP recovery out of combat

Builds
HP Sustain
- Supply Moisture – mentioned before on the Supply Moisture segment
- Time Distribution – Skill Cooldown -14.3%, Max HP +52.4%
- HP Collector – When defeating an enemy, instantly recovers 9% of Max HP (Cooldown 2s)
- Nimble Fingers – Skill Cooldown -25.6%
- HP Amplification – Max HP + , Max Shield –
- Shock Punch or Maneuvering Hook of your choice – Increases module capacity +10
- Increased HP – Max HP +218.5%
- Increased DEF – +160.4%
This build is focused on hard dungeons to keep Valby on her feet as long as possible. We have HP, DEF & some CD reduction so we have our skills up faster to keep applying our Laundry de-buff and Supply Moisture. Having HP Collector is crucial since we’ll have a hefty amount of HP to make the most use of it.
Colossus
This build is focused on Intercept bosses known as Colossus. It’s similar to the HP sustain build but with some differences. As you can see, we have a good amount of module capacity left. This is where you as a player can fit in whatever you feel will help out on the Colossus run. Some of the modules i’d recommend will be
- Absolute Curse – Upon Colossal Part removal, inflicts Dispel which removes buffs on them
- Antifreeze Solution – Frostbite Immunity, Chill resistance +7% (good for Deadbride or Frost Walker)
- Heat Release – Burn Immunity, Fire resistance +7% (good for Pyromaniac and Molten Walker)
- Insulated Conductor – Electrocution Immunity, Electric resistance +7% (good for Executioner)
- Perfect Antivenom – Poison Immunity, Toxin resistance +7% (good for Devourer, Swamp Walker and Obstructor)
Skill Critical
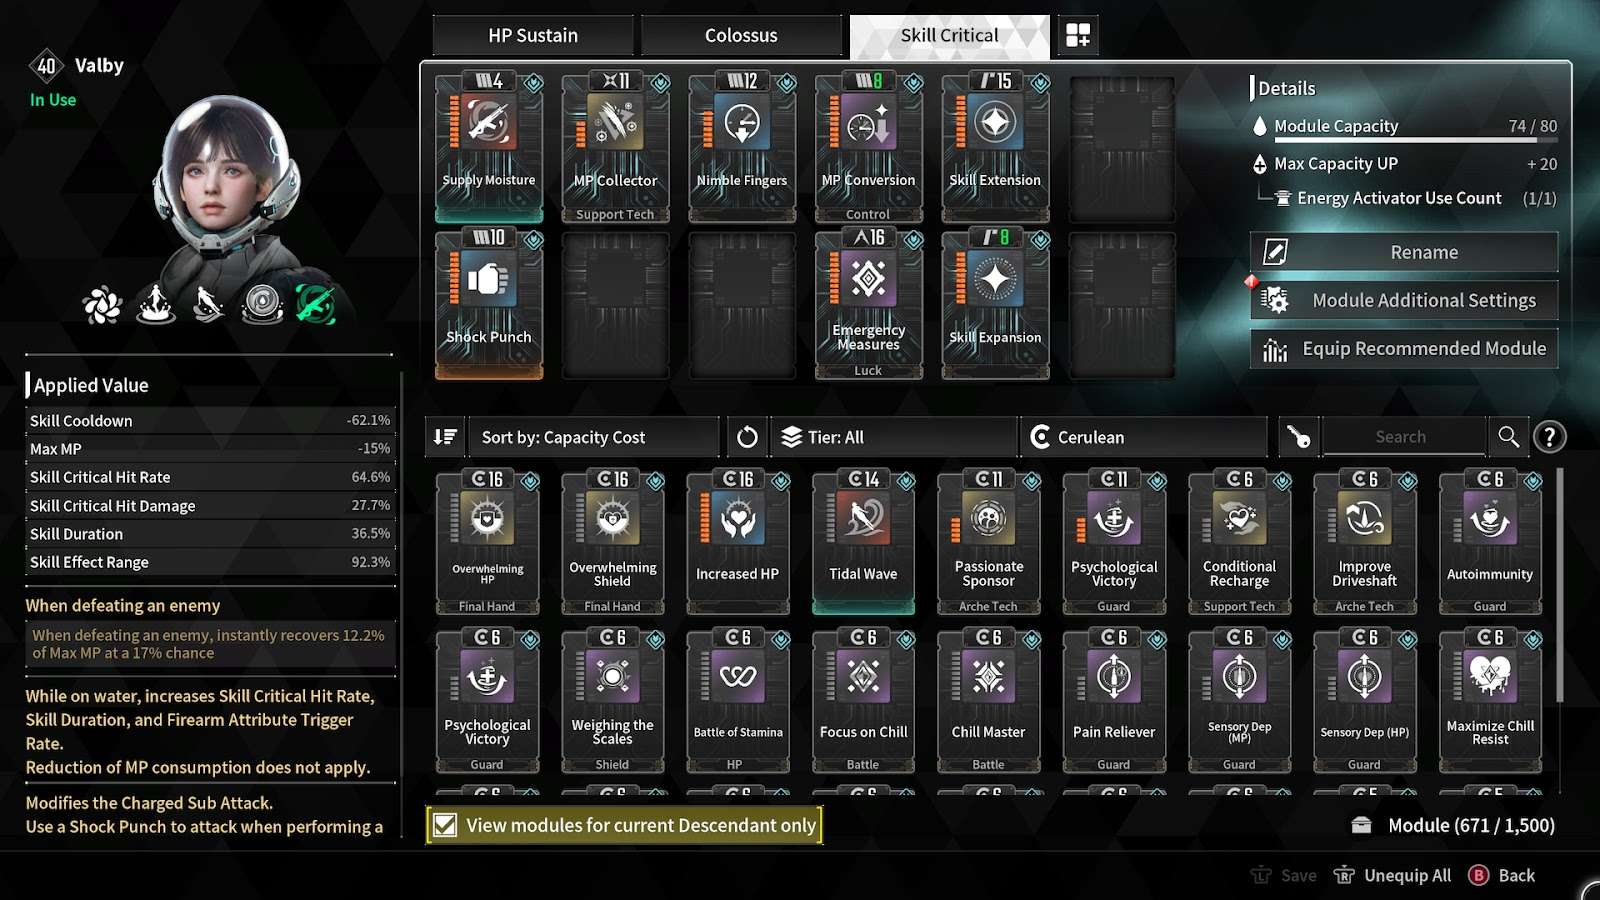
- Supply Moisture – mentioned before on the Supply Moisture segment
- MP Collector – When defeating an enemy, instantly recovers 12.2% of Max MP at a 17.7% chance
- Nimble Fingers – Skill Cooldown -25.6%
- MP Conversion – Skill Cooldown -36.5%, Max MP -15%
- Skill Extension – Skill Duration +36.5%
- Shock Punch or Maneuvering Hook of your choice – Increases module capacity +10
- Emergency Measures – Skill Critical Rate +64.6%, Skill Critical Damage +27.7%
- Skill Expansion – Skill Effect Range +92.3%
This build is focused on mob farming, void fragment missions, and easy monster missions. Your skills will have longer durations with more range to easily apply your dot damage. We added some Skill Critical rate for more consistency in our crits for faster kills. MP collector will help keep our mana up at all times. The only down-side is you’ll be squishy so be mindful of your surroundings and don’t play so recklessly.
I appreciate your time and hope this little tutorial was helpful.


Be the first to comment