
A quick guide to using beacons and getting much more value from your maps.
A Newbie’s Guide to Beacons
Introduction
NGU Industries features beacons, which can provide powerful stat boosts to your tiles’ productivity, speed, and efficiency. When placed intelligently, beacons can easily double the overall effectiveness of your maps.
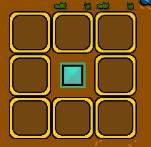
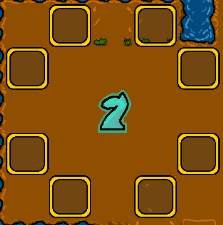
Early game, there are six different beacons you can use. Each beacon will hit 8 surrounding tiles, though in different arrangements. Boxes hit the 8 surrounding squares. Knights hit all the spaces a knight piece in chess could move to.
Blue beacons boost speed. Blue boxes boost speed by 40% and blue knights boost speed by 35%, meaning all things being equal, blue boxes should be preferred over blue knights. Multiple blue beacons on the same tile stack additively, meaning a blue box and a blue knight hitting the same tile would cause speed to be multiplied by (1+(.4+.35))=1.75. This means adding a second blue beacon provides a slightly smaller benefit than the first blue beacon does. Blue beacons are also subject to a speed cap, which is different for each factory. Once a factory is at its speed cap, additional speed boosts are wasted on the factory.
Purple beacons boost productivity. Purple boxes boost productivity by 30% and purple knights boost productivity by 35%, meaning all things being equal, purple knights should be preferred over purple boxes. Multiple purple beacons on the same tile stack additively, meaning a purple box and a purple knight hitting the same tile would cause productivity to be multiplied by (1+(.3+.35))=1.65. This means adding a second purple beacon provides a slightly smaller benefit than the first purple beacon does. While purple beacons are not subject to a cap like blue beacons, purple beacons are subject to breakpoints, particularly for new tiers of factories or juices. This means if you have a factory that only produces 1 item per bar fill, you’ll need to raise the productivity multiplier to a total of at least 2 in order to see an actual difference in productivity.
Blue and purple beacons work together multiplicatively. For example, a blue box and a purple box affecting the same factory (assuming it’s not speed capped) would multiply overall production by 1.4*1.3=1.82. It’s for this reason that you’ll generally be better off alternating speed and productivity tiles throughout your maps, assuming your factories are not either speed capped or at a very low base productivity.
Yellow beacons boost efficiency. Yellow boxes boost efficiency by 15% (costs x0.85) and yellow knights boost efficiency by 13% (costs x0.87), meaning all things being equal, yellow boxes should be preferred over yellow knights. These beacons are highly underrated because they are the games’ best solution for the higher tiers of factories/juice that otherwise demand ludicrous amounts of tier 1 factories. However, for low output factories, efficiency beacons are subject to breakpoints and effectively cap at a minimum cost of 1 per ingredient. These limitations effectively disappear pretty quickly, though, once you get the production multiplier of a factory to >10x.
Yellow beacons stack multiplicatively. N yellow box beacons would reduce costs to 0.85^N of the original cost. This effectively means there are diminishing returns on their effectiveness. A hypothetical factory being hit by 8 yellow box beacons and 8 yellow knight beacons would have costs reduced to 8.9% [(0.85^8) * (0.87^8)] of their original costs. Yellow beacons also apply multiplicatively against any base efficiency improvements for a given factory/tier.
Yellow beacons are uniquely excellent for the highest tier of factories, due to the way that ingredients tend to multiply down the chain, resulting in very high demand on your earliest tiers. With yellow beacons, you’re effectively realizing the efficiency gain for each step in the production chain prior to the factory being affected. As such, small efficiency gains on items like flesh rockets can add up to considerable reduction on items like cardboard/glue tiles. You’ll see an example of this in action later.
Beacon Layout Principles
There exists a saying, “Perfect is the enemy of good”. This saying has never been more applicable than with NGU Industries. Even the world’s best supercomputer isn’t going to be able to calculate the theoretically optimal beacon layout until long after the heat death of the universe. Fortunately, the difference between a perfect beacon layout and a “good enough” beacon layout made by your brain is pretty small, likely a <5% difference in overall map productivity . Therefore, I suggest reading these principles and figuring out for yourself a “good enough” layout that makes you happiest and then not sweating the details (unless you enjoy it).
Blue and Purple beacons should be placed such that they affect 4+ factories.
Blue Beacons and Purple Knights can justify being placed if they only affect 3 tiles, but that’s only if they’re the only beacon of that type affecting all three squares (and it only provides a marginal gain over another factory).
For blue (speed) beacons, do not count any factories that are speed capped.
Blue and Purple beacons should never hit only 1 or 2 factories.
You’re better off building another factory in that spot instead.
A mix of Blue and Purple beacons provides the highest output per second.
As described above, beacons of the same color are additive. Beacons of different colors are multiplicative (which in this case means they are better).
If you find yourself bottlenecked by a single factory or tier, use Yellow beacons.
The further up the production chain you place the efficiency beacons, the more effective their use is. For example, if you’re struggling to make tier 4 think juice, then using efficiency beacons not just on the tier 4 think juice, but on the rocket ship, fuel, and computer chip ingredients will greatly reduce the number of tier 1 and tier 2 tiles you’ll ultimately need to place.
Sometimes, no beacon is optimal.
If you have a factory that is massively overproducing relative to demand (e.g., steel), then it may make sense not to place any beacon next to it. Overproducing factories can sometimes exacerbate problems further down the chain. However, if it’s not actually causing problems, consider that you can always save the extra for a work order, or throw it into the pit.
If you just keep these principles in mind, you’re already 90% of the way there.
Layout Approaches
What does this look like in practice? There are two general layout strategies. There’s the striped approach, using primarily box beacons, and the checkered approach, using primarily knight beacons. I’ll cover both, using the Tutorial Map as an example.
Once you have an arrangement you like, I suggest saving it as a blueprint.
The striped approach is simple to design and can be used almost right out the gate. You can do horizontal or vertical stripes – doesn’t really matter much.
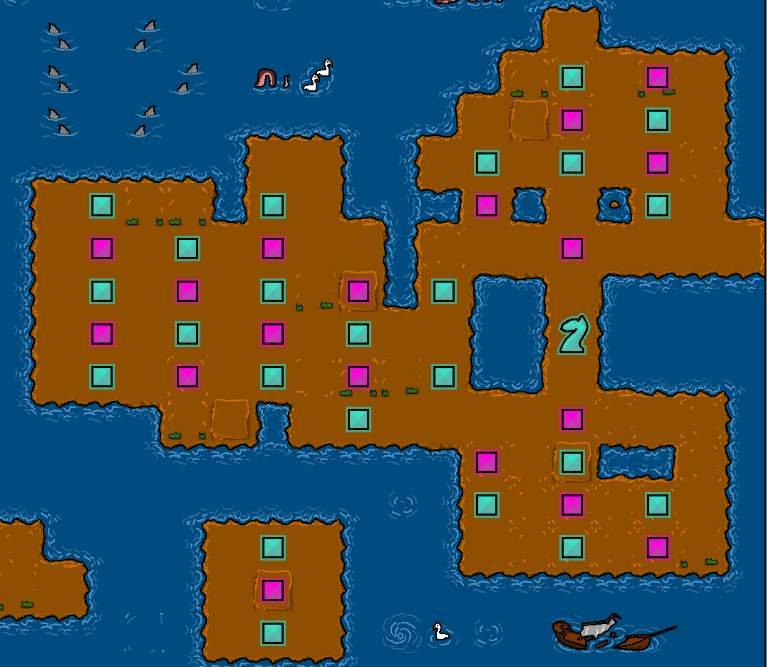
The advantage of this approach is that it’s very quick and easy to lay down and very simple to understand. You can easily fill in rows by clicking and dragging. Modifications are simple, too. If some of your factories are speed capped, then you can always simply replace the blue beacons in the relevant portions of the map with purple beacons. If you’re working on higher tier materials, then you can swap out the purple beacons for yellow efficiency beacons.
As you can see from the map, though, a single, unbroken striped pattern may not be appropriate across the whole map. The stripes on the left side of the map are staggered from the stripes on the right side. You’ll find this may happen around edges and other weird spots when you review your beacons against the layout principles in the previous section.
You’ll notice a solitary knight piece on the right side. While the striped approach largely uses boxes, this is a good example of where a knight piece fits in well. But, if you decide you’d rather simply ignore the knight pieces, it won’t make much difference overall.
The checkered approach is more complicated, but is the only approach that allows the knight beacons to become widely viable.

This approach is essentially reliant on the fact that if you place knights in a diagonal, checkered pattern, knight beacons will never hit other knight beacons. The upside is that this lets you eke a bit more out of tiles that can’t be effectively hit with just boxes (since the box beacons in the striped approach are wasting some of their 8-slot potential by hitting other box beacons). The downside of this approach is that it slows down factory placement, as you have to click each space manually. It’s also harder to tell at a glance which tiles are being affected by which beacons.
As with the striped approach, colors can easily be swapped. If you’re speed capped, you can swap blue knights for purple knights. You can also replace knights with boxes, if you’re trying to squeeze a bit more out of the surrounding tiles (at the expense of the tiles the knight would have otherwise hit). There may also be situations where a blue box would be a better fit than a blue knight, due to the slight improvement in speed bonus.
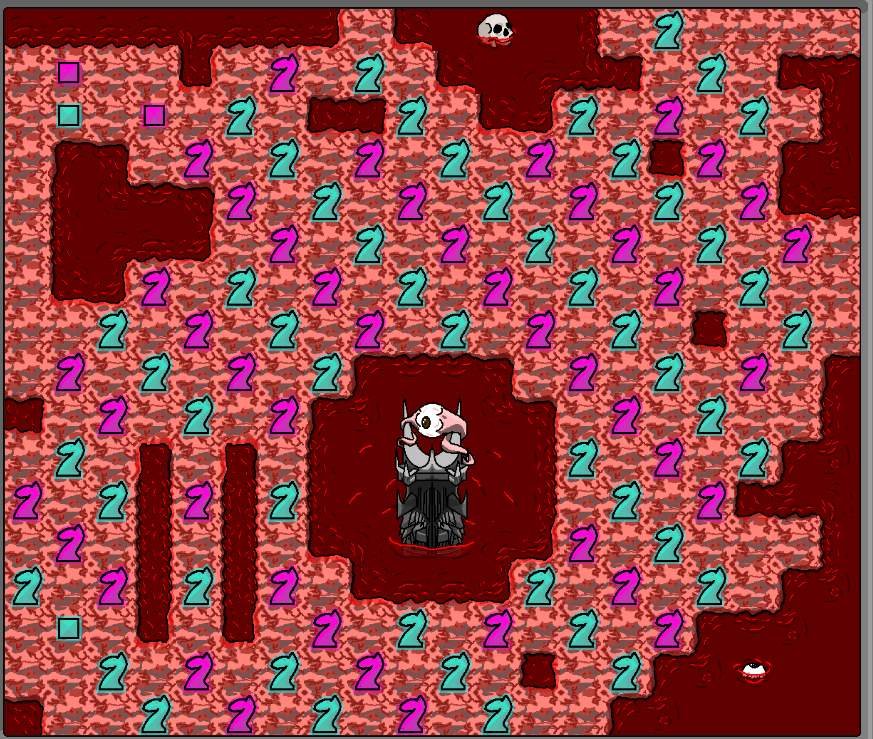
High-Tier Factory Tactic
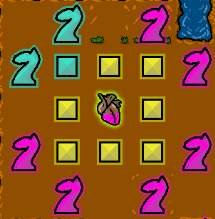
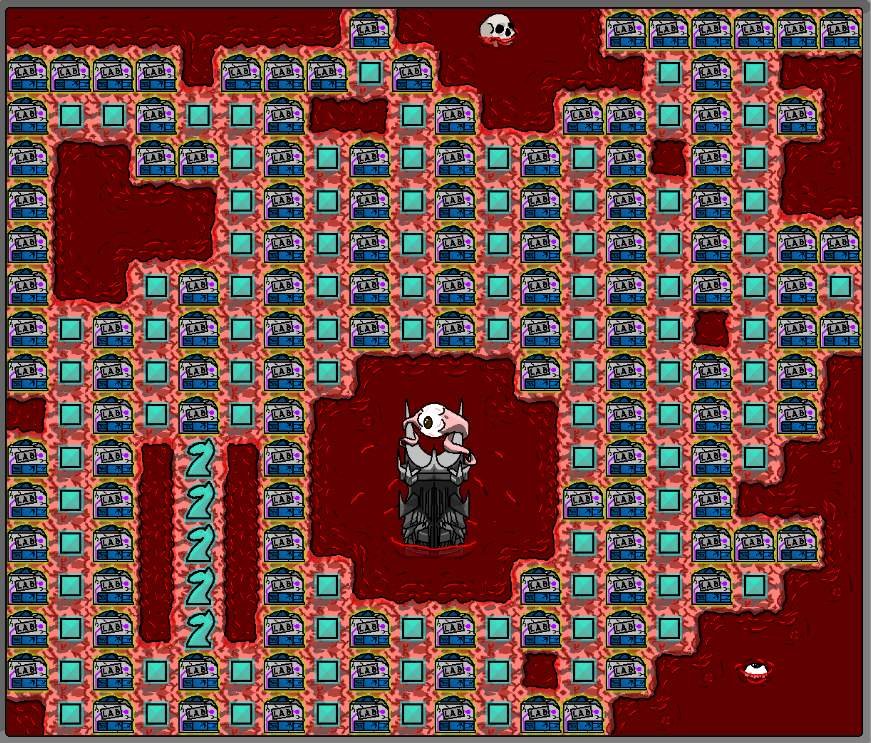
The high-tier factory tactic shown here is specifically designed for high-level materials that still have a base multiplier of 1x and have very demanding ingredients. For example, tier 4 flesh juice just after unlocking it. This approach maximizes the output of a single tile while minimizing the input costs, which saves a considerable number of tiles down the road when you’d otherwise be filling up a map with nothing but cardboard and glue ore to fuel a single juice factory.
What this does: the purple knights multiply the production and costs per bar fill by 3x (or, 1+(.35*6)=3.1, rounded down to 3). The seven yellow beacons cut the costs by one-third (or, .85^7=0.32). So with just those beacons, you are getting three times the output for the cost of one. The (optional) speed beacons multiply the tile output and costs by another 2.15x, helping to maximize its output – you can drop them if you need to throttle down the production, or if you’re trying to fit this arrangement into a tighter place. Do not place additional copies of your target factory outside this arrangement (until you have better stats/more space), as that essentially undoes the efficiency gains.
This tactic has the not-immediately obvious benefit of saving you a TON of materials as the ingredients trickle down the production chain, especially if paired with efficiency beacons on the higher-tiered ingredients. The more steps in the factory chain, the better it is.
The efficacy of this tactic drops off as production stats improve. Once you can sustain each of the necessary ingredients with just a single factory or two, there’s little point to using this tactic, and you’re better off using one of the standard approaches.
Sample Beacon Layouts
Map 1 Throughput Layout
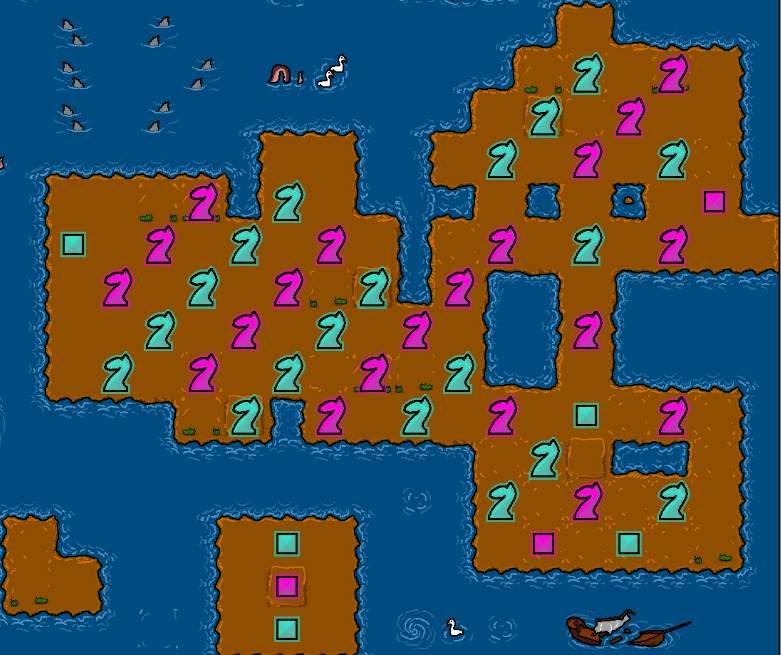
If you’re putting down speed-capped factories, then replace the blue beacons with purple beacons as needed.
Instead of alternating the colors diagonally, as I’ve done here, you can also alternate colors by rows or columns, if that’s more aesthetically pleasing to you (It makes little difference for overall throughput).
Map 1 Labs Layout
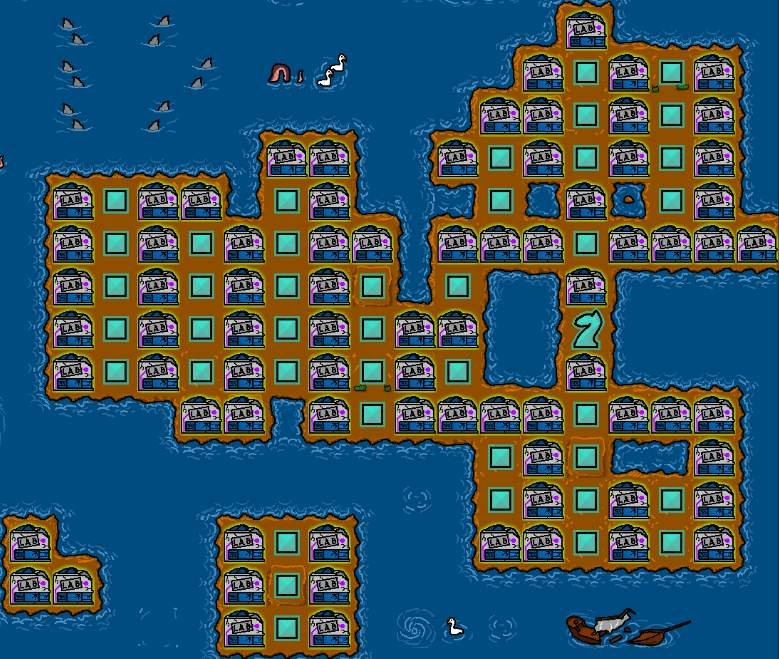
Labs (unlocked around Map 3) benefit from blue beacons and do not benefit from purple or yellow beacons. Since blue boxes are slightly superior to blue knights, labs should use a striped approach.
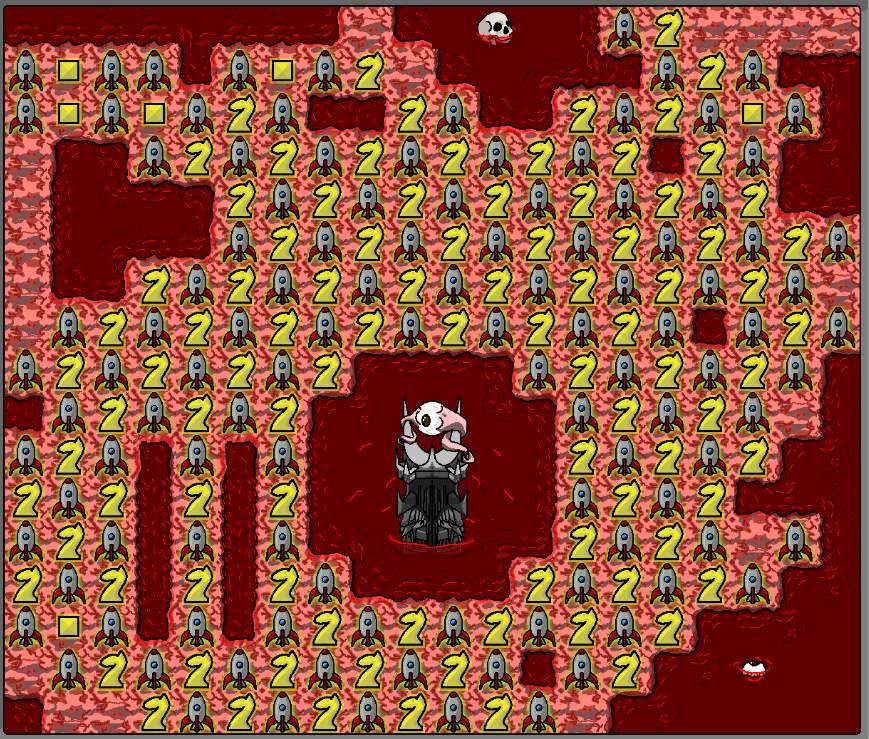
Map 1 Efficiency Layout
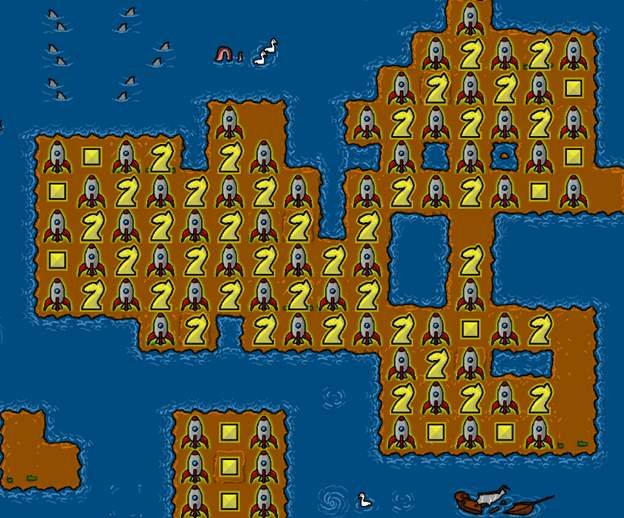
Generally, if you’re building for efficiency, you’re not really worried about productivity or speed (with some exceptions for low productivity/cost factories as described in the high-tier factory tactic).
That said, here is a build that has all tiles marked with a rocket with an efficiency of 70% or better (with some of the central tiles getting down to ~32%). While box beacons provide a stronger boost per affected factory, they’re generally unable to hit as many factories as a knight, and so knights are preferred whenever they can hit more tiles than a comparable box..
Blank tiles in the screenshot above are not getting good efficiency boosts and are better saved for factories that are otherwise overproducing what you need (e.g., steel).
Note that in my testing this setup is only marginally more efficient than a striped approach setup using yellow boxed beacons, which you may find easier to build and populate.
Map 2 Throughput Layout
Map 2 Labs Layout
Map 2 Efficiency Layout
Map 2 is much stronger than Map 1 for a widespread efficiency setup as shown here. All the tiles marked by rockets shown in the picture have better than 70% efficiency, particularly in the top-center open stretch. The average efficiency over all the indicated tiles is around 50%.
As with before, the tiles that are blank are not terribly efficient and I recommend you utilize them with factories that don’t gain much from efficiency.
Unlike Map 1 which is pretty constrained, there’s enough wide-open space on the top half of Map 2 for you to be able to use high-tier factory tactic described earlier.
Map 3 Throughput Layout
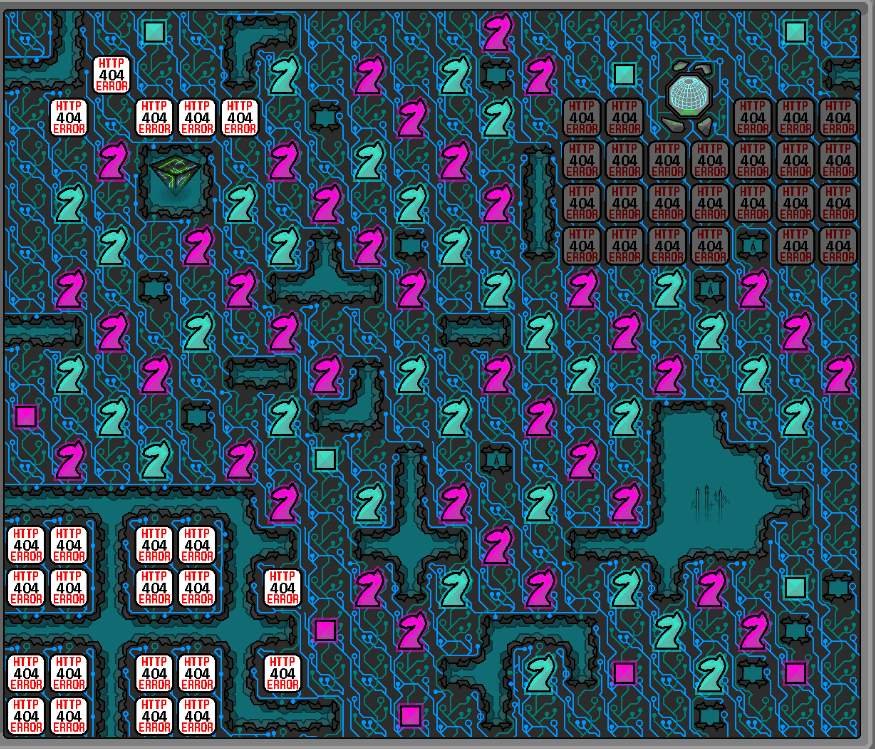
Map 3 is unlikely to ever be aesthetically pleasing to anyone due to all of its dead spots, but you have to admit there’s a lot of space.
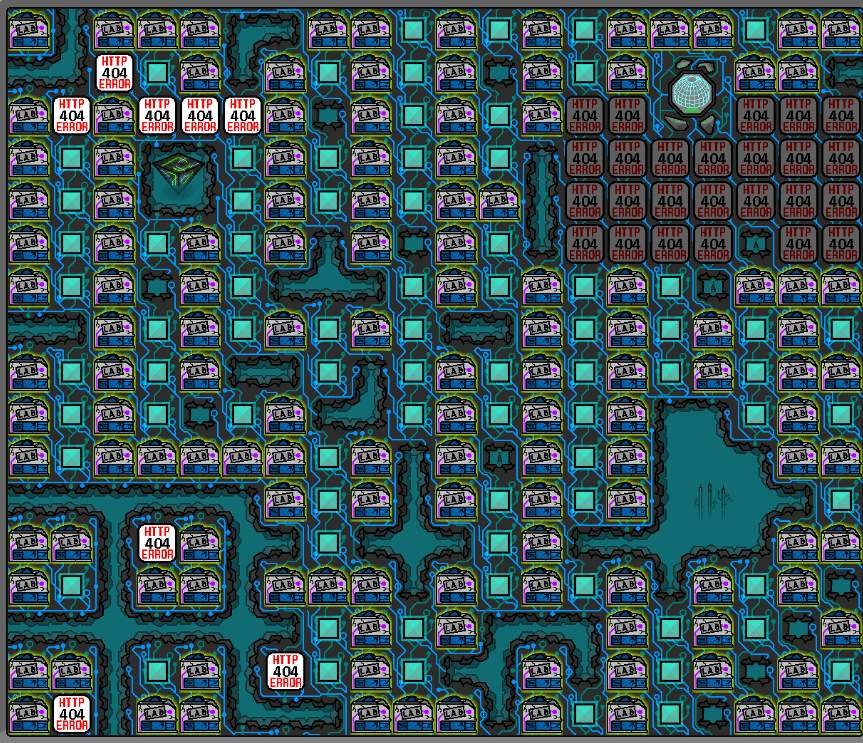
Map 3 Labs Layout
Map 3 Efficiency Layout
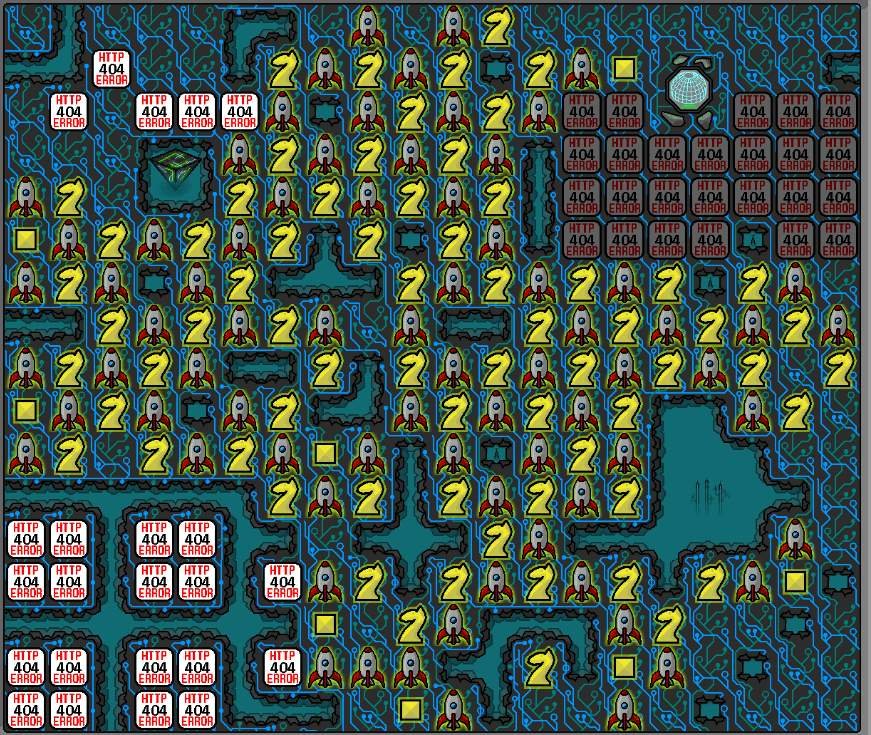
All the tiles marked by rockets shown in the picture have better than 70% efficiency.
As with before, the tiles that are blank are not terribly efficient and I recommend you utilize them with factories that don’t gain much from efficiency.
Map 3 is not as pretty as Map 1 or 2 for an efficiency setup, but has quite a lot of space.
Closing Thoughts
Your maps will be dramatically more effective with some basic beacon layouts. While the beacon layout that is truly optimal for your given situation or goal will vary, using the basic principles above and by adapting and customizing the sample layouts, you can get yourself “good enough” to meet your goals in a timely fashion. Remember, perfect is the enemy of good.
Be the first to comment