
How to Start
You enjoy this game and noticed some players might need help understanding the basics. You’re offering to explain the game’s mechanics in a different way to make it clearer for them.
It’s worth noting that this explanation focuses on the Standard game mode at the Reasonable and Forgiving difficulty settings. Keep in mind that Campaign missions and Endless mode have unique elements and will likely require different approaches.
Plan-et
First off, if you are having any trouble, make sure you are planning ahead at least a little bit. You cannot remove anything you build, including Slipways, so it’s important to not make hasty decisions.
- Understand Undo – Undo can be a powerful planning tool, since you can test out certain “constellations” (collections of linked planets), and reverse decisions if they don’t work out. However, taking any action that exposes new information, including Probing, connecting to Ruins, or looking at newly available Council Tasks will disable Undos.
- Probe or Plan – To help with the above, I’ve learned to play in two modes: Probing or Planning. I will usually probe all available pings in a certain area before thinking about what to build there next. And when I’m testing out a new constellation, I “keep my hands to myself” and don’t probe any pings exposed by newly built planets there, until I’m ready to commit to a buildout.
- See In Slipvision – Hold Alt or the Middle Mouse Button while hovering over a planet to see all potential Slipway connections and their transferred resources for that planet. I often use this to confirm whether a certain colony can be satisfied by another planet in range, or vice versa. And yes, it would be nice if there were a mode to keep this view on without holding down a button.
- Pin Plans – Instead of buliding and undoing, you can plan by “pinning” options of what to build on a planet, by right clicking it. This also pins potential connections like above, and then you can easily build the plans by clicking the pin.
Loopty Loop
To get a foothold on a new map, I usually plan out a Core Loop – a self-sustaining resource cycle – before building anything.
- Probe Everything – Information is key to enable planning. Just get it out of the way. Try to optimize for number of pings scanned for each probe to save money and time. You can ignore the hard-to-include pings on the very edge of visibility though, since one ping is usually not worth a whole probe, unless you’re really stuck.
- Keep It Steady – If you’re not into the dexterity minigame of the pulsating scan range, you can go into Settings and enable “Stable Probes”.
- The Core Loop – Now that we can see what we have to work with, get acquainted with the primary world types needed for Core Loop:
- A Colony – A People-producing world. These are, in rough order of desirability: Earthlikes, Oceans, Swamps, Jungles, Arctics, and Arids.
- A Farm – A Food-producing world to feed the Colonists. You can build farms on most of the above, as well as on Primordials.
- A Goods Factory – Colonies want Goods to be Successful. This will be a Forgeworld, or if you got the Aphorians’ Novelty Traders perk, a Remnant world.
- Everything Else – Anything necessary to supply the above with its other needs, usually enabled by the People from the colony world, or by Robots made at a Forgeworld or scavenged from a Remnant by People.
Employment for your Colonists, if they aren’t already occupied by one of the above. This is another requirement to reach Successful, and increases Happiness.
The particular planets and resources will be different each time you play. However, you should be able to set up a starting group of planets that can support themselves. This means that none of the planets in that group will be lacking necessary resources.
It’s not a big deal if one or two planets in your larger network end up struggling, especially when you are still learning the game. When you are planning how these planets will connect, just make sure that all the connections you want to make are actually possible, because the Slipways cannot overlap.
Also, you definitely do not need all of the above to get started, but each component helps.
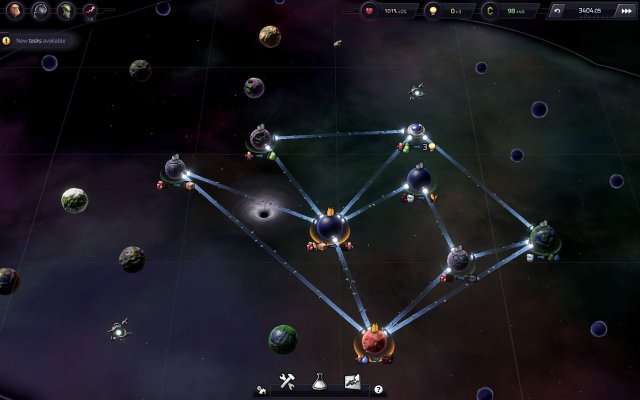
Here’s an example play-by-play from a completely random game I started up for illustrative purposes. It ended up working out extremely well – but I think this kind of start should be possible on most Reasonable maps.
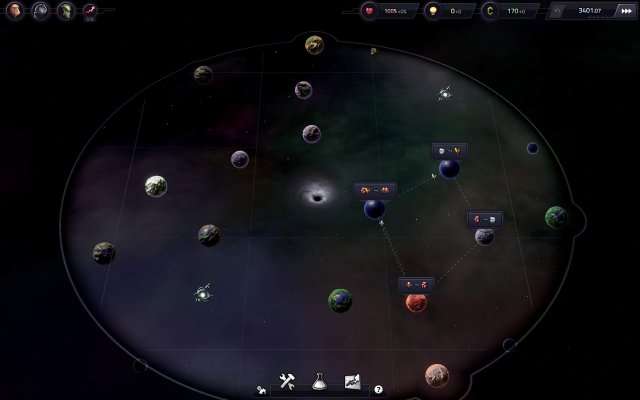
Planning out a Core Loop – maybe not the optimal one, but it seems strong.
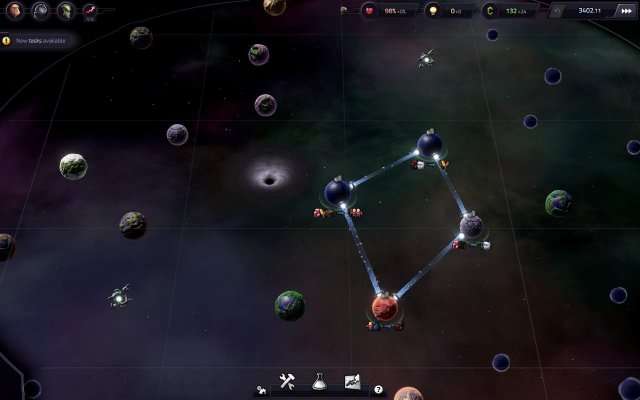
All Established, no-one left Struggling! But we can do even better. Also, with the planets built, we’re reminded of their secondary needs – more on those later. I might want to hook up the Ocean Farm with minerals from the bottom world – but there’s something I want to prioritize first.
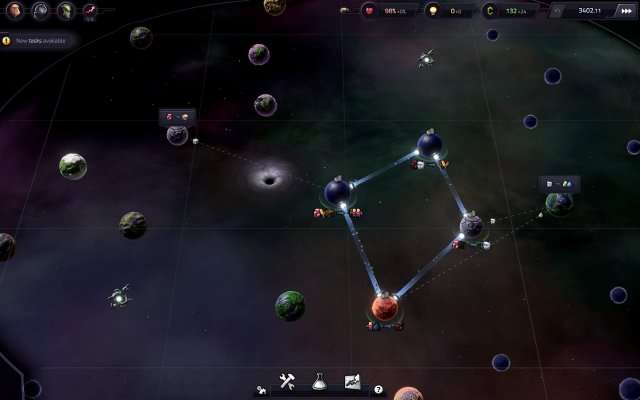
Planning the next move – the Colony has access to another Forgeworld that can produce Goods to ship to the Colony, but that will require a Mineral. My Mineral world would need some water to get to Successful and produce an extra resource, but I can get that from the Swamp on the right, enabled by the Robots next door.
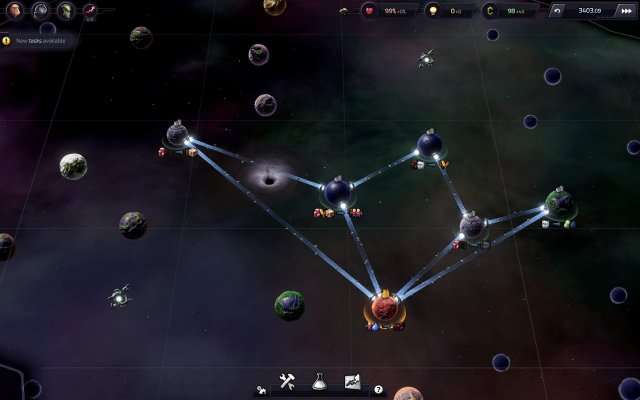
And in our Third year, we have an income of +45… not bad! With the Goods, you’d expect our Colonists to be happy and successful, but they aren’t… what’s missing? Employment! We’ll fix that in the next step.
Second Steps
After I have a good Core Loop going, one my next two steps might come in either order, or might be codependent: pursuing initial Council Tasks, and getting Research going.
- Early Bird – Check out the available Council Tasks literally ASAP. This is because many of them are very simple, and you might accidentally perform an action for your own goals that is being offered as a Task, and miss out knocking them both out in one go.
- Be Picky – Pick Tasks that seem easiest to fulfill given the current distribution of planets and what you’ve already built. The first few Tasks are usually an easy choice, especially if establishing a Lab is one of them.
- Build That Lab – Because Labs are structures hidden away in your build tab, rather than something you come across while building out planets, they’re easy to forget about when first starting out. But it’s important to get science going ASAP to prevent languishing on unlocking Tech and severely hampering the later game, so I’ve learned to try prioritizing it early.
- …Study Your Trash? – To establish a research lab this early, you want to look at your current Surplus – resources that aren’t being used already. If you have an extra Biomass or Water you’re not using, those are good choices for your first Lab. But don’t stop at a single resource – Labs are *much* more useful if you have even one more instance of that resource available. See if there are any good planets in range which can provide a second source, or maybe even another for a third, and look at what it would take to get them Established. Keep in mind that you need to get People to the lab as well, so keep all necessary paths clear. Holding Alt/MMB while placing the Lab is a good way to do this.
With a leftover Slime and some Primordial Planets nearby, we have our first Lab before our Fourth year is over! Now we’re reaping in 3 of those sweet, sweet lightbulbs. And if I can find a way to get People to that other Primordial world, I can pump out 2 more of them! It isn’t always this easy though – this might literally be my earliest-built Lab.
The Other Steps
After you have a solid core with a lab, you can start building out your network in a piecemeal fashion. But Where and Why and How?
All other things equal, I usually end up building toward my current Tasks. They provide a nice guideline when I have too many options to choose from.
But as another good guiding principle (which might sound trite; I prefer “meaning-dense”):
Make Connected Successful Planets
Try to make Established planets Successful. When building a new planet, plan how to get it to Successful, and if it can be linked to as many other Successful planets as possible. If it can’t, look for an alternative configuration. Yes, this becomes recursive, but I trust you to feel out where it should stop.
Learning how to see what is needed to do this, and sticking to it, will eventually lead to Happy, Prosperous planets, a major source of score.
Money Matters…ish
- Time Is Money – All income gains (money from trade, and science from labs), as well as cumulative Happiness adjustments, are on a yearly basis. This means that each year is kind of a puzzle to optimize for money-, science-, and happiness-generating constellations not only in space, but in time. You might decide to undo some decisions after a year completes, in order to eke out a bit more. There’s a nice visual progress bar for how many months you have left in a year, which gets highlighted with how many months a potential action will take.
- Don’t Leave Money On The Table – After you have a medium-sized constellation built up, there may be potential trade income not being collected. Use planning mode (Alt/MMB) to see potential connections between already built planets that have resources available that can’t be put to other use (often the case in the “trapped” interior of constellations), even if the destination doesn’t need the resource. To verify, check the income from each planet by hovering over them, make the connection, then check the income again; there’s usually some gains to be made.
- But It’s Not About The Money – As in real life, money is only a means to the ends of actual human values – it’s not counted toward your score at the end of a game. This means that (at least on Forgiving and Reasonable difficulties) you usually only need to worry about achieving a decent income in the early phase of a game, because as long as you are connecting planets for any reason, the trade network that builds up is usually sufficient to sustain you throughout the rest of the game. What really gets your score up are the success level of colonies, the number of colonies established (though this seems difficult to get above the Colossal threshold, 50+ planets), and Esteem points from completed Council Tasks, all multiplied by Happiness.
Advanced Connect The Dots
- Don’t Leave Them Hanging – While building out a constellation, don’t go on a planet building spree before connecting them, or else Struggling planets will drag down your happiness if the year rolls over. Connect as you go: Build Planet > Build Planet > Connect > Build Planet > Connect, etc.
- Generous and Greedy – Planets are both. When they are first built, they will always produce the resource indicated for free, even if you don’t supply them with their needs. But, if a resource is made available to a planet that consumes it, it will snatch it up even if they don’t technically need it. So be careful when connecting existing colonies to newer planets that produce resources you intend to use elsewhere.
- Happy Happy Joy Joy – While you can leave planets as struggling backwaters like Tatooine in service of your Core Worlds, you do need to watch their happiness before either overall happiness reaches 60% and you get “kicked out of office”, or the game is a few years from the end and you want to shoot for as much happiness as you can get, since it multiplies your final score. You can often address happiness problems with unlocked tech, however, I _think_ if a planet is left at struggling for too long, they gain a permanent happiness penalty. I personally keep Happiness as a priority, but I expect that skilled players don’t optimize for happiness as much as other score-generating options, since while it can reach above 100%, it seems difficult to get above 150%.
- I Have Altered The Deal – It’s easy to forget when building out planets initially, that in order to get to Successful, certain colony types need another type of resource than it needs at first. Mineral and Remnant worlds need Water, People-producing colonies need Goods, Forgeworlds and all robot-enabled colonies need Chips (and there may be some others I’m forgetting). So if you need the new planet your building to get to Successful (perhaps to get a connected planet to Prosperous), make sure you will have a source for that secondary need.
- Leaps of Faith – When calculated and intentional, it can be beneficial to build a planet near the edge of your visibility which has Needs that you can’t fulfill with known planets, and hope that they can be met with something in the great beyond. Sometimes it doesn’t work out. Often it does. There is skill here that comes with a feel for the probabilities.
- Don’t Overextend – As a counterpoint to the above, it’s probably best to avoid blindly building a long chain of planets out into the distance with their needs fulfilled by ever-further dependencies. This is because it’s much more difficult to get these planets to Prosperous due to the low connectivity of its linear nature.
Remnants
- Let’s (Not) Get Technical – There are a ton of different techs, and each game has a randomized set of those available, even within the three selected council members, so I’m not going to get into specifics. But in general, I look for techs that give me greater choices in how to satisfy dependencies, and usually avoid techs that only give me money (if I’m building out my trade network sufficiently, I usually have plenty of money). And this is a very personal thing, but I most enjoy the connect-the-existing-dots gameplay, so I usually avoid Structures, which can be placed anywhere, opening up virtually infinite options. If you’re prone to analysis paralysis like me, you might choose the same.
- The Endgame Is Closer Than It Appears – Standard mode games are restricted to 25 Years, and if you enjoy the games as much as I do and get absorbed into Flow, those 25 years will fly by. You’ll be thinking “oh this is going well, I can totally build out a whole new constellation over on this side of the map”, and then when you build the first connection out in that direction, the words “One year left” pop up. Except you might not even notice them – these messages can be easy to miss when you’re just trying to build your stuff. All the more reason to get into the habit of keeping an eye on how many years you have left, by hovering over the clock, and keep this in mind when approaching the end of the game. At around 4 or 3 years left, I usually shift focus from expansion to addressing happiness shortcomings like unemployment, getting existing colonies to Successful or Prosperous, and completing outstanding Tasks, utilizing the big Techs you start to unlock towards them.
- An Offer You Can Refuse – Since uncompleted Council Tasks count as a score penalty, it’s important to know whether you can complete the Tasks offered to you in the endgame, or whether to postpone (AFAIK there’s no real reason to actually decline them escept to get the reminder out of your way). During this phase, you can also only accept one instead of taking two or declining all – sometimes you can chain these together if they end up being completable.
Be the first to comment