This guide describes the strategy I use to maintain long (10+) win streaks when playing as The Ironclad. I describe the cards I prioritize at different points in the game, my approach to navigating the map, and more.
Introduction
This guide talks about a defensive way to play the Ironclad character. The Ironclad can be played in different ways, but the person who wrote this guide thinks this specific defensive style is the easiest and most reliable for winning several times in a row.
The author, who goes by Quincunx or ForgottenArbiter, says they have used this style a lot and have won 16 games in a row recently. They are hoping this information will help you play the Ironclad better.
Just a heads-up, this guide will tell you important things about the game that you might want to find out on your own. If you don’t want to know these things yet, you should stop reading.
Why Defensive?
A larger portion are offensive-oriented, rather than defensive. Also, their main stat is Strength, while the Silent is focused more on Dexterity. Why should we build the Ironclad in a defensive manner? In short, I find it more consistent.
As long as you defend against all of the incoming damage every turn, you only need a minimum amount of offense to win the fight. If your deck is filled with defensive cards, you have a high chance of being able to defend against enough damage every turn. If your deck relies on killing the enemy as quickly as possible, then if you ever enter a battle and cannot win in one or two turns, you face taking large amounts of damage from the enemy attacks. The best way to mitigate this risk is to create small, focused decks. However, I find that making these types of decks with Ironclad relies a bit too much on finding certain key cards.
Another big reason why defensive decks work well is the presence of one-card win conditions that will eventually lead to a win despite playing mostly blocks every turn. I will talk more about these later when I get into how to actually draft your cards. Here we go!
General Strategy
There are a few constant playstyle decisions that I will be assuming throughout the run. They all have exceptions, but all card and event decisions should be made with them in mind.
Don’t take curses
Necronomicurse is fine, because it always comes with a game-winning relic. Upgrading a card is probably worth a 25% chance at an Injury, if you don’t feel like the curse will kill your deck. If you really want the extra power, a 50% chance of a curse can be worth a relic. I suggest avoiding every other optional means of obtaining curses, unless you have Omamori. This includes Calling Bell. Never take Calling Bell from a boss without 2 charges of Omamori.
Keep a small deck
Generally, I advocate only taking about as many cards as you are going to upgrade. When every card in your deck is strong, it makes turns very consistent. I will give a bit more specific advice on which cards to take later, but my average final deck size is less than 20 cards. Keeping a small deck also requires you to remove cards. I recommend removing Strikes first, followed by Defends. If you do not upgrade Bash, consider removing it before Defends.
Save Dexterity potions
Dexterity potions are the best potion in the game for us. If you make it to the final boss with 3 Dex potions, it almost doesn’t matter what cards are in your deck; it’s that hard to lose. These potions are sometimes worth picking up in a shop, and should mostly only be used in encounters where you think you are likely to die or take overwhelming damage otherwise.
When do I rest?
It’s hard to give a general answer, but it’s good to rest when you’re below 50% hp or about to take some tricky fights. Hopefully, when following this guide, you won’t need to rest more than once or twice throughout the run.
Card Upgrade Priority
Whirlwind is the highest priority, followed by True Grit and Body Slam. Afterwards, generally Powers > Utility Skills > Defensive Skills > Attacks, though it varies pretty widely. The spreadsheet in the introduction has a more detailed breakdown of upgrade priority. For example, a few other Attacks are significantly improved by an upgrade and should take higher priority, including Uppercut and Pommel Strike. Also, Bash takes medium-high priority and is often upgraded at the first campfire.
Floor 0 Strategy: Neow
As long as you have reached the boss of the first level in your previous run, you receive a choice of four options from Neow, the mysterious space-whale-looking entity. Which choice I make depends on what lies ahead, so I recommend opening the map, and keeping the layout in mind as you make your choice. For example, 250 gold is better if a shop is present early on:
Unique Choice: Lose your starting Relic. Obtain a random Boss relic.
This is fun, but bad for consistently winning. The Ironclad starting relic is quite good. I judge it to be about the level of a rare relic. On the other hand, some of the Boss relics you can obtain have potentially disastrous outcomes. Calling Bell is probably the worst, giving you potentially disastrous curses in exchange for less benefit. Pandora’s Box can leave you with a deck containing zero defensive cards, which will cause you to take much more damage until you can repair the problem.
Drawbacks:
The only two that I would avoid are “Obtain a Curse” and “Lose 50% of your current HP”. Obtaining a curse is likely to cost HP in the short run, and will cost you card removal in the long run. It is not worth any of the benefits. Losing 50% of your current HP is very likely to force you to rest at a campfire later, costing you a precious upgrade. It is also a simply risky option, so it is less desirable when aiming for consistency. However, I sometimes consider taking it, especially if the other options look weak.
Benefits:
These are roughly in order of priority, taking into account the drawbacks that come with the options.
Strongest:
- Remove a card from your deck (choose a Strike)
- Obtain a random common Relic
- Remove 2 cards (choose 2 Strikes, or a Strike and a Defend to be safer)
- Obtain a random rare Relic
- Upgrade a Card (upgrade Bash)
- Obtain 250 gold
- Obtain 100 gold
Pickable:
- Obtain 3 random Potions
- Enemies in your next three combats have 1 HP (basically only if you can “snipe” an Elite)
- Choose a Card to obtain
- Max HP +7
- Choose a rare Card to obtain
Avoid These:
- Max HP +14 (not worth the downside)
- Obtain a random rare Card
- Transform a Card
- Transform 2 Cards
Level 1 Strategy: The Exordium
Route Choice
When choosing a route through the map, prioritize Campfires > Elites > Shops > Events > Monsters. I will not give up a Campfire for an Elite, but may give up a Campfire for 2 Elites, if I am feeling strong. Avoid paths with 2 mandatory Elite fights in a row (no Campfire in between) unless you are sure you can win without taking much damage. If you can without giving up a Campfire (and haven’t given away all your gold), try to visit one shop in the first half of the level.
Card Choice Priorities
The logic for picking cards is somewhat complicated. Generally, plan to finish the first floor with 3-5 cards added to your deck.
Your top priority is to improve your offensive capabilities. The main offensive cards you want to find at this point are, in order of priority:
Whirlwind, Pommel Strike, Cleave, Fiend Fire, Inflame, Body Slam, Rampage, Heavy Blade, Headbutt, Iron Wave, Uppercut, Spot Weakness, and Twin Strike.
If you are past floor 4 and haven’t seen any of the cards above, try to at least get one of the cards below before fighting any elites:
Armaments, Clash, Clothesline, Flex, Bludgeon, Hemokinesis, Thunderclap, Pummel, Infernal Blade, Sever Soul, Carnage, Wild Strike
For this strategy, I don’t recommend ever any offensive cards on level 1 that are not on these lists (it is strong to, for example, pick Searing Blow on the first floor and pursue a Searing Blow strategy, but that is not covered by this guide). You generally want 2-3 of the above cards, which will comprise a large portion of your damage until the end of the game.
Defensive and utility cards are less desirable than offensive cards until you have enough offense, but again, there are a few that you should be looking for. Pick mostly from this list, in order of priority (a maximum of one copy should be picked for each card with a *):
Battle Trance*, Shrug it Off, True Grit*, Disarm*, Shockwave*, Inflame*, Offering, Reaper, Impervious, Double Tap*, Flame Barrier, Evolve*, Ghostly Armor, Feed
Finally, there are a few rare cards that you should always keep an eye out for. These are your win conditions:
Limit Break, Demon Form, Barricade
After you feel comfortable with the rest of your deck, you should take the first one of these that you see, but no more. Afterwards, you will build your deck around the one you choose. Be careful when picking these, however, as they are likely to be dead cards in your deck until at least the boss of level 1.
Shop Choices
My general priority for shops on level 1 is:
Thread and Needle > Apotheosis > Key Cards > Remove a Card > Relics = Useful Misc Cards
Key cards include Whirlwind or cards that you desperately need to maintain a decent offense/defense. Useful Miscellaneous cards include Disarm, Shockwave, Battle Trance, Shrug it Off, and Inflame. You can also buy potions, though I would only recommend that if you are nervous about an upcoming elite.
Boss Strategy
The Guardian:
- Suggested safe HP: 35
- Strategy: Burst through the offensive mode if possible to avoid the biggest attacks. Watch the Sharp Hide power, and try not to take unnecessary damage.
Hexaghost:
- Suggested safe HP: 45
- Strategy: This is a DPS race. It may be worth taking minor damage in order to kill this boss faster. Trivialized by Disarm (safe HP 20).
Slime Boss:
- Suggested safe HP: 50
- Strategy: Try to set things up so you split him on the turn when he does his big (35-damage) attack, using the largest amount of extra damage possible. I prefer to focus the Acid Slime (L) first.
Choosing Boss Relics
The highest priority is to choose a relic that gives an additional energy per turn. All of these relics are better than any other relics, though Cursed Key, Ectoplasm, and Philosopher’s Stone are not preferred. If no energy relic is available, choose anything other than Calling Bell, Pandora’s Box, or Runic Cube.
Level 2 Strategy: The City
Route Choice
If you have access to Whirlwind or another AoE, or your deck has otherwise good offense, prioritize Campfires > Elites > First Shop > Events > Other Shops > Monsters. Otherwise, avoid all Elites if possible.
Card Choice Priorities
Hopefully, you managed to acquire one of the following win conditions by now (probably from the boss):
Limit Break, Demon Form, Barricade
If so, you no longer need any more offensive cards in your deck. The main exceptions are getting at least one copy of strength gain with Limit Break, and getting Body Slam or Rampage with Barricade. If you didn’t, then try to obtain a strength synergy package of (Strength gain card + Heavy Blade/Twin Strike/etc.) as your main damage. It doesn’t take very much to easily kill any enemy, just a couple extra cards. Things like Necronomicon, Double Tap, and Girya all help you get enough damage, too.
Other than what I stated above, the cards you take should be very limited now. Basically, only take these (in order of priority, and anything marked with a * should have at most one copy in your deck):
Battle Trance*, Reaper, Shrug it Off, Disarm*, Shockwave*, Whirlwind*, Entrench*, Feel No Pain*, Offering, Impervious, Double Tap*, True Grit+*, Evolve*, Warcry+
Shop Choices
My general priority for shops on level 2 is:
Thread and Needle > Remove a Card > Relics = Cards > Potions
The only cards worth considering are those listed above. If you see a Dexterity potion in the shop, it may be a good idea to pick it up, especially if you don’t have one already.
Encounter Strategy
Most encounters are fairly straightforward, but there are a few where I recommend focusing a certain enemy first.
Looter + Mugger
To start, focus the Mugger in the back, unless HP values work out so that you can burst the Looter in one turn but not the Mugger. He hits harder on turn 3 and blocks for more in general. Often it is worth using a potion in this fight if it saves you 45 stolen gold.
Centurion + Mystic
Focus the Centurion before the Mystic. It seems counter-intuitive, but you are likely to lose less HP this way, as the Centurion hits harder with the Mystic dead.
Slavers
Focus the Red Slaver (in the back) first here. If you can kill him before he makes you Vulnerable, then you should come out of this fight without losing too much HP.
Boss Strategy
The Champ:
- Suggested safe HP: Max (or 30 if running Barricade)
- Strategy: Get him to close to 50% as possible, and then deal as much damage as you can in the next two turns to spend the minimum amount of time with him enraged. Try not to take unnecessary damage early, and consider using a Dexterity pot to be extra safe, if you have any doubts about your deck. I consider this boss is the #1 win streak killer. Very easy if running Barricade, and Disarm helps significantly.
Bronze Automaton:
- Suggested safe HP: 60 (or 40 if running Barricade)
- Strategy: This boss summons orbs which will steal the rarest card in your deck. Kill the orbs first, and then focus the Automaton. Keep in mind that his pattern is to repeat Attack -> Defend -> Attack -> Defend -> Hyper Beam -> Stunned.
The Collector:
- Suggested safe HP: 40
- Strategy: As long as you keep killing his Torch Head minions, this boss is trivial. If you only have something like Rampage as your damage, he can be painful, so bring a method of getting rid of a minion immediately.
Level 3 Strategy: The Beyond
Route Choice
Elites are pretty much the only thing that can end your run if you’ve made it this far by following this guide, so avoid them. Otherwise, campfires are probably the highest priority, since you can always keep upgrading cards. Sometimes you will enter this level with 600+ gold, in which case shops become a much higher priority.
Card Choice Priorities
You should be pretty much done with your deck by now. The card priorities are similar to floor 2, except that by now, a few cards have definitely fallen off in terms of usefulness:
Battle Trance*, Reaper*, Shrug it Off, Disarm*, Shockwave*, Entrench*, Feel No Pain*, Offering, Impervious, Double Tap*, Warcry+
Shop Choices
Thread and Needle > Remove a Card > Relics = Cards > Potions
Pretty similar to The City, except now you should plan a way to spend all of your remaining gold.
Boss Strategy
The Awakened One:
- Suggested safe HP: Max
- Strategy: If you followed my guide, this boss should be trivial.
Donu and Deca:
- Suggested safe HP: Max
- Strategy: Focus Donu first. If you know you are facing this boss, picking up a copy of Feel No Pain can be helpful. This is the hardest boss for our strategy, so it’s extra helpful to bring at least one Dexterity potion.
Time Eater:
- Suggested safe HP: Max
- Strategy: Watch the card counter and try not to play too many cards. Don’t play unnecessary cards, and if you drafted one of my three win conditions, you should win by default. Even if you didn’t, you can probably block almost all of his damage, making this fight fairly straightforward. Watch out for his heal to 50% hp and debuff cleanse, which he uses one turn after being brought below 50%.
Sample Decks
Here are some of the final decks from my current win streak, for an example of how to choose cards. Unfortunately, due to how game logs are saved, I do not know which cards were upgraded. However, it is safe to assume that almost every card other than Defend is upgraded in most decks.
Deck 1 (game 3 in streak)
3x Defend, Bash, Inflame, Second Wind, Shockwave, True Grit, 2x Shrug it Off, Offering, Heavy Blade, Apotheosis, Dropkick, Disarm, Double Tap, Cleave, Feed, Berserk, Inflame, Sword Boomerang, Writhe, Rampage (23 cards)
The cards Berserk, Inflame, and Sword Boomerang were obtained from the Astrolabe item. The Feed card was acquired after defeating a boss, which was beneficial due to having two instances of the Shrug it Off card working together. Because the Second Wind and True Grit cards were available, the Writhe card was picked up from the Winding Halls event on the third level. It seems the Dropkick card was chosen with the intention of creating a repeating series of actions, but this strategy was stopped because the Time Eater appeared as the final boss.
Deck 2 (game 5 in streak)
3x Defend, Bash, Uppercut, Whirlwind, Shrug it Off, Body Slam, Juggernaut, True Grit, Disarm, Entrench, Evolve, Demon Form, Iron Wave, Thunderclap (16 cards)
I took Juggernaut from the first boss, perhaps hoping for some supplementary damage on floor 2. With Mark of Pain, Evolve was a priority floor 2 pick. Picking up Demon Form afterwards basically invalidated my Juggernaut, however, as it was used to scale my damage on level 3. Thunderclap was a final pickup to add some Artifact stripping against Donu and Deca.
Deck 3 (game 6 in streak)
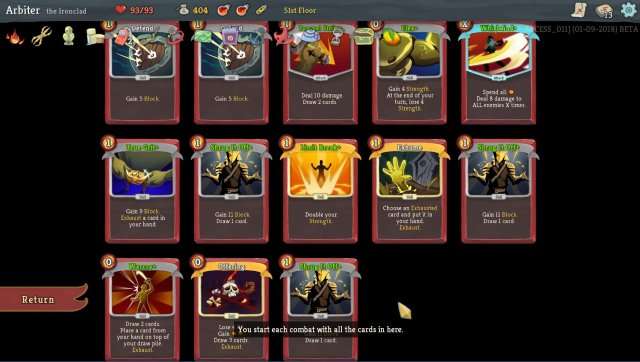
I actually have a picture of this one!

Exhume was a forced pick from the Match Game, but it didn’t hurt the deck too badly. A strength relic made Limit Break workable on its own, though it was even better when combined with Flex. A late Offering and Warcry+ helped consistency even further.
Deck 4 (game 16 in streak)
Strike, 4x Defend, Bash, Clash, Rampage, Shrug it Off x2, Body Slam, Barricade, Cleave, Ghostly Armor, Flame Barrier, Shockwave, Headbutt, Disarm (18 cards)
Not a single card was drafted in level 3. Ectoplasm resulted in a relatively small number of removals, but otherwise the deck was a very standard Barricade/Body Slam deck.


Be the first to comment